Traffic Camera Object Detection using PyTorch
Introduction
Traffic management is an important issue plaguing well-established and rapidly growing cities. Due to bad traffic management and accidents, there is a huge loss in productivity as people spend a lot of additional time on roads navigating traffic, which impacts performance at work and overall quality of life. Traffic accidents are dangerous and often result in fatalities. The time taken to respond to accidents and send medical aid depends on multiple human factors. Often a lack of timely response impacts the likelihood of survival.
Table of Contents
- Purpose
- Reference Solution
- Reference Implementation
- Intel® Optimized Implementation
- Performance Observations
Purpose
Intelligent traffic management systems leveraging video surveillance, automated accident detection, and prediction solutions will go a long way in improving safety and traffic flow in cities. These solutions need to provide real-time insights and recommendations to be effective. Cloud, Edge Computing, 5G, Artificial Intelligence (AI)/Deep Learning (DL), and Internet of Things (IoT) technologies form the core technology stack of intelligent traffic management systems. IP Cameras and Cloud-based communication between devices although effective solutions for traffic management, would introduce additional latency and bandwidth issues which could be detrimental in traffic management scenarios.
Leveraging the power of edge computing, communication between devices with very low latency can be achieved. A few example scenarios include traffic signals and vehicles exchanging information about pedestrians on crosswalks, communication between surveillance cameras and vehicles regarding proximity, and the possibility of an accident with very low latency; thus enabling preventive action in near real-time. Deep Learning (DL) algorithms can predict traffic accidents based on live traffic camera feeds. Computer vision tasks and complex feature analysis can be accomplished easily with high performance by leveraging Deep Learning algorithms. Artificial Intelligence (AI) based detection algorithms deployed at the edge enable real-time analytics of video feeds and detection of accidents and other issues, thus improving overall traffic management.
Reference Solution
- AI-enabled traffic camera imaging aid helps address traffic management challenges by reducing congestion on road, improving the accuracy of pedestrian/vehicle identification, improving device-2-device communication, and helping reduce accidents.
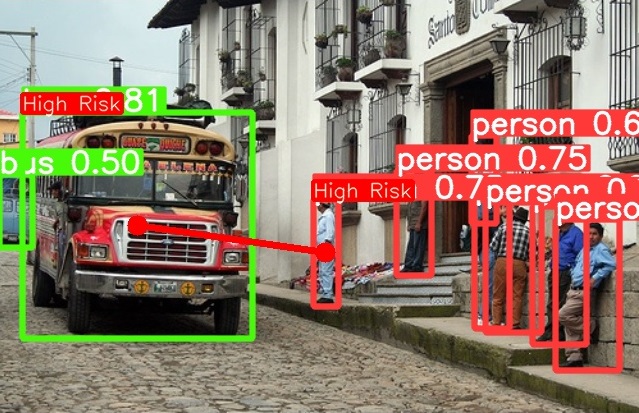
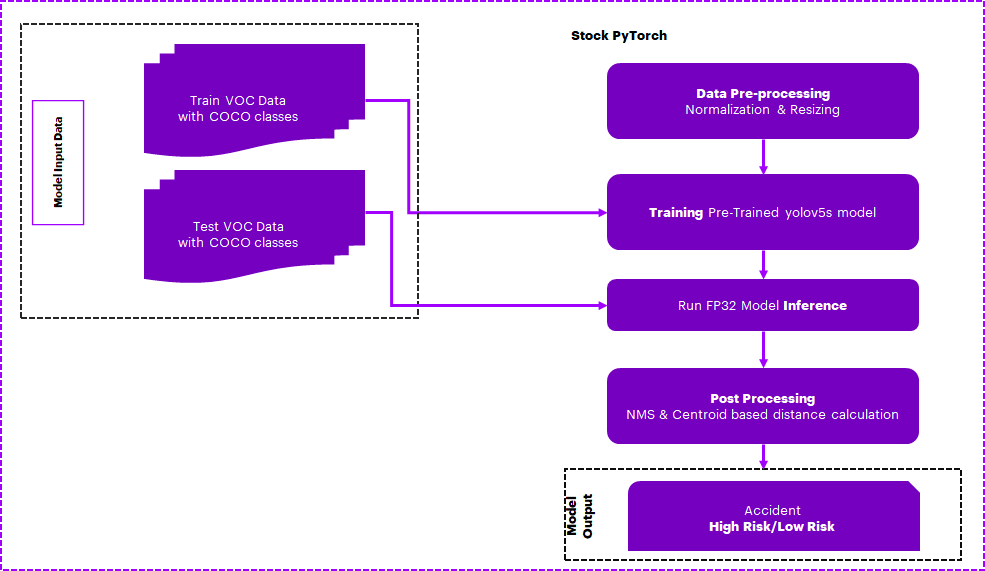
- In this reference kit, we have created a general detection model that is capable of distinguishing objects that would be relevant to traffic cameras. We first preprocess a Pascal VOC dataset by combining it with COCO classes using OpenCV. We then perform a transfer learning approach using an advanced pre-trained real-time object detection YOLOv5 model, which is further trained to detect vehicles and pedestrians. After that, OpenCV and NumPy based postprocessing of Non-Maxima Suppression (NMS) and centroid-based distance calculation of detected objects is used to predict a possible collision, which could be used for example to warn vehicle drivers via device-2-device communication.
- Since GPUs are typically the choice for Deep Learning and AI processing to achieve a higher Frames Per Second (FPS) rate, to offer a more cost-effective option leveraging a CPU, we use the quantization technique, leveraging Intel Analytics toolkit, to achieve high FPS by performing vectorized operations on CPUs itself.
- By quantizing/compressing the model (from floating point to integer model), while maintaining a similar level of accuracy as the floating point model, we demonstrate efficient utilization of underlying resources when deployed on edge devices with low processing and memory capabilities.
Key Implementation Details
- Highlighted the performance gain provided by Intel® Extension for PyTorch* v1.13.0 over the stock version of the PyTorch v1.13.0.
- The dataset is first preprocessed using OpenCV and NumPy, and then NumPy based postprocessing is performed using Non-Maxima Suppression (NMS) and centroid-based distance calculations for possible collision detection.
- CNN-based YOLOV5 object detection model is a promising method to identify objects from the traffic camera. The time required for inference and the accuracy of the model are captured for multiple runs on the stock version as well on the Intel® oneAPI version. The average of these runs is considered and the comparison has been provided.
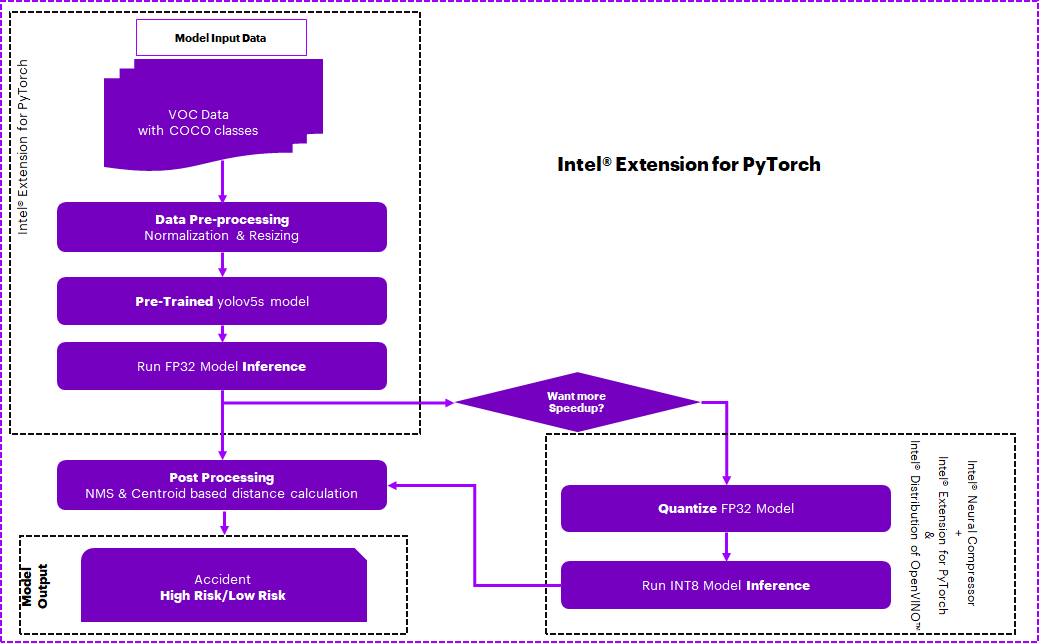
- Model has been quantized using Intel® Neural Compressor and Intel® Extension for PyTorch* which has shown high-performance vectorized operations on Intel® platforms.
Reference Implementation
E2E Architecture
Use Case E2E flow
Expected Input-Output
| Input | Output |
|---|---|
| Traffic Camera Live Feed | Detected Objects(Vehicle/Pedestrians) and Alarm(High Risk/Low Risk) for possible accident scenarios |
 |
 |
Reference Sources
Dataset: http://host.robots.ox.ac.uk/pascal/VOC/voc2012/VOCtrainval_11-May-2012.tar
Case Study & Repo: https://github.com/ultralytics/yolov5
Notes
Please see this dataset applicable license for terms and conditions. Intel®Corporation does not own the rights to this data set and does not confer any rights to it.
Repository clone and Anaconda installation
For cloning the repository please execute below
git clone https://github.com/Wei-Welles-Du/object-detection-hack
cd object-detection-hack
Note: If you are beginning to explore the reference kits on client machines such as a windows laptop, go to the Running on Windows section to ensure you are all set and come back here
Note: The performance measurements were captured on Xeon based processors. The instructions will work on WSL, however some portions of the ref kits may run slower on a client machine, so utilize the flags supported to modify the epochs/batch size to run the training or inference faster. Additionally performance claims reported may not be seen on a windows based client machine.
Note: In this reference kit implementation already provides the necessary conda environment configurations to setup the software requirements. To utilize these environment scripts, first install Anaconda/Miniconda by following the instructions at the following link
Anaconda installation
Overview
Software Requirements
| Package | Stock Python |
|---|---|
| OpenCV | opencv-python=4.5.5.64 |
| NumPy | numpy=1.23.5 |
| PyTorch | pytorch=1.13.0 |
| Intel® Extension for PyTorch | NA |
| Intel® Neural Compressor | NA |
Environment
Below are the developer environment used for this module on Azure. All the observations captured are based on this environment setup.
| Size | CPU Cores | Memory | Intel® CPU Family |
|---|---|---|---|
| Standard_D8_V5 | 8 | 32GB | ICELAKE |
| YAML file | Environment Name | Configuration |
|---|---|---|
env/stock/stock-pt.yml |
stock-pt |
Python v3.9 with stock PyTorch v1.13.0 |
Dataset
| Use case | Automated methods to detect possible accidents from the stationary traffic camera |
|---|---|
| Object of interest | Accident Detection in Autonomous Industry |
| Size | Total 4952 Validation Images of Pascal VOC |
Note: The dataset will be downloaded as part of the code and divided into folders for train and validation. For benchmarking, we make use of the Validation dataset.
Usage and Instructions
Below are the steps to reproduce the benchmarking results given in this repository
- Environment Creation
- Dataset preparation
- Training
- Model Inference
1. Environment Creation
Setting up the environment for Stock PyTorch
Follow the below conda installation commands to set up the Stock PyTorch v1.13.0 environment for the model inferencing.
conda env create -f env/stock/stock-pt.ymlActivate stock conda environment
Use the following command to activate the environment that was created:
conda activate stock-pt2. Data preparation
Data download is automated with the scripts.
The following steps need to be followed:
Cloning the repo
cd src
git clone https://github.com/ultralytics/yolov5.git
cd yolov5
git reset --hard 2f1eb21ad6c0f715f38200c31e6e01a92c5acb25

# Intel® Extension for PyTorch training patch
git apply --reject --whitespace=fix ../training.patch

# Copying required files to the cloned repo
cp ../data/VOC.yaml ./data/
cp ../deploy.yaml ./
cp ../run* ./
** Note: Going forward all experiments will be done inside the "yolov5" cloned folder**
Data downloading steps:

1. Users can change the data download path in "src/yolov5/data/VOC.yaml" by default it is "../../data/VOC"

2. Data will be downloaded automatically through the script while running experiments.
Folder structure looks as below after data downloaded.
data/
└── VOC
    ├── images
    │   ├── VOCdevkit
    │   │   ├── VOC2007
    │   │   │   ├── Annotations
    │   │   │   ├── ImageSets
    │   │   │   │   ├── Layout
    │   │   │   │   ├── Main
    │   │   │   │   └── Segmentation
    │   │   │   ├── JPEGImages
    │   │   │   ├── SegmentationClass
    │   │   │   └── SegmentationObject
    │   │   └── VOC2012
    │   │       ├── Annotations
    │   │       ├── ImageSets
    │   │       │   ├── Action
    │   │       │   ├── Layout
    │   │       │   ├── Main
    │   │       │   └── Segmentation
    │   │       ├── JPEGImages
    │   │       ├── SegmentationClass
    │   │       └── SegmentationObject
    │   ├── test2007
    │   ├── train2007
    │   ├── train2012
    │   ├── val2007
    │   └── val2012
    └── labels
        ├── test2007
        ├── train2007
        ├── train2012
        ├── val2007
        └── val2012
3. Training
Running training using Stock PyTorch v1.13.0
Activate Stock Environment before running
usage: train.py [-h] [--weights WEIGHTS] [--cfg CFG] [--data DATA] [--hyp HYP] [--epochs EPOCHS]
               [--batch-size BATCH_SIZE] [--imgsz IMGSZ] [--rect] [--resume [RESUME]] [--nosave] [--noval]
               [--noautoanchor] [--noplots] [--evolve [EVOLVE]] [--bucket BUCKET] [--cache [CACHE]] [--image-weights]
               [--device DEVICE] [--multi-scale] [--single-cls] [--optimizer {SGD,Adam,AdamW}] [--sync-bn]
               [--workers WORKERS] [--project PROJECT] [--name NAME] [--exist-ok] [--quad] [--cos-lr]
               [--label-smoothing LABEL_SMOOTHING] [--patience PATIENCE] [--freeze FREEZE [FREEZE ...]]
               [--save-period SAVE_PERIOD] [--seed SEED] [--local_rank LOCAL_RANK] [--entity ENTITY]
               [--upload_dataset [UPLOAD_DATASET]] [--bbox_interval BBOX_INTERVAL] [--artifact_alias ARTIFACT_ALIAS]
               [--intel INTEL] [--bf16]

optional arguments:
 -h, --help            show this help message and exit
 --weights WEIGHTS     initial weights path
 --cfg CFG             model.yaml path
 --data DATA           dataset.yaml path
 --hyp HYP             hyperparameters path
 --epochs EPOCHS       total training epochs
 --batch-size BATCH_SIZE
                       total batch size for all GPUs, -1 for autobatch
 --imgsz IMGSZ, --img IMGSZ, --img-size IMGSZ
                       train, val image size (pixels)
 --rect                rectangular training
 --resume [RESUME]     resume most recent training
 --nosave              only save final checkpoint
 --noval               only validate final epoch
 --noautoanchor        disable AutoAnchor
 --noplots             save no plot files
 --evolve [EVOLVE]     evolve hyperparameters for x generations
 --bucket BUCKET       gsutil bucket
 --cache [CACHE]       --cache images in "ram" (default) or "disk"
 --image-weights       use weighted image selection for training
 --device DEVICE       cuda device, i.e. 0 or 0,1,2,3 or cpu
 --multi-scale         vary img-size +/- 50%
 --single-cls          train multi-class data as single-class
 --optimizer {SGD,Adam,AdamW}
                       optimizer
 --sync-bn             use SyncBatchNorm, only available in DDP mode
 --workers WORKERS     max dataloader workers (per RANK in DDP mode)
 --project PROJECT     save to project/name
 --name NAME           save to project/name
 --exist-ok            existing project/name ok, do not increment
 --quad                quad dataloader
 --cos-lr              cosine LR scheduler
 --label-smoothing LABEL_SMOOTHING
                       Label smoothing epsilon
 --patience PATIENCE   EarlyStopping patience (epochs without improvement)
 --freeze FREEZE [FREEZE ...]
                       Freeze layers: backbone=10, first3=0 1 2
 --save-period SAVE_PERIOD
                       Save checkpoint every x epochs (disabled if < 1)
 --seed SEED           Global training seed
 --local_rank LOCAL_RANK
                       Automatic DDP Multi-GPU argument, do not modify
 --entity ENTITY       Entity
 --upload_dataset [UPLOAD_DATASET]
                       Upload data, "val" option
 --bbox_interval BBOX_INTERVAL
                       Set bounding-box image logging interval
 --artifact_alias ARTIFACT_ALIAS
                       Version of dataset artifact to use
 --intel INTEL, -i INTEL
                       To Enable Intel Optimization set to 1, default 0
 --bf16                Enable only on Intel® Fourth Gen Xeon, BF16
Note: The training code provided here is out of the box from the yolov5 repository, and its usage is described above.
Command to run training
cd src/yolov5 # should be inside the "yolov5" cloned repo folder ignore if already in "yolov5"
python train.py --weights yolov5s.pt --data ./data/VOC.yaml --epochs 10 -i 0
By default, trained model will be saved in "runs/train/exp{}/weights" folder.
4. Inference
Running inference using Stock PyTorch v1.13.0
Activate Stock Environment before running
usage: run_inference.py [-h] [-c CONFIG] [-d DATA_YAML] [-b BATCHSIZE] [-w WEIGHTS] [-i INTEL] [-int8inc INT8INC] [-qw QUANT_WEIGHTS] [-si SAVE_IMAGE] [-sip SAVE_IMAGE_PATH]

optional arguments:
  -h, --help            show this help message and exit
  -c CONFIG, --config CONFIG
                        Yaml file for quantizing model, default is "./deploy.yaml"
  -d DATA_YAML, --data_yaml DATA_YAML
                        Absolute path to the data yaml file containing configurations
  -b BATCHSIZE, --batchsize BATCHSIZE
                        batchsize for the dataloader....default is 1
  -w WEIGHTS, --weights WEIGHTS
                        Model Weights ".pt" format
  -i INTEL, --intel INTEL
                        Run Intel optimization (Ipex) when 1....default is 0
  -int8inc INT8INC      Run INC quantization when 1....default is 0
  -qw QUANT_WEIGHTS, --quant_weights QUANT_WEIGHTS
                        Quantization Model Weights folder containing ".pt" format model
  -si SAVE_IMAGE, --save_image SAVE_IMAGE
                        Save images in the save image path specified if 1, default 0
  -sip SAVE_IMAGE_PATH, --save_image_path SAVE_IMAGE_PATH
                        Path to save images after post processing/ detected results
Command to run inference
cd src/yolov5 # should be inside the "yolov5" cloned repo folder ignore if already in "yolov5"
python run_inference.py -c ./deploy.yaml -d ./data/VOC.yaml -b 1 -w yolov5s.pt
Note :
1. Users can pass the trained model "-w {trained model}" for inferencing by default pretrained model will be considered.
2. The above inference script can be run in the stock environment using different batch sizes "-b":{1/8/16/32/64/128/256}.
3. Users can enable flag "--save_image 1" and sepcify the output folder path "--save_image_path {path/to/folder}" to save the output images.
Optimizing the E2E solution with Intel® oneAPI components
Use Case E2E flow
Optimized software components
| Package | Intel® Distribution for Python |
|---|---|
| OpenCV | opencv-python=4.5.5.64 |
| NumPy | numpy=1.23.4 |
| PyTorch | pytorch=1.13.0 |
| Intel® Extension for PyTorch | intel-extension-for-pytorch=1.13.0 |
| Intel® Neural Compressor | neural-compressor=2.0 |
Optimized Solution setup
| YAML file | Environment Name | Configuration |
|---|---|---|
env/intel/intel-pt.yml |
intel-pt |
Python v3.9 with Intel® Extension for PyTorch v1.13.0 |
Usage and Instructions
Below are the steps to reproduce the benchmarking results given in this repository
- Environment Creation
- Training
- Model Inference
- Quantize trained models using Intel® Neural Compressor and benchmarking
1. Environment Creation
Setting up the environment for Intel® Extension for PyTorch
Follow the below conda installation commands to setup the Intel® Extension for PyTorch environment for the model inferencing.
conda env create -f env/intel/intel-pt.ymlNote: Users should run above command from cloned git repo "object-detection-hack".
Activate Intel® conda environment
Use the following command to activate the environment that was created:
conda activate intel-pt Note: Users can use same environment for Quantization using Intel® Neural Compressor
2. Training
Command to run training with Intel® Extension for PyTorch
cd src/yolov5 # should be inside the "yolov5" cloned repo folder ignore if already in "yolov5"
python train.py --weights yolov5s.pt --data ./data/VOC.yaml --epochs 10 -i 1
By default, trained model will be saved in "runs/train/exp{}/weights" folder.
The train.py script also includes a command line flag --bf16 which enables bf16 mixed precision training (on CPUs that support it) along with the optimizations.
The training process for Intel® Extension for PyTorch* along with bf16 mixed precision training can be enabled using the train.py script as:
Note: You can enable bf16 training by setting the bf16 flag as shown below. Please note that this flag MUST be enabled only on Intel® Fourth Gen Xeon® Scalable processors codenamed Sapphire Rapids that has bf16 training support and optimizations to utilize AMX, the latest ISA introduced in this family of processors.
cd src/yolov5 # should be inside the "yolov5" cloned repo folder ignore if already in "yolov5"
python train.py --weights yolov5s.pt --data ./data/VOC.yaml --epochs 10 --bf16
3. Inference
Running inference using Intel® Extension for PyTorch v1.13.0
Activate Intel® Environment before running
usage: run_inference.py [-h] [-c CONFIG] [-d DATA_YAML] [-b BATCHSIZE] [-w WEIGHTS] [-i INTEL] [-int8inc INT8INC] [-qw QUANT_WEIGHTS] [-si SAVE_IMAGE] [-sip SAVE_IMAGE_PATH]

optional arguments:
  -h, --help            show this help message and exit
  -c CONFIG, --config CONFIG
                        Yaml file for quantizing model, default is "./deploy.yaml"
  -d DATA_YAML, --data_yaml DATA_YAML
                        Absolute path to the data yaml file containing configurations
  -b BATCHSIZE, --batchsize BATCHSIZE
                        batchsize for the dataloader....default is 1
  -w WEIGHTS, --weights WEIGHTS
                        Model Weights ".pt" format
  -i INTEL, --intel INTEL
                        Run Intel optimization (Ipex) when 1....default is 0
  -int8inc INT8INC      Run INC quantization when 1....default is 0
  -qw QUANT_WEIGHTS, --quant_weights QUANT_WEIGHTS
                        Quantization Model Weights folder containing ".pt" format model
  -si SAVE_IMAGE, --save_image SAVE_IMAGE
                        Save images in the save image path specified if 1, default 0
  -sip SAVE_IMAGE_PATH, --save_image_path SAVE_IMAGE_PATH
                        Path to save images after post processing/ detected results
Command to run inference
cd src/yolov5 # should be inside the "yolov5" cloned repo folder ignore if already in "yolov5"
python run_inference.py -c ./deploy.yaml -d ./data/VOC.yaml -b 1 -w yolov5s.pt -i 1Note:
1. Above inference script can be run in an Intel® environment using different batch sizes "-b":{1/8/16/32/64/128/256}.
2. Users can enable flag "--save_image 1" and sepcify the output folder path "--save_image_path {path/to/folder}" to save the output images.
4. Quantize trained models using Intel® Neural Compressor
Intel® Neural Compressor is used to quantize the FP32 Model to the INT8 Model. Optimized model is used here for evaluating and timing Analysis.
Intel® Neural Compressor supports many optimization methods. In this case, we used post-training quantization with the Accuracy aware mode method to quantize the FP32 model.
Step-1: Conversion of FP32 Model to INT8 Model
usage: run_inc_quantization.py [-h] [-o OUTPATH] [-c CONFIG] [-d DATA_YAML] [-w WEIGHTS]

optional arguments:
  -h, --help            show this help message and exit
  -o OUTPATH, --outpath OUTPATH
                        absolute path to save quantized model. By default it will be saved in "./inc_compressed_model/output" folder
  -c CONFIG, --config CONFIG
                        Yaml file for quantizing model, default is "./deploy.yaml"
  -d DATA_YAML, --data_yaml DATA_YAML
                        Absolute path to the data yaml file containing configurations
  -w WEIGHTS, --weights WEIGHTS
                        Model Weights ".pt" format
**Command to run the neural_compressor_conversion **
Activate Intel® Environment before running
cd src/yolov5 # should be inside "yolov5" cloned repo folder ignore if already in "yolov5"
python run_inc_quantization.py
Quantized model will be saved by default in
./inc_compressed_model/outputfolder asbest_model.pt
Step-2: Inferencing using quantized Model
**Command to run inference **
cd src/yolov5 # should be inside the "yolov5" cloned repo folder ignore if already in "yolov5"
python run_inference.py -c ./deploy.yaml -d ./data/VOC.yaml -b 1 -w yolov5s.pt -int8inc 1
Note:
1. Above inference script can be run in Intel® environment using different batch sizes "-b":{1/8/16/32/64/128/256}
2. Users can enable flag "--save_image 1" and sepcify the output folder path "--save_image_path {path/to/folder}" to save the output images.
Performance Observations
Observations
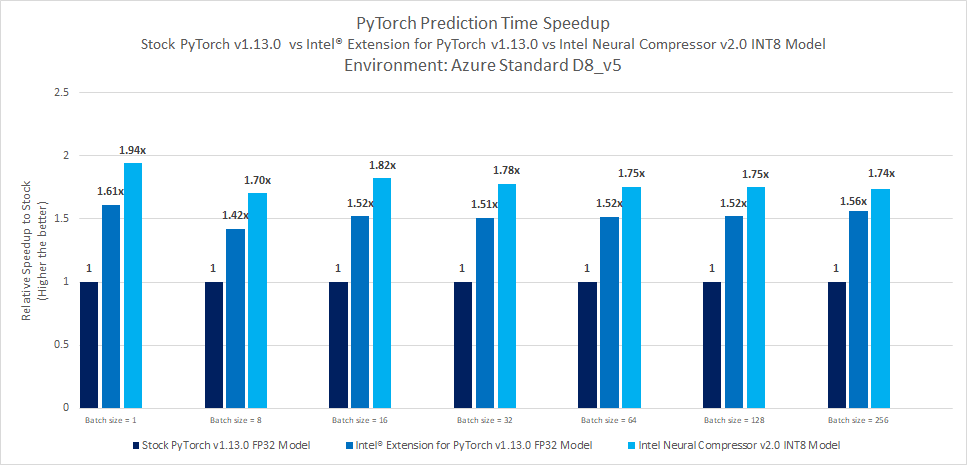
This section covers the inference time comparison between Stock PyTorch v1.13.0 and Intel® Extension for PyTorch v1.13.0 for this model building.
Inference benchmarking results
Key Takeaways
- Realtime prediction time speedup with Intel® Extension for PyTorch v1.13.0 FP32 Model shows up to 1.61x against Stock PyTorch v1.13.0 FP32 Model
- Batch prediction time speedup with Intel® Extension for PyTorch v1.13.0 FP32 Model shows up to 1.56x against Stock PyTorch v1.13.0 FP32 Model
- Intel® Neural Compressor quantization offers Realtime prediction time speedup up to 1.94x against Stock PyTorch v1.13.0 FP32 model
- Intel® Neural Compressor quantization offers batch prediction time speedup up to 1.82x against Stock PyTorch v1.13.0 FP32 model.
- Accuracy drop observed up to 0.01%.
Appendix
Running on Windows
The reference kits commands are linux based, in order to run this on Windows, goto Start and open WSL and follow the same steps as running on a linux machine starting from git clone instructions. If WSL is not installed you can install WSL.
Note If WSL is installed and not opening, goto Start ---> Turn Windows feature on or off and make sure Windows Subsystem for Linux is checked. Restart the system after enabling it for the changes to reflect.
Experiment setup
- Testing performed on: January 2023
- Testing performed by: Intel Corporation
| Platform | Microsoft Azure: Standard_D8_v5 (Ice Lake) Ubuntu 20.04 |
|---|---|
| Hardware | Azure Standard_D8_V5 |
| Software | Intel® oneAPI AI Analytics Toolkit, Intel® Extension for PyTorch v1.13.0, Intel® Neural Compressor v2.0 |
| What you will learn | Advantage of using Intel® Extension for PyTorch v1.13.0 over the stock PyTorch v1.13.0. |
Known Issues
-
Common prerequisites required to run python scripts in linux system. Install gcc and curl. For Ubuntu, this will be:
apt-get update
apt-get install curl
apt-get install gcc
apt-get install git
-
ImportError: libGL.so.1: cannot open shared object file: No such file or directory
Issue:
ImportError: libGL.so.1: cannot open shared object file: No such file or directory
or
libgthread-2.0.so.0: cannot open shared object file: No such file or directory
Solution:
Install the libgl1 and libglib2.0-0 libraries. For Ubuntu this will be:
sudo apt install libgl1
sudo apt install libglib2.0-0


