빌드 시 Spring과 React.js가 동시에 빌드되어 같은 포트로 동작하도록 하는 것이 이 프로젝트의 목표입니다.
# 프로젝트 생성 및 실행
mkdir SpringBootReactApp # root directory
cd SpringBootReactApp
npx create-react-app frontend
cd frontend
npm start

# 필요한 모듈 설치
npm install bootstrap react-bootstrap --save # 부트스트랩 모듈
npm install react-router-dom --save # 라우터 모듈
npm install axios --save # 서버와 통신하기 위한 모듈
npm install maven # 메이븐 빌드한 뒤 서버를 실행하면 프론트, 백엔드는 같은 포트로 동작하지만,
개발 시 React Dev Server(port: 3000), Spring Server(port: 8080)로 포트가 나뉘어 실행되기 때문에,
CORS를 방지하기 위해
프록시 설정이 필요합니다.
"proxy":"http://localhost:8080프론트엔드 코드는 여기 참고
- https://start.spring.io/ 에서 Packaging을 War로 설정하고 필요한 Dependencies를 추가하고 Generate 클릭
@RestController
public class ApiController {
    @GetMapping("/api/hello")
    public Map<String, Object> hello() {
        Map<String, Object> map = new HashMap<>();
        map.put("message", "Welcome. I am Spring boot Server");
        return map;
    }
}@Controller
public class WebController implements ErrorController {
// 백엔드에서 React.js 라우터에 있는 주소로 주소를 임의 변경하면,
// 매핑되는 주소가 없으므로 404 오류가 생긴다.
// 이를 방지하기 위해 에러가 발생하면 프론트엔드에서 작성한 frontend/src/index.html을 전송한다.
@GetMapping({ "/", "/error" })
public String index() {
return "index";
}
/*400에러 발생 시 getErrorPath() 호출*/
@Override
public String getErrorPath() {
return "/error";
}
}spring.thymeleaf.prefix=classpath:/static/
spring.mvc.view.suffix=.html
자세한 백엔드 코드는 여기 참고
React.js를 빌드하기 위해선 npm, node가 필요합니다. 그런데 이를 maven 위에서 사용하기 위해 frontend-maven-plugin가 필요하고,
빌드된 WAR 파일에 frontend/build/ 아래 있는 파일들을 포함시키려면 maven-antrun-plugin가 필요합니다.
// 빌드 시 node와 npm 실행하기 위한 설정
<plugin>
    <groupId>com.github.eirslett</groupId>
    <artifactId>frontend-maven-plugin</artifactId>
    <version>1.10.0</version>
    <configuration>
        <workingDirectory>../frontend</workingDirectory>
        <installDirectory>target</installDirectory>
    </configuration>
    <executions>
        <execution>
            <id>install node and npm</id>
            <goals>
                <goal>install-node-and-npm</goal>
            </goals>
            <configuration>
                <nodeVersion>설치된 node 버전 입력</nodeVersion>
                <npmVersion>설치된 npm 버전 입력</npmVersion>
            </configuration>
        </execution>

        // 빌드 중간에 npm install 실행
        <execution>
            <id>npm install</id>
            <goals>
                <goal>npm</goal>
            </goals>
            <configuration>
                <arguments>install</arguments>
            </configuration>
        </execution>

        // 빌드 중간에 npm run build 실행
        <execution>
            <id>npm run build</id>
            <goals>
                <goal>npm</goal>
            </goals>
            <configuration>
                <arguments>run build</arguments>
            </configuration>
        </execution>
    </executions>

</plugin>

// frontend/build 내용을 war 파일에 포함시키기 위한 설정
<plugin>
    <artifactId>maven-antrun-plugin</artifactId>
    <executions>
        <execution>
            <phase>generate-resources</phase>
            <configuration>
                <target>
                    <copy todir="${project.build.directory}/classes/public"> // 백엔드 빌드 파일에 복사
                        <fileset dir="../frontend/build" /> // 빌드된 프론트엔드 파일을 ▲
                    </copy>
                </target>
            </configuration>
            <goals>
                <goal>run</goal>
            </goals>
        </execution>
    </executions>
</plugin>cd backend/
mvn clean
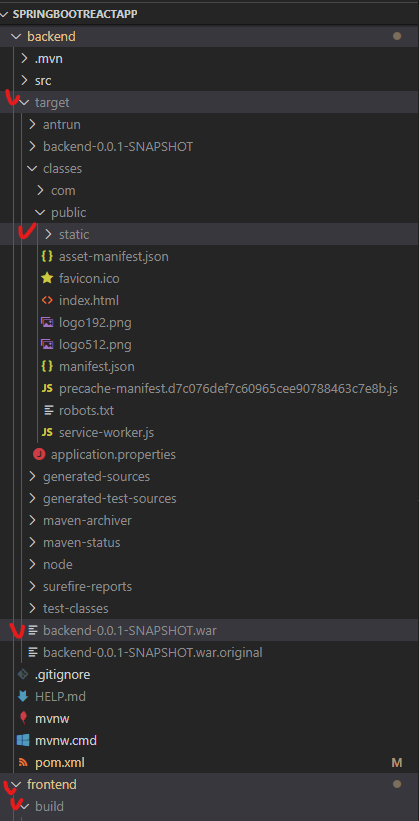
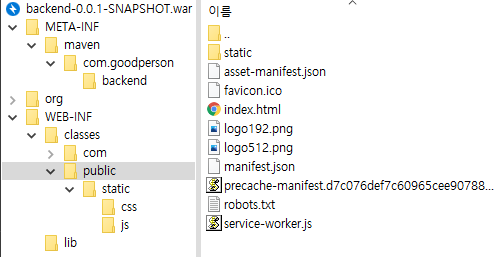
mvn install -DskipTests # JUnit Test 무시하고 install위 명령어를 실행하면 아래 사진과 같이 frontend/build 폴더가 생성되었으며
backend/target/ 아래 war 파일이 생겼고,
war 파일의 classes/public/에 frontend/build 내용들이 복사된 것을 볼 수 있습니다.
cd backend/target/
java -jar backend-0.0.1-SNAPSHOT.war


