03/01/2020 - Initial version added - Download the SnowflakeADF.zip file
FYI:This is not an official native Snowflake product but an open source project that uses Snowflake's native .net drivers for communication so please use it at your own risk.
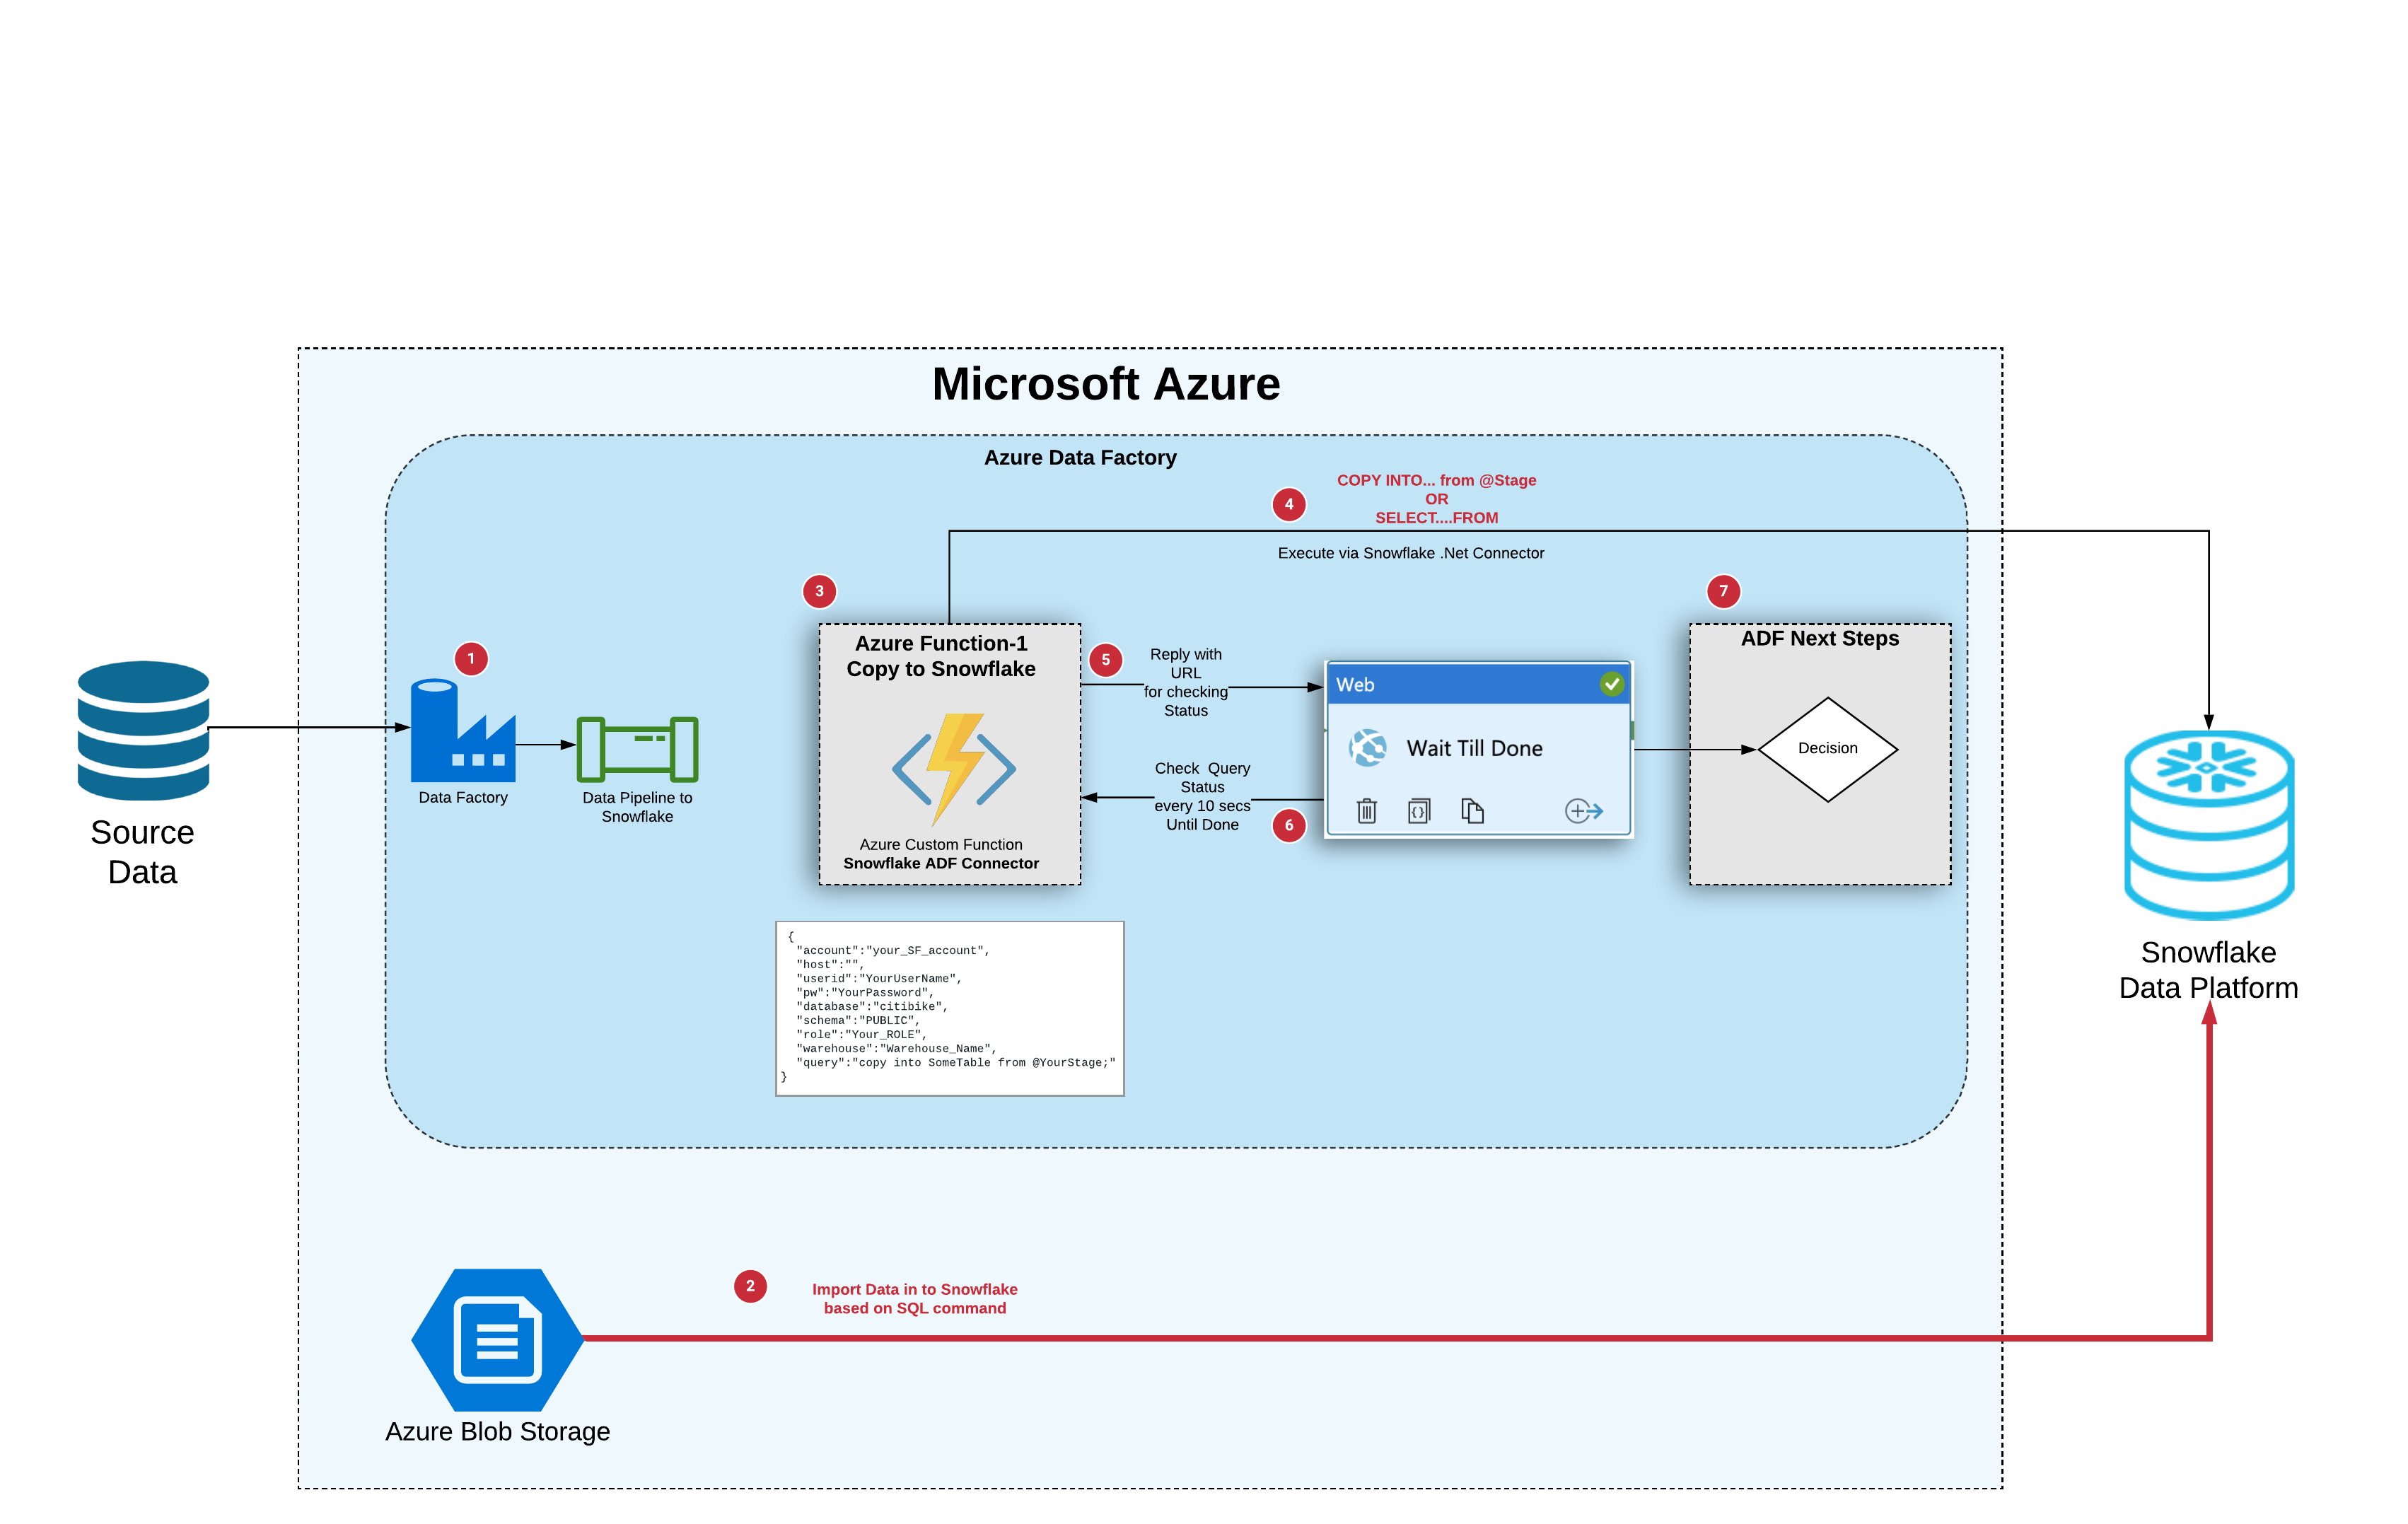
Finally easy to use Azure Data Factory (ADF) Snowflake connector that has no timeout issues for long running queries. This connector allows you to execute a single SQL statement at a time from ADF to execute in Snowflake warehouse. (SQL can be any valid SQL including COPY, Select, Stored Procs, DML & etc.)
It took me a while make it work but I was finally able to create a function that could run in ADF without any timeout limitations using Azure's cheaper shared function plans vs. dedicated ones.
Before I explain how this function works, let me explain Azure function limitations for long runnning processes that I encountered during this process and the reasoning behind the logic that I implemented into this function.
When using Azure Funtions in ADF, there are two seperate time-outs that you have to deal with.
-
HTTP Rest call timeout (230 secs) that can NOT be changed. When ADF makes a rest call to any https end-point, it has to receive some reply in less than 230 secs or that ADF step will fail. This means you can't build a function that receives a SQL, executes it & waits for query to finish than replies when it is done with results as many queries can easily take longer than 230 secs to complete & will be a failed task in ADF.
-
Execution time-outs for durable functions. (5 mins default, max 10 mins for shared plans). For long running tasks, Azure recommends Durable functions. They are designed to respond to REST calls right away with a URL link that the caller can use to monitor the status of the original request while the long running task is executing in the background. Idea is that the client will repeately call the Status URL to see if the original request it done without hitting the 230 secs HTTP time-out. Function will respond with http-200 OK message along with JSON body that can include details about the result when it is done, This basically eliminates HTTP (230 secs) time-out issue as each call gets a response quickly. However; durable functions themselves have a background execution time limit (10 to 30 mins) if you are using one of Azure's shared plans. Time limit is removed if you choose a dedicated plan but it costs more. Durable function running on a shared plan (which was Version2 that never got released) allowed me up to 10 mins of execution before I figured out this second time-out limitation .
Because of these two limitations, my first version of ADF Snowflake connector executed queries as passthrough. This meant that it sent the queries but did not wait for the result and always reported back as success. ADF developers had to monitor Snowflake query history manually to see if any of their pipeline steps failed. After my inital version, the feedback I got from Snowflake users were pretty much the same things:
-
They wanted a solution where ADF step failed if the Query failed in Snowflake so they could fail the pipeline directly from ADF & without manually monitoring snowflake query history.
-
They needed the use query outcomes to use downstream in their pipeline decisions for other steps (suchs # of rows effected).
-
They prefered not to pay for dedicated Function App instances.
Solution is a regular Azure Function app which mimics the output of a Durable function. Major change was where the durable function was actually executing & waiting for original query to be finished to report back the result, I had to build something that didn't wait around for long runnning queries to finish. Below is how I was able to satisfy all 3 major requests from users of my initial connector.
-
ADF makes a rest call to Snowflake_Function & submits a JSON payload with a Query to execute. (JSON includes Snowflake connection parameters + the SQL statement )
-
Snowflake_Function appends a unique tag to the end of the SQL query in the form of a SQL comment for tracking this query later on in history & executes it as a ExecuteNonQuery which means it doesnt wait for a result & moves on.
-
It then immediately queries the Snowflake_Query_History view for that unique tag to find the QUERYID of that original query. (it will repeat this every 5 secs for a min until it can locate it). It runs this as a regular query since it runs quickly & returns a single row.
-
it appends the QUERYID + Connection parameters in to string then encrypts it using a custom PASSCODE value you define as part of the setup. It immediately replies back to ADF with a URL that includes this encrypted text as part of the URL.
-
Status URL is what allows ADF WEB request to monitor the status of the original query. URL includes encrypted info about the QUERYID & the snowflake connection parameters.
-
When the following WEB workflow step calls this STATUS URL, function recognizes this being a STATUS check instead of new SQL QUERY. It decrypts the URL to extract the QueryID & Connection Info. Then queries the Snowflake query_history view for that QueryID using the connection info that it receives. It checks the Query_Status columns and responds back based on different statuses such as COMPLETE, RUNNING, FAILED & etc. Response also has specific HTTP Status codes to let an ADF WEB step to retry if the status is not complete.
-
if the WEB step gets a response indicating the status as RUNNING, it re-tries the same URL in X seconds configured in its properties. If Status comes back as COMPLETE, it receives a JSON payload showing the QueryExecution results from the History View such as Status, RecordsEffected & etc. When this happens, it stops retrying and passes the incoming JSON as its output.
-
ADF users can then use these results to drive their ADF pipeline logic downstream to make new call.
As a result, this function never waits for long running queries to execute. It just passes them to snowflake and moves on w/o getting a response and gets their QueryID to report back to the caller . Subsequents calls for Status checks are executed quickly against the query_history view using the Query_ID and take few seconds at most. This way each REST call whether it is to execute a ETL query or for a Status check, is responded within seconds without any Azure timeout limitaions and final outcome is a query status of SUCCESS or FAIL along with JSON payload of query_execution results if it is a PASS.
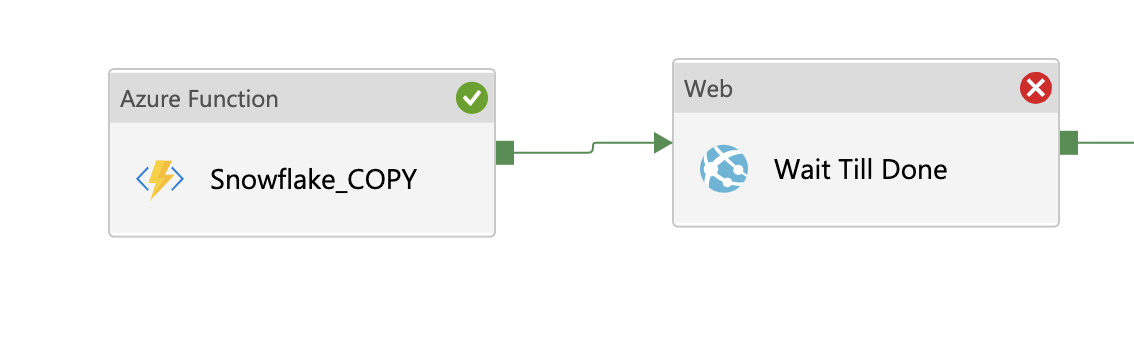
All you have to do is to add 2 ADF steps for each ETL call to snowflake. First workflow step is the AzureFunction call with the Query you want to execute. Second step is a Web step to wait until the original query is executed by repeatedly calling the Status URL which is the output of Step1.
...Below is an architectural diagram of the solution showing a data ingestion from an Azure Blob storage.
Connection attributes & the SQL command can be inserted in to JSON as hard coded values or Dynamic/Hidden variables.
- Using dynamic ADF variables. Credentials & other attributes can be dynamically fetched from Azure Key Vault Secret keys where they are securely stored. (Preferred)
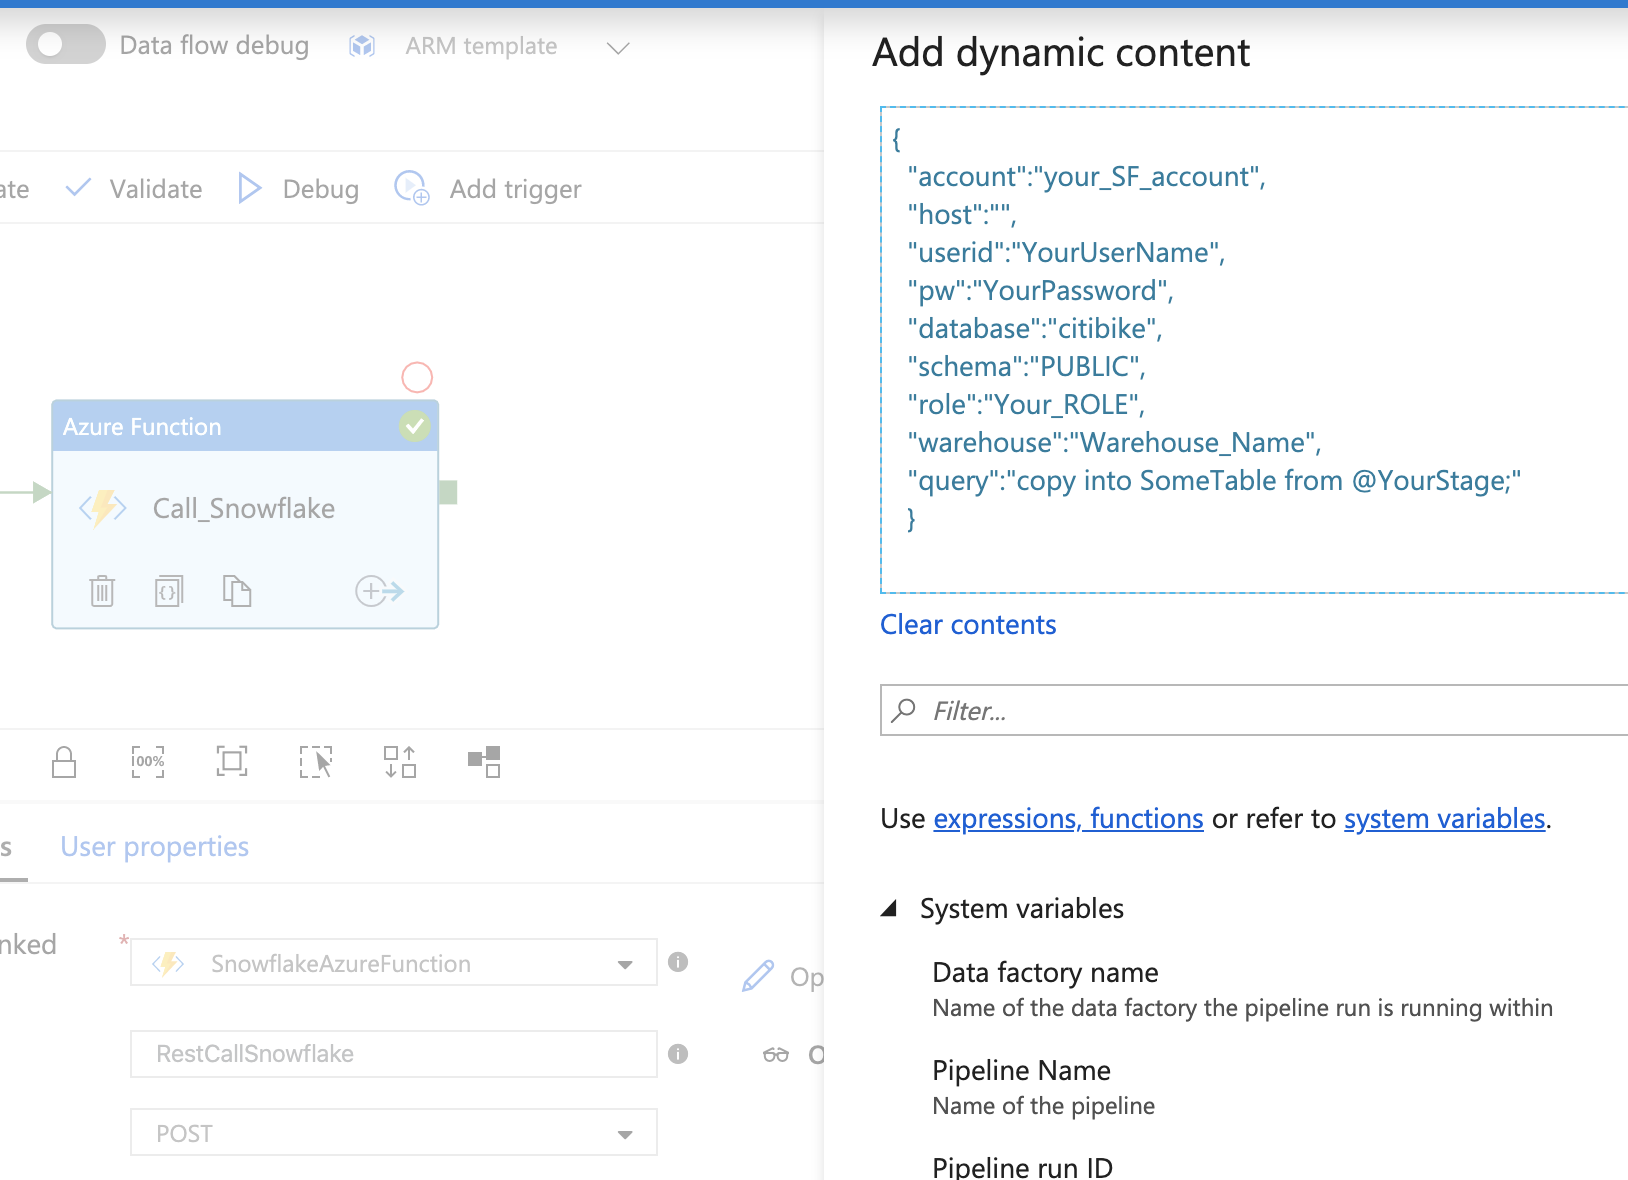
{
"account":"your_SF_account",
"host":"",
"userid":"@{variables('v_user')}",
"pw":"@{variables('v_pw')}",
"database":"db_name",
"schema":"PUBLIC",
"role":"Your_ROLE",
"warehouse":"Warehouse_Name",
"query":"Copy into SomeTable from @YourStage;"
}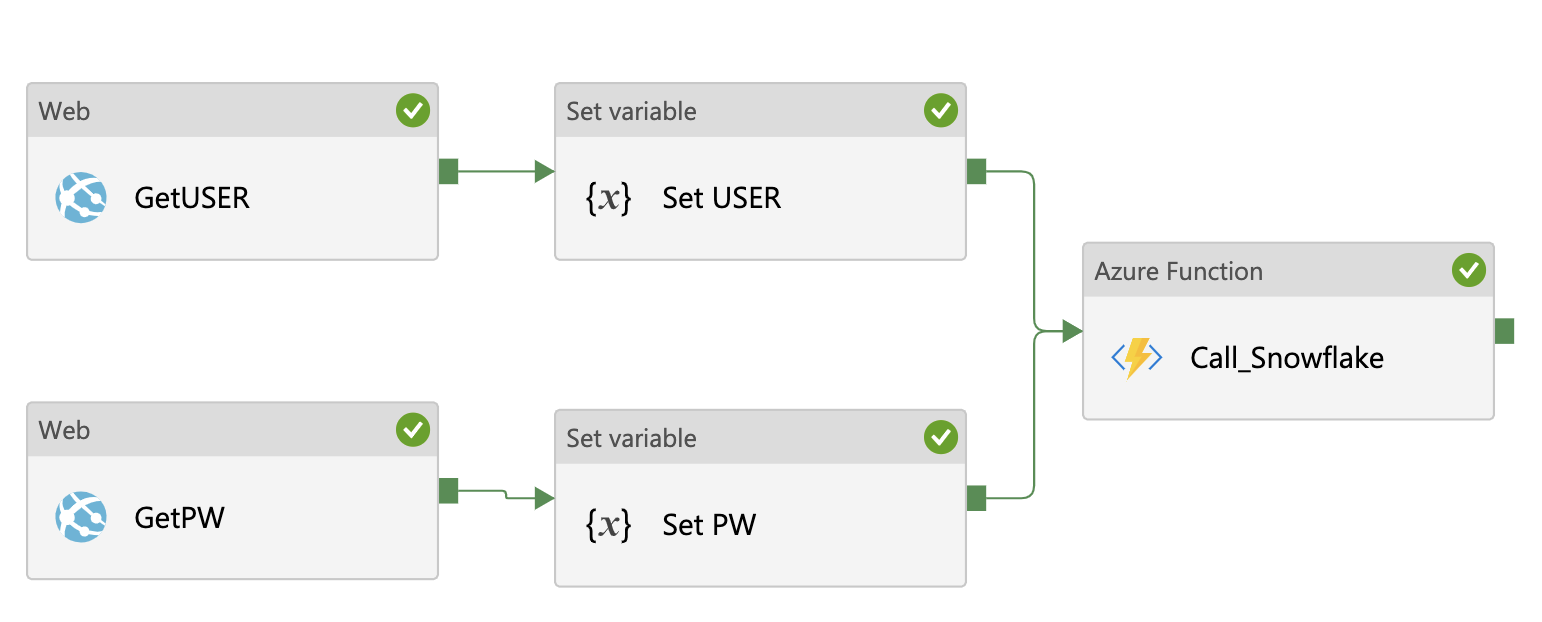
You can use web requests to fetch Azure Vault Secrets & set it as variable values to be passed to this custom function as user credentials.
- As Static Values Credentials can also be stored as part of the JSON input of the Azure function properties within the ADF Pipeline
{
"account":"your_SF_account",
"host":"",
"userid":"YourUserName",
"pw":"YourPassword",
"database":"db_name",
"schema":"PUBLIC",
"role":"Your_ROLE",
"warehouse":"Warehouse_Name",
"query":"Copy into SomeTable from @YourStage;"
}
Typical usage would be to place this at the end of a data pipeline and issue a copy command from Snowflake once Data Factory generates data files in an Azure blob storage.
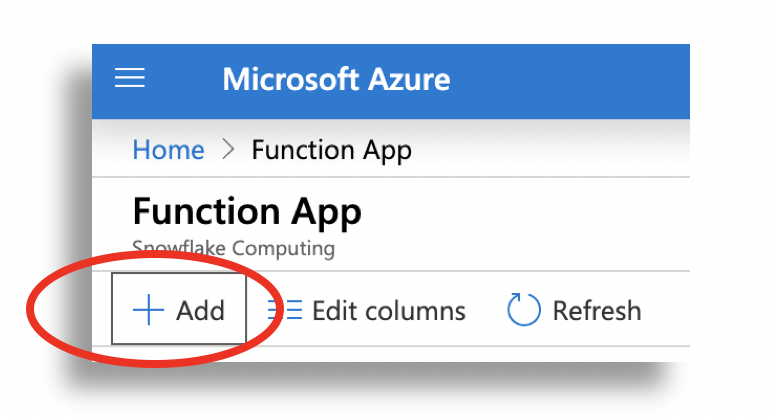
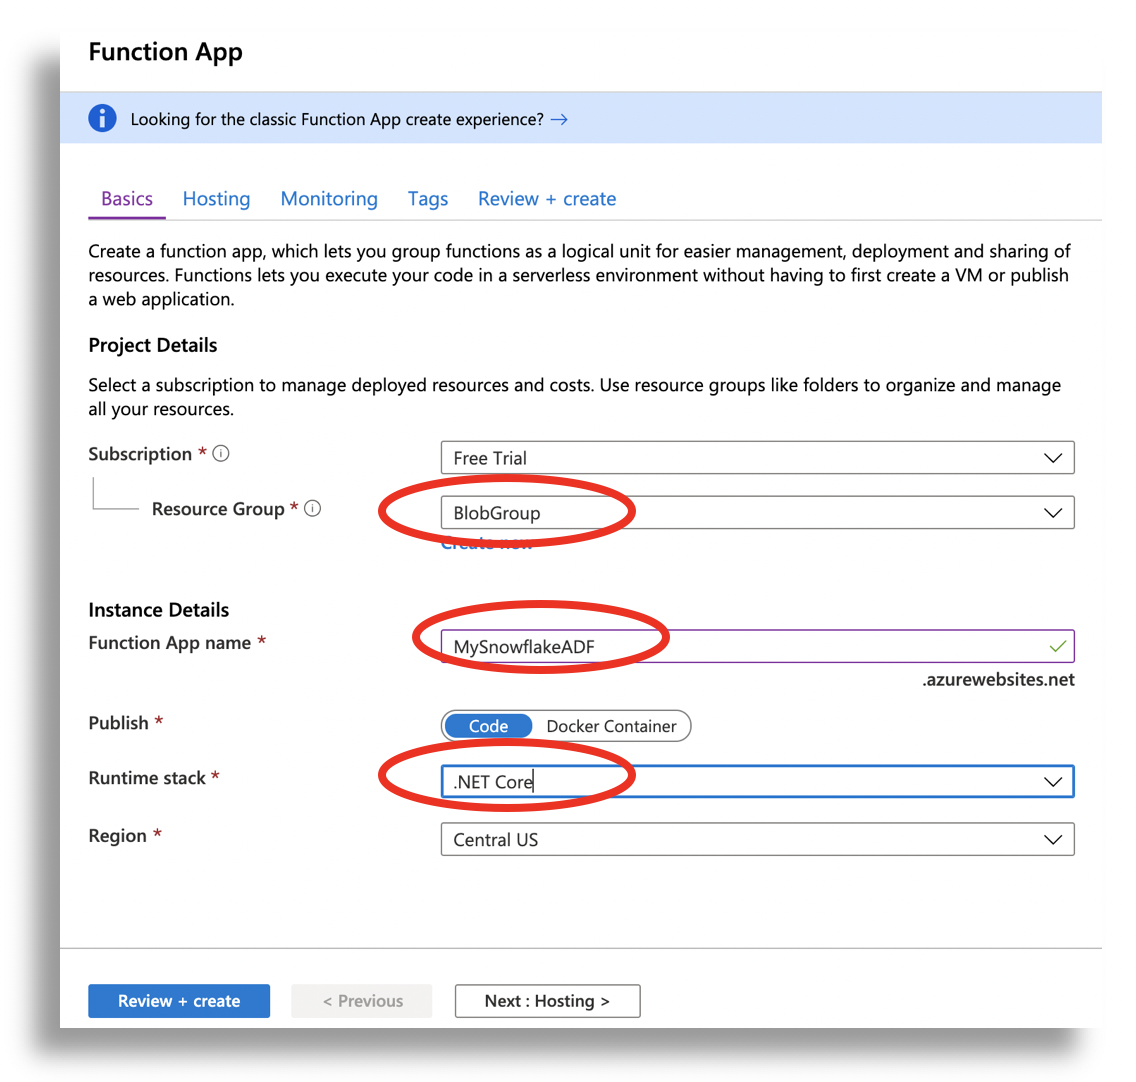
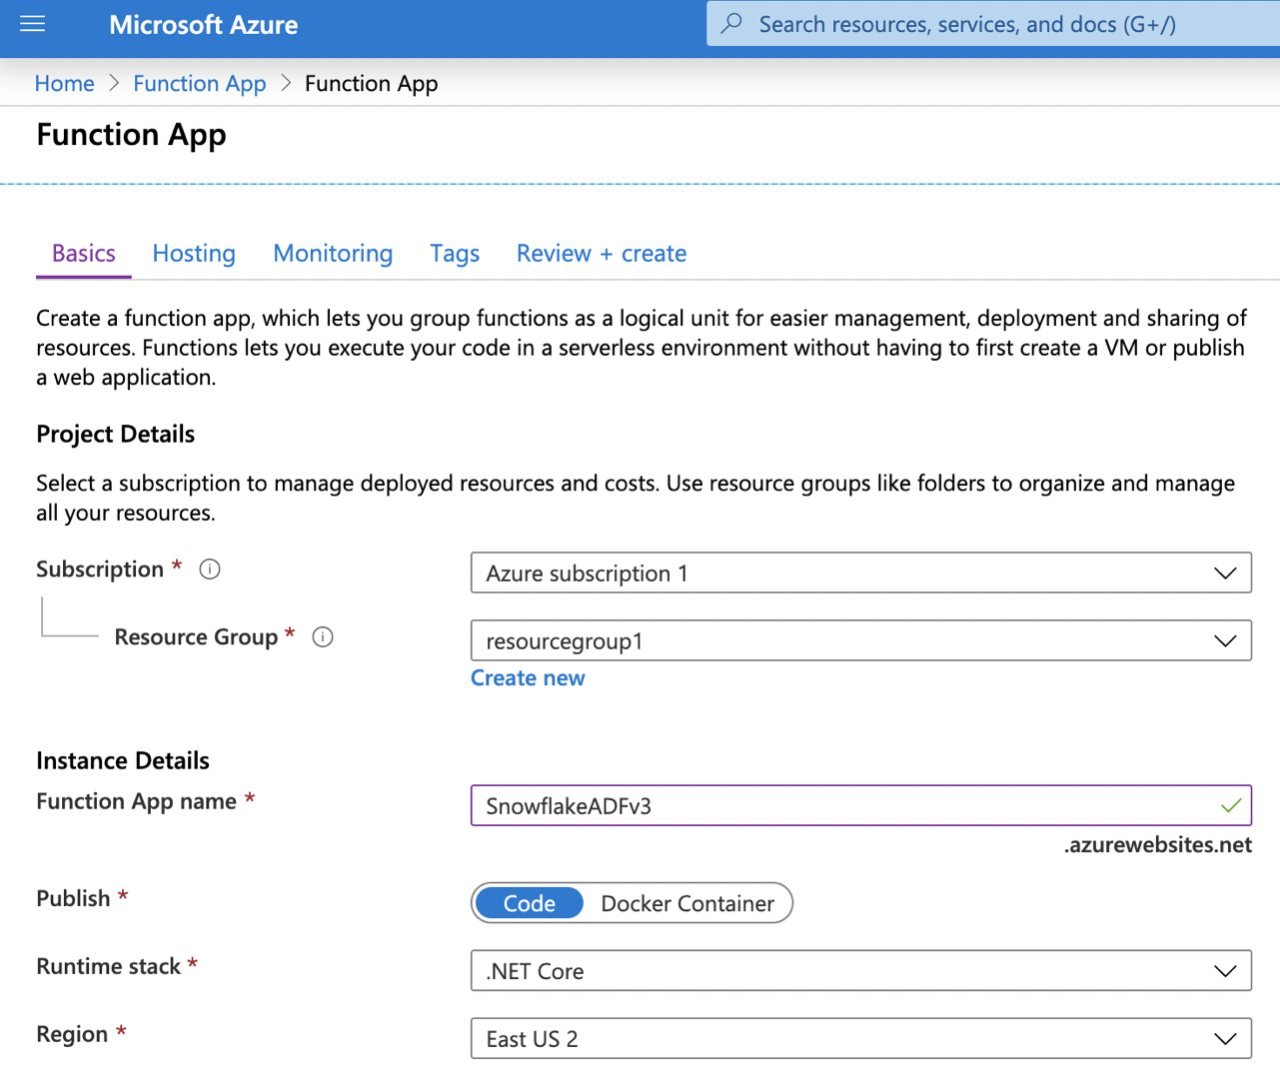
- Create a new Azure Function
-
Set the BASICS as following
-
Resource Group = Create a new one or use an existing one
-
Function App Name = Provide a unique name for your function
-
Runtime Stack : .NET Core
- Set the HOSTING properties as:
-
Storage Account = Create New or use existing
-
Operating System = Windows
-
Plan Type = Consumption is OK (as timeouts are not an issue)
-
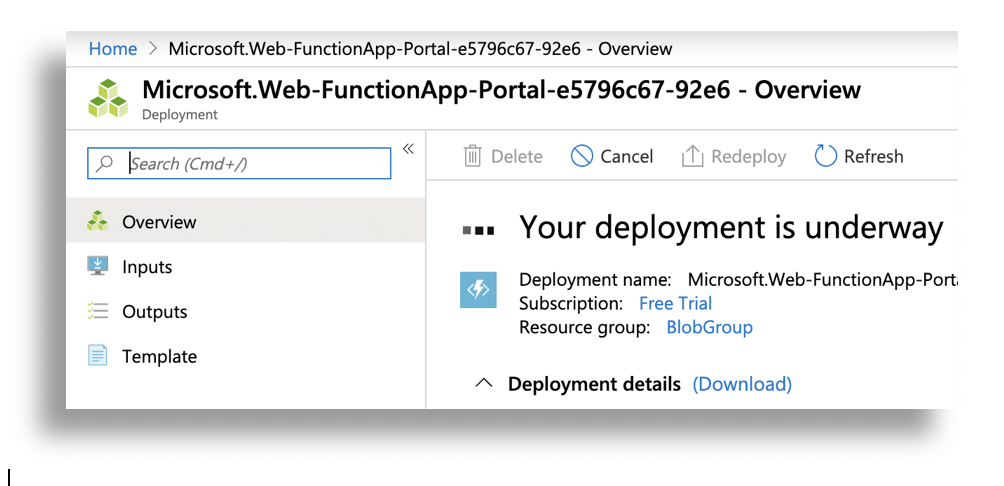
Following the following steps & click CREATE to finish the initial phase
-
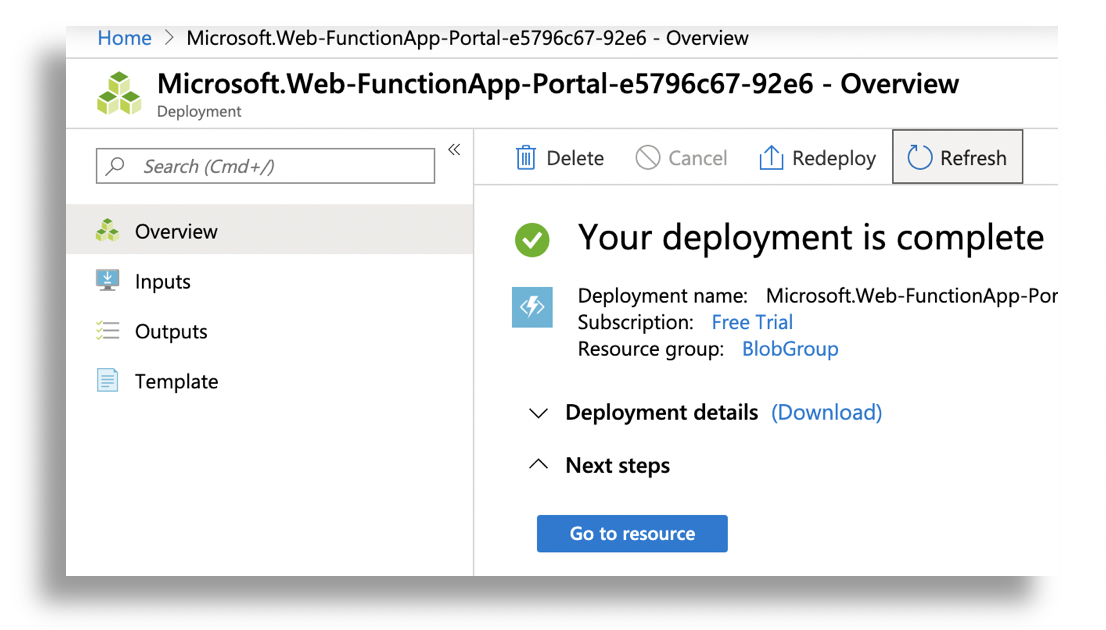
It will take few minutes to deploy it.
- Once finished, click on GO TO RESOURCE
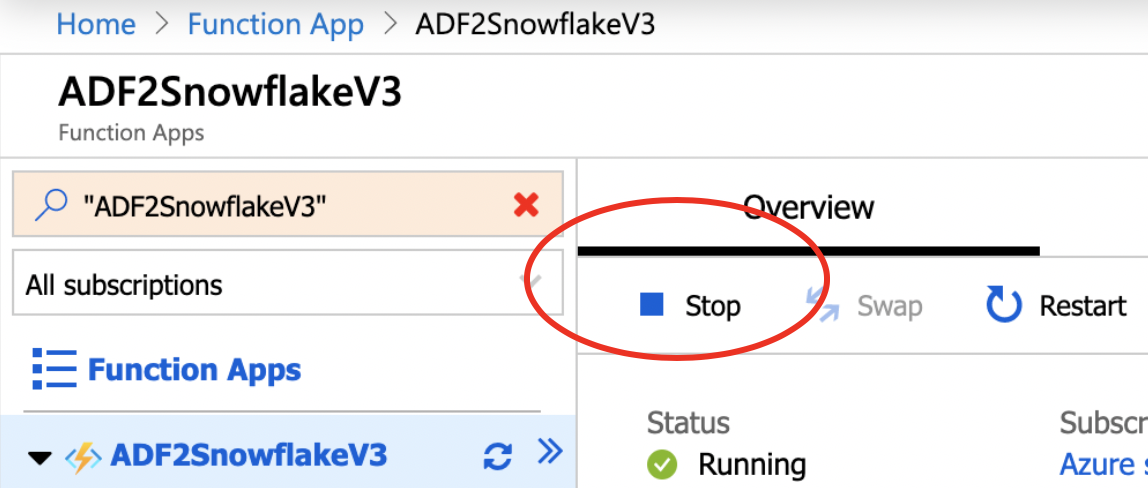
- Click on the Function APP name then click STOP
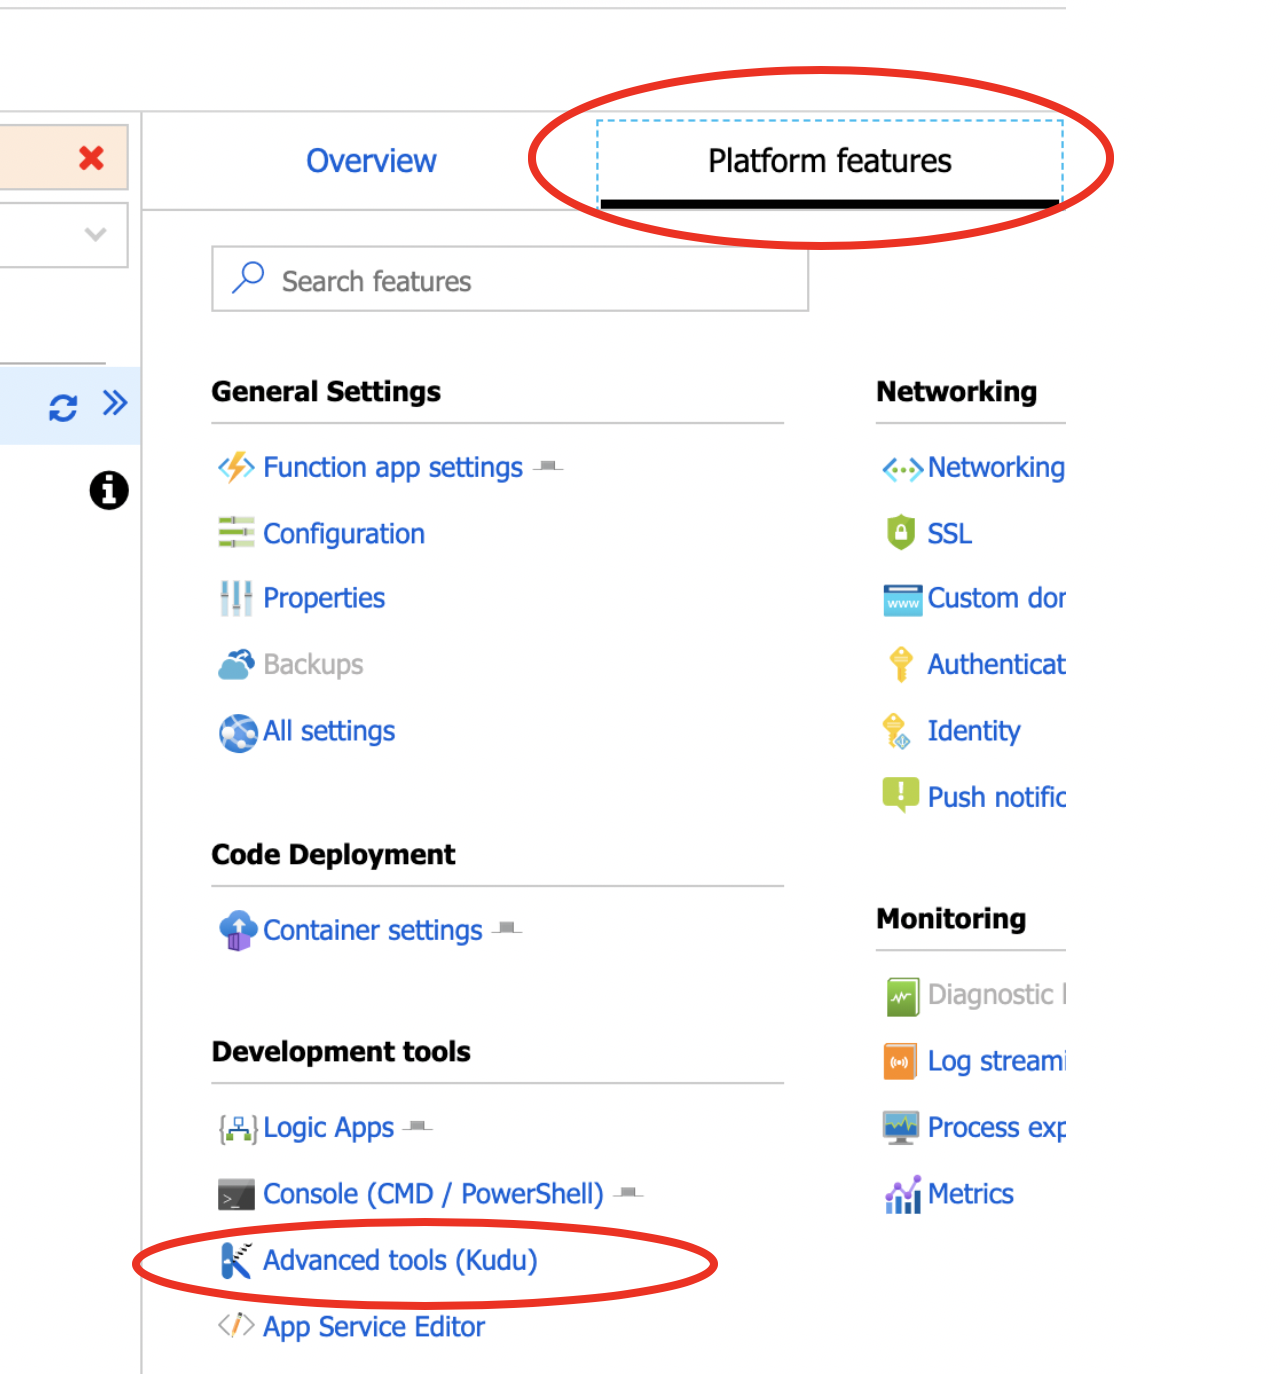
- Click on Platform Features tab then choose Advanced Tools (Kudu)
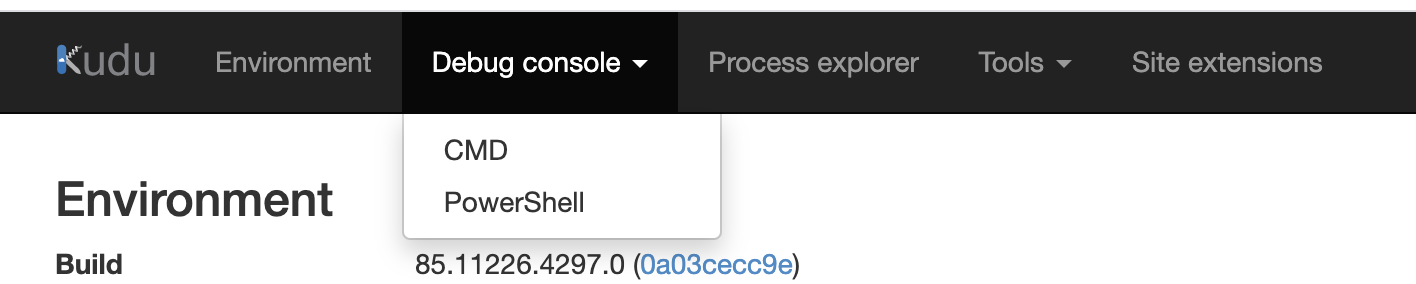
- Click on Debug Console then Choose Power Shell
- This will open a new Powershell window with a directory navigation UI on top.
-
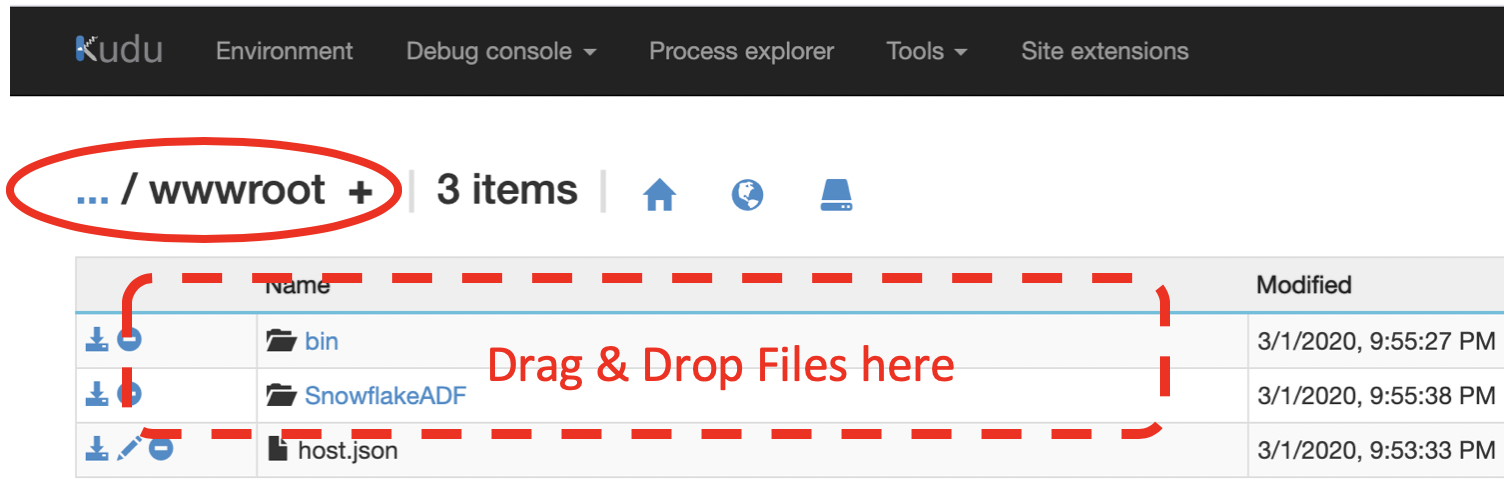
Navigate to ./site/wwwroot/ folder
-
Download the SnowflakeADF.zip file and extract it on your computer in to a temp folder.
-
Drag & Drop both "SnowflakeADF" & "bin" folders on to \wwwroot path. (UI is not intuitive but dragging & dropping a folder on the blank area below directory name starts the upload process)
- Once upload is complete,
-
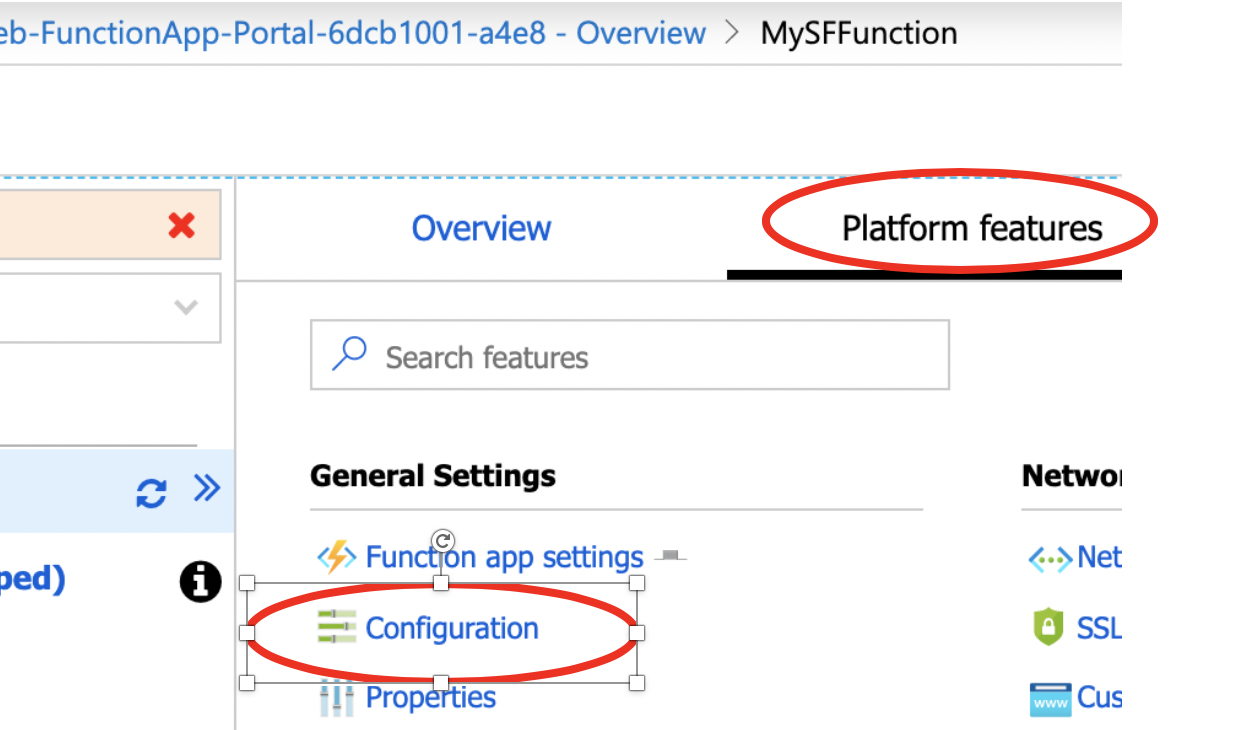
Switch back to FunctionApp - Platform features screen in previous browser tab
-
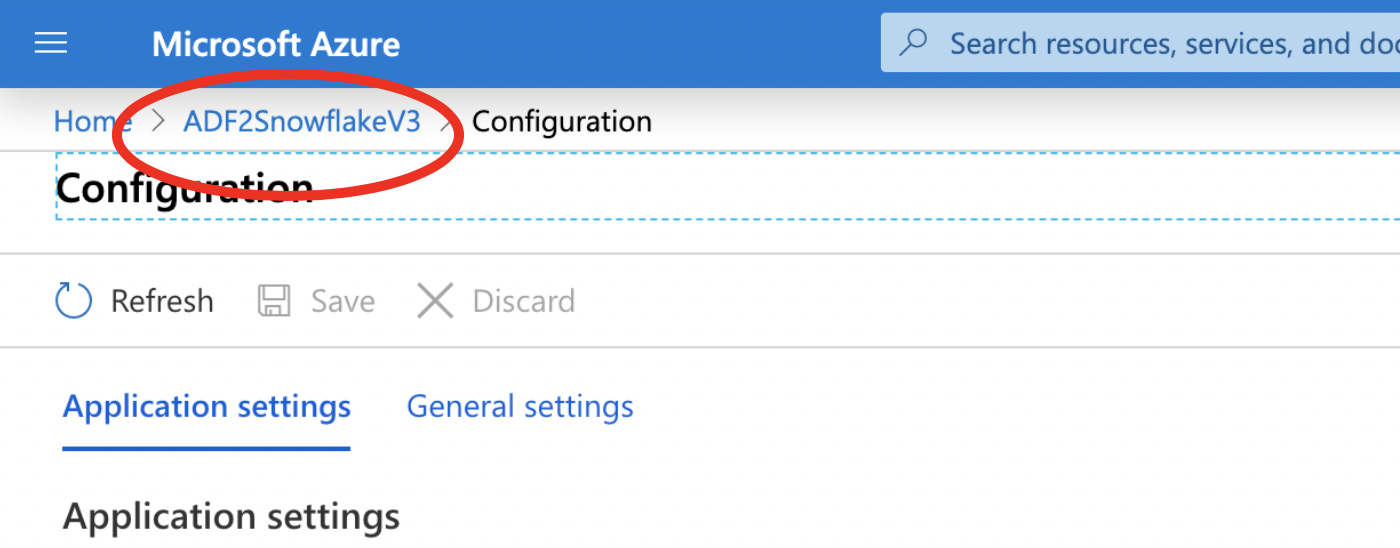
Click on Configuration
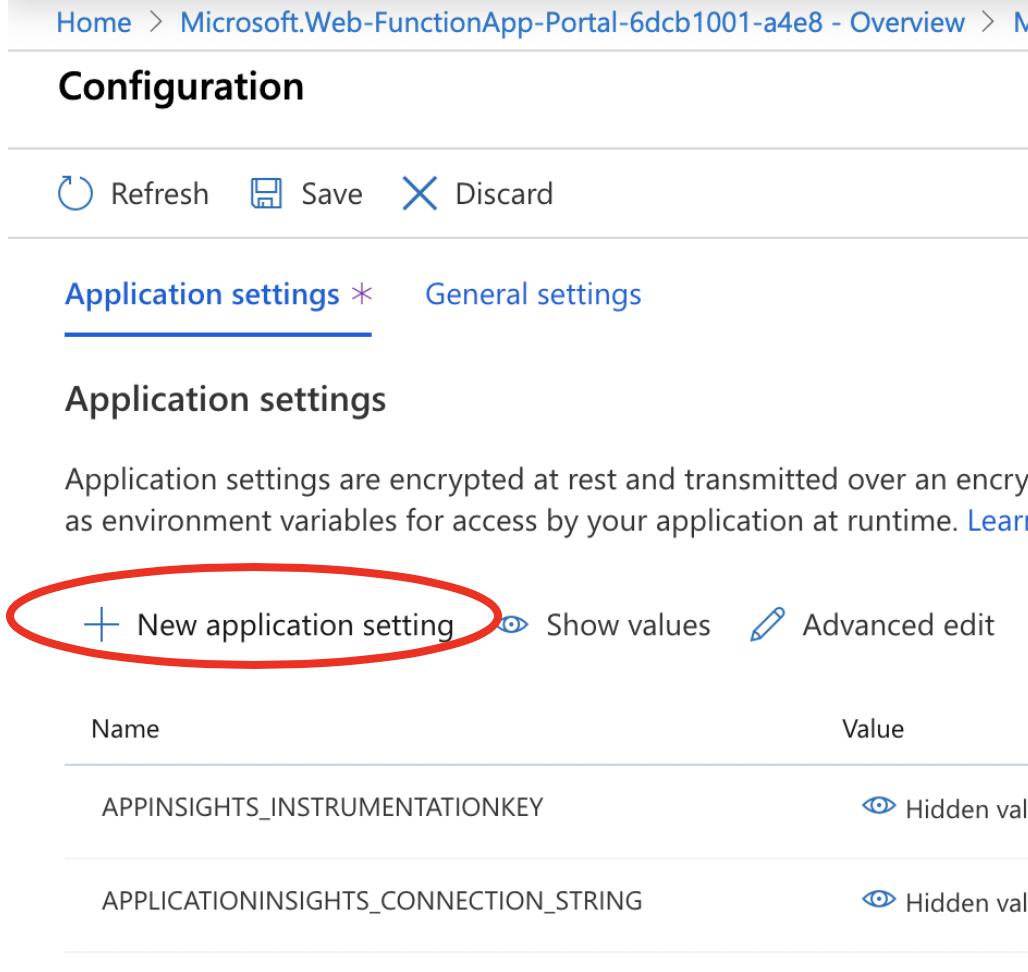
- Create a New Application Setting under application settings
- Click New Application Setting
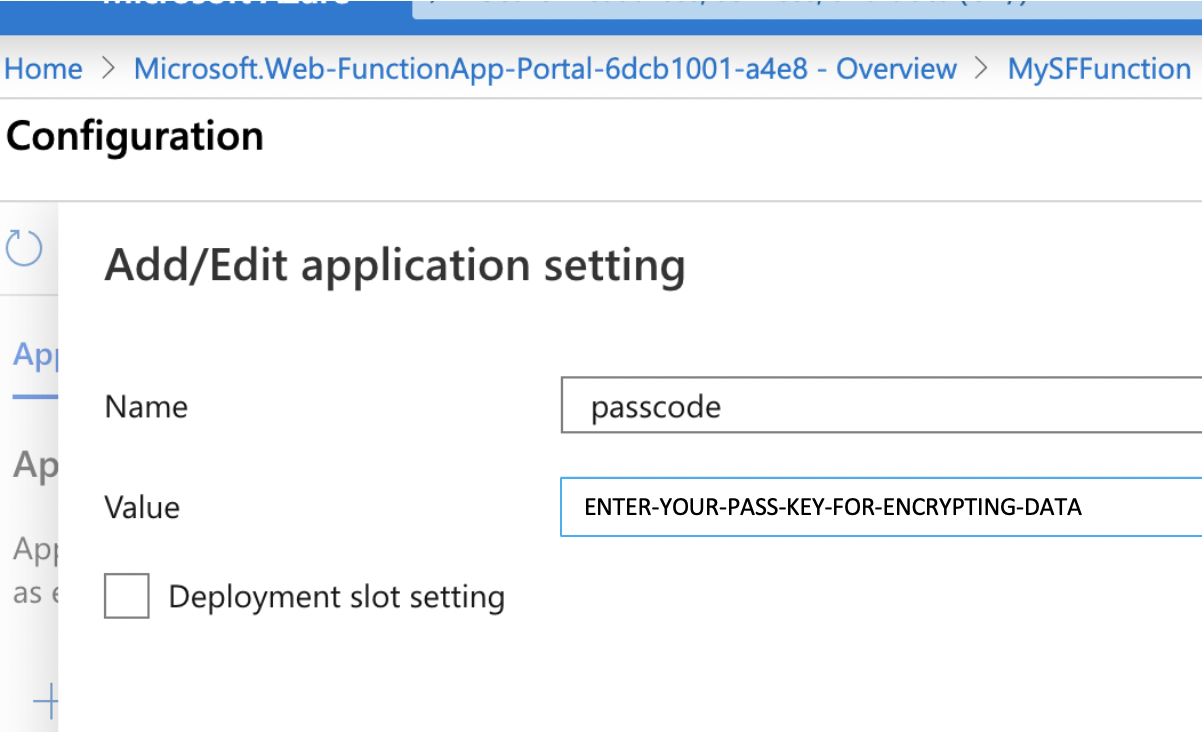
- Set Name = passcode (case sensitive) then Set the Value = enter any encryption key to be used to encypt URL parameters being sent back (letters & numbers & upper case)
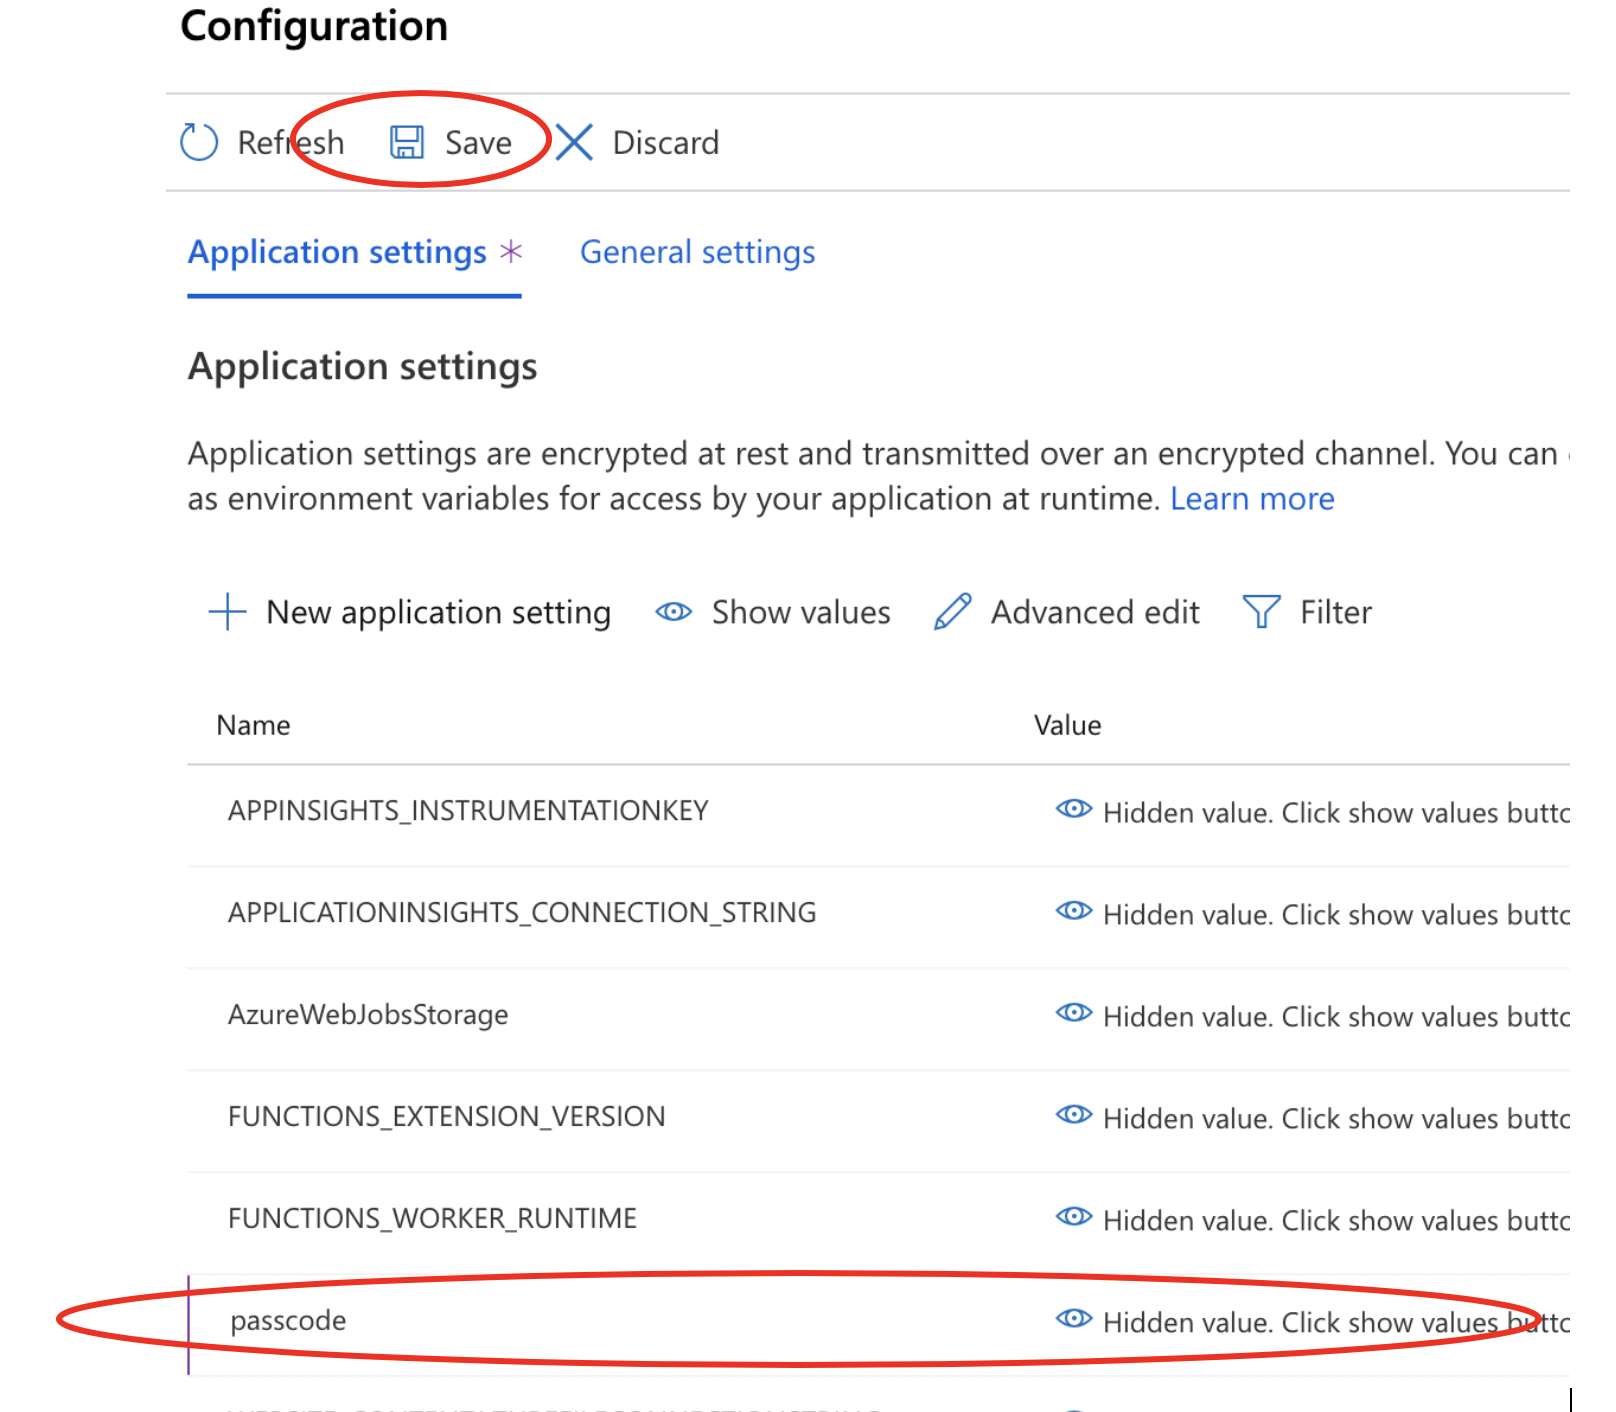
- Don't forget to SAVE the newly creared "passcode" setting.
- Click on the FunctionApp Name in the breadcrumb list on top to go back.
- Click on OVERVIEW tab & click on START
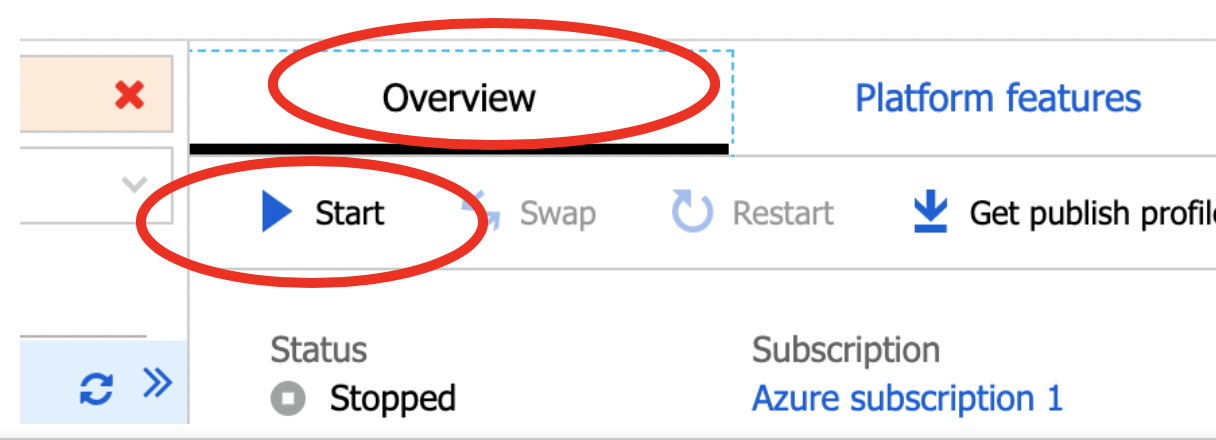
- After it Starts SUCCESSFULLY
-
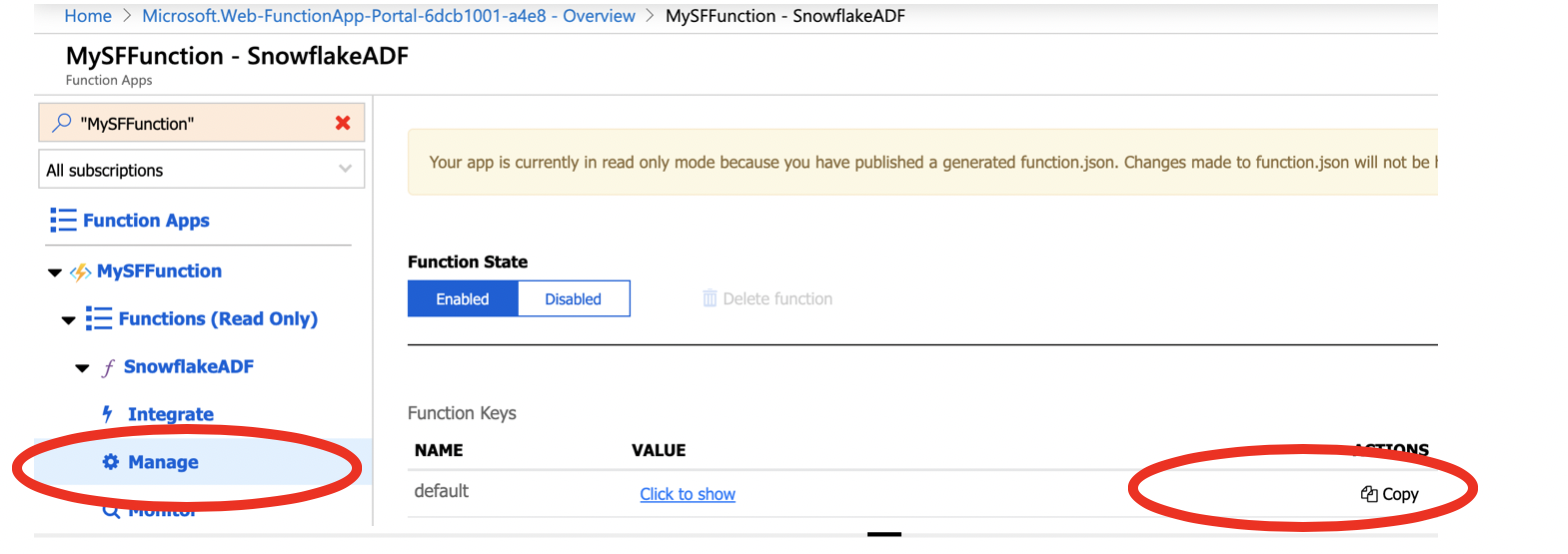
On the left menu: expand Functions --> YourFunctionName --> SnowflakeADF & click on MANAGE
-
COPY the default key value under FUNCTION KEYS section and store it in a notepad (this is the key to let ADF access this function)
- Deploying & configuring SnowflakeADF function is DONE!.
-
Add Azure Function on to canvas
-
Give it descriptive name to what you plan to do. (example: Copy_Invoices_from_AzureBlob or FlattenJSONfilesToTable )
- Check Secure Input & Output to if you like to hide JSON connection info from being logged.
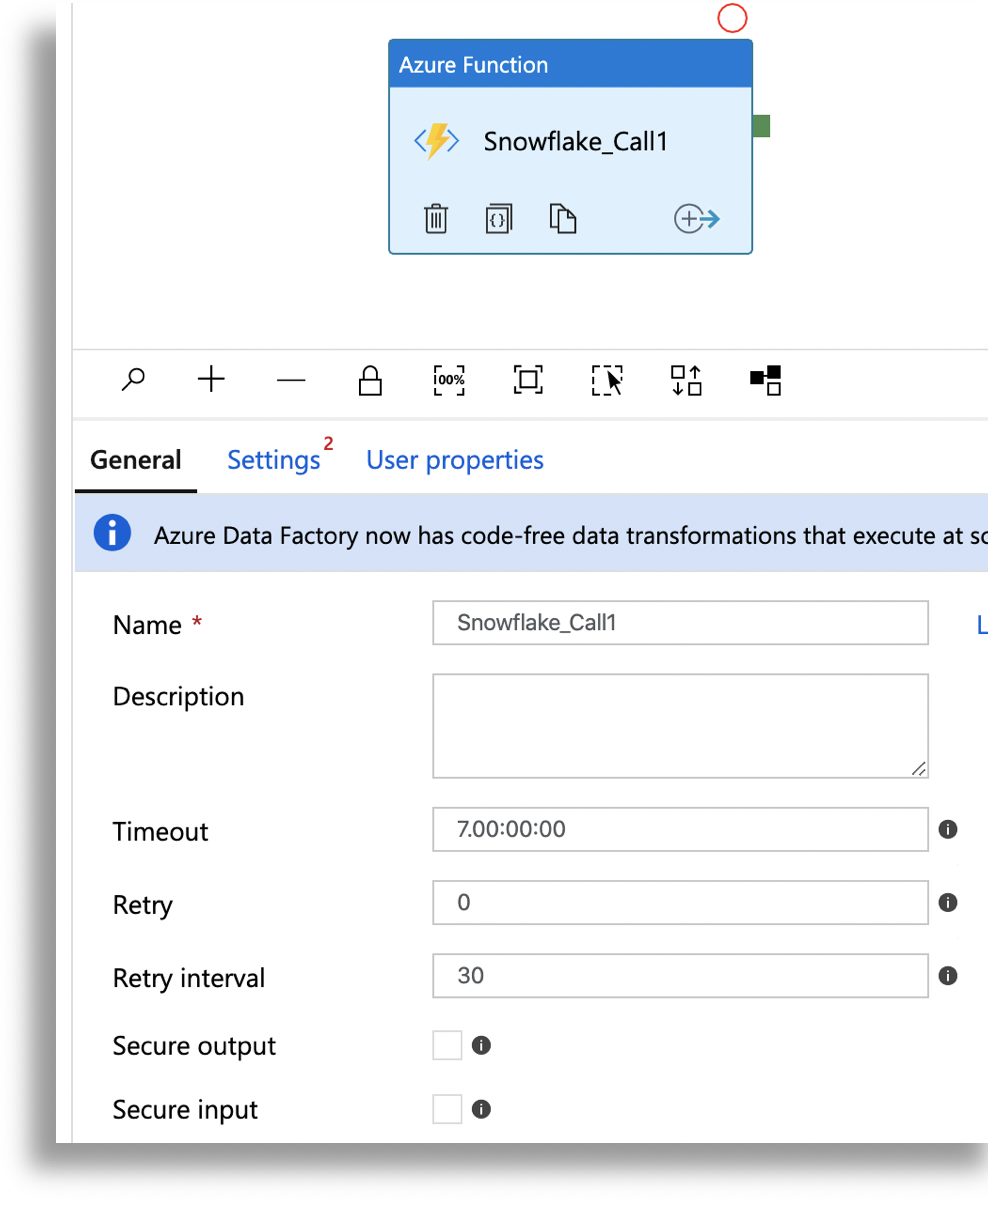
- Switch to SETTINGS
-
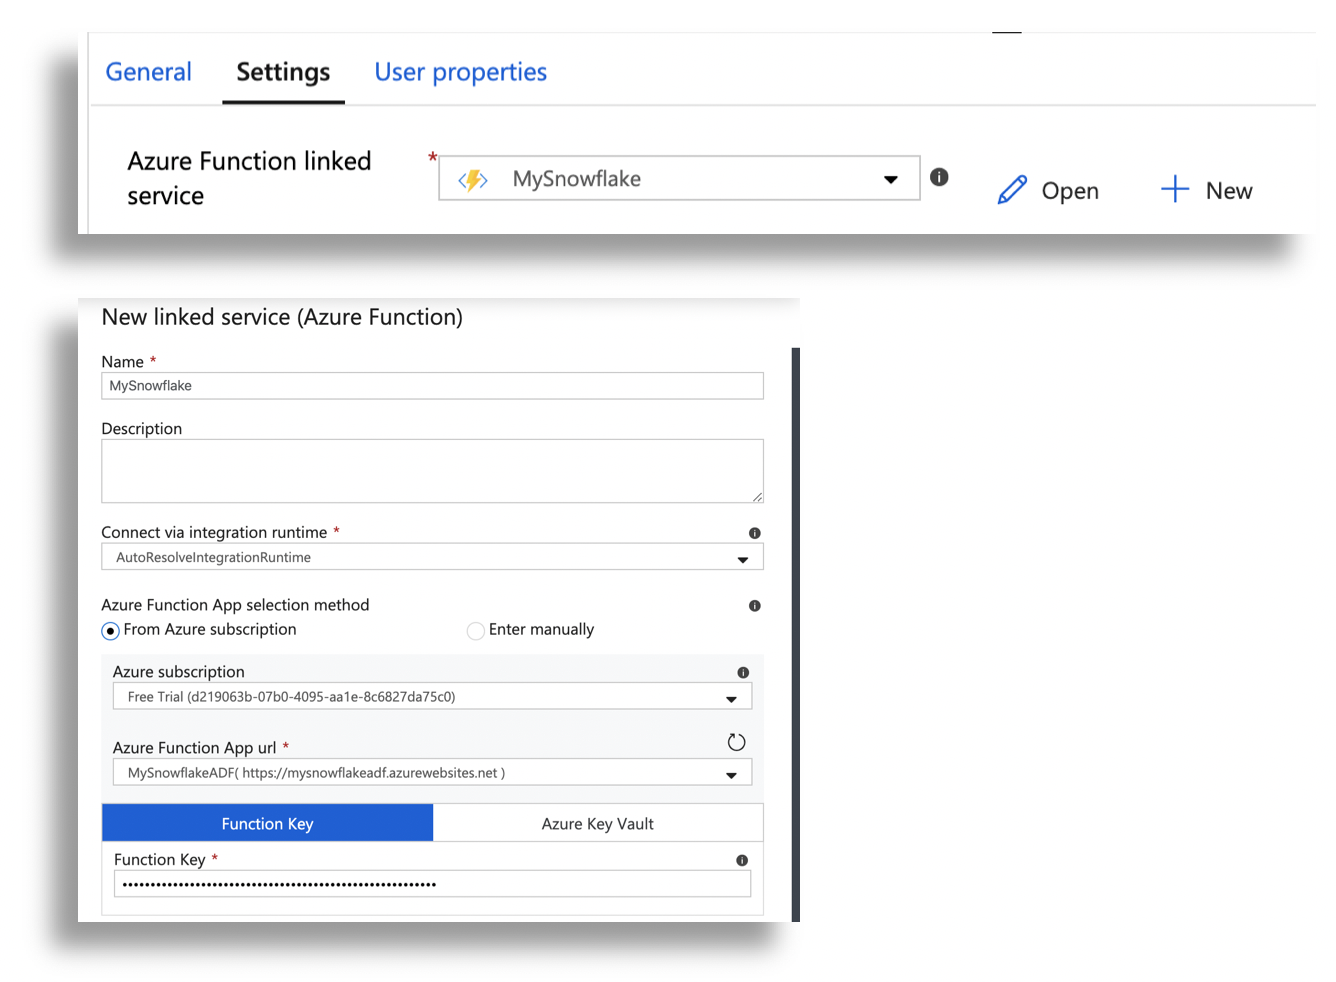
+ NEW to add a new AZURE FUNCTION LINKED SERVICE
-
Set All Required Properties to link to the Azufe function you created
-
for Function Key =Use the Default Key value copied in step 15
-
Function Name = Function name from Step #3
-
Method = POST

- Set BODY to following JSON format with Snowflake connection & SQL command attributes. leave host: blank if your region is US West (Oregon), otherwise use the following SNOWFLAKE LINK to lookup the host name. (when using the list, DO NOT include the account name in the host. Example: if sample shows xy12345.ca-central-1.aws use host = ca-central-1.aws
{
"type":"RUN",
"account":"your_SF_account",
"host":"",
"userid":"YourUserName",
"pw":"YourPassword",
"database":"db_name",
"schema":"PUBLIC",
"role":"Your_ROLE",
"warehouse":"Warehouse_Name",
"query":"Copy into SomeTable from @YourStage;"
}- Add a new WEB step in to canvas and connect them together.
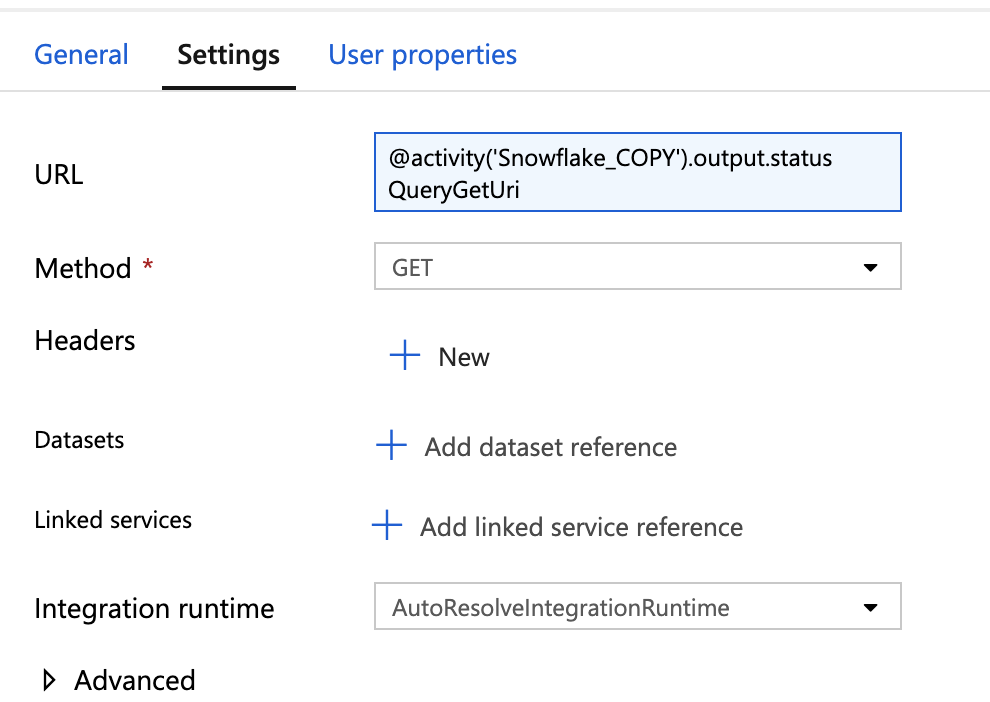
- Set the properties of WEB step as below
-
Give it a Step Name in General tab
-
Under Settings tab, Set the URL as Dynamic Content as follows where you replace Snowflake_COPY with the name of your Azure Function Step you gave on Step #2
@activity('Snowflake_COPY').output.statusQueryGetUri
- Set Method = GET
- If you need to add additional steps based on the result of inital call, you can now attach them after WEB step.
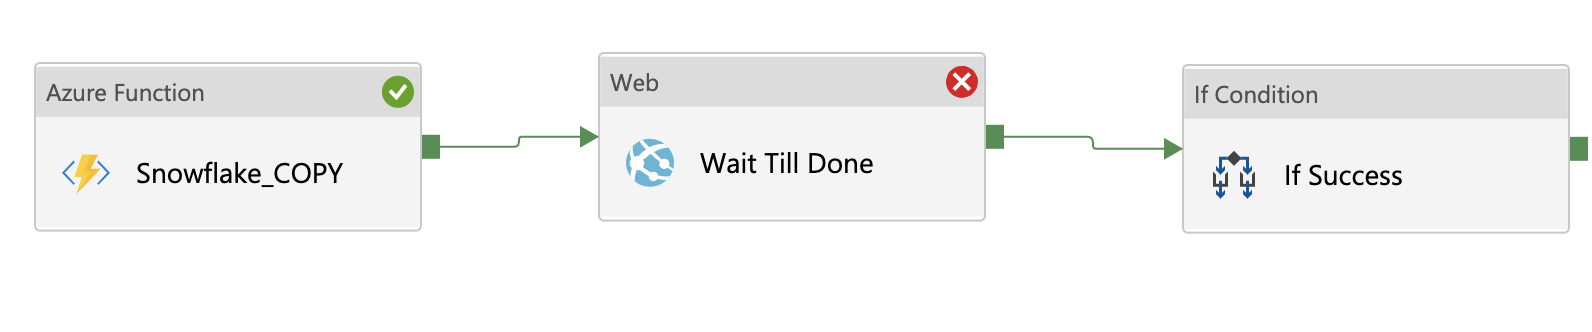
- In this case, I added IF logic that tests the outcome of the WAIT TILL DONE.
-
Output of a successful query is the QueryHistory result of the original query in JSON format.
-
The dynamic expression to test a boolean outcome for the IF step is as follows:
To test if the outcome is "Success"
@equals(activity('Wait Till Done').output.Status,'Success')
To test if the Rows_Produced from the Query = "15"
@equals(activity('Wait Till Done').output.Rows[0].ROWS_PRODUCED,'3')
Sample output:
{
	"Status": "Success",
	"Rows": [
				{
				"QUERY_ID": "01929f.......0223c2",
				"QUERY_TEXT": "SOME SQL;",
				"DATABASE_NAME": "SOME_DB_NAME",
				"SCHEMA_NAME": "PUBLIC",
				"QUERY_TYPE": "UNKNOWN",
				"SESSION_ID": "..",
				"USER_NAME": "YOUR_USERID",
				"ROLE_NAME": "YOUR_ROLENAME",
				"WAREHOUSE_NAME": "MY_WAREHOSUE",
				"WAREHOUSE_SIZE": "",
				"WAREHOUSE_TYPE": "STANDARD",
				"CLUSTER_NUMBER": "",
				"QUERY_TAG": "",
				"EXECUTION_STATUS": "SUCCESS",
				"ERROR_CODE": "",
				"ERROR_MESSAGE": "",
				"START_TIME": "03/02/2020 18:23:49 +00:00",
				"END_TIME": "03/02/2020 18:23:49 +00:00",
				"TOTAL_ELAPSED_TIME": "163",
				"BYTES_SCANNED": "0",
				"ROWS_PRODUCED": "0",
				"COMPILATION_TIME": "161",
				"EXECUTION_TIME": "2",
				"QUEUED_PROVISIONING_TIME": "0",
				"QUEUED_REPAIR_TIME": "0",
				"QUEUED_OVERLOAD_TIME": "0",
				"TRANSACTION_BLOCKED_TIME": "0",
				"OUTBOUND_DATA_TRANSFER_CLOUD": "",
				"OUTBOUND_DATA_TRANSFER_REGION": "",
				"OUTBOUND_DATA_TRANSFER_BYTES": "0",
				"INBOUND_DATA_TRANSFER_CLOUD": "",
				"INBOUND_DATA_TRANSFER_REGION": "",
				"INBOUND_DATA_TRANSFER_BYTES": "0",
				"CREDITS_USED_CLOUD_SERVICES": "0.000025000"
				}
			]
}- Click DEBUG on the PIPELINE to test.
If the data settings were correct & queries execute successfully, each step in ADF will pass. If the query returns error, step will fail with error message.
That's it. Feel free to use this & use github to reach out if you have questions, encounter issues or additional change requests.