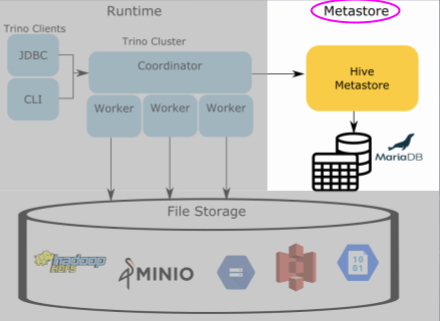
If you are new to Trino or Presto®, I recommend that you check out the following blog to get a sense for the Hive connector architecture. A gentle introduction to the Hive connector
In this tutorial, you will:
- Learn how to run a CTAS (CREATE TABLE AS) statement in Trino.
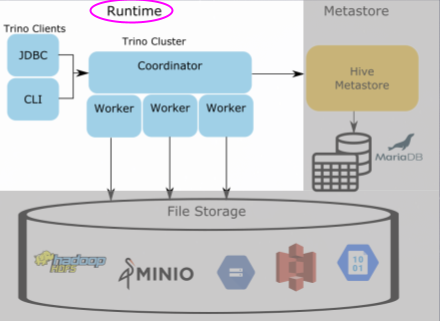
- Learn the roles of the Trino runtime, metastore, and storage.
- Dive into the relational database that contains the Hive model and metadata that is stored in the Hive metstore service.
First, you want to start the services. Make sure that you are in the
trino-getting-started/hive/trino-minio directory. Now run the following
command:
docker compose up -d
You should expect to see the following output (you may also have to download the Docker images before you see the "done" message):
Creating network "trino-minio_trino-network" with driver "bridge"
Creating volume "trino-minio_minio-data" with local driver
Creating minio                          ... done
Creating trino-minio_trino-coordinator_1 ... done
Creating trino-minio_mariadb_1           ... done
Creating trino-minio_hive-metastore_1    ... done
Once this is complete, you can log into the Trino coordinator node. We will
do this by using the exec
command and run the trino CLI executable as the command we run on that
container. Notice the container id is trino-minio-trino-coordinator-1 so the
command you will run is:
docker container exec -it trino-minio-trino-coordinator-1 trino
When you start this step, you should see the trino cursor once the startup
is complete. It should look like this when it is done:
trino>
The first step to understanding the Hive metastore's role in the Hive connector is to run a CTAS (CREATE TABLE AS) query that pushes data from one of the TPC connectors into the hive catalog that points to MinIO. The TPC connectors generate data on the fly so that we can run simple tests like this.
First, run a command to show the catalogs to see the tpch and minio catalogs
since these are what we will use in the CTAS query.
SHOW CATALOGS;
You should see that the minio catalog is registered. This is actually a Hive
connector configured under the name minio to delineate the underlying storage
we are using.
If we look at the Trino Architecture, we're first going to prep the file storage where the actual data will reside. In earlier iterations of big data systems, this layer was commonly HDFS or other S3 compatible storage and AWS S3. For our example, we're using MinIO which is also S3 compatible. Creating a bucket gives us a location to write our data to and we can tell Trino where to find it.
Now, open the MinIO UI and log in using:
Access Key: minio
Secret Key: minio123
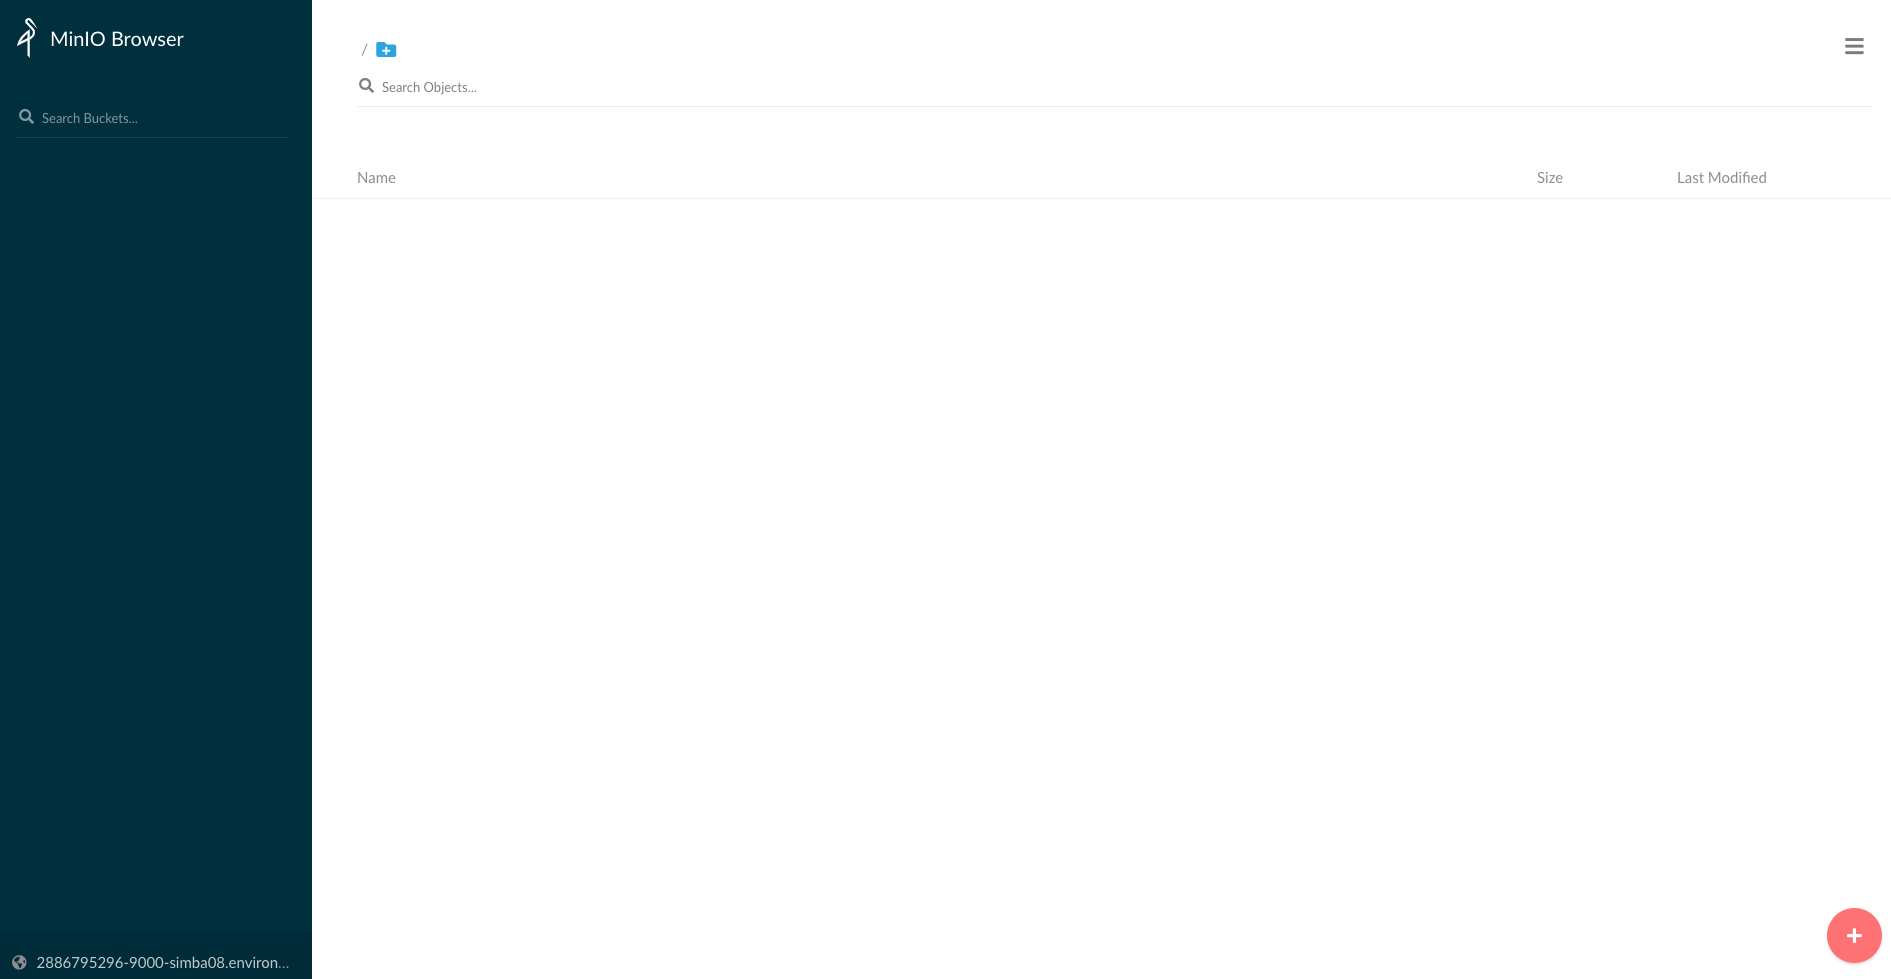
Upon logging in, you will see the following screen.
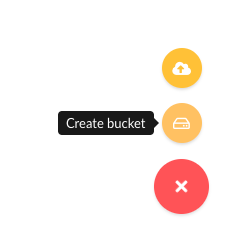
Create a Bucket by clicking (+) button and create bucket.
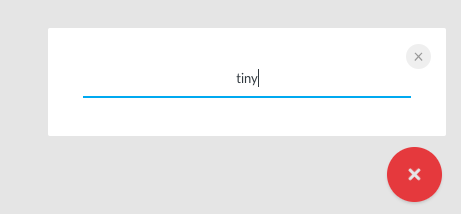
Name the bucket tiny as the dataset we will be transferring will be small.
Now that we've set up the MinIO bucket, lets move to creating our SCHEMA that points us to the bucket in MinIO and then run our CTAS query. When we create a table using CTAS, we're telling the table to copy the table schema and the data from the source table into the table we're creating. This will make more sense when you see the query below.
Note: There are two meanings we just used when saying the word "schema". There is the table schema that defines columns of a table, then there is the SCHEMA that I intentionally put in all caps that signifies the SCHEMA in the containment hierarchy used by Trino. Trino defines a CATALOG which contains multiple SCHEMAS, which contain multiple TABLES. In other databases like Hive and MySQL
Back in the terminal create the minio.tiny SCHEMA. This will be the first call to the metastore to save the location of the S3 schema location in MinIO.
CREATE SCHEMA minio.tiny
WITH (location = 's3a://tiny/');
Now that we have a SCHEMA that references the bucket where we store our tables in MinIO, we now can create our first table.
Optional: To view your queries run, log into the Trino UI and log in using any username (it doesn't matter since no security is set up).
Move the customer data from the tiny generated tpch data into MinIO uing a CTAS query. Run the following query and if you like, watch it running on the Trino UI:
CREATE TABLE minio.tiny.customer
WITH (
    format = 'ORC',
    external_location = 's3a://tiny/customer/'
)
AS SELECT * FROM tpch.tiny.customer;
Go back to the MinIO UI, and click under the tiny
bucket. You will now see a customer directory generated from that table and
underneath that directory will be a file with a name comprised of uuid and date.
This is the orc file generated by the trino runtime residing in MinIO.
Now there is a table under MinIO, you can query this data by checking the following.
SELECT * FROM minio.tiny.customer LIMIT 50;
So the question now is how does Trino know where to find the orc file residing in MinIO when all we specify is the catalog, schema, and table? How does Trino know what columns exist in the orc file, and even the file it is retrieving is an orc file to being with? Find out more in the next step.
In order for Trino to know where to locate this file, it uses the Hive
metastore to manage and store this information or metadata in a relational
database that the metastore points to, in this case our mariadb instance.
Execute the following statement to log into the mariadb instance and follow
the remaining commands to learn how the metadata gets split into different
tables. Understanding this model will also solidify the metastore's role in the
scheme of Trino's use of it in the Hive connector.
Open another terminal and run the following command:
docker container exec -it "trino-minio-mariadb-1" /bin/bash
Once you see the root@mariadb terminal, enter into the cli.
mysql -uroot -p"$MYSQL_ROOT_PASSWORD"
Now that you're in the metastore's database command line interface, you can run SQL commands on this database to see where the metadata is stored. First, let's look at the databases stored in the metastore.
SELECT
 DB_ID,
 DB_LOCATION_URI,
 NAME,
 OWNER_NAME,
 OWNER_TYPE,
 CTLG_NAME
FROM metastore_db.DBS;
+-------+---------------------------+---------+------------+------------+-----------+
| DB_ID | DB_LOCATION_URI           | NAME    | OWNER_NAME | OWNER_TYPE | CTLG_NAME |
+-------+---------------------------+---------+------------+------------+-----------+
|     1 | file:/user/hive/warehouse | default | public     | ROLE       | hive      |
|     2 | s3a://tiny/               | tiny    | trino      | USER       | hive      |
+-------+---------------------------+---------+------------+------------+-----------+
This shows the databases. What may be strange at first glance, is this is
showing the schema that we created under the database table. This is because
the Hive metastore has two abstractions for its metadata, databases and tables.
Since Trino follows the traditional 3 level ANSI SQL catalog standard, schema
is equivalent to a database. So just as a database contains multiple tables,
a schema will contain multiple tables. Notice the DB_LOCATION_URI is in the
bucket location created before in MinIO and set when you created this schema.
The owner is the trino user coming from the user in the trino instance. Also
note the CTLG_NAME references the trino catalog.
The next command will show us metadata about the customer table created in the previous step
SELECT
 t.TBL_ID,
 t.DB_ID,
 t.OWNER,
 t.TBL_NAME,
 t.TBL_TYPE,
 t.SD_ID
FROM metastore_db.TBLS t
 JOIN metastore_db.DBS d
  ON t.DB_ID= d.DB_ID
WHERE d.NAME = 'tiny';
+--------+-------+-------+----------+----------------+-------+
| TBL_ID | DB_ID | OWNER | TBL_NAME | TBL_TYPE       | SD_ID |
+--------+-------+-------+----------+----------------+-------+
|      1 |     2 | trino | customer | EXTERNAL_TABLE |     1 |
+--------+-------+-------+----------+----------------+-------+
There's nothing unexpected here. You should note that the DB_ID matches with
the id of the tiny database (ie schema) name. The owner is the same trino
user from our trino instance. The TBL_NAME is the name of the customer
table created in the last step.
You may notice the location for the table seems to be missing but that
information is actually on another table. The next query will show this
location. Take note of the SD_ID before running the next query.
SELECT
 s.SD_ID,
 s.INPUT_FORMAT,
 s.LOCATION,
 s.SERDE_ID
FROM metastore_db.TBLS t
 JOIN metastore_db.DBS d
  ON t.DB_ID = d.DB_ID
 JOIN metastore_db.SDS s
  ON t.SD_ID = s.SD_ID
WHERE t.TBL_NAME = 'customer'
 AND d.NAME='tiny';
+-------+-------------------------------------------------+---------------------+----------+
| SD_ID | INPUT_FORMAT                                    | LOCATION            | SERDE_ID |
+-------+-------------------------------------------------+---------------------+----------+
|     1 | org.apache.hadoop.hive.ql.io.orc.OrcInputFormat | s3a://tiny/customer |        1 |
+-------+-------------------------------------------------+---------------------+----------+
This table should contain a row that matches the SD_ID from the last query
result. You should also see the expected INPUT_FORMAT class which since we
specified we were storing orc files it should be the OrcInputFormat. Also
notice the LOCATION is the schema location we set. If we hadn't set this it
would have defaulted to <schema_url>/<table_name>. Then there is the
SERDE_ID. SerDe is an abbreviation for serializer/deserializer. This will
point us to another table that contains the information to find which serializer
to use when parsing the file in MinIO.
To find out the serializer used, run the following query:
SELECT
 sd.SERDE_ID,
 sd.NAME,
 sd.SLIB
FROM metastore_db.TBLS t
 JOIN metastore_db.DBS d
  ON t.DB_ID = d.DB_ID
 JOIN metastore_db.SDS s
  ON t.SD_ID = s.SD_ID
 JOIN metastore_db.SERDES sd
  ON s.SERDE_ID = sd.SERDE_ID
WHERE t.TBL_NAME = 'customer'
 AND d.NAME='tiny';
+----------+----------+-------------------------------------------+
| SERDE_ID | NAME     | SLIB                                      |
+----------+----------+-------------------------------------------+
|        1 | customer | org.apache.hadoop.hive.ql.io.orc.OrcSerde |
+----------+----------+-------------------------------------------+
This is a pretty simple table, you will notice the NAME refers to the table
the serializer is used for, and SLIB is the serializer library used when
parsing the file in MinIO.
Our last metadata query is looking at the columns on the table.
SELECT c.*
FROM metastore_db.TBLS t
 JOIN metastore_db.DBS d
  ON t.DB_ID = d.DB_ID
 JOIN metastore_db.SDS s
  ON t.SD_ID = s.SD_ID
 JOIN metastore_db.COLUMNS_V2 c
  ON s.CD_ID = c.CD_ID
WHERE t.TBL_NAME = 'customer'
 AND d.NAME='tiny'
ORDER by CD_ID, INTEGER_IDX;
+-------+---------+-------------+--------------+-------------+
| CD_ID | COMMENT | COLUMN_NAME | TYPE_NAME    | INTEGER_IDX |
+-------+---------+-------------+--------------+-------------+
|     1 | NULL    | custkey     | bigint       |           0 |
|     1 | NULL    | name        | varchar(25)  |           1 |
|     1 | NULL    | address     | varchar(40)  |           2 |
|     1 | NULL    | nationkey   | bigint       |           3 |
|     1 | NULL    | phone       | varchar(15)  |           4 |
|     1 | NULL    | acctbal     | double       |           5 |
|     1 | NULL    | mktsegment  | varchar(10)  |           6 |
|     1 | NULL    | comment     | varchar(117) |           7 |
+-------+---------+-------------+--------------+-------------+
You'll notice that the COLUMNS_V2 table has a foreign key CD_ID to the
SDS storage table. Each key will correlate to a specific table and so you'll
see that the columns are for the customer table. You can now notice the
COLUMN_NAME, TYPE_NAME, and the order these fields are expected in the
INTEGERD_IDX.
So now you have a working understanding of the Hive metastore and the model it uses to store metadata about the files that are generated and written to when inserting using the Hive connector.
Once you complete this tutorial, the resources used for this excercise can be released by runnning the following command:
docker compose down
See trademark and other legal notices.


