- Azure Cloud Credits
- Getting Technical Help
- Functionality
- Azure Setup
- Virtual Machine Deployment
- Sample Run
- Interface for a scheduler
The present coursework is designed for using an Azure virtual machine (VM) as working environment. All students who registered to 70068 have been awarded $100 on Azure. You should have received by now an email notification. If you did not or experienced other problems related to the subscription throughout (e.g., you run out of credits), please contact the lecturer, Giuliano Casale (g.casale@imperial.ac.uk).
If you face technical problems related to Azure or to the tools used in this coursework, please contact the GTA for the first part of the module: Runan Wang (runan.wang19@imperial.ac.uk) and Shreshth Tuli (s.tuli20@imperial.ac.uk). You can also post questions on EdStem.
The scheduling problems in this coursework arise in the context of serverless workflows. These are workflows where jobs are executions of serverless functions. A serveless function is a software component that runs in the cloud, accepting jobs from the external world and returning responses. A scheduling problem arises when functions are hosted inside the same environment (e.g., a virtual machine) and we want to sequence the jobs in order to minimize some performance metrics, such as maximum lateness.
The functions considered in this coursework are imaging processing functions, for example filters that mix the content of an image with the style of another image. It is not essential to understand what the functions do in order to do the coursework, but if you want to read more about them please check here and this link.
To do the coursework, the functions need first to be deployed using Azure, by first creating an Azure VM on which to run the coursework.
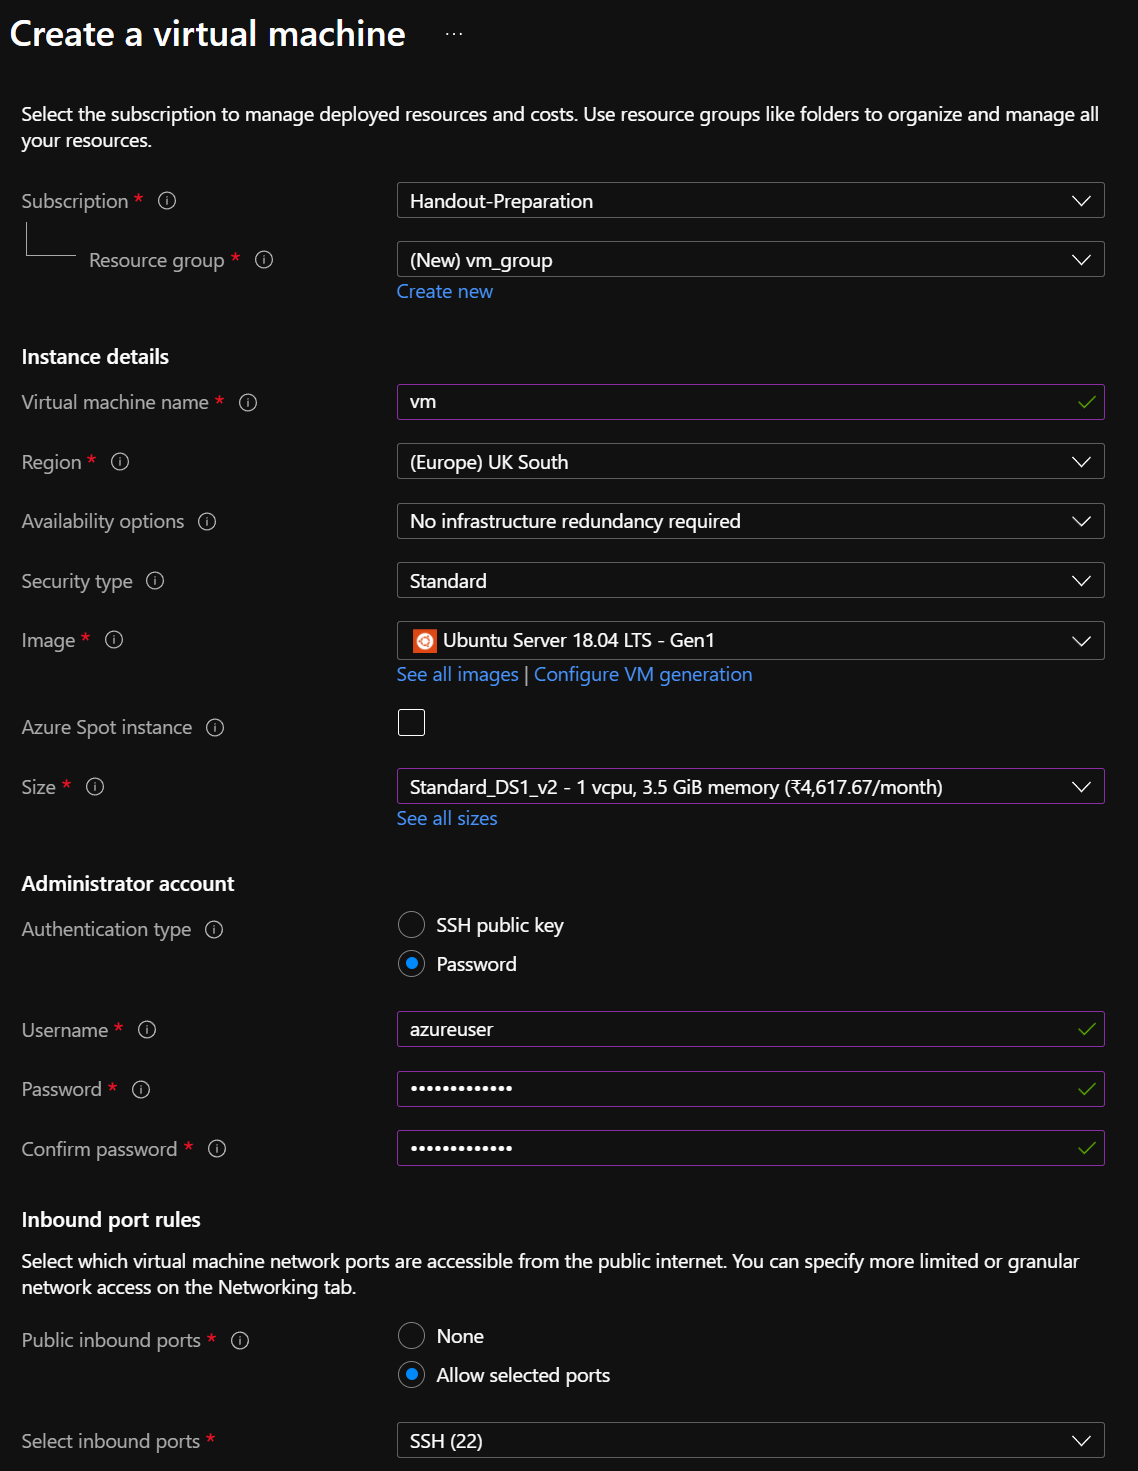
First, sign into the Azure portal. Type virtual machines in the search bar. Under Services, select Virtual machines. In the Virtual machines page, select Create. The "Create a virtual machine page" will then open.
- Select "Coursework2 <Your Name>".
- Create a resource group "coursework".
- Set virtual machine name as "vm"
- Set region as "(Europe) UK South".
- Image as "Ubuntu 18.04 LTS Gen1".
- Size: Standard_DS1_v2 (1 vcpu).
- Authentication type: Password.
- Username: "azureuser".
- Enter a custom password.
Pay attention in particular to choose a Generation 1 (Gen 1) machine, and Ubuntu 18.04, neither of which is the default. Using Ubuntu 20.04, for example, will break the execution of some of the tools supplied with the coursework.
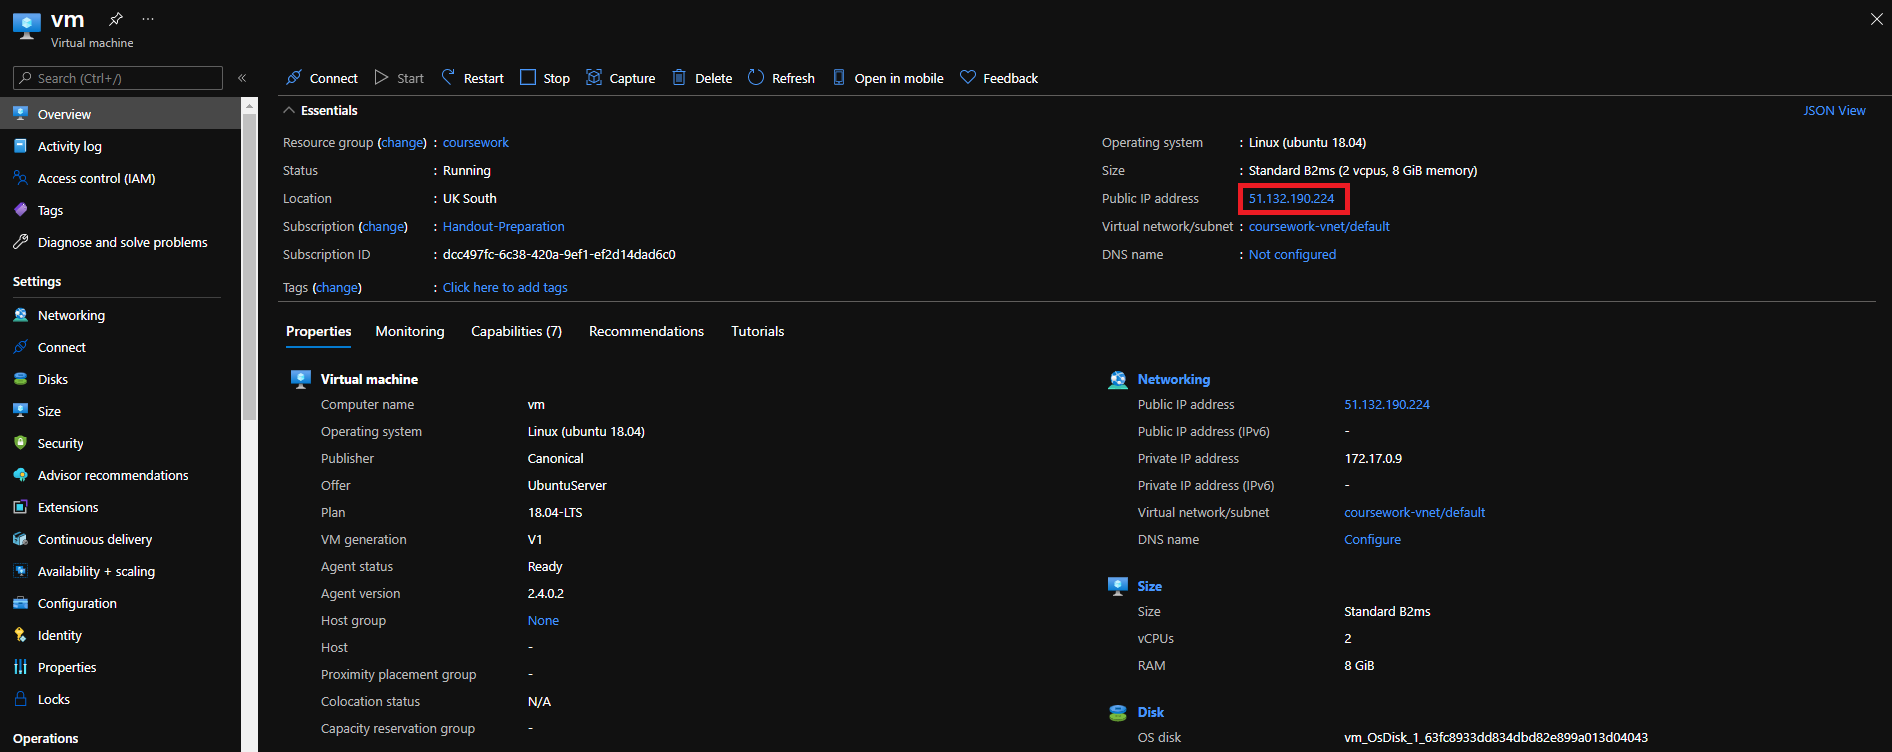
Click on "Review+Create" -> "Create". Once deployed, click "Go to resource". Copy the Public IP address of the VM as shown below. We shall refer to this as <public_ip>.
We will be using Microsoft Azure services to deploy a serverless function on the Azure Functions platform, and virtual-machine on Azure VM, and run from there the ONNX-based application. To do this, we need first to install Azure CLI and Azure Function Tools for local execution. We also need to install and sign in with Azure CLI using the az login command.
# SSH into the vm and enter password when prompted
ssh azureuser@<public_ip>

# clone git repo
git clone https://gitlab.doc.ic.ac.uk/gcasale/70068-cwk-ay2021-22.git
mv 70068-cwk-ay2021-22/ WorkflowSchedulingCwk/
cd WorkflowSchedulingCwk

# install Azure CLI
curl -sL https://aka.ms/InstallAzureCLIDeb | sudo bash

# install Azure Function Tools
sudo chmod +x install.sh && ./install.sh

# login with azure account (follow instructions after entering the command below)
az login

# deploy another single-core VM
python3 deployazure.py

# run functions
./funcstart.sh
The deployazure.py opens the required ports for the Azure Functions. If you suspend and restart your VM you would need to rerun the last three commands.
You can check the deployment of Azure Functions using instructions below.
To test if your functions are deployed on a <public_ip> use the following command.
# execute the onnx test run for VM
http http://<public_ip>:7071/api/onnx @tutorial/babyyoda.jpg > output.jpgThis example output is shown here: httpie.
To get processing times of the jobs run:
python3 gettimes.py --runs 3We have created a sample DAG that have some visualizations in the dag folder. The DAG with the due dates is used as an input for the scheduler as in the inputs.json file. Here the workflows consist of the DAG, where edges specify precedences and due dates are given for each node. From this your scheduler needs to generate an output .json file that is the schedule for each workflow in the input file. The intermediate results of execution are saved in the temp folder. You can convert a schedule in a CSV format to JSON using the following command. You are given sinit.csv as an initial example. To generate a sinit.json file, run:
python3 convert.py --fname sinitOnce you have obtained with your code the schedules for LCL and Tabu search, enter them in a CSV file and use the convert.py tool to convert them into corresponding JSON files, e.g., lcl.json (for LCL) and tabu.json (for Tabu search). You are also given the sinit.json as an example on how to encode the schedule in question Q4 in the CSV file. To run your scheduler's output, you can now run:
python3 main.py --runs 3 --scheduler <fname>Here, <fname> is the name of the output JSON file, for instance sinit. In ZIP file, you will only need to submit the LCL schedule as lcl.json file and Tabu Search schedule as tabu.json file. You also need to submit READMEs as README_lcl.txt and README_tabu.txt. Your submitted ZIP file should contain the above mentioned four files with additional files for code implementations.
Please contact in first instance Shreshth Tuli or Runan Wang. Azure credit-related queries should be directed to the lecturer Giuliano Casale.


