Table of contents
- About the Application
- Technology and Knowledge
- Installation
- UML of this project
- Contributors
- References
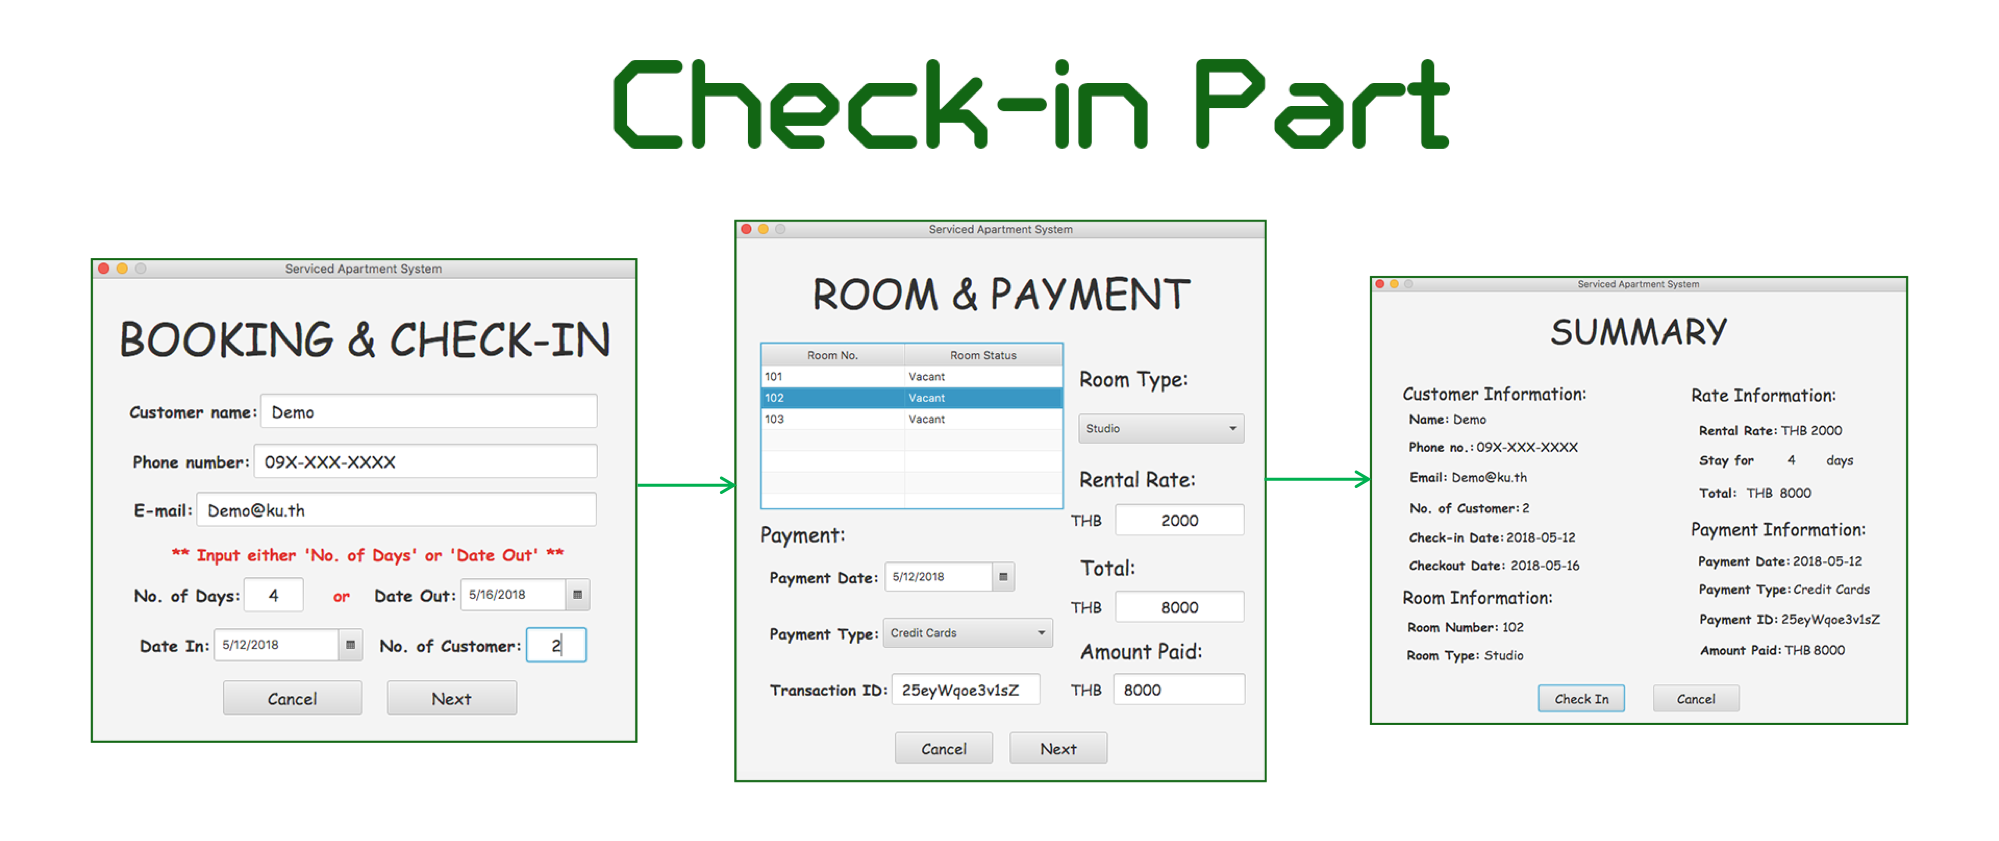
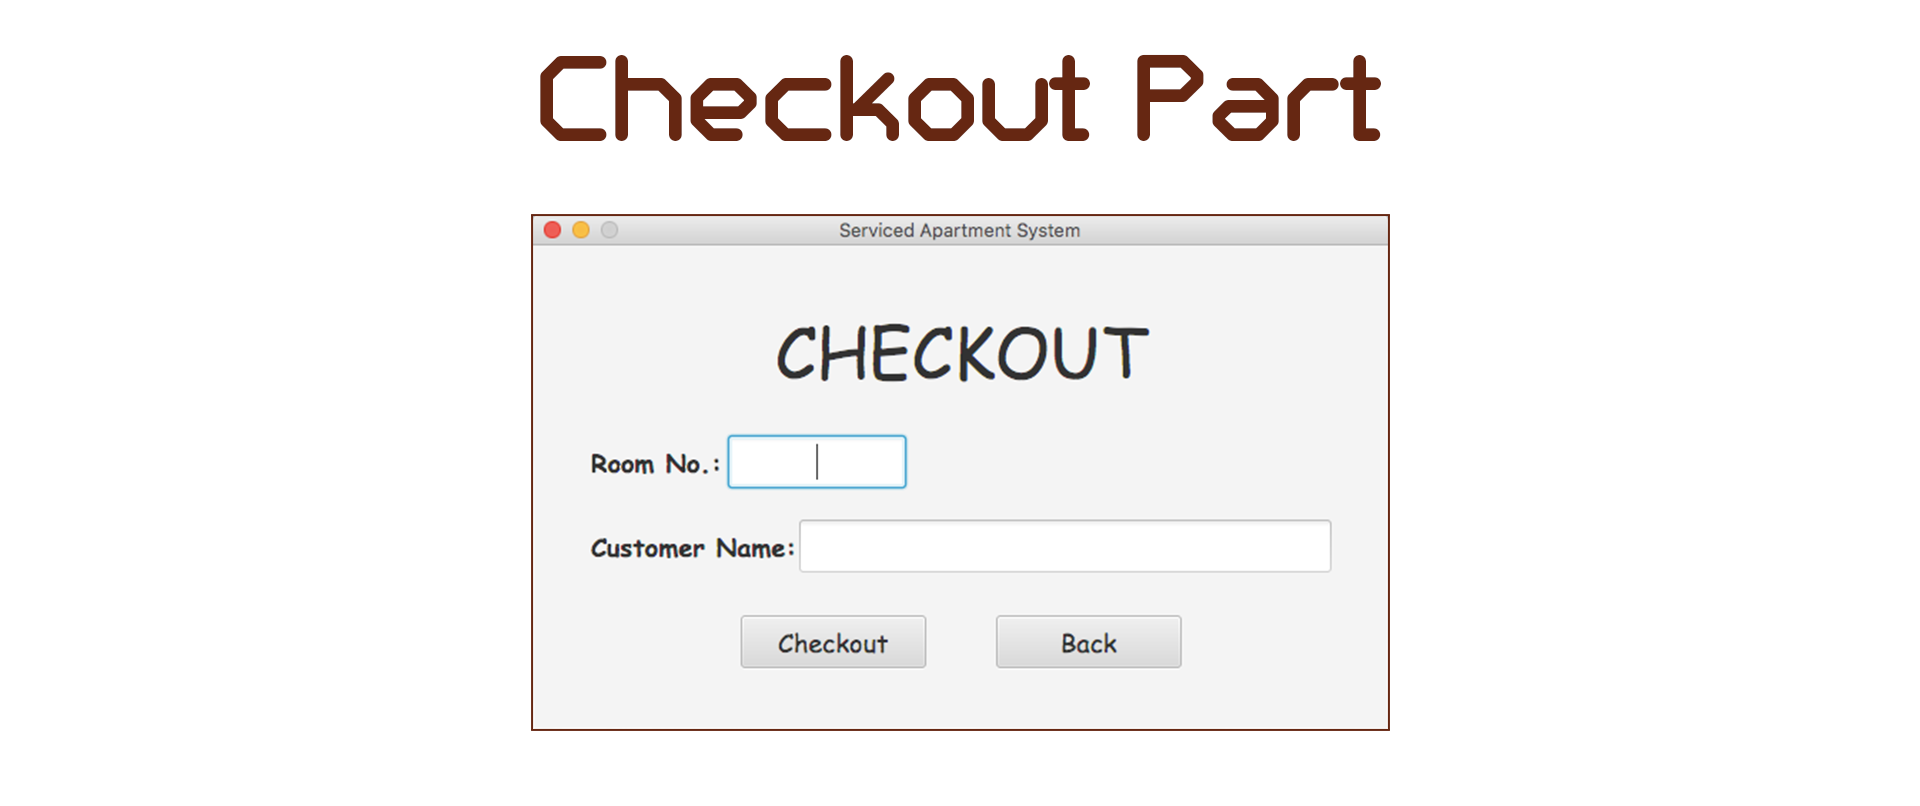
Serviced Apartment System is an application that will be used by clerks, administrators or owners of any serviced apartment with four types of room (Studio, 1-Bedroom, 2-Bedroom and 3-Bedroom). This application can be separated into three main parts: Check-in, Check-out and Administrator part.
The following steps will be done by the clerk:
- Fill in the required information in the Booking & Check-in page
- Fill in customer's room type and payment information in the Room & Payment page
- Press the
Check Inbutton in the Order Summary page. The order information will be saved in the database.
The clerk fill in customer's name and room number in the Check-out page. If the values exist in the database, the check-out is successful and the room status will be marked as vacant.
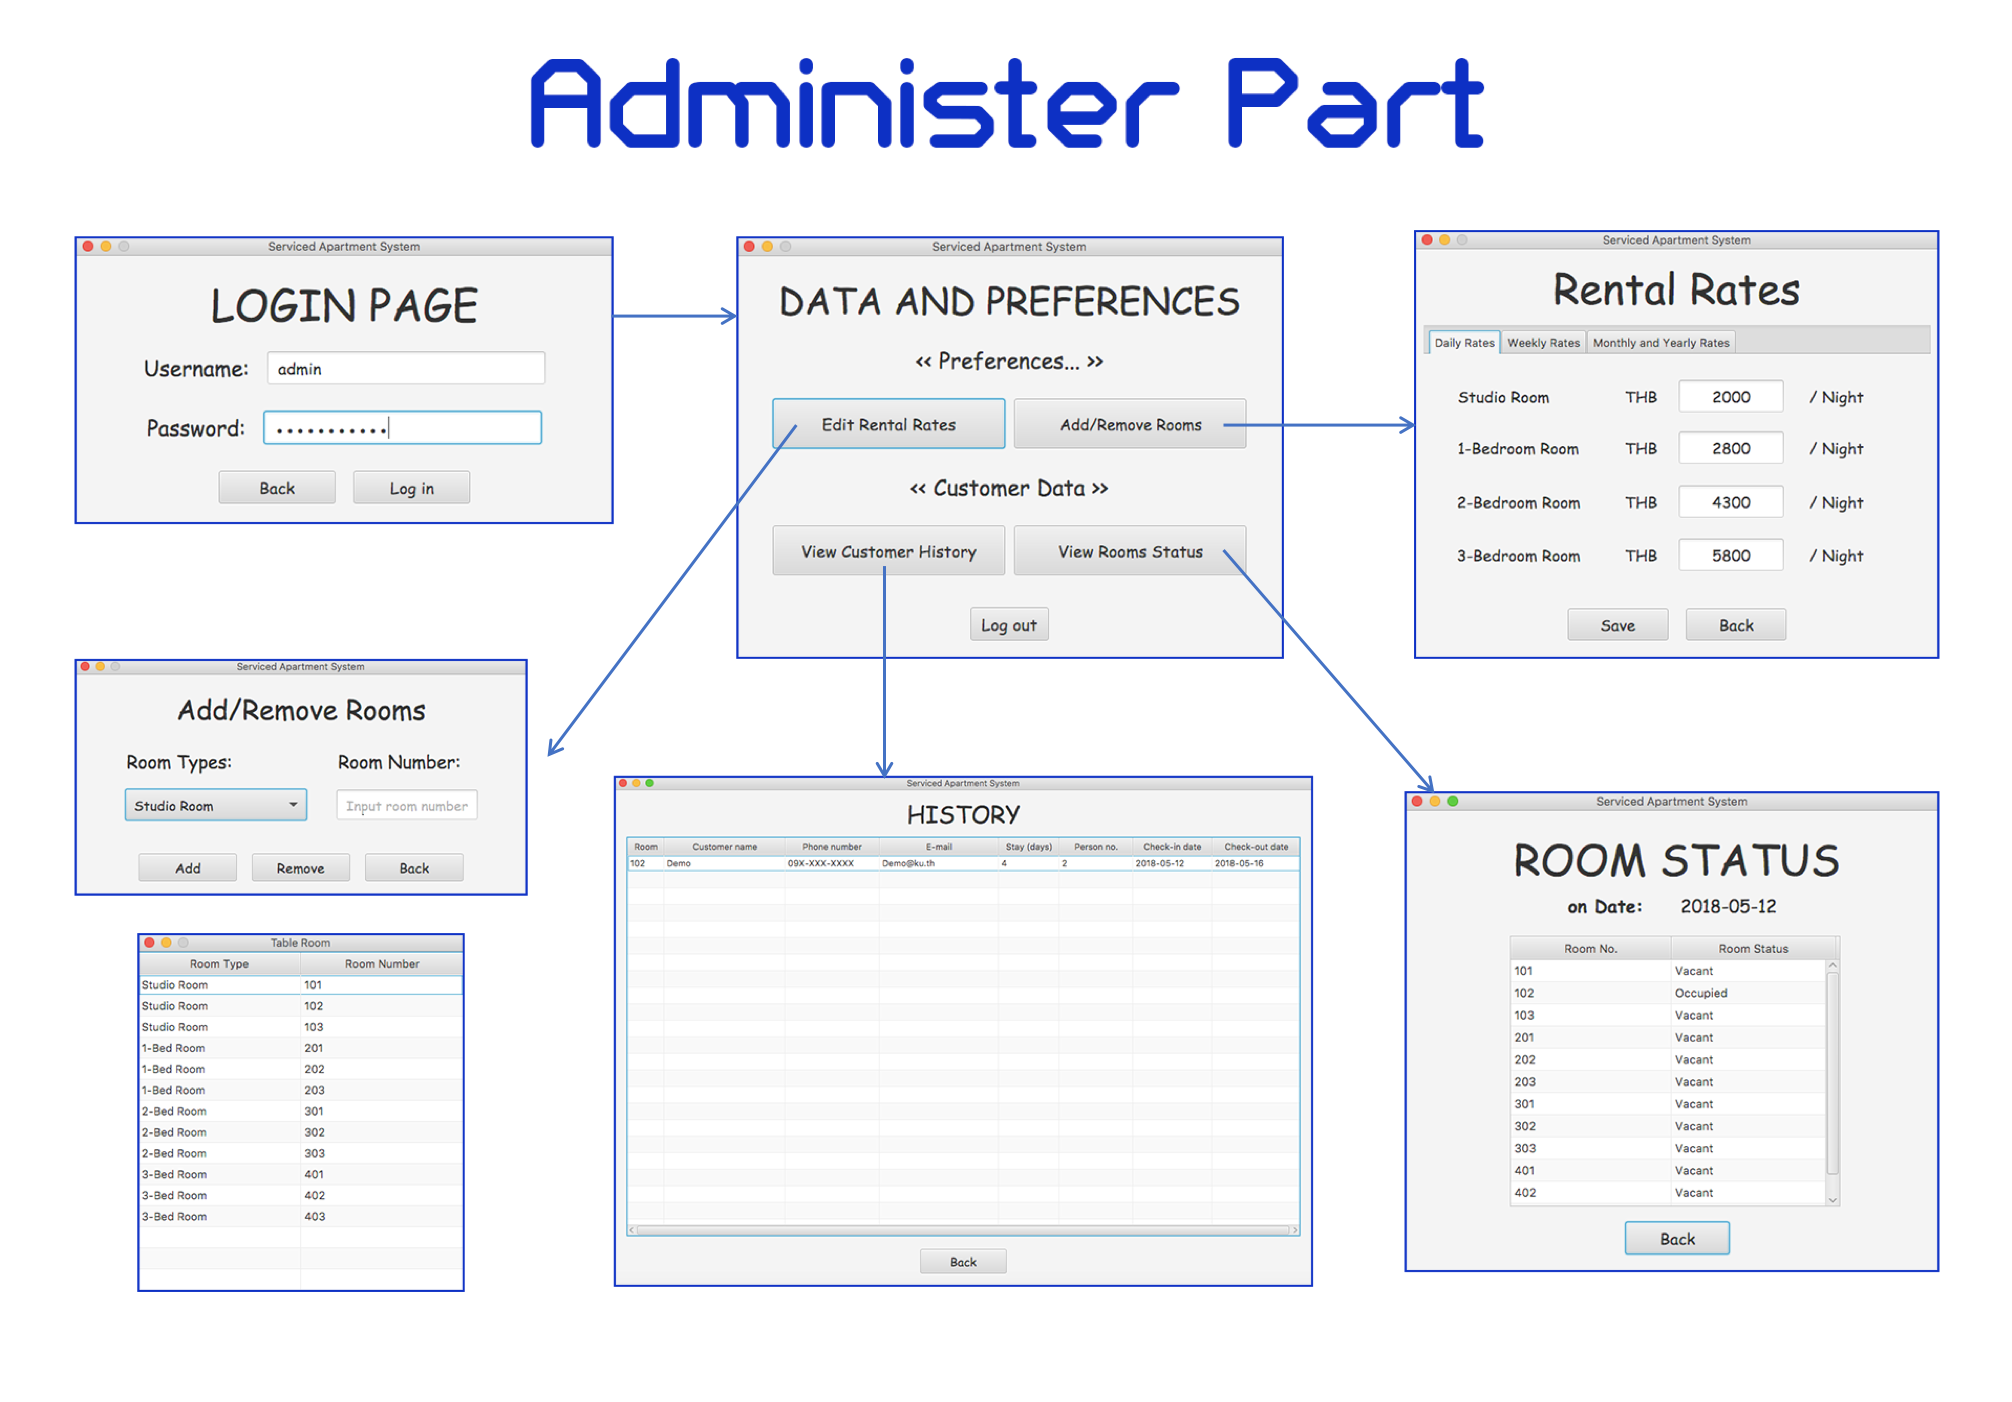
Only admin users are allowed to access this part. The admin user needs to log in using their username and password. This part allows admins or owners to:
- Edit room rates
- Add/remove rooms
- View room status by day
- View order history
Demo username and password
| Username | Password |
|---|---|
| admin | 123456admin |
- checkin - Contains controller classes and user interface documents for check-in part.
- checkout - Contains controller class and user interface document for checkout part.
- data - Contains classes that related to received data and other useful classes.
- dataandpreferences - Contains controller classes and user interface documents for administer part.
- database - Contains class about database.
- home - Contains controller class and user interface document for home part.
ThreeTen-Extra provides additional date-time classes that complement those in JDK 8 because not every piece of date/time logic is destined for the JDK. Some concepts are too specialized or too bulky to make it in. This project provides some of those additional classes as a well-tested and reliable jar.
In our project, we've used Interval class which represents the time on the time-line between two Instants (start and end instants) and other useful methods to check that the time is overlap or not to give a state to rooms.
This is some code sample from our project:
public boolean checkOverlap(String startA, String endA, String startB, String endB) {
	// create start/end instants and first interval.
	Instant instantStartA = Instant.parse(startA);
	Instant instantEndA = Instant.parse(endA);
	Interval A = Interval.of(instantStartA, instantEndA);
	// create another start/end instants and second interval.
	Instant instantStartB = Instant.parse(startB);
	Instant instantEndB = Instant.parse(endB);
	Interval B = Interval.of(instantStartB, instantEndB);
	// use the intervals to check date/time overlap.
	return A.overlaps(B) || A.encloses(B) || B.encloses(A) || A.equals(B);
}
For more information about ThreeTen-Extra:
We chose to store data in a database instead of a file because database supports query, provides fast data access, and is able to handle large amount of data.
- CREATE DATABASE creates a new database.
CREATE DATABASE database_name;- CREATE TABLE creates a new table in the database. It allows you to specify the name of the table and the name of each column in the table.
CREATE TABLE table_name (column_1 datatype, column_2 datatype, column_3 datatype);- INSERT INTO statements are used to add a new row to a table.
INSERT INTO table_name (column_1, column_2, column_3)
VALUES (value_1, 'value_2', value_3);- DELETE statements are used to remove rows from a table.
DELETE FROM table_name
WHERE some_column = some_value;- DROP DATABASE statement is used to drop an existing SQL database. (Note: Be careful before dropping a database. Deleting a database will result in loss of complete information stored in the database!)
DROP DATABASE database_name;- SELECT statements are used to fetch data from a database. Every query will begin with SELECT.
SELECT column_name FROM table_name;- UPDATE statements allow you to edit rows in a table.
UPDATE table_name
SET some_column = some_value
WHERE some_column = some_value;- WHERE is a clause that indicates you want to filter the result set to include only rows where the following condition is true.
SELECT column_name(s)
FROM table_name
WHERE column_name operator value;
In our project, we've chosen SQLite because it's small, fast, reliable and simplicity. Moreover, there's no intermediary server process because SQLite is serverless so the process that wants to access the database reads and writes directly from the database files on disk. We connected the SQLite database by using SQLite JDBC (Java Database Connectivity) Driver.
This is some example from our project:
import java.sql.*;

private final String url = "jdbc:sqlite:CustomerLog.db";

public void createDatabase() {
	// try to open a connection.
	try (Connection connect = DriverManager.getConnection(url)){
		if(connect != null) {
			// create a statement.
			Statement stm = connect.createStatement();
			String sqlRoom = "CREATE TABLE Rooms "
					+ "(ROOM_ID		INTEGER PRIMARY KEY,"
					+ "ROOM_NUMBER	VARCHAR(5),"
					+ "TYPE_ID		INT);";
			// executes the given SQL statement.
			stm.executeUpdate(sqlRoom);
			// close statement and connection.
			stm.close();
			connect.close();
		}
	} catch(SQLException e) { }
}
We also used Prepared Statement when insert the data into the database because it can accept bind variables, preventing SQL injection and formatting portability.
This is some example from our project:
public void insertDataToRooms(RoomInfo room) {
	try(Connection connect = DriverManager.getConnection(url)){
		connect.setAutoCommit(false);
		if(connect != null) {
			// set prepared statement,
			String data = "INSERT INTO Rooms (ROOM_NUMBER, TYPE_ID) VALUES (?, ?);";
			PreparedStatement pstm = connect.prepareStatement(data);
			// set bind variables.
			pstm.setString(1, room.getRoomNumb());
			pstm.setInt(2, room.getTypeId());
			// execute statement in PreparedStatement object.
			pstm.executeUpdate();
			// close statement and connection.
			pstm.close();
			connect.commit();
			connect.close();
		}
	} catch(SQLException e) { }
}
For more information about SQLite:
- Documentation: https://www.sqlite.org/docs.html
- Website: https://www.sqlite.org/index.html
- See also: https://docs.oracle.com/javase/tutorial/jdbc/basics/index.html
In our project, we decided to show order's history or room number with room's status by put those information in form of table to make them easy to see.
To do that we need TableView which designed to visualize an unlimited number of rows of data, broken out into columns. A TableView is made up of a number of TableColumn instances. Each TableColumn in a table is responsible for displaying the contents of that column.
This is the code sample from JavaFx API for create a TableView:
 ObservableList<Person> teamMembers = ...;
 table.setItems(teamMembers);

 TableColumn<Person,String> firstNameCol = new TableColumn<Person,String>("First Name");
 firstNameCol.setCellValueFactory(new PropertyValueFactory("firstName"));
 TableColumn<Person,String> lastNameCol = new TableColumn<Person,String>("Last Name");
 lastNameCol.setCellValueFactory(new PropertyValueFactory("lastName"));

 table.getColumns().setAll(firstNameCol, lastNameCol);
Note: This example and our project used an ObservableList because it is the simplest way of showing data in a TableView.
See also:
- Documentation for TableView: https://docs.oracle.com/javase/8/javafx/api/toc.htm
- Documentation for TableColumn: https://docs.oracle.com/javase/8/javafx/api/toc.htm
- Singleton Pattern: Use for data manager which will do all activities that related with database.
- Observer Pattern: Use to show an update after the administer(owner) add/remove room in Administer part.
To run this application, your computer need
- Java version 8 or newer
- Serviced Apartment Application.jar file
- Download a runnable JAR file named 'Serviced Apartment Application.jar' or 'Serviced Apartment System.zip' from the links below.
- Run 'Serviced Apartment Application.jar' file.
Download links:
- JAR file: Serviced Apartment Application.jar
- ZIP file: Serviced Apartment System.zip
- Download a ZIP file of this project from a link below then extract the file and open in your IDE.
- Add the Referenced Libraries (can be download from the links below).
- Run 'Main.java' class.
Download links:
- Kunyaruk Katebunlu (ID: 6010545692)
- Thanaphon Keawjam (ID: 6010545781)
Note: This program is a final project of Object Oriented Programming II Course which created by students in Faculty of Software and Knowledge Engineering, Kasetsart University.


