Info: This tutorial is likely outdated. For an up-to-date version of how to set up an AP visit the official Raspberry Pi Documentation:
RouteryPi is a WiFi access point originally based on the Raspberry Pi Zero W combined with a custom case and some status LEDs. The project has since expanded to helping users set up a WiFi access point (AP). This repo is aimed at working with Raspberry Pi OS, alternatively you could also use OpenWrt to achieve the same things (see https://openwrt.org/toh/raspberry_pi_foundation/raspberry_pi).
Note however, that using a Raspberry Pi as your main AP can be a real bottleneck for your network. In the past all Raspi models had rather bad networking features, fortunately, this changed with the Pi 4. It features an even faster CPU and more RAM than any previous model and most importantly has 2.4 and 5GHz WiFi ac and Gigabit Ethernet! You can even run the Pi over PoE with the proper header.
This will run on pretty much any Raspberry Pi generation aiming at the newer ones with onboard WiFi, however this probably also works with any compatible WiFi and LAN dongle.
To get the best performance possible I recommend you to use the Raspberry Pi 4 for all the before mentioned networking features. Nevertheless, this also works without a problem on a Pi Zero W for example, networking speeds will be slower though.
This build uses the latest version of Raspberry Pi OS which is based on Debian Buster. You can download it on the official Raspberry Pi website, at https://www.raspberrypi.org/downloads/raspberry-pi-os/. I guess you already know how to flash the image onto the SD Card - if you don't however, have a look at this tutorial: https://www.raspberrypi.org/documentation/installation/installing-images/
The heart of this whole installation will be 'hostapd' and 'bridge-utils' because we will be using the Pi as a network bridge between the LAN and WiFi. This means that you will need an additonal DHCP and DNS server. Nevertheless, this simplifies the whole installation a lot and makes it less error-prone. If you already have a router (which I assume you do) you can connect it to your RouteryPi and everything will work out of the box.
You will need no additional drivers at all!
Preparation
The first step is, obviously, to install the image onto the uSD Card and booting it up. The first boot usually takes longer than a normal startup because the Pi has to do first time stuff like generating new SSH keys and so on.
Then use sudo raspi-config to configure the Pi to your likings.
Now update it using sudo apt update && sudo apt full-upgrade - once it's done reboot it and we'll start with the actual AP installation.
AP setup
Firstly, install hostapd and bridge-utils with the following command.
sudo apt install hostapd bridge-utils
Now comes the important part. The next step is editing the hostapd.conf.
sudo nano /etc/hostapd/hostapd.conf
If the file is not empty just delete it's content. We will be using a custom config anyways. The minimal config that you should use looks like that:
# Bridge mode
bridge=br0

# Networking interface
interface=wlan0

# WiFi configuration
ssid=RouteryPi
channel=1
hw_mode=g
country_code=US
ieee80211n=1
ieee80211d=1
wmm_enabled=1

# WiFi security
auth_algs=1
wpa=2
wpa_key_mgmt=WPA-PSK
rsn_pairwise=CCMP
wpa_passphrase=SomeStrongPassword
Just paste the text into the hostapd config file, edit country_code=US to your country, save it and you're good to go.
You should then update wpa_passphrase to your custom WiFi password and optionally channel to another WiFi channel.
To create and use the network bridge we only have to edit one more file. Now edit the network interfaces file like that:
sudo nano /etc/network/interfaces
Delete anything that's in here and paste the following configuration:
auto lo
iface lo inet loopback

# Ethernet
auto eth0
allow-hotplug eth0
iface eth0 inet manual

# WiFi
auto wlan0
allow-hotplug wlan0
iface wlan0 inet manual
wireless-power off

# Bridge
auto br0
iface br0 inet dhcp
bridge_ports eth0 wlan0
bridge_fd 0
bridge_stp off
This will result in the Pi using DHCP which means it can be used in any existing network. The downside of this is that you have to find out the IP address if you want to, let's say, use SSH. You could use a static IP address by changing the br0(!) interface config a little bit - just google 'static ip raspberry pi'. (For the lazy: https://duckduckgo.com/?q=static+ip+raspberry+pi)
Final steps
After you did a quick reboot using sudo reboot, you can start testing the whole thing. To test the hostapd config use this command: sudo hostapd /etc/hostapd/hostapd.conf. Note: If it does exit without you doing something, then there is something wrong with it. To go into debug mode use sudo hostapd -dd /etc/hostapd/hostapd.conf.
While testing the hostapd config you can also try connecting as a client. If you've done everything correctly you should be able to do so without any problems.
To enable hostapd to run upon boot you have to edit one last file.
sudo nano /etc/default/hostapd
Now paste this text into the file and save it:
RUN_DAEMON=yes
DAEMON_CONF="/etc/hostapd/hostapd.conf"
You're ready to go! From now on hostapd will start whenever your Pi boots up.
Some users reported issues with the above mentioned method of autostarting hostapd. From hostapd's side this should all work, but for some reason it looks like Raspbian doesn't like that anymore. The latest workaround is to paste the following commands to overwrite Raspbian's default masking of hostapd. See issue #5 for more info.
sudo systemctl unmask hostapd
sudo systemctl enable hostapd
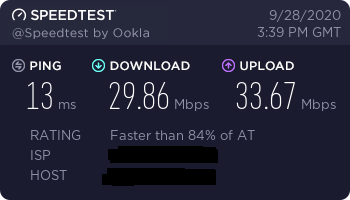
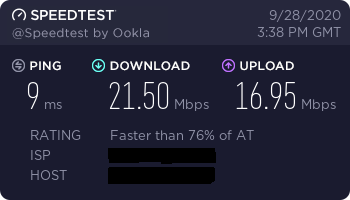
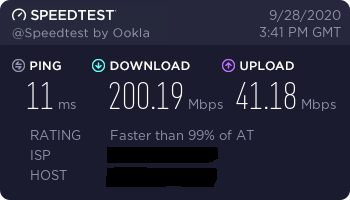
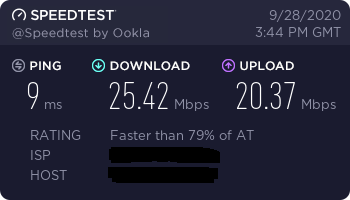
sudo systemctl start hostapdI did some speed tests with my Raspberry Pi 4 and I have to admit I'm still very disappointed. Although the Pi features dual band wifi and gigabit ethernet the speeds really aren't outstanding. Maybe I did something wrong, however the fact that it's working leads me to believe that these results are what you get...
If you get different speed results, please let me know.
2.4 GHz Test Router VS Pi:
5 GHz Test Router VS Pi:
-
You could add an automatic speedtest with speedtest-cli-extras by utilizing crontab and outputting the results in a file. You'll have more convincing arguments when contacting your ISP in case something's not working again ;)
-
You could remove some unused software from your pi to decrease the disk size even more - although this will only clean up some 10s of MBytes. Raspbian Lite is already pretty slim. Stuff you could remove would be e.g. vim-common, triggerhappy, bluez and so on. You can get a list of all installed packages by typing
apt list --installed. Don't forget to dosudo apt autoremoveafterwards! -
You could also solder an external antenna onto the Pi if you aren't satisfied with it's range. The Pi Zero W has tiny solder pads for soldering a U.FL RF connector. Together with a small adapter cable you could use your standard WiFi antennas. You can read into this with a nice tutorial like this one: https://www.briandorey.com/post/raspberry-pi-zero-w-external-antenna-mod
-
Security related (OLD): Raspbian Stretch or newer is no longer vulnerable to the WPA2 Krack attack. Since the system got patched you are totally safe with using any Raspberry Pi as AP or client as long as all your other devices are secure. So please always update your system!


