github:https://github.com/ActivePeter/carLineDetect
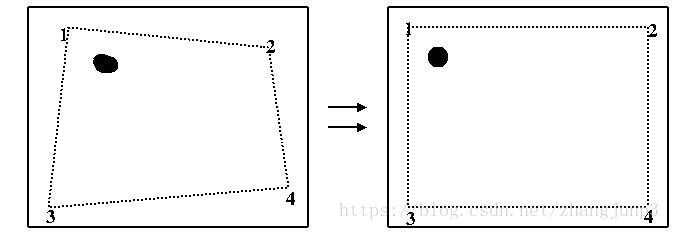
getPerspectiveTransform 通过该函数可以将图像变换到正交视图下,可以排除一部分路面外的干扰,并且易于分析曲率。
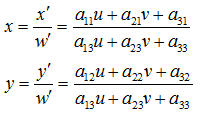
u,v是原始图片左边,对应得到变换后的图片坐标x,y,其中。
变换矩阵


所以可以理解成仿射等是透视变换的特殊形式。经过透视变换之后的图片通常不是平行四边形(除非映射视平面和原来平面平行的情况)。
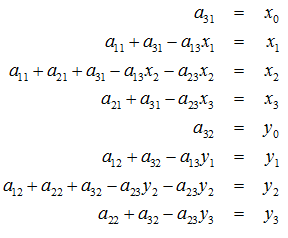
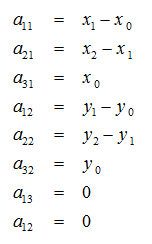
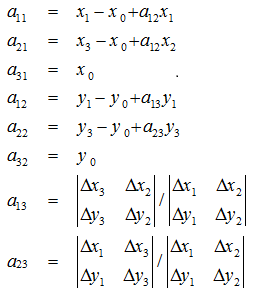
所以,已知变换对应的几个点就可以求取变换公式。反之,特定的变换公式也能新的变换后的图片。简单的看一个正方形到四边形的变换:
求解出的变换矩阵就可以将一个正方形变换到四边形。反之,四边形变换到正方形也是一样的。于是,我们通过两次变换:四边形变换到正方形+正方形变换到四边形就可以将任意一个四边形变换到另一个四边形。
1.创建映射点数组
Point2f src_vertices[4];//从原图中选择出需要识别的透视区域,用于变换
    src_vertices[0] = Point(src.size().width/2-halfFarW,H1);
    src_vertices[1] = Point(src.size().width/2+halfFarW, H1);
    src_vertices[2] = Point(src.size().width/2-halfCloseW, H2);
    src_vertices[3] = Point(src.size().width/2+halfCloseW, H2);


    Point2f dst_vertices[4];//设置透视区域变换后的区域
    dst_vertices[0] = Point(200, 0)+Point(20, 20);
    dst_vertices[1] = Point(640, 0)+Point(20, 20);
    dst_vertices[2] = Point(200, 1080);
    dst_vertices[3] = Point(640, 1080);
2.透视变换
Mat M = getPerspectiveTransform(src_vertices, dst_vertices);//透视变换矩阵
    Mat dst(1080, 840, CV_8UC3);//变换后的区域

	Mat binery,lab,gray,grayToBinary,hls;

warpPerspective(src, dst, M, dst.size(), INTER_LINEAR, BORDER_CONSTANT);//变换仅考虑一般路面容易出现的黄色线和白色线,黄色线使用lab色域进行筛选,白色线使用rgb或hls色域进行筛选。
inRange(hls, Scalar(0, 232, 150), Scalar(255, 255, 255), binery);
使用inrange函数可以实现对颜色在三个维度内的筛选,并且二值化。
1.创建不同色域图片变量
Mat binery,lab,gray,grayToBinary,hls;2.转换色域
cvtColor(dst, gray, COLOR_BGR2GRAY);//获取灰度图
	cvtColor(dst, lab, cv::COLOR_BGR2Lab);//获取lab图
	cvtColor(dst, hls, cv::COLOR_BGR2HLS);
3.二值化
inRange(hls, Scalar(0, 232, 150), Scalar(255, 255, 255), binery);findContours
使用findContours函数可以寻找色块的轮廓。根据轮廓组成的点,我们可以提取出色块线条的大致点序列。以便用于后面的拟合
std::vector<std::vector<Point> > vec_p;

		std::vector<Vec4i> vec_4f;
	findContours(binery, vec_p, vec_4f,CV_RETR_EXTERNAL, CHAIN_APPROX_SIMPLE, Point(0, 0));


	std::vector<Point> keyPoints;//储存经过过滤的 线段的关键顶点,用于拟合

	for(int i=0;i<vec_p.size();i++){
		if(fabs(arcLength(vec_p.at(i),true)) > 216){//周长限制
			Point max=vec_p.at(i).at(0);
			Point min=vec_p.at(i).at(0);
			for(int j=1;j<vec_p.at(i).size();j++){//寻找端点
				if(vec_p.at(i).at(j).y>max.y){
					max=vec_p.at(i).at(j);
				}
				if(vec_p.at(i).at(j).y<min.y){
					min=vec_p.at(i).at(j);
				}
			}
			if((max.x-min.x)*(max.x-min.x)+(max.y-min.y)*(max.y-min.y)>8000){//长度限制
				circle(dst2, min, 7, Scalar(255, 0, 255), CV_FILLED, CV_AA);
				circle(dst2, max, 7, Scalar(255, 255, 0), CV_FILLED, CV_AA);

				// keyPoints.push_back(max);
				// keyPoints.push_back(min);
				keyPoints.push_back(Point(max.y,max.x));
				keyPoints.push_back(Point((min.y+max.y)/2,(min.x+max.x)/2));
				keyPoints.push_back(Point(min.y,min.x));
			}
			//drawContours(dst2, vec_p,i, Scalar(255, 255, 100),23);
		}
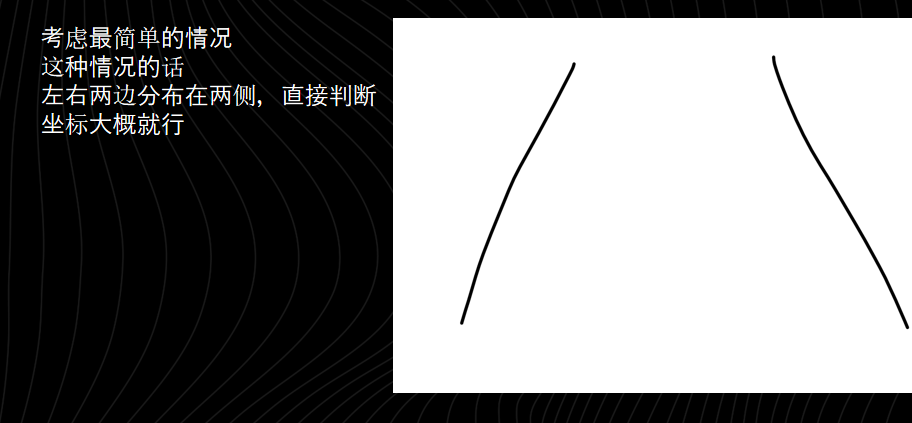
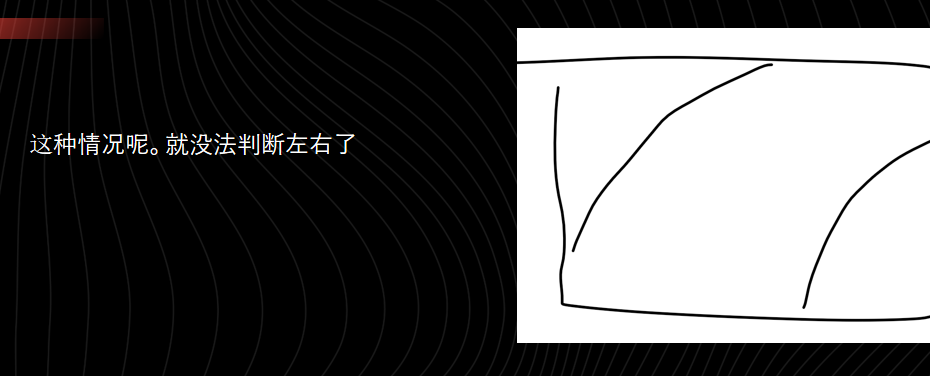
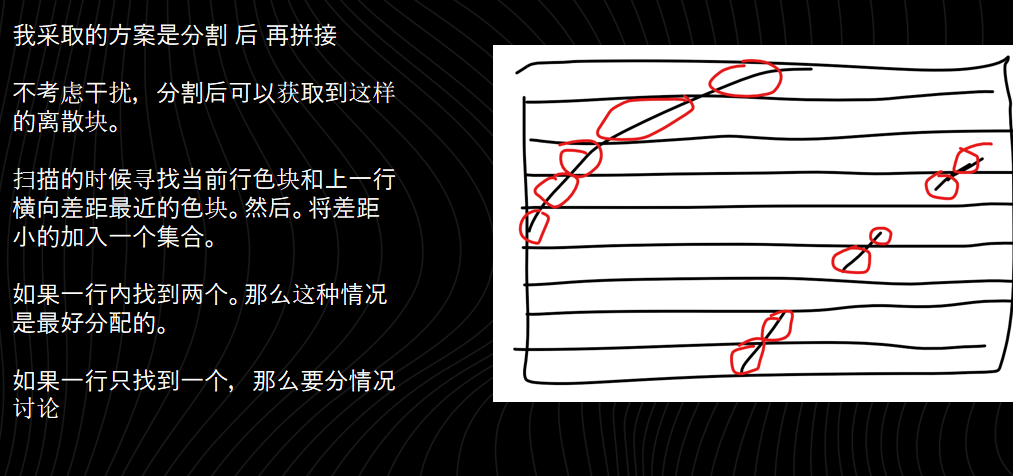
}遍历中根据相邻距离。区分色块是否为同一车道线
由于后面测试视频中色块过于离散,我还没有能力实现作区分的算法。
原来的视频中是实现了的。
基本原理:幂函数可逼近任意函数。
上式中,N表示多项式阶数,实际应用中一般取3或5;
假设N=5,则:
共有6个未知数,仅需6个点即可求解;
Y的维数为[R*1],U的维数[R * 6],K的维数[6 * 1]。
R> 6时,超定方程求解:
Mat polyfit(vector<Point>& in_point, int n)//
{
	int size = in_point.size();
	//所求未知数个数
	int x_num = n + 1;
	//构造矩阵U和Y
	Mat mat_u(size, x_num, CV_64F);
	Mat mat_y(size, 1, CV_64F);
    for (int i = 0; i < mat_u.rows; ++i)
        for (int j = 0; j < mat_u.cols; ++j)
        {
            mat_u.at<double>(i, j) = pow(in_point[i].x, j);
        }

    for (int i = 0; i < mat_y.rows; ++i)
    {
        mat_y.at<double>(i, 0) = in_point[i].y;
    }

    //矩阵运算,获得系数矩阵K
    Mat mat_k(x_num, 1, CV_64F);
    mat_k = (mat_u.t()*mat_u).inv()*mat_u.t()*mat_y;
    //cout << mat_k << endl;
    return mat_k;
}
for (int i = keyPoints.back().x; i < keyPoints.front().x; ++i)
		{


			Point2d ipt;
			ipt.y = i;
			ipt.x = 0;
			for (int j = 0; j < n + 1; ++j)
			{
				ipt.x += mat_k.at<double>(j, 0)*pow(i,j);
			}
			if(i!=keyPoints.front().x){//weifen,用于曲率计算
				double dy=ipt.x-lasty;
				if(i!=keyPoints.front().x+1){
					double ddy=dy-lastdy;
					theata+=ddy/pow((1+dy*dy),3/2);
					theata_count++;
				}
				lastdy=dy;
			}
			lasty=ipt.x;
			circle(dst2, ipt, 7, Scalar(255, 255, 0), CV_FILLED, CV_AA);
			//circle(lab, pointArr[i], 3, cv::Scalar(0, 255, 0),3);
		}
每遍历一个点和上一个点作差,即为y',此次求得的y‘和上一次求得的y’作差,即为y‘’,每次遍历可以计算一次,求和并且计数,最后在循环外取平均即可。
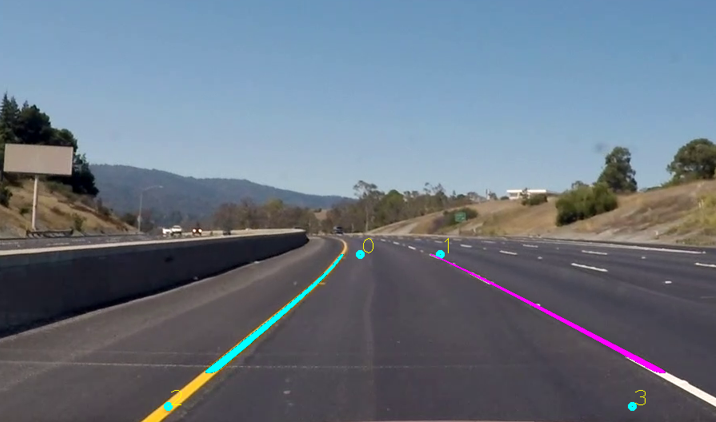
现将线条绘制到一张透视变换后一样大的黑色图里,将其逆透视变换回原图。然后在创建一个他的拷贝并进行二值化用于作为遮罩。然后使用二值化图对其进行剔除来绘制到原图
Mat M2 = getPerspectiveTransform(dst_vertices, src_vertices);//用于变换回原图

warpPerspective(dst2, mask, M2, mask.size(), INTER_LINEAR, BORDER_CONSTANT);//变换

Mat binary2;
cvtColor(mask, binary2, CV_BGR2GRAY);//转黑白
//imshow("binary2", binary2);
threshold(binary2,binary2, 50, 255, THRESH_BINARY);//二值化
mask.copyTo(src,binary2);//剔除遮罩未实现区分较为离散的车道线算法。
#include "ros/ros.h"
#include "std_msgs/String.h"

#include<cv_bridge/cv_bridge.h>
#include<sensor_msgs/image_encodings.h>
#include<image_transport/image_transport.h>

#include<opencv2/opencv.hpp>
#include<opencv2/highgui/highgui.hpp>
#include<opencv2/imgproc/imgproc.hpp>

#include <sstream>


using namespace cv;
using namespace std;

/**
 * This tutorial demonstrates simple sending of messages over the ROS system.
 */
int main(int argc, char *argv[])
{
	/**
	 * The ros::init() function needs to see argc and argv so that it can perform
	 * any ROS arguments and name remapping that were provided at the command line.
	 * For programmatic remappings you can use a different version of init() which takes
	 * remappings directly, but for most command-line programs, passing argc and argv is
	 * the easiest way to do it.  The third argument to init() is the name of the node.
	 *
	 * You must call one of the versions of ros::init() before using any other
	 * part of the ROS system.
	 */
	ros::init(argc, argv, "videoShow_pub");

	/**
	 * NodeHandle is the main access point to communications with the ROS system.
	 * The first NodeHandle constructed will fully initialize this node, and the last
	 * NodeHandle destructed will close down the node.
	 */
	ros::NodeHandle n;

	/**
	 * The advertise() function is how you tell ROS that you want to
	 * publish on a given topic name. This invokes a call to the ROS
	 * master node, which keeps a registry of who is publishing and who
	 * is subscribing. After this advertise() call is made, the master
	 * node will notify anyone who is trying to subscribe to this topic name,
	 * and they will in turn negotiate a peer-to-peer connection with this
	 * node.  advertise() returns a Publisher object which allows you to
	 * publish messages on that topic through a call to publish().  Once
	 * all copies of the returned Publisher object are destroyed, the topic
	 * will be automatically unadvertised.
	 *
	 * The second parameter to advertise() is the size of the message queue
	 * used for publishing messages.  If messages are published more quickly
	 * than we can send them, the number here specifies how many messages to
	 * buffer up before throwing some away.
	 */
	ros::Publisher chatter_pub = n.advertise<std_msgs::String>("chatter", 1000);

	ros::Rate loop_rate(10);

	/**
	 * A count of how many messages we have sent. This is used to create
	 * a unique string for each message.
	 */
	// 定义节点句柄
    image_transport::ImageTransport it(n);
    image_transport::Publisher image_pub = it.advertise("video_image", 1);
    sensor_msgs::ImagePtr msg;

    // opencv准备读取视频
    VideoCapture video;
    video.open("/home/pa/slam_study_on_linux/car_video3.mp4");

    if( !video.isOpened() )
    {
        ROS_INFO("Read Video failed!\n");
        return 0;
    }
    Mat frame;
	int count = 0;
	while (ros::ok())
	{

		/**
		 * This is a message object. You stuff it with data, and then publish it.
		 */
		//std_msgs::String msg;


		video >> frame;
        if( frame.empty() )
            break;
		//resize(frame, frame, Size(1280,1280*frame.rows/frame.cols));
        msg = cv_bridge::CvImage(std_msgs::Header(), "bgr8", frame).toImageMsg();
        //cv::imshow("view", frame);
		//waitKey(1);
		std::stringstream ss;
		cout << "frame size:"<<frame.rows<<" "<<frame.cols << endl;
		//msg.data = ss.str();

		//ROS_INFO("%s","hhhh");

		/**
		 * The publish() function is how you send messages. The parameter
		 * is the message object. The type of this object must agree with the type
		 * given as a template parameter to the advertise<>() call, as was done
		 * in the constructor above.
		 */
		image_pub.publish(msg);

		ros::spinOnce();

		loop_rate.sleep();
		++count;
	}

	return 0;
}
2。视频的订阅并调用回调处理
int main(int argc, char *argv[])
{
	/**
	 * The ros::init() function needs to see argc and argv so that it can perform
	 * any ROS arguments and name remapping that were provided at the command line.
	 * For programmatic remappings you can use a different version of init() which takes
	 * remappings directly, but for most command-line programs, passing argc and argv is
	 * the easiest way to do it.  The third argument to init() is the name of the node.
	 *
	 * You must call one of the versions of ros::init() before using any other
	 * part of the ROS system.
	 */
	ros::init(argc, argv, "videoShow_sub");

	/**
	 * NodeHandle is the main access point to communications with the ROS system.
	 * The first NodeHandle constructed will fully initialize this node, and the last
	 * NodeHandle destructed will close down the node.
	 */
	ros::NodeHandle n;


	//ros::spin();
	cv::namedWindow("view");
	cv::startWindowThread();
	image_transport::ImageTransport it(n);
	image_transport::Subscriber sub = it.subscribe("video_image", 1, imageCallback);
	ros::spin();
	cv::destroyWindow("view");

	return 0;
}
