linux烹饪书,linux命令总结
方法一
$ cat /etc/issue
Debian GNU/Linux 9 \n \l
方法二
$cat /etc/issue.net
Debian GNU/Linux 9
方法三
$ uname -a
Linux 1de774242804 4.9.125-linuxkit #1 SMP Fri Sep 7 08:20:28 UTC 2018 x86_64 GNU/Linux
方法四
$ cat /proc/version
Linux version 4.9.125-linuxkit (root@659b6d51c354) (gcc version 6.4.0 (Alpine 6.4.0) ) #1 SMP Fri Sep 7 08:20:28 UTC 2018
方法五(Mac和Ubuntu/centos测试可行)
$ echo $OSTYPE
darwin18.0

$ echo $OSTYPE
linux-gnu

$ echo $OSTYPE
linux-gnu方法一:查看$SHELL环境变量
shiming@pro ➜  ~ echo $SHELL
/bin/zsh
方法二:echo $0, 据说不是对所有shell都支持
shiming@pro ➜  ~ echo $0
-zsh
方法三:敲一个不存在的命令,查看提示
shiming@pro ➜  ~ tom
zsh: command not found: tom
查看系统支持的shell
root@sz ➜  ~ cat /etc/shells
# /etc/shells: valid login shells
/bin/sh
/bin/dash
/bin/bash
/bin/rbash
/bin/zsh
/usr/bin/zsh
/usr/bin/tmux使用uname命令可以查看系统信息,了解系统信息对安装软件很有帮助,安装软件时必须知道是装32位还是64位,是x86架构还是i686架构,诸如此类。
mac示例
shiming@pro ➜  ~ uname -a
Darwin pro 18.2.0 Darwin Kernel Version 18.2.0: Fri Oct  5 19:41:49 PDT 2018; root:xnu-4903.221.2~2/RELEASE_X86_64 x86_64
ubuntu示例
root@MNG-BC ➜  ~ uname -a
Linux MNG-BC 4.4.0-142-generic #168-Ubuntu SMP Wed Jan 16 21:00:45 UTC 2019 x86_64 x86_64 x86_64 GNU/Linuxlshw命令可以查看硬件信息
lscpu命令可以查看cpu信息
root@MNG-BC ➜  ~ lscpu
Architecture:          x86_64
CPU op-mode(s):        32-bit, 64-bit
Byte Order:            Little Endian
CPU(s):                12
On-line CPU(s) list:   0-11
Thread(s) per core:    2
Core(s) per socket:    6
Socket(s):             1
NUMA node(s):          1
Vendor ID:             GenuineIntel
CPU family:            6
Model:                 85
Model name:            Intel(R) Xeon(R) Platinum 8163 CPU @ 2.50GHz
Stepping:              4
CPU MHz:               2499.998
BogoMIPS:              4999.99
Hypervisor vendor:     KVM
Virtualization type:   full
L1d cache:             32K
L1i cache:             32K
L2 cache:              1024K
L3 cache:              33792K
NUMA node0 CPU(s):     0-11
Flags:                 fpu vme de pse tsc msr pae mce cx8 apic sep mtrr pge mca cmov pat pse36 clflush mmx fxsr sse sse2 ss ht syscall nx pdpe1gb rdtscp lm constant_tsc rep_good nopl pni pclmulqdq ssse3 fma cx16 pcid sse4_1 sse4_2 x2apic movbe popcnt tsc_deadline_timer aes xsave avx f16c rdrand hypervisor lahf_lm abm 3dnowprefetch invpcid_single ibrs ibpb stibp kaiser fsgsbase tsc_adjust bmi1 hle avx2 smep bmi2 erms invpcid rtm mpx avx512f rdseed adx smap avx512cd xsaveopt xsavec xgetbv1
cat /proc/cupinfo可以查看cpu信息,每一个核心都会列出来,以core id区分
root@MNG-BC ➜  ~ cat /proc/cpuinfo
processor       : 0
vendor_id       : GenuineIntel
cpu family      : 6
model           : 85
model name      : Intel(R) Xeon(R) Platinum 8163 CPU @ 2.50GHz
stepping        : 4
microcode       : 0x1
cpu MHz         : 2499.998
cache size      : 33792 KB
physical id     : 0
siblings        : 12
core id         : 0
cpu cores       : 6
apicid          : 0
initial apicid  : 0
fpu             : yes
fpu_exception   : yes
cpuid level     : 13
wp              : yes
flags           : fpu vme de pse tsc msr pae mce cx8 apic sep mtrr pge mca cmov pat pse36 clflush mmx fxsr sse sse2 ss ht syscall nx pdpe1gb rdtscp lm constant_tsc rep_good nopl pni pclmulqdq ssse3 fma cx16 pcid sse4_1 sse4_2 x2apic movbe popcnt tsc_deadline_timer aes xsave avx f16c rdrand hypervisor lahf_lm abm 3dnowprefetch invpcid_single ibrs ibpb stibp kaiser fsgsbase tsc_adjust bmi1 hle avx2 smep bmi2 erms invpcid rtm mpx avx512f rdseed adx smap avx512cd xsaveopt xsavec xgetbv1
bugs            : cpu_meltdown spectre_v1 spectre_v2 spec_store_bypass l1tf
bogomips        : 4999.99
clflush size    : 64
cache_alignment : 64
address sizes   : 46 bits physical, 48 bits virtual
power management:
[shiming@red-hat-enterprise-linux ~]$ date        #打印系统时间
2018年 07月 25日 星期三 19:38:53 CST
[shiming@red-hat-enterprise-linux ~]$ date +%x    #打印日期
2018年07月25日
[shiming@red-hat-enterprise-linux ~]$ date --utc  #打印UTCtime
2018年 07月 25日 星期三 11:55:17 UTC
[shiming@red-hat-enterprise-linux ~]$ date +%T    #打印hh:mm:ss time
19:56:57
[shiming@red-hat-enterprise-linux ~]$ date +%s    #打印unix时间戳,精确到秒
1532519829
locale命令
locale - description of multilanguage support
A locale is a set of language and cultural rules.
http://man7.org/linux/man-pages/man7/locale.7.html
[shiming@red-hat-enterprise-linux ~]$ cat /etc/locale.conf  #查看linux系统语言设置
LANG=en_US.UTF-8                                            #修改语言只需修改这行
[shiming@red-hat-enterprise-linux ~]$ echo $LANG            #查看ssh语言环境变量设置
zh_CN.UTF-8                   #系统为英文,但ssh设置为中文,所以通过ssh远程连接还是会显示中文
[shiming@red-hat-enterprise-linux ~]$ LANG=en_US.UTF-8      #通过给LANG赋值改变ssh语言(这样只是临时修改,下次ssh登录时还是会显示中文)
mac为例,在本机中 vi /etc/ssh/ssh_config,如果希望在ssh连接中传入loacle环境变量,则放开注释,否则用#号注释以下行(使用服务器的系统语言)
SendEnv LANG LC_*
redhat中有三种主机名类型:--pretty, --static, and --transient, 参考1 and 参考2
| Hostname Type | Description |
|---|---|
| Static | Assigned by the system admin |
| Transient/Dynamic | Assigned by DHCP or mDNS server at runtime |
| Pretty | Assigned by the system admin. Its can be used as Description like “Oracle DB server” |
[shiming@red-hat-enterprise-linux ~]$ hostnamectl          #查看所有主机名
[shiming@red-hat-enterprise-linux ~]$ hostnamectl set-hostname redhat  #修改主机名(三个主机名都改为redhat)
[shiming@redhat ~]$                              #修改后重启,主机名变了
[shiming@red-hat-enterprise-linux ~]$ hostname            #查看主机名
red-hat-enterprise-linux.shared
[shiming@red-hat-enterprise-linux ~]$ hostname redhat     #修改主机名为redhat
hostname: you must be root to change the host name        #要root权限才能修改
[shiming@red-hat-enterprise-linux ~]$ sudo hostname redhat #使用管理员权限修改
[sudo] password for shiming:
[shiming@red-hat-enterprise-linux ~]$ hostname            #查看修改后的主机名
redhat
                                                          #重启主机名不变
在敲击命令行时,可以用到以下快捷键提高效率 ctrl + a 移到行首 ctrl + e 移到行尾 meta + f 向前移一个word mtea + b 向后移一个word Ctrl + b 后移一个字符 Ctrl + f 前移一个字符 Ctrl + d 删除当前字符 Backspace 删除前一个字符 Ctrl + - 撤销 ctrl + l 清屏
mata键在windows就是alt键,mac osx用户需要手动开,根据约定,meta键是专门用来处理单个词(word)的。
ctrl + k 从光标剪切到行尾 ctrl + y 粘贴
ctrl + r 敲入搜索关键字搜索 继续按ctrl + r搜索结果列表 ctrl + j 选定当前命令 ctrl + g 取消搜索
whatis命令会精确搜索whatis数据库,给出命令的简介
shiming@pro ➜  ~ whatis cal
cal(1), ncal(1) - displays a calendar and the date of Easterapropos是whatis的模糊搜索版,会全文模糊搜索whatis数据库
shiming@pro ➜ ~ apropos calLinux不以文件名后缀来识别文件类型,通过file命令可以查看文件类型,一般文件类型分为3类
| keyword | description |
|---|---|
| text | 可读文本 |
| executable | 可执行文件 |
| data | 除此之外的叫做data,一般是二进制的或不可打印的 |
[shiming@redhat ~]$ file /etc/passwd
/etc/passwd: ASCII text
[shiming@redhat ~]$ file /bin/passwd
/bin/passwd: setuid ELF 64-bit LSB shared object, x86-64, version 1 (SYSV), dynamically linked (uses shared libs), for GNU/Linux 2.6.32, BuildID[sha1]=0a16a7915f7f9b01d96442755257e22067ce5b2c, stripped
wc for word count, print newline, word, and byte counts for each file
[shiming@redhat ~]$ wc /etc/passwd
  46  100 2426 /etc/passwd                  #行数,word数,byte数,文件名
[shiming@redhat ~]$ wc -l /etc/passwd       #只打印行数
46 /etc/passwd
df显示磁盘使用情况,默认大小为bytes,加上-h参数使用更适于人类阅读的方式展示
root@mix2 ➜  bitcoin df -h
Filesystem      Size  Used Avail Use% Mounted on
udev             16G     0   16G   0% /dev
tmpfs           3.2G  4.6M  3.2G   1% /run
/dev/vda1        99G   45G   49G  48% /
tmpfs            16G   40K   16G   1% /dev/shm
tmpfs           5.0M     0  5.0M   0% /run/lock
tmpfs            16G     0   16G   0% /sys/fs/cgroup
/dev/vdc       1008G   63G  895G   7% /mnt/ethereum
/dev/vdb       1008G  273G  684G  29% /mnt/bitcoin
tmpfs           3.2G     0  3.2G   0% /run/user/0
tmpfs           3.2G     0  3.2G   0% /run/user/1002
du命令查看文件大小, du -h, h means human readable,默认
root@mix2 ➜  bitcoin du --max-depth=0 -h
273G	.
root@mix2 ➜  bitcoin du --max-depth=1 -h
26G	./testnet3
26G	./omni
223G	./mainnet
273G	.
默认打印开头10行
[shiming@redhat ~]$ head /etc/passwd        #头10行
root:x:0:0:root:/root:/bin/bash
bin:x:1:1:bin:/bin:/sbin/nologin
daemon:x:2:2:daemon:/sbin:/sbin/nologin
adm:x:3:4:adm:/var/adm:/sbin/nologin
lp:x:4:7:lp:/var/spool/lpd:/sbin/nologin
sync:x:5:0:sync:/sbin:/bin/sync
shutdown:x:6:0:shutdown:/sbin:/sbin/shutdown
halt:x:7:0:halt:/sbin:/sbin/halt
mail:x:8:12:mail:/var/spool/mail:/sbin/nologin
operator:x:11:0:operator:/root:/sbin/nologin
可指定打印行数 - head -n [linenum]
[shiming@redhat ~]$ head -n 5 /etc/passwd    #头5行
root:x:0:0:root:/root:/bin/bash
bin:x:1:1:bin:/bin:/sbin/nologin
daemon:x:2:2:daemon:/sbin:/sbin/nologin
adm:x:3:4:adm:/var/adm:/sbin/nologin
lp:x:4:7:lp:/var/spool/lpd:/sbin/nologin
默认打印末尾10行
[shiming@redhat ~]$ tail /etc/passwd
nfsnobody:x:65534:65534:Anonymous NFS User:/var/lib/nfs:/sbin/nologin
pcp:x:990:985:Performance Co-Pilot:/var/lib/pcp:/sbin/nologin
gnome-initial-setup:x:989:984::/run/gnome-initial-setup/:/sbin/nologin
nslcd:x:65:55:LDAP Client User:/:/sbin/nologin
avahi:x:70:70:Avahi mDNS/DNS-SD Stack:/var/run/avahi-daemon:/sbin/nologin
postfix:x:89:89::/var/spool/postfix:/sbin/nologin
sshd:x:74:74:Privilege-separated SSH:/var/empty/sshd:/sbin/nologin
oprofile:x:16:16:Special user account to be used by OProfile:/var/lib/oprofile:/sbin/nologin
tcpdump:x:72:72::/:/sbin/nologin
shiming:x:1000:1000:Shiming Liu:/home/shiming:/bin/bash
指定打印行数 - tail -n [linenum]
[shiming@redhat ~]$ tail -n 5 /etc/passwd
postfix:x:89:89::/var/spool/postfix:/sbin/nologin
sshd:x:74:74:Privilege-separated SSH:/var/empty/sshd:/sbin/nologin
oprofile:x:16:16:Special user account to be used by OProfile:/var/lib/oprofile:/sbin/nologin
tcpdump:x:72:72::/:/sbin/nologin
shiming:x:1000:1000:Shiming Liu:/home/shiming:/bin/bash
打印整个文件内容 - cat [filename]
[shiming@redhat ~]$ tail /etc/passwd
man自带帮助页:man hier

Filesystem Hierarchy Standard fhs-2.3.pdf http://www.pathname.com/fhs/
| 位置 | 用途 |
|---|---|
| /usr | 安装软件、共享的库,包括文件和静态只读程序数据。重要的子目录有: -/usr/bin:用户命令。 -/usr/sbin:系统管理命令。 -/usr/local:本地自定义软件。 |
| /etc | 特定于此系统的配置文件, 静态的永久系统配置数据。 |
| /var | 特定于此系统的可变数据,在系统启动之间保持永久性。动态变化的文件(如数据库、缓存目录、日志文件、打印机后台处理文档内容和网站内容)可以在 /var 下找到。 |
| /run | 包含动态的、非永久的应用程序运行时数据,自上一次系统启动以来启动的进程的运行时数据。这包括进程 ID 文件和锁定文件,等等。此目录中的内容在重启时重新创建。(此目录整合了旧版 Red Hat Enterprise Linux 中的 /var/run 和 /var/lock。) |
| /home | 普通用户主目录。 |
| /root | root 主目录。 |
| /tmp | 临时文件目录。10 天内未访问、未更改或未修改的文件将自动从该目录中删除。还有一个临时目录 /var/tmp,该目录中的文件如果在 30 天内未曾访问、更改或修改过,将自动删除。 |
| /boot | 开机启动过程中所需的文件。 |
| /dev | 包含特殊的设备文件,供系统使用的物理硬件。 |
| /media | 可移除的设备挂载点,如cd、vcd、U盘 |
| /usr/bin | 普通用户命令和实用程序 |
| /usr/sbin/ | 供root用户使用的二进制文件 |
[shiming@redhat tmp]$ pwd
/tmp
常用参数
[shiming@redhat ~]$ mkdir tmp
[shiming@redhat ~]$ ls
Desktop  Documents  Downloads  Music  Pictures  Public  Templates  tmp  Videos
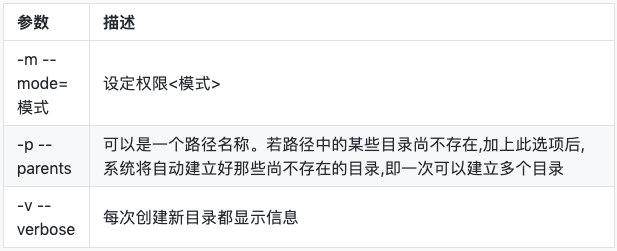
递归创建目录
mkdir -p /dir/not/exist # 如果/dir或者/dir/not不存在则都会被创建创建带权限的目录
mkdir -m 744 /dir # /dir的权限会被新建为744一次性创建多个目录
shiming@pro ➜  /tmp mkdir -p dir1/{dir2/,dir3/{dir3.1,dir3.2}}
shiming@pro ➜  /tmp tree dir1
dir1
├── dir2
└── dir3
    ├── dir3.1
└── dir3.2[shiming@redhat ~]$ ls -l #长列表
[shiming@redhat ~]$ ls -a #显示包括隐藏文件
[shiming@redhat ~]$ ls -R #递归列表(包含子文件夹)
[shiming@redhat dir2]$ ls -alR /tmp/dir1 #可组合使用
/tmp/dir1:
total 12
drwxrwxr-x. 3 shiming shiming 4096 Jul 26 22:25 .
drwxrwxrwt. 14 root root 4096 Jul 26 22:26 ..
drwxrwxr-x. 2 shiming shiming 4096 Jul 26 22:26 dir2
/tmp/dir1/dir2:
total 8
drwxrwxr-x. 2 shiming shiming 4096 Jul 26 22:26 .
drwxrwxr-x. 3 shiming shiming 4096 Jul 26 22:25 ..
-rw-rw-r--. 1 shiming shiming 0 Jul 26 22:26 file1
-rw-rw-r--. 1 shiming shiming 0 Jul 26 22:26 .file2
ls可以一次性列出几个文件夹中的文件
[shiming@redhat ~]$ ls -l Music Pictures Videos         #列出N个文件夹
Music:
total 0
-rw-rw-r--. 1 shiming shiming 0 Jul 27 23:25 song1.mp3
-rw-rw-r--. 1 shiming shiming 0 Jul 27 23:25 song2.mp3

Pictures:
total 0
-rw-rw-r--. 1 shiming shiming 0 Jul 27 23:26 snap1.jpg
-rw-rw-r--. 1 shiming shiming 0 Jul 27 23:26 snap2.jpg

Videos:
total 0
-rw-rw-r--. 1 shiming shiming 0 Jul 27 23:27 film1.avi
-rw-rw-r--. 1 shiming shiming 0 Jul 27 23:27 film2.avi
ls -h列出文件大小为人眼可读的(B,K,M,G)
shiming@pro ➜  asset-platform git:(master) ls -alh
total 24
drwxr-xr-x@  6 shiming  staff   192B Apr 18 10:50 .
drwxr-xr-x@ 22 shiming  staff   704B Apr 16 20:13 ..
-rw-r--r--@  1 shiming  staff   6.0K Apr 22 20:10 .DS_Store
drwxr-xr-x@ 13 shiming  staff   416B Apr 22 20:12 .git
-rw-r--r--   1 shiming  staff    36B Apr 16 20:13 README.md
drwxr-xr-x@  7 shiming  staff   224B Apr 22 20:10 docs
[shiming@redhat tmp]$ cd /
[shiming@redhat /]$ cd ~/tmp
[shiming@redhat tmp]$ cd -      #切到上一个工作目录
/
[shiming@redhat /]$
[shiming@redhat ~]$ cd ..       #切到父目录
[shiming@redhat home]$ ls
lost+found  shiming
[shiming@redhat ~]$ cd ../..    #从当前位置上移两个级别
[shiming@redhat /]$
[shiming@redhat tmp]$ touch tmp1 #tmp1不存在则新建,存在则将文件的时间戳更新为当前时间
新建多个文件
[shiming@redhat tmp]$ touch file1 file2
使用大括号新建多个文件
[shiming@redhat ~]$ touch file{1..5}       #如果文件名有规则的话可以这么建
[shiming@redhat ~]$ ls -l
-rw-rw-r--. 1 shiming shiming    0 Jul 28 09:41 file1
-rw-rw-r--. 1 shiming shiming    0 Jul 28 09:41 file2
-rw-rw-r--. 1 shiming shiming    0 Jul 28 09:41 file3
-rw-rw-r--. 1 shiming shiming    0 Jul 28 09:41 file4
-rw-rw-r--. 1 shiming shiming    0 Jul 28 09:41 file5
常用选项
常用选项
| 文件管理命令 | 单一来源 | 多来源 |
|---|---|---|
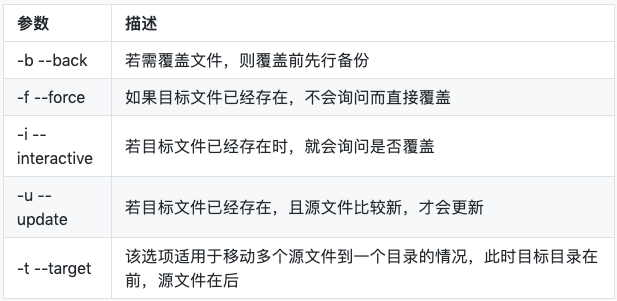
| 复制文件 | cp file1 file2 | cp file1 file2 file3 dir④ |
| 复制文件(目标文件夹不存在) | mkdir -p ~/.litecoin && cp bitcoin.conf litecin.conf | |
| 移动文件 | mv file1 file2① | mv file1 file2 file3 dir④ |
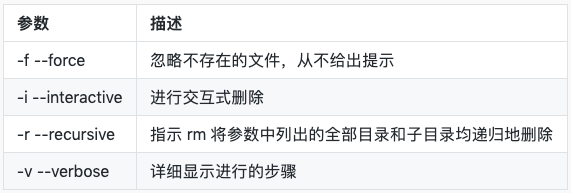
| 删除文件 | rm file1 | rm -f file1 file2 file3⑤ |
| 创建目录 | mkdir dir | mkdir -p part1/part2/dir⑥ |
| 复制目录 | cp -r dir1 dir2② | cp -r dir1 dir2 dir3 dir4④ |
| 移动目录 | mv dir1 dir2③ | mv dir1 dir2 dir3 dir4④ |
| 删除目录 | rm -r dir1② | rm -rf dir1 dir2 dir3⑤ |
| *注: | ||
| ①结果为重命名。 | ||
| ②需要使用“递归”选项来处理来源目录。 | ||
| ③如果 dir2 存在,则结果为移动。如果 dir2 不存在,则结果为重命名。 | ||
| ④最后一个参数必须是目录。 | ||
| ⑤请谨慎使用“force”选项,系统将不会提示您确认操作。 | ||
| ⑥使用“创建父级”选项时应小心;无法捕获键入错误。 |
~/.oh-my-zsh/themes/
chown newowner file   # 修改file的owner为newowner
chgrp newgroup file   # 修改file的group为newowner
chown newowner.newgroup file # 同时修改file的ownerchmod +x file
chmod -x file
chmod u+x file
chmodhttps://help.aliyun.com/document_detail/25426.html
在本地terminal下执行scp命令
- 将本地文件复制到远程
# 将本地文件file1.txt复制到远程服务器家目录下
$ scp file1.txt root@47.52.241.187:~
- 将本地文件夹复制到远程(-r选项)
# 将本地文件夹dir1复制到远程家目录
$ scp -r dir1 root@47.52.241.187:~
- 将远程文件复制到本地
# 将远程文件file2.txt 复制到本地工作目录
$ scp root@47.52.241.187:~/file2.txt .
- 将远程文件夹复制到本地
# 将远程目录dir1复制到本地当前工作目录
$ scp -P <sshport> -r root@47.52.241.187:~/dir1 .
- 将多个本地文件复制到远程
Shimings-Air:0-transfer Shiming$ scp file4 file5 root@47.52.241.187:~
# 只要输一次密码
Enter passphrase for key '/Users/Shiming/.ssh/id_rsa':
file4                                         100%    0     0.0KB/s   00:00
file5                                         100%    0     0.0KB/s   00:00
- 将多个远程文件复制到本地
# 几个文件就输几次密码
Shimings-Air:~ Shiming$ scp root@47.52.241.187:~/{file1.txt,file2.txt} .
Enter passphrase for key '/Users/Shiming/.ssh/id_rsa':
file1.txt                                     100%   26     0.3KB/s   00:00
Enter passphrase for key '/Users/Shiming/.ssh/id_rsa':
file2.txt                                     100%   26     0.3KB/s   00:00
https://www.tecmint.com/add-users-in-linux/
https://www.tecmint.com/usermod-command-examples/
[shiming@red-hat-enterprise-linux ~]$ passwd      #修改当前用户密码
更改用户 shiming 的密码 。
为 shiming 更改 STRESS 密码。
(当前)UNIX 密码:
新的 密码:
su 切换到root用户
su anotheruser 将当前用户的环境变量带到新用户下
su - anotheruser 使用新用户的环境变量
root@tool1:~# passwd -l bot #-l means lock, lock后仍可以使用su - username切换用户
deluser --remove-home tecmint      [On Debian and its derivatives]
userdel --remove tecmint           [On RedHat/CentOS based systems]
如果要更严谨的删除用户可以参考 https://www.tecmint.com/delete-remove-a-user-account-with-home-directory-in-linux/
- 锁住账号,这样就无法登陆
- 查看用户进程
- 杀死用户进程
- 备份用户家目录
- 删除用户和家目录
w命令可以查看当前登录用户
shiming@pro ➜  ~ w
23:22  up 12:42, 3 users, load averages: 2.12 1.77 1.84
USER     TTY      FROM              LOGIN@  IDLE WHAT
shiming  console  -                10:40   12:41 -
shiming  s001     -                11:19       - w
shiming  s002     -                10:55       1 ssh root@ubuntu
last,last <user_name>可以查看登录记录,包括重启/关机记录
shiming@pro ➜  ~ last
shiming   ttys001                   Tue Mar 26 11:19   still logged in
shiming   ttys002                   Tue Mar 26 10:55   still logged in
shiming   ttys001                   Tue Mar 26 10:53 - 10:53  (00:00)
shiming   console                   Tue Mar 26 10:40   still logged in
reboot    ~                         Tue Mar 26 10:40
shutdown  ~                         Tue Mar 26 10:17
编辑/etc/ssh/sshd_config文件,在最后加上DenyUsers配置(如已存在,复用即可)
# deny user ssh login
DenyUsers user1 user2 user3
重启ssh服务
sudo systemctl reload ssh
用户不能通过ssh登录了,但是可以通过已登录的账号su - user1去切换到user1
编辑/etc/ssh/sshd_config文件,
- 如果是禁止个别用户/组
在最后加上
Match段,在里面加上
# disable ssh login by password for some user
Match User user1
    PasswordAuthentication no
    ChallengeResponseAuthentication no
# disable ssh login by password for some group
Match Group group1
    PasswordAuthentication no
    ChallengeResponseAuthentication no
- 如果禁止所有用户密码登录,将以下参数都改为no
PasswordAuthentication no
ChallengeResponseAuthentication no
重启ssh服务
sudo systemctl reload ssh
无证书登录时会报错
shiming@pro ➜  ~ ssh shiming@ubuntu
shiming@ubuntu: Permission denied (publickey).
如果使用adduser命令新增用户,该命令的配置文件是/etc/adduser.conf,修改该文件将默认
DSHELL=/bin/sh修改为
DSHELL=/bin/zsh如果使用useradd添加用户则修改/etc/default/useradd
SHELL=/bin/sh
改为
SHELL=/bin/zsh
通过以上步骤,新用户确实默认使用zsh,但是因为没有配置~/.zshrc文件,新用户在首次登陆的时候zsh会出以下提示,不是太友好:
This is the Z Shell configuration function for new users,
zsh-newuser-install.
You are seeing this message because you have no zsh startup files
(the files .zshenv, .zprofile, .zshrc, .zlogin in the directory
~).  This function can help you with a few settings that should
make your use of the shell easier.

You can:

(q)  Quit and do nothing.  The function will be run again next time.

(0)  Exit, creating the file ~/.zshrc containing just a comment.
     That will prevent this function being run again.

(1)  Continue to the main menu.

(2)  Populate your ~/.zshrc with the configuration recommended
     by the system administrator and exit (you will need to edit
     the file by hand, if so desired).

--- Type one of the keys in parentheses ---
linux可以支持在新建用户时同时将一些文件放到新用户的家目录下,在配置文件/etc/adduser.conf和/etc/default/useradd中都定义了一个参数
SKEL=/etc/skel这个路径的含义就是,凡是放到这个目录下的文件,都会拷贝到新用户家目录。
新建用户blog做测试,注意Copying files from /etc/skel会有这一句。
root@sz ➜  ~ adduser blog
Adding user `blog' ...
Adding new group `blog' (1001) ...
Adding new user `blog' (1001) with group `blog' ...
Creating home directory `/home/blog' ...
Copying files from `/etc/skel' ...
systemd vs init.d

tar xzf bitcoin-0.14.2-x86_64-linux-gnu.tar.gz
sudo install -m 0755 -o root -g root -t /usr/local/bin bitcoin-0.14.2/bin/*
-m 设置二进制文件权限 -o 设置owner -g 设置group -t 设置install目录 最后一个目录为源目录
当命令包含反引号(注意,不是单引号),或$(command)时,允许命令替换
[shiming@redhat ~]$ echo today is `date +%A`    #反引号和单引号容易引起混淆
today is Saturday
[shiming@redhat ~]$ echo today is $(date +%A)   #建议使用$(command)
today is Saturday
[shiming@redhat ~]$ history
  189  wc -l /etc/passwd
  190  man wc
  191  ls /etc/passwd
  192  su
  193  history
  194  ls /etc/passwd
  195  mkdir tmp
  196  ls /etc/passwd
  197  man wc
  198  history
  193  history
  194  ls /etc/passwd
  195  mkdir tmp
  196  ls /etc/passwd
  197  man wc
  198  history
[shiming@redhat ~]$ !194            #!+编号 可以执行历史命令行
ls /etc/passwd
/etc/passwd
[shiming@redhat ~]$ !m              #!+string 执行最近的一个以m开头的命令行,即 man wc
搜索ctrl + r , 取消搜索 ctrl + g
nohup command &
$ nohup geth --testnet --datadir /mnt/ethereum/ --syncmode "full" --rpc --ws &如果要让正在运行的"前台任务"变为"后台任务",可以先按ctrl + z,然后执行bg命令(让最近一个暂停的"后台任务"继续执行)
http://www.ruanyifeng.com/blog/2016/02/linux-daemon.html
http://www.ruanyifeng.com/blog/2016/03/systemd-tutorial-commands.html systemd示例配置1
[Unit]
Description=ropsten
After=network.target
[Service]
Type=simple
LimitNOFILE=8192
WorkingDirectory=/mnt/disk2/ethereum/ropsten/
ExecStart=/usr/bin/geth --testnet --syncmode=full --datadir "/mnt/disk2/ethereum/ropsten" --rpc --rpcapi "eth,net,web3,admin,miner,debug,personal,txpool,db,shh" --rpccorsdomain '*' --rpcaddr 127.0.0.1 --rpcport 8540 --port 30300
Restart=always
User=bot
Group=bot
[Install]
WantedBy=multi-user.target
systemd示例配置2
[Unit]
Description=openresty A high performance web server and a reverse proxy server
After=network.target

[Service]
Type=forking
PIDFile=/usr/local/openresty/nginx/logs/nginx.pid
ExecStartPre=/usr/local/openresty/nginx/sbin/nginx -t -q -g 'daemon on; master_process on;'
ExecStart=/usr/local/openresty/nginx/sbin/nginx -g 'daemon on; master_process on;'
ExecReload=/usr/local/openresty/nginx/sbin/nginx -g 'daemon on; master_process on;' -s reload
ExecStop=-/usr/local/openresty/nginx/sbin/start-stop-daemon --quiet --stop --retry QUIT/5 --pidfile /run/nginx.pid
TimeoutStopSec=5
KillMode=mixed

[Install]
WantedBy=multi-user.target
新增一个service后来设置开机启动 每一个 Unit 都有一个配置文件,告诉 Systemd 怎么启动这个 Unit 。
Systemd 默认从目录/etc/systemd/system/读取配置文件。但是,里面存放的大部分文件都是符号链接,指向目录/usr/lib/systemd/system/,真正的配置文件存放在那个目录。
systemctl enable命令用于在上面两个目录之间,建立符号链接关系。
$ sudo systemctl enable clamd@scan.service
# 等同于
$ sudo ln -s '/usr/lib/systemd/system/clamd@scan.service' '/etc/systemd/system/multi-user.target.wants/clamd@scan.service'
如果配置文件里面设置了开机启动,systemctl enable命令相当于激活开机启动。
与之对应的,systemctl disable命令用于在两个目录之间,撤销符号链接关系,相当于撤销开机启动。
$ sudo systemctl disable clamd@scan.service
列出所有配置文件
# 列出所有配置文件
$ systemctl list-unit-files

# 列出指定类型的配置文件
$ systemctl list-unit-files --type=service
这个命令会输出一个列表
$ systemctl list-unit-files

UNIT FILE              STATE
chronyd.service        enabled
clamd@.service         static
clamd@scan.service     disabled
这个列表显示每个配置文件的状态,一共有四种。
enabled:已建立启动链接
disabled:没建立启动链接
static:该配置文件没有[Install]部分(无法执行),只能作为其他配置文件的依赖
masked:该配置文件被禁止建立启动链接
# 注意,从配置文件的状态无法看出,该 Unit 是否正在运行。这必须执行前面提到的systemctl status命令。
启动服务
systemctl start xxx.service
查看服务状态
systemctl status xxx.service
reload systemctl配置
systemctl daemon-reload #一旦修改配置文件,就要让 SystemD 重新加载配置文件,然后重新启动,否则修改不会生效。
重启服务
systemctl restart xxx.service
停止服务
systemctl stop xxx.service
看所有systemctl的日志(启动失败的时候可以来这里看)
journalctl -xef
看指定service的日志
journalctl -u servicename
端口号说明:
| 端口号 | 说明 |
|---|---|
| 0~1023 | the Well Known Ports, also referred to as System Ports. |
| 1024~49151 | the Registered Ports, also known as User Ports. |
| 49152~65535 | the Dynamic Ports, also referred to as the Private Ports. |
1024前的端口绑定需要root权限才可以
查看服务和端口绑定信息:
$ cat /etc/services列出所有打开的端口或正在运行的端口(包括TCP/UDP): -l – prints only listening sockets -n – shows port number -t – enables listing of tcp ports -u – enables listing of udp ports -p – display PID/Program name for sockets
$ netstat -lntup列出所有tcp/udp、端口、pid、程序名,比较实用
$ netstat -lntu
Active Internet connections (only servers)
Proto Recv-Q Send-Q Local Address           Foreign Address         State
tcp        0      0 0.0.0.0:22              0.0.0.0:*               LISTEN
tcp        0      0 0.0.0.0:18333           0.0.0.0:*               LISTEN
tcp        0      0 127.0.0.1:8545          0.0.0.0:*               LISTEN
tcp        0      0 127.0.0.1:8546          0.0.0.0:*               LISTEN
tcp6       0      0 :::18333                :::*                    LISTEN
tcp6       0      0 :::30303                :::*                    LISTEN
udp        0      0 0.0.0.0:68              0.0.0.0:*
udp        0      0 172.31.42.181:123       0.0.0.0:*
udp        0      0 127.0.0.1:123           0.0.0.0:*
udp        0      0 0.0.0.0:123             0.0.0.0:*
udp6       0      0 :::30303                :::*
udp6       0      0 :::123                  :::*
或使用 ss -lntu
$ ss -lntu
Netid State      Recv-Q Send-Q              Local Address:Port                             Peer Address:Port
udp   UNCONN     0      0                               *:68                                          *:*
udp   UNCONN     0      0                   172.31.42.181:123                                         *:*
udp   UNCONN     0      0                       127.0.0.1:123                                         *:*
udp   UNCONN     0      0                               *:123                                         *:*
udp   UNCONN     0      0                              :::30303                                      :::*
udp   UNCONN     0      0                              :::123                                        :::*
tcp   LISTEN     0      128                             *:22                                          *:*
tcp   LISTEN     0      128                             *:18333                                       *:*
tcp   LISTEN     0      128                     127.0.0.1:8545                                        *:*
tcp   LISTEN     0      128                     127.0.0.1:8546                                        *:*
tcp   LISTEN     0      128                            :::18333                                      :::*
tcp   LISTEN     0      128                            :::30303                                      :::*
重启网络 - ubuntu
sudo service networking restartping不通或丢包严重时需要进行网络链路测试,定位问题 https://help.aliyun.com/knowledge_detail/40573.html
推荐使用mtr命令
1.你可以使用 lsof 命令来查看某一端口是否开放。查看端口可以这样来使用,我就以80端口为例: lsof -i:80 如果有显示说明已经开放了,如果没有显示说明没有开放 2.netstat -aptn执行看看,是否监听在0.0.0.0:3306 3. netstat -nupl (UDP类型的端口) netstat -ntpl (TCP类型的端口) 例如 4.telnet ip 端口号 方式测试远程主机端口是否打开 参考:https://blog.csdn.net/m0_37975886/article/details/78405808?utm_source=copy
如果阿里云安全组里没有开放端口,即便服务在本机端口绑定了,外网也无法访问
shiming@pro ➜  telnet 120.79.226.111 9009
Trying 120.79.226.111...
telnet: connect to address 120.79.226.111: Operation timed out
telnet: Unable to connect to remote host
root@iZj6c48apyeg9dvouqz3uxZ:~# sudo ufw status verbose  #查看防火墙详情
Status: inactive  #未开启
root@iZj6c48apyeg9dvouqz3uxZ:~# sudo ufw allow 8545/tcp  #允许端口tcp访问
Rules updated
Rules updated (v6)
root@iZj6c48apyeg9dvouqz3uxZ:~# sudo ufw allow 8546/tcp
Rules updated
Rules updated (v6)
root@iZj6c48apyeg9dvouqz3uxZ:~# sudo ufw allow 8545/udp   #允许端口udp访问
Rules updated
Rules updated (v6)
root@iZj6c48apyeg9dvouqz3uxZ:~# sudo ufw allow 8546/udp
Rules updated
Rules updated (v6)
root@iZj6c48apyeg9dvouqz3uxZ:~# sudo ufw status verbose
Status: inactive
root@iZj6c48apyeg9dvouqz3uxZ:~# sudo ufw enable  #开启防火墙
Command may disrupt existing ssh connections. Proceed with operation (y|n)? y
Firewall is active and enabled on system startup
root@iZj6c48apyeg9dvouqz3uxZ:~# sudo ufw allow http #开启80端口(http)访问
Rule added
Rule added (v6)
root@iZj6c48apyeg9dvouqz3uxZ:~# sudo ufw allow https #开启443端口(https)访问
Rule added
Rule added (v6)
root@iZj6c48apyeg9dvouqz3uxZ:~# sudo ufw allow ssh #开启22端口(ssh)访问
Rule added
Rule added (v6)
root@iZj6c48apyeg9dvouqz3uxZ:~# sudo service networking restart
root@iZj6c48apyeg9dvouqz3uxZ:~# sudo ufw status verbose
Status: active
Logging: on (low)
Default: deny (incoming), allow (outgoing), disabled (routed)
New profiles: skip

To                         Action      From
--                         ------      ----
8545/tcp                   ALLOW IN    Anywhere
8546/tcp                   ALLOW IN    Anywhere
8545/udp                   ALLOW IN    Anywhere
8546/udp                   ALLOW IN    Anywhere
80                         ALLOW IN    Anywhere
443                        ALLOW IN    Anywhere
22                         ALLOW IN    Anywhere
8545/tcp (v6)              ALLOW IN    Anywhere (v6)
8546/tcp (v6)              ALLOW IN    Anywhere (v6)
8545/udp (v6)              ALLOW IN    Anywhere (v6)
8546/udp (v6)              ALLOW IN    Anywhere (v6)
80 (v6)                    ALLOW IN    Anywhere (v6)
443 (v6)                   ALLOW IN    Anywhere (v6)
22 (v6) ALLOW IN Anywhere (v6)Shimings-Air:~ Shiming$ traceroute -p 8545 47.75.70.201
traceroute to 47.75.70.201 (47.75.70.201), 64 hops max, 52 byte packets
1 172.16.0.1 (172.16.0.1) 4.037 ms 1.054 ms 1.719 ms
2 192.168.5.1 (192.168.5.1) 5.688 ms 8.667 ms 6.993 ms
3 100.64.0.1 (100.64.0.1) 16.788 ms 5.867 ms 7.902 ms
4 213.106.38.59.broad.fs.gd.dynamic.163data.com.cn (59.38.106.213) 9.796 ms 8.975 ms 8.774 ms
5 183.56.65.62 (183.56.65.62) 13.150 ms 10.301 ms
183.56.65.66 (183.56.65.66) 11.280 ms
6 59.43.80.21 (59.43.80.21) 12.356 ms 10.645 ms 11.649 ms
7 59.43.130.106 (59.43.130.106) 12.012 ms 51.356 ms 43.798 ms
8 59.43.187.126 (59.43.187.126) 16.115 ms
59.43.187.122 (59.43.187.122) 13.389 ms
59.43.187.150 (59.43.187.150) 11.819 ms
9 59.43.187.178 (59.43.187.178) 16.522 ms
59.43.183.106 (59.43.183.106) 21.514 ms
59.43.188.126 (59.43.188.126) 18.220 ms
10 59.43.249.10 (59.43.249.10) 17.732 ms
59.43.186.126 (59.43.186.126) 22.963 ms
59.43.186.122 (59.43.186.122) 14.746 ms
11 210.48.139.70 (210.48.139.70) 21.244 ms
210.48.136.158 (210.48.136.158) 19.783 ms
203.100.48.254 (203.100.48.254) 22.733 ms
12 * * *
13 11.211.16.137 (11.211.16.137) 24.828 ms
11.211.16.105 (11.211.16.105) 22.569 ms
11.211.20.165 (11.211.20.165) 30.418 ms
14 * * *
15 * * *
16 * * *
17 * * *使用nload命令可以查看网络负荷,实时显示网速,按enter可以切换网卡
nload比较简洁,只显示总网速,nethogs可以按进程显示网络占用,类似htop
分隔同一行中的命令
| shell命令 | 描述 |
|---|---|
| ctrl+a | 跳到命令行开头 |
| ctrl+e | 跳到命令行结尾 |
| ctrl+u | 删除光标前内容 |
| ctrl+k | 删除光标后内容 |
| ctrl+左箭头 | 向左跳一字 |
| ctrl+右箭头 | 向右跳一字 |
| ctrl+r | 在命令行历史中搜索某一模式命令 |
| ; | 分隔同一行中的命令 |
| Esc + . | 复制以前命令的最后一个参数 |
执行顺序: /etc/profile -> (~/.bash_profile | ~/.bash_login | ~/.profile) -> ~/.bashrc -> /etc/bashrc -> ~/.bash_logout 见参考一
| file | Interactive login | Interactive non-login | Script | Description |
|---|---|---|---|---|
| /etc/profile | A | system wide version of ~/.profit, execute once when user login. Executed only for interactive shells | ||
| /etc/profile.d/* | A | user defined /etc/profile, invoked by /etc/profile | ||
| /etc/bashrc or /etc/bash.bashrc | A | system wide version of ~/.bashrc. Executed for both interactive and non-interactive shells. In fact in Ubuntu the /etc/profile calls the /etc/bashrc directly | ||
| ~/.bashrc | B | user defined shell config | ||
| ~/.bash_profile | B1 | |||
| ~/.bash_login | B2 | |||
| ~/.profile | B3 | |||
| BASH_ENV | A | |||
| ~/.bash_logout | C |
查看所有环境变量使用printenv命令
➜ ~ printenv
别名可以定义在.zshrc或.bashrc中方便一些操作
# add python3.7 to path
export PATH=/usr/local/Cellar/python/3.7.1/bin:$PATH
export PATH=/usr/local/Cellar/python/3.7/bin:$PATH
alias pip3='python3 -m pip'
alias python2="/usr/bin/python"

# alias cleos in docker
alias cleos='docker exec -it eosio /opt/eosio/bin/cleos --url http://127.0.0.1:7777 --wallet-url http://127.0.0.1:5555'

# alias md_to_json
alias mtj='md_to_json'

# alias for clear
alias cl='clear'

# alias for tldr
alias sman='tldr'

# alias for go to defang dir
alias defang='cd /Users/shiming/Nutstore/21-defang'

# alias for go to jianguoyun dir
alias jianguoyun='cd /Users/shiming/Nutstore'

# alias for go to myrepo dir
alias myrepo='cd /Users/shiming/Nutstore/00-myrepo'
bash内建命令,使得子进程可以复用父进程的环境变量。通过命令行敲的export命令,不管是导入还是删除都是临时的。如果需要永久保持有效需要写在~/.bashrc等配置文件中。
unset命令可以删除export的环境变量
➜  ~ export TMPVAR="XX"
➜  ~ printenv TMPVAR
XX
➜  ~ unset TMPVAR
➜ ~ printenv TMPVAR➜ ~ printenv HOME
/Users/shiming| Variable | Description |
|---|---|
| EDITOR | The program to run to perform edits. |
| HOME | The Home directory of the user. |
| LOGNAME | The login name of the user. |
| The location of the user's local inbox. | |
| OLDPWD | The previous working directory. |
| PATH | A colon separated list of directories to search for commands. |
| PAGER | This program may be called to view a file. |
| PS1 | PS1 The primary prompt string. |
| PWD | The present working directory. |
| USER | The username of the user. |
PATH环境变量决定了系统寻找执行程序时的路径,默认的环境变量如下
john@ubuntu:~$ echo $PATH
/home/john/bin:/home/john/.local/bin:/usr/local/bin:/usr/bin:/bin:/usr/local/games:/usr/games/usr/bin和/usr/local/bin的区别:
首先注意usr 指 Unix System Resource,而不是User
然后通常:
/usr/bin下面的都是系统预装的可执行程序,会随着系统升级而改变。
/usr/local/bin目录是给用户放置自己的可执行程序的地方,推荐放在这里,不会被系统升级而覆盖同名文件。
~/.local目录是使用systemd linux发行版都会有的一个目录
-p
List of all names that are exported in the current shell
-n
Remove names from export list
-f
Names are exported as functions
没用export前
[shiming@redhat ~]$ name=shiming            #设置变量name=shimiing
[shiming@redhat ~]$ echo $name              #在当前进程下输出
shiming                                     #正确输出
[shiming@redhat ~]$ bash                    #新开一个进程
[shiming@redhat ~]$ echo $name              #在新开的进程输出$name
                                            #无效
[shiming@redhat ~]$
用了export后
[shiming@redhat ~]$ name=shiming            #设置变量name=shiming
[shiming@redhat ~]$ echo $name              #当前进程输出
shiming                                     #正确输出
[shiming@redhat ~]$ export name             #export变量
[shiming@redhat ~]$ bash                    #新开进程
[shiming@redhat ~]$ echo $name              #再次输出
shiming                                     #正确输出
给PATH加一个路径,用冒号分隔
$ export PATH=$PATH:/home/himanshu/practice/
export name="xiongxiong"                        #在~/.bashrc文件末尾加上这句
[shiming@redhat shiming]$ echo $name            #打印为空

[shiming@redhat shiming]$ source .bashrc        #执行.bashrc
[shiming@redhat shiming]$ echo $name            #打印有值
xiongxiong
[shiming@redhat shiming]$ unset name            #如果不想用这个环境变量了,用unset暂时删除
[shiming@redhat shiming]$ echo $name            #打印为空
参考这里
使用命令top(或 htop,需要安装)
Processes: 501 total, 2 running, 499 sleeping, 2532 threads                                              09:39:06
Load Avg: 2.68, 1.92, 1.79  CPU usage: 1.26% user, 1.42% sys, 97.30% idle
SharedLibs: 229M resident, 47M data, 86M linkedit.
MemRegions: 171203 total, 8320M resident, 84M private, 1873M shared.
PhysMem: 16G used (6889M wired), 118M unused.
VM: 2489G vsize, 1121M framework vsize, 30538579(0) swapins, 32834518(0) swapouts.
Networks: packets: 60080455/70G in, 68155895/7815M out. Disks: 6097134/243G read, 6811848/392G written.

PID    COMMAND      %CPU TIME     #TH    #WQ  #PORTS MEM    PURG   CMPRS  PGRP  PPID  STATE    BOOSTS
44018  top          5.0  00:02.23 1/1    0    26     6032K  0B     0B     44018 33399 running  *0[1]
44017  sleep        0.0  00:00.00 1      0    10     328K   0B     0B     26499 26726 sleeping *0[1]
44000  quicklookd   0.0  00:00.16 4      1    88     5104K  28K    0B     44000 1     sleeping  0[0]
43947  com.apple.iC 0.0  00:00.14 2      1    59     3032K  0B     256K   43947 1     sleeping  0[0]
43904  ocspd        0.0  00:00.02 2      1    36     1912K  0B     0B     43904 1     sleeping *0[1]
43881  Google Chrom 0.0  00:00.79 10     2    73     29M    4096B  9560K  1123  1123  sleeping *0[3]
43880  Google Chrom 0.0  00:05.02 16     1    125    98M    0B     19M    1123  1123  sleeping *0[3]
43879  Google Chrom 0.0  00:00.31 16     1    122    17M    0B     12M    1123  1123  sleeping *0[3]
43769  MTLCompilerS 0.0  00:00.06 3      3    27     16K    0B     10M    43769 1     sleeping  0[2]
43764  com.apple.pr 0.0  00:02.17 4      1    274    5948K  0B     21M    43764 1     sleeping *0[598]
43763  MTLCompilerS 0.0  00:00.07 3      3    27     12K    0B     10M    43763 1     sleeping  0[2]
43757  System Prefe 0.0  00:02.70 4      1    296    5632K  8192B  18M    43757 1     sleeping *0[304]
43729  com.apple.no 0.0  00:00.04 2      1    44     28K    0B     1424K  43729 1     sleeping  0[1]
43727  mdworker     0.0  00:00.07 3      1    54     52K    0B     3232K  43727 1     sleeping *0[1]
43711  Google Chrom 0.0  00:25.45 17     1    133    44M    0B     125M   1123  1123  sleeping *0[24]
43004 Google Chrom 0.2 04:07.35 19 1 150 208M 0B 62M 1123 1123 sleeping *0[26]| 命令 | 描述 |
|---|---|
| command & | 进程后台运行 |
| ctrl + c | 停止前台运行进程 |
| ctrl + z | 挂起当前进程 |
| bg | 讲挂起的进程放在后台继续运行(需配合ctrl + z使用) |
| bg [%num] | 将进程放在后台运行 |
| fg [%num] | 将进程放在前台运行 |
| kill -l | 查看所有中断信号 |
| kill -9 pid | 杀死进程 |
| jobs | 查看jobs |
[shiming@redhat profile.d]$ ps -p 1        #查看pid = 1的进程信息
  PID TTY          TIME CMD
    1 ?        00:00:03 systemd
[shiming@redhat profile.d]$ echo $$        #两个美元符号打印当前进程名
19376
[shiming@redhat profile.d]$ echo $$        #当前进程
19376
[shiming@redhat profile.d]$ bash           #新起一个子进程
[shiming@redhat profile.d]$ echo $$        #获取子进程id
21139
[shiming@redhat profile.d]$ ps --ppid 19376  #查看子进程信息
  PID TTY          TIME CMD
21139 pts/0    00:00:00 bash
https://www.thegeekstuff.com/2010/05/unix-background-job/
[shiming@redhat ~]$ vimtutor
mac自带的vim位于/usr/bin目录下,这个版本不支持将vim中的内容复制到系统剪贴板 如何查看是否支持复制到剪贴板:
vim --version
如果出现+clipboard则支持,出现-clipboard则不支持
所以需要自己重新安装vim, brew install vim --with-client-server
安装后需要做两件事:
- 做一个软连接到/usr/local/bin, 这样就会使用新装的vim,因为/usr/local/bin在path中比/usr/bin更靠前
ln -sf /usr/local/Cellar/vim/8.1.0600_1/bin/vim /usr/local/bin/vim
ln -sf /usr/local/Cellar/vim/8.1.0600_1/bin/vim /usr/local/bin/vi
2.还需要修改~/.vimrc文件,加上下面这行
set clipboard=unnamed
以后就可以在vim中visual模式选中文字进行复制(yank)了
有时没有用sudo打开文件,编辑后保存不了,会提示read-only,可以用以下命令将文件写进去,不用退出文件再sudo打开。
:w !sudo tee %命令解释: :w – write !sudo – call shell sudo command tee – the output of write (:w) command is redirected using tee % – current file name
set relativenumber可以开启相对行号
以下.vimrc配置可以在normal模式下显示相对行号,insert模式下现在正常行号
set nu
augroup relative_numbser
    autocmd!
    autocmd InsertEnter * :set norelativenumber
    autocmd InsertLeave * :set relativenumber
augroup END
https://medium.com/@realjohnnylau/vscode-vim-easymotion-%E9%85%8D%E7%BD%AE-6b64bba642cf
normal模式和插入模式指针形状如果没有区别(normal模式方块,插入模式一根竖线)可以在.vimrc文件中进行设置
参考 https://vim.fandom.com/wiki/Change_cursor_shape_in_different_modes
| 操作 | 命令 | 备注 |
|---|---|---|
| 光标左移 | h | |
| 光标右移 | l | |
| 光标下移 | j | |
| 光标上移 | k | |
| 光标移到当前屏幕顶部 | H | |
| 光标移到当前屏幕中部 | M | |
| 光标移到当前屏幕底部 | L | |
| 插入模式 | i | |
| 附加模式 | a | |
| 复制行 | yy or Y | |
| 剪切行 | dd | |
| 剪切两行 | 2dd | |
| 粘贴(光标后) | p | p for paste |
| 粘贴(光标前) | P(大写) | |
| 复制行 | yy | |
| 显示行号 | :set number | 等价于:set nu |
| 不显示行号 | :set nonumber | 等价于:set nu! |
| 显示相对行号 | :set relativenumber | 等价于:set rnu |
| 不显示相对行号 | :set norelativenumber | 等价于:set rnu! |
| 显示所有设置项 | :set all | |
| 显示用户设置 | :set | |
| 删除到本单词结尾(包括紧跟着的空格) | dw | |
| 删除到两个单词结尾(包括紧跟着的空格) | d2w | 以此类推 |
| 删除到本单词结尾(不包括紧跟的空格) | de | |
| 删除到两个单词结尾(不包括紧跟的空格) | d2e | 以此类推 |
| 删除到本行末尾 | d$ | |
| 删除到文件末尾 | dG | |
| 删除两个引号/括号中的内容(不包括引号) | di" 或 di) | i for inside |
| 删除两个引号/括号中的内容(包括引号) | da" 或 da) | |
| 删除到文件开头(包括光标所在行) | dgg/d1G | |
| 删除到指定字符(包含字符) | dfX | 删除到X,包含X |
| 删除到指定字符(不包含字符) | dtX | 删除到X,不包含X |
| 删除到指定正则匹配到的字符(不包含字符) | d/ | |
| 反向删除到指定字符(包含字符) | dFX | 删除到X,包含X |
| 反向删除到指定字符(不包含字符) | dTX | 删除到X,不包含X |
| 删除一行并进入插入模式 | cc | |
| 删除到单词结尾并进入插入模式 | ce | 方便修改该单词,c for change |
| 删除到本行末尾并进入插入模式 | c$/C(大写) | |
| 整行向右缩进 | >> | |
| 整行向左缩进 | << | |
| 撤销 | u | |
| 撤销之撤销 | ctrl + r | r for redo |
| 保存 | :w | |
| 另存为 | :w + filename | 将目前编辑的文件另存为filename |
| 保存并退出 | :wq or :ZZ | |
| 不保存退出 | :q! | q for quit |
| 跳到下一词首 | w | w for word |
| 跳到上一词首 | b | b for back |
| 跳到下2个词首 | 2w | 以此类推 |
| 跳到词尾 | e | e for end |
| 跳到下一词尾 | 2e | 以此类推 |
| 替换光标处字符 | r + <new_char> | |
| 找到该行第一个字母 | f + | |
| 跳到文本末尾 | G | |
| 跳到文本开头 | gg | |
| 跳到指定行 | + G | |
| 向下搜索 | / + | |
| 向上搜索 | ? + | |
| 查找下一个 | n | |
| 查找上一个 | N | |
| 搜索高亮 | :set hls | |
| 跳到光标上一个所在的位置 | ctrl + o | o for older |
| 跳到光标下一个所在的位置 | ctrl + i | |
| 找到对称的另一半括号(大中小括号都行) | 将光标置于括号上然后按% | |
| 替换光标行第一个匹配项 | :s/old/new/ | old为待替换字符,new为新字符 |
| 替换光标行所有匹配项 | :s/old/new/g | g for global |
| 替换指定行所有匹配项 | :#,#s/old/new/g | 两个井号代表开始行和结束行 |
| 全局替换(无确认) | :%s/old/new/g | |
| 全局替换(逐个确认) | :%s/old/new/gc | c for comfirm |
| 执行外部命令 | :! + command | 举例 :!ls :!rm file |
| 进入visual模式 | v | 进入visual模式后可以通过移动光标选中文字 |
| 复制选中文字 | visual模式选中 + y | |
| 删除选中文字 | visual模式选中 + d | |
| 选中文字另存为新文件 | visual模式选中 + :w + | |
| 在光标后插入另一文件的内容 | :r + filename | 将filename附加到光标后 |
| 在光标后插入命令行的标准输出 | :r + !ls -l | 将ls -l输出附加到光标后 |
| 在光标下插一空行 | o | o for open, open a line |
| 在光标上插一空行 | O | |
| vim | :set xxx | 'ic' 'ignorecase' ignore upper/lower case when searching 'is' 'incsearch' show partial matches for a search phrase 'hls' 'hlsearch' highlight all matching phrases 给以上选项前加上'no'即可撤销命令 |
| 查看帮助 | :help | 查看帮助时切换窗口ctrl + w |
| 个性化vim配置文件 | :e ~/.vimrc | 查看帮助时切换窗口ctrl + w |
如果vim中文乱码,在用户家目录下新建.vimrc文件,填入以下内容
set fileencodings=utf-8,gbk,utf-16le,cp1252,iso-8859-15,ucs-bom
set termencoding=utf-8
set encoding=utf-8
也可以在/etc/vim/vimrc里加在最后,但是这个文件影响所有用户,在自己家目录下的.vimrc只影响自己
[shiming@redhat ~]$ man -k passwd         #搜索与关键字passwd有关的帮助
chpasswd (8)         - update passwords in batch mode
fgetpwent_r (3)      - get passwd file entry reentrantly
getpwent_r (3)       - get passwd file entry reentrantly
gpasswd (1)          - administer /etc/group and /etc/gshadow
grub2-mkpasswd-pbkdf2 (1) - Generate a PBKDF2 password hash.
kpasswd (1)          - change a user's Kerberos password
lpasswd (1)          - Change group or user password
lppasswd (1)         - add, change, or delete digest passwords.
| num | topic | note |
|---|---|---|
| 1 | Executable programs or shell commands | 用户命令 |
| 2 | System calls (functions provided by the kernel) | 系统调用 |
| 3 | Library calls (functions within program libraries) | 库函数 |
| 4 | Special files (usually found in /dev) | 特殊文件 |
| 5 | File formats and conventions eg /etc/passwd | 文件格式 |
| 6 | Games | 游戏 |
| 7 | Miscellaneous (including macro packages and conventions), e.g. man(7), groff(7) | 惯例、标准和其他 |
| 8 | System administration commands (usually only for root) | 系统管理命令 |
| 9 | Kernel routines [Non standard] | Linux内核API |
pinfo提供更详细的帮助文档
[shiming@redhat doc]$ pinfo vim
软件包文档储存在/usr/share/doc目录下,里面包含大量软件包提供的文档说明

[shiming@redhat doc]$ echo "hello" > /tmp/hello.txt         #输出重定向,新建
[shiming@redhat doc]$ cat /tmp/hello.txt
hello
[shiming@redhat doc]$ echo "world" >> /tmp/hello.txt        #输出重定向,追加
[shiming@redhat doc]$ cat /tmp/hello.txt
hello
world
[shiming@redhat doc]$ echo "hello world" > /tmp/hello.txt   #输出重定向,覆盖
[shiming@redhat doc]$ cat /tmp/hello.txt
hello world
[shiming@redhat doc]$ echox "hello world" 2>/tmp/hello_err.txt  #错误重定向,新建
[shiming@redhat doc]$ cat /tmp/hello_err.txt
bash: echox: command not found...
Similar command is: 'echo'
[shiming@redhat doc]$ echoy "hello world" 2>>/tmp/hello_err.txt #错误重定向,追加
[shiming@redhat doc]$ cat /tmp/hello_err.txt
bash: echox: command not found...
Similar command is: 'echo'
bash: echoy: command not found...
Similar command is: 'echo'
[shiming@redhat doc]$ echoz "hello world" 2 > /tmp/hello_err.txt #重定向符号左右不能空格
bash: echoz: command not found...
Similar command is: 'echo'
[shiming@redhat doc]$ echoz "hello world" 2>/tmp/hello_err.txt   #错误重定向,覆盖
[shiming@redhat doc]$ cat /tmp/hello_err.txt
bash: echoz: command not found...
Similar command is: 'echo'
[shiming@redhat doc]$ echoz "hello world" 2>/dev/null            #将错误信息重定向到/dev/null,从而将它丢弃
[shiming@redhat doc]$ cat /dev/null                              #无输出
$ command >file 2>&1            #重定向stdout和stderr以覆盖同一个文件
$ command &>file                #与上面等效(推荐)

$ command >>file 2>&1           #重定向stdout和stderr以附加到同一个文件
$ command &>>file               #与上面等效(推荐)

#示例:
[shiming@redhat doc]$ echo "nice day" &>/tmp/nice.txt
[shiming@redhat doc]$ cat /tmp/nice.txt
nice day
[shiming@redhat doc]$ echoa "nice day" &>>/tmp/nice.txt
[shiming@redhat doc]$ cat /tmp/nice.txt
nice day
bash: echoa: command not found...
Similar command is: 'echo'
[shiming@redhat ~]$ date > /tmp/saved_timestamp
[shiming@redhat ~]$ tail -n 100 /var/log/dmesg >/tmp/last_100_boot_msg
[shiming@redhat ~]$ cat file1 file2 file3 file4 >/tmp/four_in_one
[shiming@redhat ~]$ cat /tmp/filename
[shiming@redhat ~]$ echo "new line info" >>/tmp/many_lines_of_info
[shiming@redhat ~]$ diff previous_file current_file >>/tmp/tracking_change_made
[shiming@redhat ~]$ find /etc -name passwd 2>/tmp/error
[shiming@redhat ~]$ find /etc -name passwd >/tmp/output 2>/tmp/error
[shiming@redhat ~]$ find /etc -name passwd >/tmp/output 2>/dev/null
[shiming@redhat ~]$ find /etc -name passwd &>/tmp/save_both
[shiming@redhat ~]$ find /etc -name passwd &>>/tmp/save_both

[shiming@redhat ~]$ ls | wc -l            #计算文件数
14
#将ls -l命令输出前5行重定向到 /tmp.first_five_lines文件
[shiming@redhat ~]$ ls -l | head -n 5 > /tmp/first_five_lines
[shiming@redhat ~]$ cat /tmp/first_five_lines
total 36
drwxr-xr-x. 2 shiming shiming 4096 Mar  3 11:35 Desktop
drwxr-xr-x. 2 shiming shiming 4096 Jan 13  2018 Documents
drwxr-xr-x. 2 shiming shiming 4096 Jan 13  2018 Downloads
-rw-rw-r--. 1 shiming shiming    0 Jul 28 09:41 file1
Copy standard input to each FILE, and also to standard output.
[shiming@redhat ~]$ ls -l file* | tee /tmp/saved_output   #文件中有保持,stdout也打印
-rw-rw-r--. 1 shiming shiming 0 Jul 28 09:41 file1
-rw-rw-r--. 1 shiming shiming 0 Jul 28 09:41 file2
-rw-rw-r--. 1 shiming shiming 0 Jul 28 09:41 file3
-rw-rw-r--. 1 shiming shiming 0 Jul 28 09:41 file4
-rw-rw-r--. 1 shiming shiming 0 Jul 28 09:41 file5
[shiming@redhat ~]$ ls -l file* | head -n 2 | tee /tmp/first_two_lines
-rw-rw-r--. 1 shiming shiming 0 Jul 28 09:41 file1
-rw-rw-r--. 1 shiming shiming 0 Jul 28 09:41 file2
[shiming@redhat ~]$ id
uid=1000(shiming) gid=1000(shiming) groups=1000(shiming),10(wheel) context=unconfined_u:unconfined_r:unconfined_t:s0-s0:c0.c1023

- Username: It is used when user logs in. It should be between 1 and 32 characters in length.
- Password: An x character indicates that encrypted password is stored in /etc/shadow file. Please note that you need to use the passwd command to computes the hash of a password typed at the CLI or to store/update the hash of the password in /etc/shadow file.
- User ID (UID): Each user must be assigned a user ID (UID). UID 0 (zero) is reserved for root and UIDs 1-99 are reserved for other predefined accounts. Further UID 100-999 are reserved by system for administrative and system accounts/groups.
- Group ID (GID): The primary group ID (stored in /etc/group file)
- User ID Info: The comment field. It allow you to add extra information about the users such as user’s full name, phone number etc. This field use by finger command.
- Home directory: The absolute path to the directory the user will be in when they log in. If this directory does not exists then users directory becomes /
- Command/shell: The absolute path of a command or shell (/bin/bash). Typically, this is a shell. Please note that it does not have to be a shell.
搜索用户tom
$ grep tom /etc/passwd
与用户一样,组也有名称和编号(GID)。本地组在/etc/group中定义
- 每个用户只有一个主要组
- 对于本地用户,主要组通过/etc/passwd第四个字段定义
- 通常,用户创建的新文件归主要组所有
- 通常,新建用户的主要组是名称与用户相同的新建组,用户是此用户专用组(UPG)的唯一成员
用户可以是零个或多个补充组的成员。 属于本地组补充成员的用户列在/etc/group中组条目的最后一个字段中。对于本地组,成员身份由/etc/group中组条目的最后一个字段中的逗号分隔用户列表确定。
不同的发行版有不同的包管理程序
| Operating System | Format | Tool(s) |
|---|---|---|
| Debian | .deb | apt, apt-cache, apt-get, dpkg |
| Ubuntu | .deb | apt, apt-cache, apt-get, dpkg |
| CentOS | .rpm | yum |
| Fedora | .rpm | dnf |
| FreeBSD | Ports, .txz | make, pkg |
| System | Command |
|---|---|
| Debian / Ubuntu | sudo apt-get update |
| sudo apt update | |
| CentOS | yum check-update |
| Fedora | dnf check-update |
| FreeBSD Packages | sudo pkg update |
| FreeBSD Ports | sudo portsnap fetch update |
| System | Command | Notes |
|---|---|---|
| Debian / Ubuntu | sudo apt-get upgrade | Only upgrades installed packages, where possible. |
| sudo apt-get dist-upgrade | May add or remove packages to satisfy new dependencies. | |
| sudo apt upgrade | Like apt-get upgrade. | |
| sudo apt full-upgrade | Like apt-get dist-upgrade. | |
| CentOS | sudo yum update | |
| Fedora | sudo dnf upgrade | |
| FreeBSD Packages | sudo pkg upgrade | |
| FreeBSD Ports | less /usr/ports/UPDATING | Uses less to view update notes for ports (use arrow keys to scroll, press q to quit). |
| cd /usr/ports/ports-mgmt/portmaster && sudo make install && sudo portmaster -a | Installs portmaster and uses it to update installed ports. |
| System | Command | Notes |
|---|---|---|
| Debian / Ubuntu | apt-cache search search_string | |
| apt search search_string | ||
| CentOS | yum search search_string | |
| yum search all search_string | Searches all fields, including description. | |
| Fedora | dnf search search_string | |
| dnf search all search_string | Searches all fields, including description. | |
| FreeBSD Packages | pkg search search_string | Searches by name. |
| pkg search -f search_string | Searches by name, returning full descriptions. | |
| pkg search -D search_string | Searches description. | |
| FreeBSD Ports | cd /usr/ports && make search name=package | Searches by name. |
| cd /usr/ports && make search key=search_string | Searches comments, descriptions, and dependencies. |
| System | Command | Notes |
|---|---|---|
| Debian / Ubuntu | apt-cache show package | Shows locally-cached info about a package. |
| apt show package | ||
| dpkg -s package | Shows the current installed status of a package. | |
| CentOS | yum info package | |
| yum deplist package | Lists dependencies for a package. | |
| Fedora | dnf info package | |
| dnf repoquery --requires package | Lists dependencies for a package. | |
| FreeBSD Packages | pkg info package | Shows info for an installed package. |
| FreeBSD Ports | cd /usr/ports/category/port && cat pkg-descr |
| System | Command | Notes |
|---|---|---|
| Debian / Ubuntu | sudo apt-get install package | |
| sudo apt-get install package1 package2 ... | Installs all listed packages. | |
| sudo apt-get install -y package | Assumes "yes" where apt would usually prompt to continue. | |
| sudo apt install package | Displays a colored progress bar. | |
| CentOS | sudo yum install package | |
| sudo yum install package1 package2 ... | Installs all listed packages. | |
| sudo yum install -y package | Assumes "yes" where yum would usually prompt to continue. | |
| Fedora | sudo dnf install package | |
| sudo dnf install package1 package2 ... | Installs all listed packages. | |
| sudo dnf install -y package | Assumes "yes" where dnf would usually prompt to continue. | |
| FreeBSD Packages | sudo pkg install package | |
| sudo pkg install package1 package2 ... | Installs all listed packages. | |
| FreeBSD Ports | cd /usr/ports/category/port && sudo make install | Builds and installs a port from source. |
安装包时自动确认加-y选项
sudo apt install -y nginx
| System | Command | Notes |
|---|---|---|
| Debian / Ubuntu | sudo dpkg -i package.deb | |
| sudo apt-get install -y gdebi && sudo gdebi package.deb | Installs and uses gdebi to install package.deb and retrieve any missing dependencies. | |
| CentOS | sudo yum install package.rpm | |
| Fedora | sudo dnf install package.rpm | |
| FreeBSD Packages | sudo pkg add package.txz | |
| sudo pkg add -f package.txz | Installs package even if already installed. |
| System | Command | Notes |
|---|---|---|
| Debian / Ubuntu | sudo apt-get remove package | |
| sudo apt remove package | ||
| sudo apt-get autoremove | Removes unneeded packages. | |
| CentOS | sudo yum remove package | |
| Fedora | sudo dnf erase package | |
| FreeBSD Packages | sudo pkg delete package | |
| sudo pkg autoremove | Removes unneeded packages. | |
| FreeBSD Ports | sudo pkg delete package | |
| cd /usr/ports/path_to_port && make deinstall | De-installs an installed port. |
| System | Command | Notes |
|---|---|---|
| Debian / Ubuntu | man apt-get | Updating the local package database and working with packages. |
| man apt-cache | Querying the local package database. | |
| man dpkg | Working with individual package files and querying installed packages. | |
| man apt | Working with a more concise, user-friendly interface to most basic operations. | |
| CentOS | man yum | |
| Fedora | man dnf | |
| FreeBSD Packages | man pkg | Working with pre-compiled binary packages. |
| FreeBSD Ports | man ports | Working with the Ports Collection. |
建议使用apt替代apt-get,apt是apt-get与apt-cache的常用命令集成
| apt | apt-get | function |
|---|---|---|
| apt install | apt-get install | Installs a package |
| apt remove | apt-get remove | Removes a package |
| apt purge | apt-get purge | Removes package with configuration |
| apt update | apt-get update | Refreshes repository index |
| apt upgrade | apt-get upgrade | Upgrades all upgradable packages |
| apt autoremove | apt-get autoremove | Removes unwanted packages |
| apt full-upgrade | apt-get dist-upgrade | Upgrades packages with auto-handling of dependencies |
| apt search | apt-cache search | Searches for the program |
| apt show | apt-cache show | Shows package details |
This guide covers Ubuntu and Debian package management in detail. There's an official CentOS guide to managing software with yum. There's a Fedora wiki page about dnf, and an official manual for dnf itself. This guide covers FreeBSD package management using pkg. The FreeBSD Handbook contains a section on using the Ports Collection.
递归搜索当前目录,名字为tecmint.txt
# find . -name tecmint.txt

./tecmint.txt
递归搜/home目录
# find /home -name tecmint.txt

/home/tecmint.txt
不区分小写搜索
# find /home -iname tecmint.txt

./tecmint.txt
./Tecmint.txt
搜索目录名
# find / -type d -name Tecmint

/Tecmint
find -type参数
     -type t
             True if the file is of the specified type.  Possible file types are as follows:

             b       block special
             c       character special
             d       directory
             f       regular file
             l       symbolic link
             p       FIFO
             s       socket
查找java文件
# find . -name '*.java'

person.java
main.java
配合xargs使用:递归搜索当前目录,名字为.java结尾的文件,并附加到src.txt中
# find . -name '*.java' | xargs cat >> src.txt找出777权限的文件
# find . -perm 777
找出所有的空文件
find /tmp -type f -empty找出所有的空文件夹
# find /tmp -type d -empty找出所有的隐藏文件
# find /tmp -type f -name ".*"找出某个用户的文件
# find / -user root -name tecmint.txt找出某个组的文件
# find /home -group developer找出近50天修改的文件
# find / -mtime 50找出近50天打开过的文件
# find / -atime 50找出50~100天内修改的文件
# find / -mtime +50 –mtime -1001小时内有文件属性变化
# find / -cmin -601小时文件内容变化
# find / -mmin -60大于50小于100M的文件
# find / -size +50M -size -100M找出并删除大于10M的mp3文件
# find / -type f -name *.mp3 -size +10M -exec rm {} +find找出路径后配合其他命令使用:
# 推荐,并行处理,无需借助管道
find . -exec cmd {} +

# 推荐,并行处理,速度快
find . -print0 | xargs -0 cmd

# 文件名有空格时将不能处理
find . | xargs cmd

# 不推荐,命令一行行执行,不是并行,速度最慢
find . -exec cmd {} \;
参考: 35个find示例 linux find中的-print0和xargs中-0的奥妙
sed的意思是Stream EDitor,即流式编辑器,sed命令实现对文件的”增删改查“,玩转sed是写自动化脚本必须的基础之一。
sed遵循简单的工作流:
- 读取(从输入中读取某一行)
- 执行(在某一行上执行sed命令)
- 显示(把结果显示在输出中)
- 默认是显示修改后内容,不会修改原文件,除非使用-i 参数。
查找并替换文件中搜索到的内容 linux下:
sed -i 's/original/new/g' file.txtmac下的sed命令略有区别,前面还需要指定一个备份文件后缀。
sed -i '.bup' 's/original/new/g' file.txt

# 如果不需要备份也可以这么写的
sed -i '' 's/original/new/g' file.txt执行以下命令
wget http://update.aegis.aliyun.com/download/uninstall.sh && chmod +x uninstall.sh && ./uninstall.sh
执行以下命令
wget http://update.aegis.aliyun.com/download/quartz_uninstall.sh && chmod +x quartz_uninstall.sh && ./quartz_uninstall.sh
删除残留
pkill aliyun-service && rm -fr /etc/init.d/agentwatch /usr/sbin/aliyun-service && rm -rf /usr/local/aegis*
屏蔽云盾
iptables -I INPUT -s 140.205.201.0/28 -j DROP
iptables -I INPUT -s 140.205.201.16/29 -j DROP
iptables -I INPUT -s 140.205.201.32/28 -j DROP
iptables -I INPUT -s 140.205.225.192/29 -j DROP
iptables -I INPUT -s 140.205.225.200/30 -j DROP
iptables -I INPUT -s 140.205.225.184/29 -j DROP
iptables -I INPUT -s 140.205.225.183/32 -j DROP
iptables -I INPUT -s 140.205.225.206/32 -j DROP
iptables -I INPUT -s 140.205.225.205/32 -j DROP
iptables -I INPUT -s 140.205.225.195/32 -j DROP
iptables -I INPUT -s 140.205.225.204/32 -j DROP
(1)安装 MySQL 是一个小型关系型数据库管理系统,其安装分为服务端与客户端 安装命令如下:
$ sudo apt-get install mysql-server mysql-client # 这样安装的会是mysql 5.5左右
然后会看见输入密码的界面,你只需接下来输入管理员密码就行。
(2)修改 MySQL 的配置文件
$ sudo vim /etc/mysql/my.cnf
将 bind-address = 127.0.0.1 注释掉,就可以远程连接数据库了 https://github.com/rackerlabs/rackspace-how-to/edit/master/content/cloud-servers/installing-mysql-server-on-ubuntu.md
安装mysql后默认只支持127.0.0.1访问3306端口
shiming@ubuntu:/etc/mysql/conf.d$ netstat -aptn
(Not all processes could be identified, non-owned process info
 will not be shown, you would have to be root to see it all.)
Active Internet connections (servers and established)
Proto Recv-Q Send-Q Local Address           Foreign Address         State       PID/Program name
tcp        0      0 127.0.1.1:53            0.0.0.0:*               LISTEN      -
tcp        0      0 0.0.0.0:22              0.0.0.0:*               LISTEN      -
tcp        0      0 127.0.0.1:631           0.0.0.0:*               LISTEN      -
tcp        0      0 127.0.0.1:3306          0.0.0.0:*               LISTEN      -
tcp        0      0 10.1.1.236:22           10.1.1.232:50221        ESTABLISHED -
tcp        0      0 10.211.55.7:22          10.211.55.2:50237       ESTABLISHED -
tcp6       0      0 :::22                   :::*                    LISTEN      -
tcp6       0      0 ::1:631                 :::*                    LISTEN      -
要想让mysql listen 0.0.0.0:3306需要在其配置文件/etc/mysql/mysql.conf.d/mysqld.cnf找到bind-address = 127.0.0.1改成 bind-address = 0.0.0.0 这个操作需要管理员权限
然后重启mysql
systemctl restart mysql
再次查看端口状态,发现已经在监听0.0.0.0:3306了
shiming@ubuntu:/etc/mysql/mysql.conf.d$ netstat -aptn
(Not all processes could be identified, non-owned process info
 will not be shown, you would have to be root to see it all.)
Active Internet connections (servers and established)
Proto Recv-Q Send-Q Local Address           Foreign Address         State       PID/Program name
tcp        0      0 127.0.1.1:53            0.0.0.0:*               LISTEN      -
tcp        0      0 0.0.0.0:22              0.0.0.0:*               LISTEN      -
tcp        0      0 127.0.0.1:631           0.0.0.0:*               LISTEN      -
tcp        0      0 0.0.0.0:3306            0.0.0.0:*               LISTEN      -
试下使用外网地址连接
shiming@ubuntu:/etc/mysql/mysql.conf.d$ mysql -h 10.211.55.7:3306 -u root -p
Enter password:
ERROR 2005 (HY000): Unknown MySQL server host '10.211.55.7:3306' (0)
shiming@ubuntu:/etc/mysql/mysql.conf.d$ mysql -h 10.211.55.7 -P 3306 -u root -p
Enter password:
ERROR 1130 (HY000): Host 'ubuntu.shared' is not allowed to connect to this MySQL server
发现失败了,第一个原因是不支持host:3306这样方式,需要用-h 10.211.55.7 -P 3306这样的方式,第二个原因是mysql的root账户只开启了localhost访问权限,登录后使用SELECT host FROM mysql.user WHERE User = 'root';命令可查看
shiming@ubuntu:/etc/mysql/mysql.conf.d$ mysql -u root -p
Enter password:
Welcome to the MySQL monitor.  Commands end with ; or \g.
Your MySQL connection id is 6
Server version: 5.7.23-0ubuntu0.16.04.1 (Ubuntu)

Copyright (c) 2000, 2018, Oracle and/or its affiliates. All rights reserved.

Oracle is a registered trademark of Oracle Corporation and/or its
affiliates. Other names may be trademarks of their respective
owners.

Type 'help;' or '\h' for help. Type '\c' to clear the current input statement.

mysql> SELECT host FROM mysql.user WHERE User = 'root';
+-----------+
| host      |
+-----------+
| localhost |
+-----------+
1 row in set (0.00 sec)
新建一个mysql user赋予远程访问权限
mysql> CREATE USER 'shiming'@'localhost' IDENTIFIED BY 'pass';
Query OK, 0 rows affected (0.00 sec)

mysql> GRANT ALL PRIVILEGES ON *.* TO 'shiming'@'localhost' WITH GRANT OPTION;
Query OK, 0 rows affected (0.00 sec)

mysql> CREATE USER 'shiming'@'%' IDENTIFIED BY 'pass';
Query OK, 0 rows affected (0.00 sec)

mysql> GRANT ALL PRIVILEGES ON *.* TO 'shiming'@'%' WITH GRANT OPTION;
Query OK, 0 rows affected (0.00 sec)

mysql> FLUSH PRIVILEGES;
Query OK, 0 rows affected (0.00 sec)
使用新建的用户登录,登录成功
Edit → Keyboard Shortcuts menu. 下可配置快捷键
ssh-copy-id将本地公钥copy到远程服务器允许的主机中去
$ ssh-copy-id -i ~/.ssh/id_rsa.pub root@47.52.96.235
/usr/bin/ssh-copy-id: INFO: Source of key(s) to be installed: "/Users/Shiming/.ssh/id_rsa.pub"
The authenticity of host '47.52.96.235 (127.0.0.1)' can't be established.
ECDSA key fingerprint is SHA256:H0LIGfcGjxFjilR+V6IQt/T97MGRczTQvmx2jXE3Irs.
Are you sure you want to continue connecting (yes/no)? yes
/usr/bin/ssh-copy-id: INFO: attempting to log in with the new key(s), to filter out any that are already installed
/usr/bin/ssh-copy-id: INFO: 1 key(s) remain to be installed -- if you are prompted now it is to install the new keys
root@47.52.96.235's password:

Number of key(s) added:        1

Now try logging into the machine, with:   "ssh 'root@47.52.96.235'"
and check to make sure that only the key(s) you wanted were added.
ssh远程连接服务器老是超时自动断开,如何保持不断? 方案一:在客户端设置 方法很简单,只需在客户端电脑上编辑(需要root权限)/etc/ssh/ssh_config,并添加如下一行:
ServerAliveInterval 30
此后该系统里的用户连接SSH时,每30秒会发一个KeepAlive请求,避免被踢。
方案二:在服务器设置 如果有相应的权限,也可以在服务器端设置,即编辑/etc/ssh/sshd_config,并添加:
ClientAliveInterval 60
重启SSH服务器后该项设置会生效。每一个连接到此服务器上的客户端都会受其影响。应注意启用该功能后,安全性会有一定下降(比如忘记登出时……)
https://code.visualstudio.com/docs/setup/mac
Ubuntu开机之后会执行/etc/rc.local文件中的脚本,可以直接在/etc/rc.local中添加启动脚本, 要添加到语句:exit 0 前面才行。
sudo vi /etc/rc.localrc.local文件:
#!/bin/sh -e
#
# rc.local
#
# This script is executed at the end of each multiuser runlevel.
# Make sure that the script will "exit 0" on success or any other
# value on error.
#
# In order to enable or disable this script just change the execution
# bits.
#
# By default this script does nothing.

# add by shiming to auto run in system restart for bitcoin testnet and ethereum testnet
nohup geth --testnet --datadir /mnt/ethereum/ --syncmode "full" --rpc --ws &
nohup btcd --testnet --datadir /mnt/bitcoin/ &
exit 0nginx 的配置文件位置为 /etc/nginx/nginx.conf
但是在这个配置中include了其他配置文件
        include /etc/nginx/conf.d/*.conf;
        include /etc/nginx/sites-enabled/*;
所以我们在conf.d中编写配置文件即可 /etc/nginx/conf.d/btcd.conf
server{
        listen 9000;   # 对外端口
        # using web1 sub domain to access
        server_name 127.0.0.1 47.75.70.201;
        access_log  /var/log/nginx/btcd.log;

        location / {
            proxy_pass http://127.0.0.1:18334; # 代理端口
            proxy_read_timeout 300;
            proxy_connect_timeout 300;
            proxy_redirect     off;

            proxy_set_header   X-Forwarded-Proto $scheme;
            proxy_set_header   Host              $http_host;
            proxy_set_header   X-Real-IP         $remote_addr;
        }
    }
配置完了检查nginx配置是否正确
$ conf.d nginx -t
nginx: the configuration file /etc/nginx/nginx.conf syntax is ok
nginx: configuration file /etc/nginx/nginx.conf test is successful
重启nginx生效配置
➜ conf.d systemctl restart nginx查看端口是否被监听
➜  conf.d lsof -i:9000
COMMAND  PID     USER   FD   TYPE DEVICE SIZE/OFF NODE NAME
nginx   2821     root    7u  IPv4 535089      0t0  TCP *:9000 (LISTEN)
nginx   2822 www-data    7u  IPv4 535089      0t0  TCP *:9000 (LISTEN)
nginx   2823 www-data    7u  IPv4 535089      0t0  TCP *:9000 (LISTEN)
nginx   2824 www-data    7u  IPv4 535089      0t0  TCP *:9000 (LISTEN)
nginx   2825 www-data    7u  IPv4 535089      0t0  TCP *:9000 (LISTEN)
nginx   2826 www-data    7u  IPv4 535089      0t0  TCP *:9000 (LISTEN)
nginx   2827 www-data    7u  IPv4 535089      0t0  TCP *:9000 (LISTEN)
nginx   2828 www-data    7u  IPv4 535089      0t0  TCP *:9000 (LISTEN)
nginx 2830 www-data 7u IPv4 535089 0t0 TCP *:9000 (LISTEN)执行以下命令
ln -s "/Applications/Sublime Text.app/Contents/SharedSupport/bin/subl" /usr/local/bin/sublime参考 https://olivierlacan.com/posts/launch-sublime-text-3-from-the-command-line/
清除Linux的最近登录日志和Bash历史 http://topspeedsnail.com/clear-last-linux-login-log/
使用tor实现匿名扫描/SSH登录 http://topspeedsnail.com/use-tor-hide-your-ass/
-bash: warning: setlocale: LC_CTYPE: cannot change locale (UTF-8): No such file or directory centos ssh登录,登录成功但是报 -bash: warning: setlocale: LC_CTYPE: cannot change locale (UTF-8): No such file or directory
➜  ~ ssh shiming@10.211.55.13
shiming@10.211.55.13's password:
Last login: Sat Oct 13 19:33:34 2018
-bash: warning: setlocale: LC_CTYPE: cannot change locale (UTF-8): No such file or directory
[shiming@centos ~]$
解决方案:
sudo vi /etc/environment然后加上这两行,再次登录就不会报了:
LANG=en_US.utf-8
LC_ALL=en_US.utf-8
- 先判断ssh是否安装
shiming@ubuntu:/etc/ssh$ ps -e | grep ssh
shiming@ubuntu:/etc/ssh$ /etc/init.d/ssh -start
bash: /etc/init.d/ssh: No such file or directory
shiming@ubuntu:/etc/ssh$ whichis ssh
whichis: command not found
发现ssh未安装
- 安装ssh-server
shiming@ubuntu:/etc/ssh$ sudo apt-get install openssh-server- 启动ssh服务
shiming@ubuntu:/etc/ssh$ systemctl start sshd
shiming@ubuntu:/etc/ssh$ ps -e|grep ssh
5602 ? 00:00:00 sshd- 本地连接ssh进行测试
shiming@ubuntu:/etc/ssh$ ssh shiming@localhost
The authenticity of host 'localhost (127.0.0.1)' can't be established.
ECDSA key fingerprint is SHA256:fHN3yPgM87SlGdXxzvvCGzqf3ARmN2iyyq9EfNwSMo4.
Are you sure you want to continue connecting (yes/no)? yes
Warning: Permanently added 'localhost' (ECDSA) to the list of known hosts.
shiming@localhost's password:
Welcome to Ubuntu 16.04.3 LTS (GNU/Linux 4.10.0-28-generic x86_64)- ifconfig查看外网地址 inet即外网地址
shiming@ubuntu:/etc/ssh$ ifconfig
enp0s5    Link encap:Ethernet  HWaddr 00:1c:42:28:80:a2
          inet addr:10.211.55.7  Bcast:10.211.55.255  Mask:255.255.255.0
          inet6 addr: fe80::2598:3ddc:aea:479b/64 Scope:Link
          inet6 addr: fdb2:2c26:f4e4:0:2cb3:821a:c4:a047/64 Scope:Global
          inet6 addr: fdb2:2c26:f4e4:0:2991:5c69:98eb:d6a5/64 Scope:Global
          UP BROADCAST RUNNING MULTICAST  MTU:1500  Metric:1
          RX packets:1142 errors:0 dropped:0 overruns:0 frame:0
          TX packets:840 errors:0 dropped:0 overruns:0 carrier:0
          collisions:0 txqueuelen:1000
          RX bytes:1332342 (1.3 MB)  TX bytes:83530 (83.5 KB)

lo        Link encap:Local Loopback
          inet addr:127.0.0.1  Mask:255.0.0.0
          inet6 addr: ::1/128 Scope:Host
          UP LOOPBACK RUNNING  MTU:65536  Metric:1
          RX packets:310 errors:0 dropped:0 overruns:0 frame:0
          TX packets:310 errors:0 dropped:0 overruns:0 carrier:0
          collisions:0 txqueuelen:1000
RX bytes:27329 (27.3 KB) TX bytes:27329 (27.3 KB)- 通过外网进行ssh连接(略)
https://askubuntu.com/questions/353911/hitting-arrow-keys-adds-characters-in-vi-editor
关闭图形界面可以让虚拟机少占用一些资源 参考: https://wiki.zthxxx.me/wiki/%E6%8A%80%E6%9C%AF%E5%BC%80%E5%8F%91/Linux/Ubuntu/Ubuntu-16-%E5%BC%80%E6%9C%BA%E9%BB%98%E8%AE%A4%E5%91%BD%E4%BB%A4%E8%A1%8C%E7%95%8C%E9%9D%A2/
shiming@ubuntu:~$ sudo systemctl set-default multi-user.target
[sudo] password for shiming:
Created symlink from /etc/systemd/system/default.target to /lib/systemd/system/multi-user.target.➜ ~ systemctl set-default multi-user.target
Removed symlink /etc/systemd/system/default.target.
Created symlink from /etc/systemd/system/default.target to /usr/lib/systemd/system/multi-user.target.$ hostnamectlhostnamectl set-hostname newhostnameyouwantssh -e none root@47.75.70.201 "cat /tmp/bb.conf" | pbcopy #到本地剪贴板
pbpaste > /tmp/bb.txt #本地剪贴板到本地文件https://stackoverflow.com/questions/39861793/how-update-vim-to-8-0-version-in-osx
spacevim使用的是nerd字体,系统一般都没有装,会导致图标乱码,虽然不影响使用,但是看到乱码很烦人
安装字体的步骤(mac好装,有brew命令,以下是linux的安装步骤):
- 去nerd官网找到对应的系统 https://nerdfonts.com/,下载字体压缩文件,比如ubuntu
https://github.com/ryanoasis/nerd-fonts/releases/download/v2.0.0/Ubuntu.zip - 在linux中解压字体包,得到.ttf的字体文件
- 将字体文件复制到
/usr/share/founts目录或者/usr/local/share/fonts目录,如果目录不存在就新建
问题原因: Mac OS X ssh登陆Linux是终端提示cannot change locale
man命令运行后一直出这个提示,字符集问题,先运行:
sudo locale-gen "en_US.UTF-8"
sudo dpkg-reconfigure locales
然后在/etc/default/locale加入以下行
LC_ALL="en_US.UTF-8"