This repository includes the Unity project to complete the final project for "Intro to HCI (CMSC 20300)."
The project features a simple scuba-diving-esque scene, for which you must improve and complete the player's user interface. All the instructions for the homework are in the class wiki.
Download and install Unity Hub (https://unity3d.com/get-unity/download). Then, make sure to add Unity version 2019.4.15f1 via the hub (this is a long-term support version as of 2020/11/22). Most computers should be able to handle this project without any problems (we have tested this on new/old laptops on windows and mac).
After you have downloaded the project, you can start the "game" (the experience) by clicking in the play button.
Here for more source and more details: https://docs.unity3d.com/Manual/UsingTheEditor.html

- Click the play button to start.

- If you are having difficulties starting the project, read the introduction to unity's interface below (section 6.2)

Use your mouse to orient the player and the following keys for navigation:
- w: move forward.
- a: move to the left.
- d: move to the right.
- s: move backwards.
- SPACE: jump.
- SHIFT: run.
- Left click (in Game Screen): interact with a UI button.
The keys remain the same when you go underwater, but you may have a harder time jumping due to the pressure from the water. Special note: when you call the emergency frequency, you're game restarts.
Within the scene are 3 main user interface categories:
- (A) An arm-anchored user interface, which includes some basic transmitter functionality.
- (B) Flat interfaces for the Heads Up Display. For example, we developed the "Oxygen Level" gauge in class.
- (C) 3D interfaces for the Heads Up Display, including the compass, which shows you the North and a target direction.

Additionally, there are three crewmates on boats scattered across your map: Pedro, Romain, and Suzie, which you can see are selected below.

These crewmates will attempt to call you and their information (to call them or find their location) can be accessed via the Call Tower Manager (see Section 5).
To complete your homework, you may need to implement some UIs or simple code that interfaces with parts of the existing project. Below we provide a list of key scripts, game objects, and functions you may want to keep in mind:
- Game Objects:
Player: the player, includes the camera, arm, arm UI, and 3D UI nested under it.Pedro,Romain,Suzie: your crewmates! (But you shouldn't be accessing their game objects directly!)Information Manager: this is the game object that holds theInformationManagerscript, from which you can get key info about things like oxygen or battery levels.Call Tower Manager: this is the game object that holds theCallTowerManagerscript, from which you can get key info like crewmate names, coordinates, and frequencies.HUD Flat UI: this is the canvas with flat HUD interfaces, like the oxygen bar made in class.Goggles (UI): this is the game object with the objects that form the 3D HUD interfaces, like the compass.Arm UI: this is the canvas with the UI anchored on the player's arm.
- Scripts:
InformationManagerscript functions of interest:float GetDepth()returns the user's current depth.int GetBatteryLevel()returns the current battery level. This value does not replenish!int GetOxygenLevel()returns the current oxygen level. This value replenishes out of water.int GetMaxOxygenLevel()returns the maximum oxygen level.
CallTowerManagerscript functions of interest:CrewInfo[] GetCrewmatesInformation()returns aCrewInfo[]array of crewmate information, including name, position, and call frequency. SeeCrewInfofor the struct.int GetFrequencyMin()returns the minimum frequency for crewmate calls.int GetFrequencyMax()returns the maximum frequency for crewmate calls.int GetEmergencyFrequency()returns the emergency frequency number, which is unique and outside of the regular frequency range.AudioClip CallCrewmate(int frequency)returns the appropriate audio clip based on the frequency you gave the function.
SimpleDialscript (on theForearm) functions of interest:void QuickDial(int freq)attempts to make a call to the given frequency if you are not currently busy with an incoming call or in a call (or forgot to hang up!).void AnswerCall()attempts to answer an incoming call if there is currently one occurring.void HangUp()attempts to hang up if you are currently busy (incoming call, in a call, or forgot to hang up).
- Scenes (in the
Scenesfolder!):Underwater: the main game scene.GameOverBattery: game over screen when your battery runs out.GameOverOxygen: alternative game over screen when your oxygen runs out.
Check the homework instructions in the class wiki.
We highly recommend you start by completing this tutorial: https://docs.unity3d.com/ScriptReference/
Here for more source and more details: https://docs.unity3d.com/Manual/UsingTheEditor.html
- (A) The Toolbar provides access to the most essential working features. On the left it contains the basic tools for manipulating the Scene view and the GameObjects within it. In the centre are the play, pause and step controls. To run the application, press the play button. The game view (C) should now be running the game and the play button should turn blue.
You can either pause the game or stop your game by pressing the play button again. Note that all the new changes made after running the game will only be applied on the next instance. Inspector (E) values change during the gameplay will also reset once you stop the game.
- (B) The Hierarchy window is a hierarchical text representation of every GameObject (objects in your game) in the Scene. Each item in the Scene has an entry in the hierarchy, so the two windows are inherently linked. The hierarchy reveals the structure of how GameObjects attach to each another following a parent-child structure. Children's reference (i.e. coordinates) are based on the parent's unless specified, and the root parent to the world's.
- (C) The Game view simulates what your final rendered game will look like through your Scene Cameras. When you click the Play button, the simulation begins.
- (D) The Scene view allows you to visually navigate and edit your Scene. The Scene view can show a 3D or 2D perspective, depending on the type of Project you are working on. If you can't see the scene window, you can find it in a tab on the central window next to the Game view.
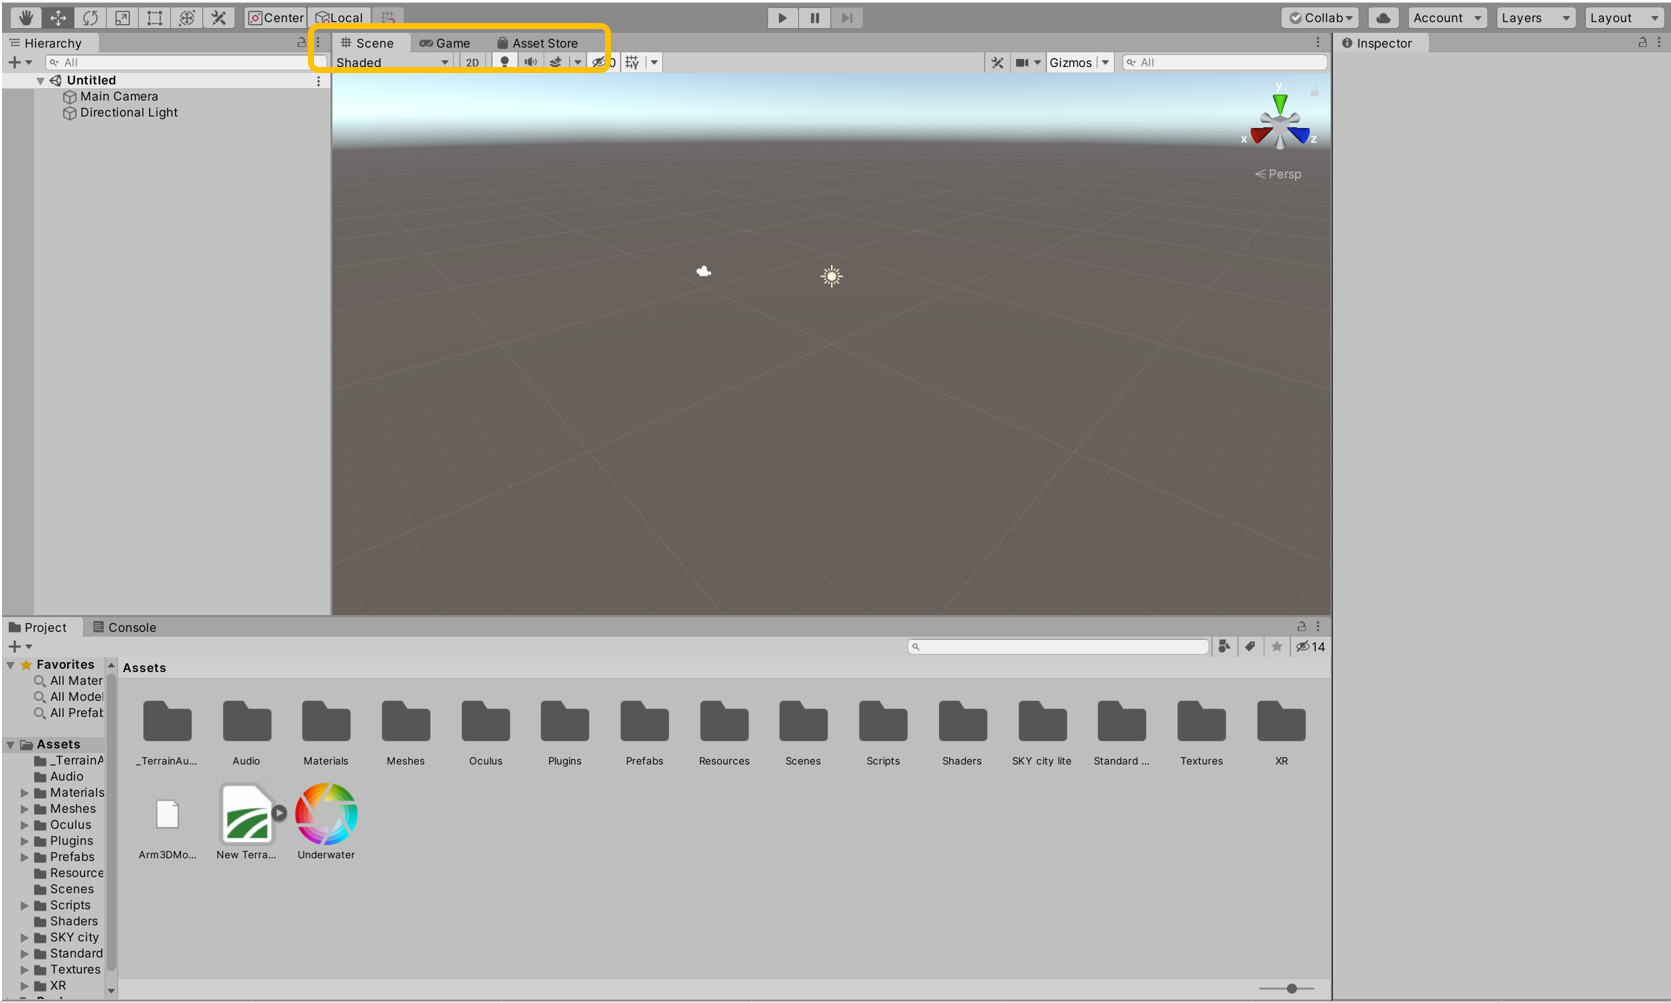
- (E) The Inspector Window allows you to view and edit all the properties of the currently selected GameObject. Because different types of GameObjects have different sets of properties, the layout and contents of the Inspector window change each time you select a different GameObject. Please refer to the later section about how to display variables in the inspector.
- (F) The Project window displays your library of Assets (scripts, 3D files, shaders, etc...) that are available to use in your Project. When you import Assets into your Project, they appear here.

You can also visit the Asset Store if you wish to add premade 3D elements, scripts etc... to your project. Please only use free assets and delete all unused ones to avoid having a large project file.

When working in Unity, you'll especially be working with things called GameObjects this is essentially anything that is in the scene's hierarchy.

As you can see above, the key_silver GameObject is being selected. When selected, we get to see the GameObject highlighted in the Scene window as well as its components in the Inspector window. By default, all GameObjects include things like a name and Transform component, the later holds information like the object's position, rotation, and scale.

Additionally, GameObjects can be nested within each other. In this case, the key_silver doesn't actually hold its 3D model information, in fact a GameObject nested inside of key_silver is the model (pPlane3).

As seen in the Inspector, GameObjects have components, which are usually Scripts added to the object. You can add new components by clicking "Add Component" in the inspector, or you can add your own custom scripts by dragging and dropping them into the object's Inspector window.

Here, we drag and dropped the ButtonTrigger script to add it as a components of key_silver. New components usually appear at the end.
You need to know there are two different types of variables in Unity: private and public variables.
We will explain this with a simple example you see in the below.

There is a character (Ethan) standing on a plain. We will try to rotate Ethan with a simple script, which we call Rotate Character and is attached to Ethan's game object.

Inside the script, we define two variables: x_axis and y_axis, which respectively control the rotation of Ethan around x and y axes.
Importantly, we define x_axis as a public float while y_axis as a private float.
And we only dectate the value (-90) of y_axis in the script.
Let's see how this script turns out to be...

Then, when you go back to the inspector, now you can see the variable, x_axis which you can directly manipulate on the inspector; this is very useful and we highly recommend you to take advantage of it.
Whereas, we never see anything regarding y_axis on the inspector. This is the fundamental difference between private and public variables. If you want to make your variable accessible from outside of a specific script, you have to define it as a public variable.
When you do not put any prefix (i.e., private or public) to your variables, Unity automatically regards them as private variables which you can only make change on them through the scope of the original script.
Now, we've set the value of x_axis to 40 on the Unity's inspector window.
Let's see the result by playing the scene.

As you can see, Ethan is now facing to the view (because of y_axis) and tilted (because of x_axis).
Further, public variables can be referred by external scripts.
We show this with the following example.

Now, let's create additional (empty) game object called 'External Controller' and attach a new script titled 'externalController'.

In this script, we define another public variable, 'original' in which we can call the public variable, 'x_axis'.
And, we try to read the value of 'x_axis' and show it on the console.

Make sure that you assign the Ethan object to the public variable, 'original' on the inspector.

As you can see, now we could successfully read the value of the public variable from the external script.
By editing 'externalController', you can also manipulate 'x_axis'.