![]()
-
Go to the releases page and download the
rhubarb_lipsync_ng<your_system>*.zipfile to your PC. For example:rhubarb_lipsync_ng-Windows-1.4.1.zipfor Windows. -
Run Blender, go to the
Main menu/Edit/Preferences/Addons. Click the Install button (top right) and select the downloaded zip file (don't unzip the file).

-
After a short moment, the plugin will install and show up. Enable the plugin by ticking the checkbox in front of the plugin name.
-
Verify the
rhubarbexecutable is working by pressing the Check rhubarb version button. Note the plugin wraps the executable from the rhubarb-lip-sync project.

Note: Generally, each time you see a button is disabled, hover the mouse cursor over the button and a popup will show the reason.
-
There should now be a new RLSP tab visible in the 3D view with two panels. First, create a new
Capturein the current scene by pressing the Create capture button in theRLSP: Sound setup and cues capturepanel. -
Select a sound file.
- Note the plugin can convert sound files to the supported formats.
- For a better experience: Enable
Audio ScrubbingCacheandSync to Audio. - Optionally, place the
sound stripin theSequencerby pressing the Place as Strip button. You can set the start frame here, but if you change the start frame later, you need to remove the strip and place it again.
-
Press the Capture button. The list of Cues should get populated. Note:
- The capture task runs in the background, so you can still use Blender while it is running. You can even create and run another capture(s) concurrently. However, pressing
Escwill cancel the running operator. - The underlying
rhubarb cliis also able to utilize multiple threads, but only for longer sound clips. It runs single-threaded for short sounds. - There are additional capture options available when pressing the small
⌄button beside theCapturebutton, such as extended-shapes usage or Dialog file. The dialog file is a sound transcription that can improve accuracy, but only works for English.
- The capture task runs in the background, so you can still use Blender while it is running. You can even create and run another capture(s) concurrently. However, pressing
-
You can preview the captured cues by clicking on the cue lists. Too short or too long cues are highlighted in red. You can also start playback, and the small icon will follow the cues. However, there is probably some refreshing bug, and sometimes the icon doesn't refresh unless the mouse cursor is moving over the panel.

-
Open the other panel
RLSP: Cue mapping and bakingand select theObjectyou want to animate. For bone animation, select an armature. For shape-key animation, select a mesh. -
For each
Cue type, select the appropriate Action. Note:-
Use the
?button to show a hint about the expected mouth shape (copied from therhubarb-clipage). -
Usually, your
Actionswould have a single keyframe on the first frame (a.k.a. pose). But multi-frame actions are supported as well. -
It is possible to map the same
Actionto multipleCue types. For instanceAandX. -
Using
Action-sheetwhere multiple cues are on different frames of the sameActionis supported too. Use the custom frame range button to select the desired (sub)range: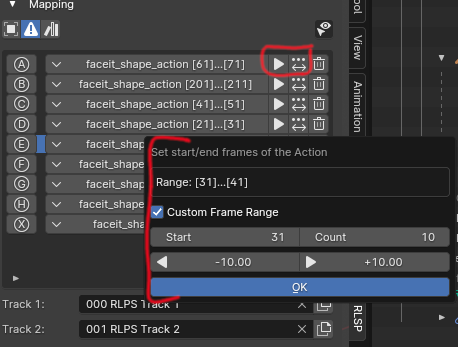
-
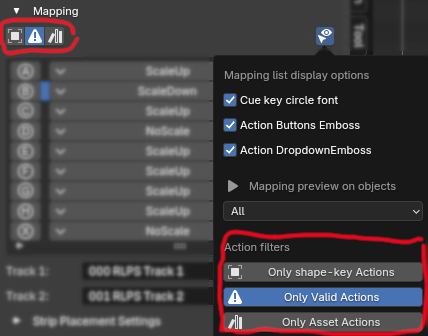
There are action-filters available that can be used to narrow down the selection in the dropdowns. Use this, for instance, if all your poses are flagged as an asset. Or if you want to make invalid Actions (with a missing key) show up as well.
-
-
Select or create
NLA Track. For 2D animation use a single track. But for 3D two tracks are preferable since it allows the placedAction stripsto interleave and fluently blend their influence.
-
You can tweak the
Strip placement settings. For 2D animation theIn Out Blend Typeshould beNo Blending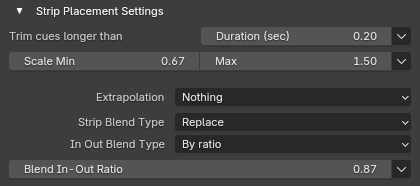


-
Press the big Bake to NLA button. This will bring up an additional dialog with a few more baking options and information:
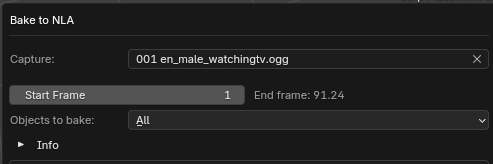
- Select the
Capture(cue list) to be baked. It matches the one selected earlier in theRLSP: Sound setup and cues capturepanel. Note it is possible to bake multiple Captures and bake them one-by-one reusing the same mapping. - You can again set/change the
Start Framehere. - The
Object to bakeoption indicates whichObjectsshould be considered for baking. By default, allObjectswith non-empty mapping will get baked at once. For example, there could be mapping on the Armature with the basic animation. Additionally, there could be mapping on the mesh with some corrective shape-key Actions. Or it could be useful where there are separate Objects for the tongue and teeth.
- Select the
-
Review errors/warnings and press the Ok button. Note:
- The baking might still work even with some errors/warnings.
- If you are repeating the bake,press the Remove strips button to remove the previously baked
Actionsand make room for newStrips.
-
After the baking is done, review the baking report. The report is shown only when there were any baking errors/warnings.


-
Open the
NLA Editor. You can tweak the position/length/blending of theNLA Strips. Some default Strip properties can be changed in theStrip placement settingssection. However, theBake to NLAwould have to be run again (removing the existingStripsfirst). -
Hint: In Blender, it is possible to change a property of multiple objects at once. For instance, to enable auto-blending on all strips:
- Select all the strips in the NLA (press the
akey). 2x Shift-clickany of the already selected strips again to make it active. This should show the side panel.Alt+clicktheAuto Blend In/Outto distribute the change to all the selected strips.
- Select all the strips in the NLA (press the
If needed, the NLA Tracks can be baked into a single new Action. Note, if you have both a normal-action track pair and a shapekey-action track pair, they have to be baked one-by-one.
- Select the Armature and go to
Pose mode(for normal-action tracks). - Select the Bones you want to bake. For example, press
ato select all. - Select the strips in the NLA track you want to bake. Use the
bkey and box-select strips if you don't want to include all tracks. - Then go to
NLA Editor/main menu/Edit/Bake Action. - Consider checking the
Visual KeyingandClean Curvesoptions:

A new Action will be created and selected in the Action Editor. The two RLPS tracks can now be disabled or removed (mouse-hover on the track name and press x).
Any Blender version newer than v3.2. Test results:
| Version | System | Total | Passed | Failed | Errors | Skipped | Status |
|---|---|---|---|---|---|---|---|
| 4.1.1 | Windows | 44 | 42 | 0 | 0 | 2 | ✔️ |
| 4.0.2 | Windows | 44 | 42 | 0 | 0 | 2 | ✔️ |
| 3.6.13 | Windows | 44 | 42 | 0 | 0 | 2 | ✔️ |
| 3.5.1 | Windows | 44 | 42 | 0 | 0 | 2 | ✔️ |
| 3.4.1 | Windows | 44 | 42 | 0 | 0 | 2 | ✔️ |
| 3.3.20 | Windows | 44 | 42 | 0 | 0 | 2 | ✔️ |
| 3.2.2 | Windows | 44 | 33 | 7 | 2 | 2 | ❌ |
| 3.1.2 | Windows | 44 | 33 | 7 | 2 | 2 | ❌ |
| 3.0.1 | Windows | 44 | 33 | 7 | 2 | 2 | ❌ |
- Inspired by the scaredyfish/blender-rhubarb-lipsync.
- The underlying engine rhubarb-lip-sync project.