A frame-based layout framework that works with UIView, NSView, CALayer, any anything else that implements setFrame:. Avoid Interface Builder and Auto Layout and take full control over your layouts.
Here is an example of a view with an image, title label, and multi-line description label with a dynamic height.
// TableViewCellView.h
#import <YOLayout/YOLayout.h>

@interface TableViewCellView : YOView // Subclass YOView
@end

// TableViewCellView.m
@interface TableViewCellView ()
@property UILabel *titleLabel;
@property UILabel *descriptionLabel;
@end

@implementation TableViewCellView

- (void)viewInit {
  [super viewInit];
  UIImageView *imageView = [[UIImageView alloc] initWithImage:[UIImage imageNamed:@"information.png"]];
  [self addSubview:imageView];

  self.titleLabel = [[UILabel alloc] init];
  self.titleLabel.numberOfLines = 1;
  self.titleLabel.lineBreakMode = NSLineBreakByTruncatingTail;
  self.titleLabel.font = [UIFont boldSystemFontOfSize:16];
  [self addSubview:self.titleLabel];

  self.descriptionLabel = [[UILabel alloc] init];
  self.descriptionLabel.font = [UIFont systemFontOfSize:16];
  self.descriptionLabel.numberOfLines = 0; // Multi-line label (word wrapping
  self.descriptionLabel.lineBreakMode = NSLineBreakByWordWrapping;
  [self addSubview:self.descriptionLabel];

  YOSelf yself = self;
  self.viewLayout = [YOLayout layoutWithLayoutBlock:^CGSize(id<YOLayout> layout, CGSize size) {
    CGFloat x = 10;
    CGFloat y = 10;

    // imageView's size is set by the UIImage when using initWithImage:
    CGRect imageViewFrame = [layout setOrigin:CGPointMake(x, y) view:imageView options:0];
    x += imageViewFrame.size.width + 10;

    y += [layout sizeToFitVerticalInFrame:CGRectMake(x, y, size.width - x - 10, 0) view:yself.titleLabel].size.height;
    y += [layout sizeToFitVerticalInFrame:CGRectMake(x, y, size.width - x - 10, 1000) view:yself.descriptionLabel].size.height;

    // Ensure the y position is at least as high as the image view
    y = MAX(y, (imageViewFrame.origin.y + imageViewFrame.size.height));
    y += 10;

    return CGSizeMake(size.width, y);
  }];
}viewLayoutperforms layout and returns the size it requires. This unifieslayoutSubviewsandsizeThatFits:into a single method. This example returns the same width passed in but with a variable height. To make a view fill all size available you can returnsize(that was passed in).viewInitis a unified initializer.initWithFrame:andinitWithCoder:both call this method.- Layouts are block based allowing you to capture local references.
- YOSelf weak reference helps prevent self retain cycle.
- Since layout is block based, you can create multiple views with subviews and layouts all in a single method.
The best way to follow and learn YOLayout is by seeing it in action. Open the example project: YOLayoutExample. It contains both a iOS and OSX targets.
NSView and Cocoa is supported. YOLayout makes layout consistent for both UIKit and Cocoa.
Have you ever tried to do a significant project in IB? It's maddening. Small tweaks can break Auto Layout constraints in unexpected ways. Plus, Interface Builder isn't great for projects with multiple committers; git-merging storyboards and xibs can be very difficult. Ultimately we're coders; we like to do things with code.
Auto Layout in code is a step in the right direction but carries several disadvantages to frame-based layouts:
- Auto Layout is generally slower than frame-based layouts. Here's an excellent writeup on the performance disadvantage of Auto Layout.
- Auto Layout can also be tricky to animate, since you need to animate all the relevant constraints.
- Auto Layout debugging can be hellish because there is little transparency into what is happening on the inside. With YOLayout, you have full visibility into the layout process. If your layout breaks, just step through the layout code and see what went wrong! Easy.
The core problem with writing your layout code in layoutSubviews is the massive duplication of layout code you have to write in both layoutSubviews and sizeThatFits:. When you have multiple subviews that themselves may size themselves dynamically, this code gets repetitive and tricky to maintain. You can't call layoutIfNeeded in sizeThatFits: without the risk of infinite recursion if a superview uses your sizeThatFits: method in its layoutSubviews.
You probably weren't asking this question, but you should have! One of the neat things about YOLayout is that layouts also work for views that get drawn in drawRect:. Because YOLayout works independently from the view hierarchy, you can easily switch between adding a subview to the hierarchy, or just drawing it in drawRect: without having to change your layout code. Try to do that with Auto Layout!
YOLayout is a great fit for custom drawn controls. Views that render in drawRect: can use the IB_DESIGNABLE attribute to be rendered live in interface builder. Open up the example project (pod try YOLayout) and take a look at DrawableView.m and DrawableView.xib.
- (void)viewInit; is the unified initializer for views. With YOLayout there is no need to specify a default frame or handle initialization differently if the view is from Interface Builder or from code.
Nope. If your layout is really simple, or it doesn't have dynamic sizing, just use layoutSubviews (UIKit) or layout (AppKit) like you normally would. YOLayout doesn't do anything special to override behavior and is compatible with existing layout methods.
YOLayout, like most things, has trade-offs. We like using it especially for really complex layouts with lots of different alignments and for things that are dynamically sized.
But there are downsides:
- You might find yourself hardcoding pixel values for things like padding and insets.
- With simple layouts AutoLayout can be easier.
- YOLayout is a custom framework whereas Interface Builder and AutoLayout are part of Apple and their SDK, and so are better supported.
And probably many more, feel free to tell us why you hate it, by submitting an issue.
There are none!
YOLayout is available through CocoaPods. To install it, simply add the following line to your Podfile:
pod "YOLayout"
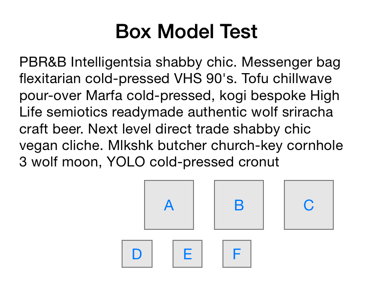
Using YOLayout we implemented a box model (YOVBox and YOHBox), that supports some basic
layout properties such as spacing, insets, horizontalAlignment, minSize, and maxSize.
YOVBox is for vertical layout, and YOHBox is for horizontal layout. For example:
#import <YOLayout/YOBox.h>

@interface BoxExample : YOVBox
@end

@implementation BoxExample

- (void)viewInit {
  [super viewInit];
  self.backgroundColor = UIColor.whiteColor;

  // Labels stacked vertically (VBox)
  YOVBox *labelsView = [YOVBox box:@{@"spacing": @"10", @"insets": @"20,20,0,20"}];
  {
    UILabel *label1 = [[UILabel alloc] init];
    label1.text = @"Box Model Test";
    label1.font = [UIFont boldSystemFontOfSize:20];
    label1.textAlignment = NSTextAlignmentCenter;
    [labelsView addSubview:label1];

    UILabel *label2 = [[UILabel alloc] init];
    label2.font = [UIFont systemFontOfSize:14];
    label2.numberOfLines = 0;
    label2.text = @"PBR&B Intelligentsia shabby chic. Messenger bag flexitarian cold-pressed VHS 90's. Tofu chillwave pour-over Marfa cold-pressed, kogi bespoke High Life semiotics readymade authentic wolf sriracha craft beer. Next level direct trade shabby chic vegan cliche. Mlkshk butcher church-key cornhole 3 wolf moon, YOLO cold-pressed cronut";
    [labelsView addSubview:label2];
  }
  [self addSubview:labelsView];

  // Buttons with min size right aligned (HBox)
  YOHBox *buttons = [YOHBox box:@{@"spacing": @"20", @"insets": @"10,20,10,20", @"minSize": @"50,50", @"horizontalAlignment": @"right"}];
  {
    UIButton *button1 = [self buttonWithText:@"A"];
    [buttons addSubview:button1];
    UIButton *button2 = [self buttonWithText:@"B"];
    [buttons addSubview:button2];
    UIButton *button3 = [self buttonWithText:@"C"];
    [buttons addSubview:button3];
  }
  [self addSubview:buttons];

  // Buttons centered horizontally (HBox)
  YOHBox *buttonsCenter = [YOHBox box:@{@"spacing": @"20", @"horizontalAlignment": @"center"}];
  {
    [buttonsCenter addSubview:[self buttonWithText:@"D"]];
    [buttonsCenter addSubview:[self buttonWithText:@"E"]];
    [buttonsCenter addSubview:[self buttonWithText:@"F"]];
  }
  [self addSubview:buttonsCenter];
}

- (UIButton *)buttonWithText:(NSString *)text {
  UIButton *button = [UIButton buttonWithType:UIButtonTypeSystem];
  button.backgroundColor = [UIColor colorWithWhite:0.9 alpha:1.0];
  [button setTitle:text forState:UIControlStateNormal];
  button.layer.borderWidth = 1.0;
  button.layer.borderColor = UIColor.grayColor.CGColor;
  button.contentEdgeInsets = UIEdgeInsetsMake(5, 10, 5, 10);
  return button;
}

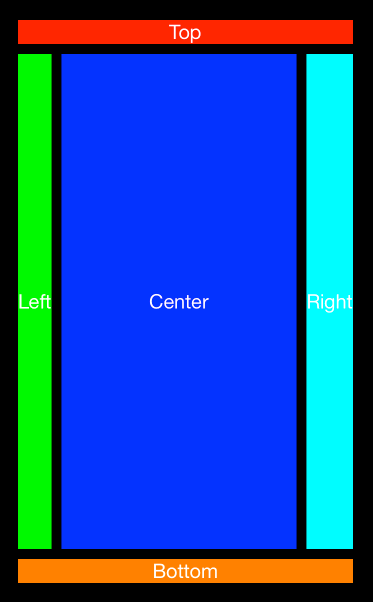
@endFor border layouts, you can use YOVBorderLayout or YOHBorderLayout. For example,
@implementation BorderView

- (void)viewInit {
  [super viewInit];
  self.backgroundColor = UIColor.blackColor;

  UILabel *topView = [self label:@"Top" backgroundColor:UIColor.redColor];
  [self addSubview:topView];

  YOView *centerView = [YOView view];
  {
    UILabel *leftLabel = [self label:@"Left" backgroundColor:UIColor.greenColor];
    [centerView addSubview:leftLabel];
    UILabel *centerLabel = [self label:@"Center" backgroundColor:UIColor.blueColor];
    [centerView addSubview:centerLabel];
    UILabel *rightLabel = [self label:@"Right" backgroundColor:UIColor.cyanColor];
    [centerView addSubview:rightLabel];

    centerView.viewLayout = [YOHBorderLayout layoutWithCenter:centerLabel left:@[leftLabel] right:@[rightLabel] insets:UIEdgeInsetsZero spacing:10];
  }
  [self addSubview:centerView];

  UILabel *bottomView = [self label:@"Bottom" backgroundColor:UIColor.orangeColor];
  [self addSubview:bottomView];

  self.viewLayout = [YOVBorderLayout layoutWithCenter:centerView top:@[topView] bottom:@[bottomView] insets:UIEdgeInsetsMake(20, 20, 20, 20) spacing:10];
}

- (UILabel *)label:(NSString *)text backgroundColor:(UIColor *)backgroundColor {
  UILabel *label = [[UILabel alloc] init];
  label.font = [UIFont systemFontOfSize:20];
  label.text = text;
  label.numberOfLines = 0;
  label.textAlignment = NSTextAlignmentCenter;
  label.backgroundColor = backgroundColor;
  label.textColor = [UIColor whiteColor];
  return label;
}

@endYOLayout is available under the MIT license. See the LICENSE file for more info.


