Let's build a new app 📱 using React Native & Expo. We're going to clone Zalo. Our app will help users see a lot of unique content based on what it is they're looking for. This will require the use of a library called React Navigation that comes with Expo.

- User can see tabs at the bottom of the screen.
- User can press a tab to navigate to a unique screen.
- User can see tabs which corresponds to the tabs of Zalo.
- User can see a
Messsagesscreen which has many messages. - User can press on an individual message to navigate to a
Conversationscreen. - User can see information about the user whose message they pressed on arriving at the
Conversationscreen. - User can see an icon on the
Messagesscreen which when pressed, opens aDrawer. - User can see additional navigation items when they open the
Drawer.
-
Learn how to create multiple screens.
- Recognize any meaningful app has content hidden in different parts of the app; and that users need a way to get to that content.
-
Learn how to use React Navigation.
- Recognize this is a library we get with Expo which has the responsibility of handling navigation.
-
Learn how to customize the default navigator of Expo.
- Recognize the default n`avigator is a boilerplate setup which we can build off of.
-
Learn how to use the
navigationprop provided by React Navigation to our screen components.- Recognize it's an object with a lot of useful keys.
Tip 💡: Screens give us a way to provide a lot of content to our users for their consumption whether it's for work or play. Structuring the screens in a meaningful and easily understood way is called information architecture.
A) Use expo init to generate a new project. I'm calling mine rn-zalo. This time however, choose the tabs option when prompted.

We should now see a new boiler plate app when we open our simulator that has 3 default tabs at the bottom, Home, Links, & Settings

Tip 💡: This project has a lot of stuff setup for you. Poke around the inital code for a minute or two to see how the team at Facebook likes structuring their projects. You'll learn a lot!
B) Refactor first tab.
We're going to need 5 screens Messsages, Contacts, Groups, Timeline, & More eventually. Let's start with Messages.
Open up the ./navigation/MainTabNavigator.js file and look for the following line.
import HomeScreen from "../screens/HomeScreen";Then change it to
import MessagesScreen from "../screens/MessagesScreen";We're changing the component we're importing and where we're importing from in order to be more explicit to our future teammates.
C) Change the places where HomeScreen was previously used and change it to correspond to the new value(Messages). There are other keys/variables we should change as well in order to be consistent
const MessagesStack = createStackNavigator(
{
Messages: MessagesScreen
},
config
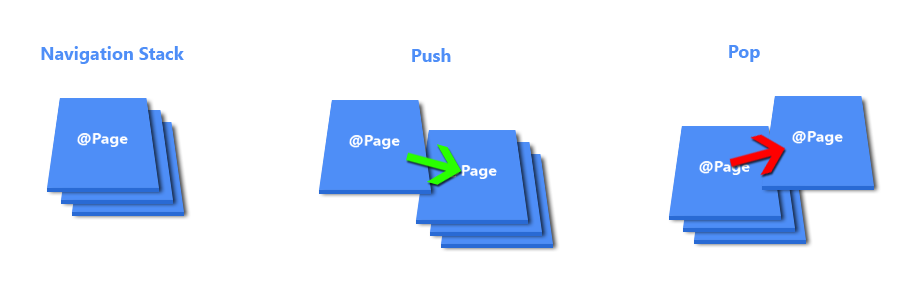
);This is a Stack Navigator. Stack navigators can be thought of as screens on top of each other. We can put a new screen onto our Stack as well as remove them.
MessagesStack.navigationOptions = {
  tabBarLabel: "Messages",
  tabBarIcon: ({ focused }) => (
    <TabBarIcon
      focused={focused}
      name={Platform.OS === "ios" ? "ios-chatbubbles" : "android-messages"}
    />
  )
};
Here were defining our Navigation Options. Specifically, what the tab says and what icon is displayed at the bottom of the screen.
MessagesStack.path = "";

// ... code ..

const tabNavigator = createBottomTabNavigator({
  MessagesStack
});
D) Update the name of the file from ./screens/HomeScreen.js to ./screens/MessagesScreen.js
Everything should continue working, however our Home tab should be updated to Messsages and should display a different icon, incredible.

E) Delete everything in MessagesScreen.js and refactor to get a blank screen with minimaltext, Messages Screen.
Refactored Messages Screen
import React from "react";
import { View, Text, StyleSheet } from "react-native";

export default function MessagesScreen(props) {
  return (
    <View style={styles.container}>
      <Text>Messages Screen</Text>
    </View>
  );
}

MessagesScreen.navigationOptions = {
  title: "Messages"
};

const styles = StyleSheet.create({
  container: {
    flex: 1,
    alignItems: "center",
    justifyContent: "center"
  }
});
Take note of the following lines.
MessagesScreen.navigationOptions = {
  title: "Messages"
};
The value of the title key corresponds to the header we see at the top of the screen. There are other options as well which we'll soon work with.
F) Repeat for Contacts & Groups.
For these two, we'll rename the files, import, definitions, and appropriate variables to correspond to this content it will hold like we did with Home => Messages.
LinksScreen => ContactsScreen
// ./navigation/MainTabNavigator.js
import ContactsScreen from "../screens/ContactsScreen";
// ./navigation/MainTabNavigator.js
const ContactsStack = createStackNavigator(
{
Contacts: ContactsScreen
},
config
);
ContactsStack.navigationOptions = {
tabBarLabel: "Contacts",
tabBarIcon: ({ focused }) => (
<TabBarIcon
focused={focused}
name={Platform.OS === "ios" ? "ios-contacts" : "md-link"}
/>
)
};
ContactsStack.path = "";// ./screens/ContactsScreen.js
import React from "react";
import { View, Text, StyleSheet } from "react-native";
export default function ContactsScreen(props) {
return (
<View style={styles.container}>
<Text>Contacts Screen</Text>
</View>
);
}
ContactsScreen.navigationOptions = {
title: "Contacts"
};
const styles = StyleSheet.create({
container: {
flex: 1,
alignItems: "center",
justifyContent: "center"
}
});SettingsScreen => GroupsScreen
// ./navigation/MainTabNavigator.js
import GroupsScreen from "../screens/GroupsScreen";
// ./navigation/MainTabNavigator.js
const GroupsStack = createStackNavigator(
{
Groups: GroupsScreen
},
config
);
GroupsStack.navigationOptions = {
tabBarLabel: "Groups",
tabBarIcon: ({ focused }) => (
<TabBarIcon
focused={focused}
name={Platform.OS === "ios" ? "ios-people" : "md-options"}
/>
)
};
GroupsStack.path = "";// ./screens/GroupsScreen.js
import React from "react";
import { View, Text, StyleSheet } from "react-native";
export default function GroupsScreen(props) {
return (
<View style={styles.container}>
<Text>Groups Screen</Text>
</View>
);
}
GroupsScreen.navigationOptions = {
title: "Groups"
};
const styles = StyleSheet.create({
container: {
flex: 1,
alignItems: "center",
justifyContent: "center"
}
});G) Update the createBottomNavigator in ./navigation/MainTabNavigator.js as well.
const tabNavigator = createBottomTabNavigator({
  MessagesStack,
  ContactsStack,
  GroupsStack
});
This code will take our 3 stack navigators and consolidate them into a single Tab Navigator.
Key Points 🔑📝
- Our apps will need many different screens to show different content.
- There are
Stack&Tabnavigators to help us handle this. - Navigation Options can be used to customize text, icons, and colors.
- React Navigation is a set of configurations that come in the shape of
Objects,keys, &Components.
A) Add two new tabs that correspond to Zalo's Timeline & More screens.
Timeline tab
// ./navigation/MainTabNavigator.js
import TimelineScreen from "../screens/TimelineScreen";
// ./navigation/MainTabNavigator.js
const TimelineStack = createStackNavigator(
{
Timeline: TimelineScreen
},
config
);
TimelineStack.navigationOptions = {
tabBarLabel: "Timeline",
tabBarIcon: ({ focused }) => (
<TabBarIcon
focused={focused}
name={Platform.OS === "ios" ? "ios-bookmarks" : "md-options"}
/>
)
};
TimelineStack.path = "";
const tabNavigator = createBottomTabNavigator({
MessagesStack,
ContactsStack,
GroupsStack,
TimelineStack
});// ./screens/TimelineScreen.js
import React from "react";
import { View, Text, StyleSheet } from "react-native";
export default function TimelineScreen(props) {
return (
<View style={styles.container}>
<Text>Timeline Screen</Text>
</View>
);
}
TimelineScreen.navigationOptions = {
title: "Timeline"
};
const styles = StyleSheet.create({
container: {
flex: 1,
alignItems: "center",
justifyContent: "center"
}
});More tab
// ./navigation/MainTabNavigator.js
import MoreScreen from "../screens/MoreScreen";
// ./navigation/MainTabNavigator.js
const MoreStack = createStackNavigator(
{
More: MoreScreen
},
config
);
MoreStack.navigationOptions = {
tabBarLabel: "More",
tabBarIcon: ({ focused }) => (
<TabBarIcon
focused={focused}
name={Platform.OS === "ios" ? "ios-options" : "md-options"}
/>
)
};
MoreStack.path = "";
const tabNavigator = createBottomTabNavigator({
MessagesStack,
ContactsStack,
GroupsStack,
TimelineStack,
MoreStack
});// ./screens/MoreScreen.js
import React from "react";
import { View, Text, StyleSheet } from "react-native";
export default function MoreScreen(props) {
return (
<View style={styles.container}>
<Text>More Screen</Text>
</View>
);
}
MoreScreen.navigationOptions = {
title: "More"
};
const styles = StyleSheet.create({
container: {
flex: 1,
alignItems: "center",
justifyContent: "center"
}
});
B) Get data for MessagesScreen.
Copy this gist and paste it to a file called messages.json in the root of your project.
C) Import the data into the MessagesScreen for consumption.
import messages from "../messages.json";D) Define a new component, MessageCard, which will be responsible for rendering the content for each message to a beautiful card.
MessageCard Component
// ./components/MessageCard.js
import React from "react";
import { Text, View, Image, StyleSheet, TouchableOpacity } from "react-native";

const MessageCard = props => (
  <TouchableOpacity
    onPress={() => props.onGoToConversation("Conversation", { ...props })}
  >
    <View style={styles.messageCardStyle}>
      <View>
        <Image style={styles.image} source={{ uri: props.uri }} />
      </View>
      <View style={styles.cardTextContainer}>
        <View style={styles.cardText}>
          <Text style={{ fontWeight: "bold" }}>{props.name}</Text>
          <Text>{props.last_message_date}</Text>
        </View>
        <Text numberOfLines={3}>{props.last_message_content}</Text>
      </View>
    </View>
  </TouchableOpacity>
);

export default MessageCard;

const styles = StyleSheet.create({
  messageCardStyle: {
    margin: 5,
    padding: 5,
    width: "100%",
    shadowRadius: 5,
    shadowOpacity: 0.9,
    flexDirection: "row",
    alignItems: "center",
    backgroundColor: "white",
    justifyContent: "space-around",
    shadowColor: "rgba(0,0,0,0.2)",
    shadowOffset: { height: 5, width: 5 }
  },
  image: {
    width: 75,
    height: 75,
    borderWidth: 1,
    borderRadius: 37,
    borderColor: "grey"
  },
  cardTextContainer: {
    flex: 1,
    marginLeft: 10
  },
  cardText: {
    flex: 1,
    width: "100%",
    flexDirection: "row",
    justifyContent: "space-between"
  }
});<TouchableOpacity
onPress={() => props.onGoToConversation('Conversation', { ...props })}
>We'll implement navigating to the Conversation component by passing a prop, onGoToConversation, to MessageCard shortly.
- The prop
onGoToConversationis a function. - The 1st argument of this function is the
keyof the Screen we want to navigate to. - The 2nd is an object. The object contains all the props sent to
MessageCardvia a spread operator. - The
objectwe pass as the second argument will end up as props in the destination component, the value of theConversationkey/argument.
E) Refactor MessagesScreen to use the component we just defined, MessageCard.
MessagesScreen
// ./screens/MessagesScreen.js
import React from "react";
import { View, ScrollView, Text, StyleSheet } from "react-native";

import MessageCard from "../components/MessageCard";

import messages from "../messages.json";

export default function MessagesScreen(props) {
  return (
    <View style={styles.container}>
      <ScrollView
        style={styles.container}
        contentContainerStyle={styles.contentContainer}
      >
        {messages.map(msg => {
          return (
            <MessageCard
              key={msg.id}
              name={msg.first_name}
              uri={msg.avatar_url}
              last_message_date={msg.last_message_date}
              last_message_content={msg.last_message_content}
              onGoToConversation={props.navigation.navigate}
            />
          );
        })}
      </ScrollView>
    </View>
  );
}

MessagesScreen.navigationOptions = {
  title: "Messages"
};

const styles = StyleSheet.create({
  container: {
    flex: 1,
    backgroundColor: "#fff"
  },
  contentContainer: {
    alignItems: "center",
    justifyContent: "center"
  },
  messageCardStyle: {
    margin: 5,
    padding: 5,
    width: "100%",
    shadowRadius: 5,
    shadowOpacity: 0.9,
    flexDirection: "row",
    alignItems: "center",
    backgroundColor: "white",
    justifyContent: "space-around",
    shadowColor: "rgba(0,0,0,0.2)",
    shadowOffset: { height: 5, width: 5 }
  },
  image: {
    width: 75,
    height: 75,
    borderWidth: 1,
    borderRadius: 37,
    borderColor: "grey"
  },
  cardTextContainer: {
    flex: 1,
    marginLeft: 10
  },
  cardText: {
    flex: 1,
    width: "100%",
    flexDirection: "row",
    justifyContent: "space-between"
  }
});
Look at the prop onGoToConversation we pass to MessageCard component.
onGoToConversation={props.navigation.navigate}Any component which is listed as a key's value in our MainTabNavigator file will automatically be passed a prop called navigation.
This is a tremendously useful prop. Spend a few minutes reading about all the valuable data passed into it here.
This prop will allow us to navigate, pass props, and view the state of our app in terms of where the user is.
Key Points 🔑📝
- Creating a new tab is as simple as defining a new component and then passing it to our Navigators.
- React Navigation passed all screen components a prop called
navigation. - The
navigationprop provides us with a lot of useful methods such asnavigate.
Milestone 3 🛣🏃 Implement behavior where a user can navigate to a specific conversation and see pertinent content
A) Define a new component, ConversationScreen, which will represent a private conversation our user has with another user.
// ./screens/ConversationScreen.js
import React from "react";
import { Image, Text, ScrollView, StyleSheet } from "react-native";

export default function ConversationScreen(props) {
  const propsFromMessages = props.navigation.state.params;
  return (
    <ScrollView contentContainerStyle={styles.contentContainer}>
      <Image
        source={{ uri: propsFromMessages.uri }}
        style={{
          width: 200,
          height: 200
        }}
      />
      <Text>{props.navigation.state.params.name}</Text>
      <Text>{props.navigation.state.params.last_message_content}</Text>
    </ScrollView>
  );
}

ConversationScreen.navigationOptions = {
  title: "Conversation"
};

const styles = StyleSheet.create({
  container: {
    flex: 1,
    paddingTop: 15,
    backgroundColor: "#fff"
  },
  contentContainer: {
    alignItems: "center",
    justifyContent: "center"
  }
});
B) Import the component into ./navigators/MainTabNavigator.js
import ConversationScreen from "../screens/ConversationScreen";C) Define a new key, Conversation, in the MessagesStack where the value is the component we just imported, ConversationScreen.
const MessagesStack = createStackNavigator(
  {
    Messages: MessagesScreen,
    Conversation: ConversationScreen
  },
  config
);
The reason we place the definition in the MessagesStack is because the user navigates to the ConversationScreen component from the MessagesScreen; a screen in the MessagesStack.
We should now be able to navigate to the ConversationScreen from our MessagesScreen when we press on a single card.

Notice that when we tap on Carmelina we navigate to a ConversationScreen which has data corresponding to Carmelina. The same thing occurs when we press on Guntar; excellent.
A) Import a few dependencies we'll need soon into ./navigation/MainTabNavigator.js
import { Text, View, Platform } from "react-native";
import {
  createStackNavigator,
  createDrawerNavigator,
  createBottomTabNavigator
} from "react-navigation";
B) Scroll to the bottom of this file and delete this line.
export default tabNavigator;C) Define a new export for this file.
Define a new component at the bottom of this file, Drawer, then call the createDrawerNavigator function we imported to define a new const drawer. This drawer will be our default export now. Notice that the createDrawerNavigator takes two arguments, both objects. Learn more about how to use the drawer component here.
const Drawer = () => (
  <View style={{ flex: 1, justifyContent: "center", alignItems: "center" }}>
    <Text>Drawer Item 1</Text>
    <Text>Drawer Item 2</Text>
  </View>
);

const drawer = createDrawerNavigator(
  {
    Initial: tabNavigator
  },
  {
    contentComponent: Drawer
  }
);

export default drawer;
We should now see that if we swipe from the left part of the screen to the right, a drawer opens, amazing.

D) Import new dependencies so we can add the hamburger menu to MessagesScreen.
import {
  View,
  Image,
  ScrollView,
  StyleSheet,
  TouchableOpacity
} from "react-native";
E) Refactor the MessagesScreen.navigationOptions in the MessagesScreen. We warned ya this was gonna get more complicated =).
MessagesScreen.navigationOptions = props => {
  return {
    title: "Messages",
    headerLeft: () => {
      return (
        <TouchableOpacity onPress={props.navigation.openDrawer}>
          <Image
            style={{ height: 20, width: 20, marginLeft: 10 }}
            source={{
              uri:
                "https://cdn3.iconfinder.com/data/icons/ui-ux-essentials-solid/24/hamburger-menu-solid-512.png"
            }}
          />
        </TouchableOpacity>
      );
    }
  };
};
- Screen navigation is important to providing an engaging experience for users.
- A
Stack Navigatorhas screens stacked one on top of the other. We can go "down" and "up" - A
Tab Navigatorhas tabs at the bottom of the screen. - A
Drawer Navigatorhas a drawer that's hidden away from view until a user wants access to it. - Screens defined in our Navigators are all passed a
propfrom React Navigation callednavigation. - The
navigationprop is very useful prop because the object has many useful key's that we'll need in the future. - Navigation Options is how we'll customize headers, icons, display text, & etc. for our navigators.
- User can see tabs at the bottom of the screen.
- User can press a tab to navigate to a unique screen.
- User can see tabs which corresponds to the tabs of Zalo.
- User can see a
Messsagesscreen which has many messages. - User can press on an individual message to navigate to a
Conversationscreen. - User can see information about the user whose message they pressed on arriving at the
Conversationscreen. - User can see an icon on the
Messagesscreen which when pressed, opens aDrawer. - User can see additional navigation items when they open the
Drawer.
- User can press on a a users profile image inside of the
Messagesscreen to be directed to a profile screen. - User can press a link within their drawer to go to a
Settingsscreen.