✨ Looking for Hamster Pro version? Click here
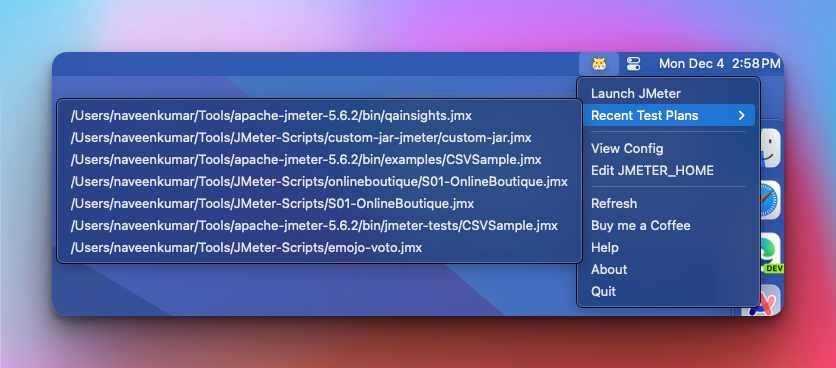
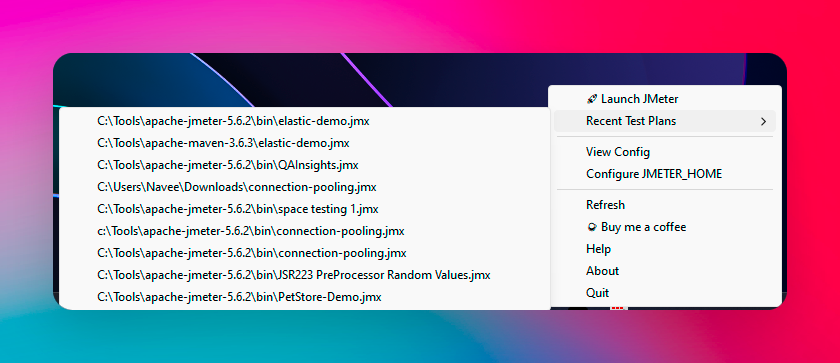
An app that puts your recent JMeter test plans just a click away from your Mac menu or Windows status bar.
✨ Looking for Hamster Pro version? Click here
- 🎯 No more digging through folders or endless searches. With Hamster, launching your recent JMeter test plans is swift and seamless. Boost your productivity by accessing your tests instantly, streamlining your workflow like never before.
- 🌟 Whether you're a seasoned JMeter pro or just getting started, Hamster's user-friendly interface makes your testing experience effortless. Say hello to smoother workflows and goodbye to unnecessary hassle!
- 🚀 Hamster is a lightweight app that's easy to install and use. It's also open-source, so you can customize it to your liking. What's more, it's free! So what are you waiting for? Download Hamster today and take your testing to the next level.
- 🏛️ Supports Intel and Apple Silicon architectures.
- Configure
JMETER_HOMEby launchingHamster > Edit JMETER_HOME⚙️ - To launch JMeter, click on
Hamster > Just JMeter🚀 - To launch JMeter test plans, click on
Hamster > Recent Test Plans > select the test plan🚀 - To view the configuration, click on
Hamster > View Config👀 - To refresh Hamster, click on
Hamster > Refresh🔄 - To quit Hamster, click on
Hamster > Quit❌ - To know more about Hamster, click on
Hamster > Aboutℹ️
-
Clone the repository:
git clone https://github.com/qainsights/hamster.git
-
Create
venv⚙️python3 -m venv <venv_name> -
Install the required dependencies:
pip install -r requirements.txt
-
Run the project:
python ./hamster/__main__.py
- Download the
dmgfile based on your architecture from the latest release from here - Double-click on the
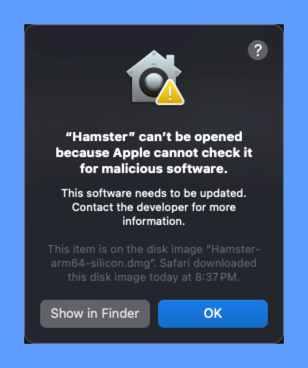
dmgfile - If you see the below screen, click on
OKbutton👇

- Go to
System Preferences > Security & Privacy > General > Click on Open Anywaybutton 👇, then click onOpenbutton

- Move the
Hamster.apptoApplicationsfolder - Launch
Hamster.appfromApplicationsfolder - Configure
JMETER_HOMEby launchingHamster > Edit JMETER_HOME⚙️ - To launch JMeter, click on
Hamster > Just JMeter🚀
✨ Looking for Hamster Pro version? Click here
- Experimental App: Please note that this application is experimental and may contain bugs.
⚠️ - macOS: This application is only for macOS and Windows.
- JMeter: This application requires JMeter to be installed on your machine. 📥
- Hamster collects anonymous usage data to improve the app. 📊
- The data collected is the menu clicks only.
- No personal information or entities are collected.
- The data collected is not shared with any third-party.
- The data collected is not used for any marketing purposes.
- The data is being collected using Mixpanel via AWS Lambda.
- You can opt out of telemetry by configuring
falsein~/.hamster_app.propertiesfile and restart the app.-
[TELEMETRY]
enabled = false
-
- You can opt in of telemetry by configuring
truein~/.hamster_app.propertiesfile and restart the app.-
[TELEMETRY]
enabled = true
-
✨ Looking for Hamster Pro version? Click here
| Features | Windows | Mac |
|---|---|---|
| Launch JMeter | ✅ | ✅ |
| Launch JMeter Recent Test Plans | ✅ | ✅ |
| Set JMeter Home | ✅ | ✅ |
| View Config | ✅ | ✅ |
| Refresh | ✅ | ✅ |
| Telemetry | ❌ | ✅ |
| Updates | ❌ | ❌ |
- Apache 2 License
- Logo sourced from OpenMoji
- My daughter for the name 🐹

