- Comet Server v18.9.2+
- WHMCS v7.6.0+
- PHP v5.6.0+
Earlier versions of these products may work with some caveats, but are untested.
-
Extract the module .zip file
-
Upload the module folder to your WHMCS provisioning module folder, and rename it to
cometbackup.- e.g. your_whmcs_root_folder / modules / servers / cometbackup
-
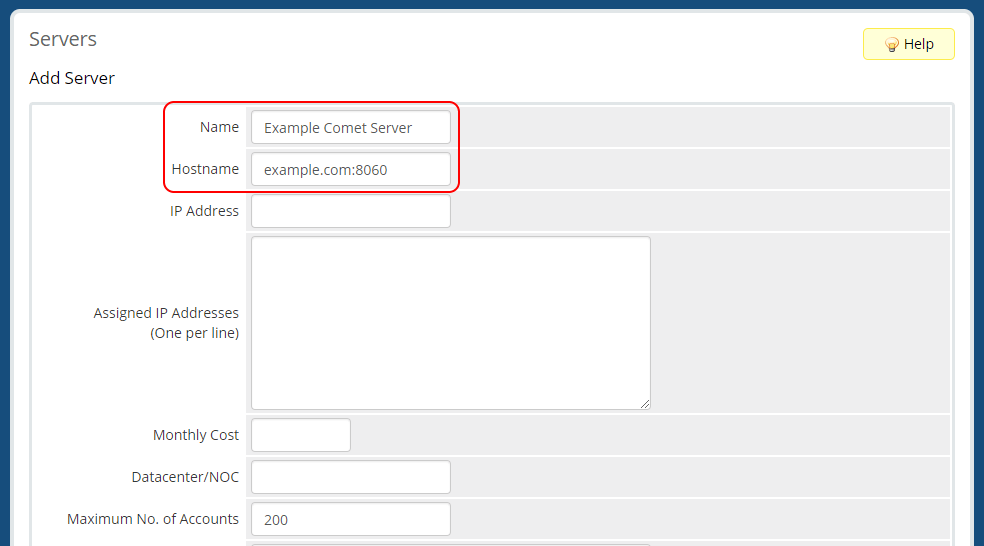
Navigate to Setup > Products/Services > Servers and click Add New Server.
-
Choose a name, and input your Comet server's connection details (including port, but not protocol) in the Hostname field.
-
Select Comet Backup as the server's Type, enter your login details, enable the Secure option if your server is using HTTPS, and click Save.
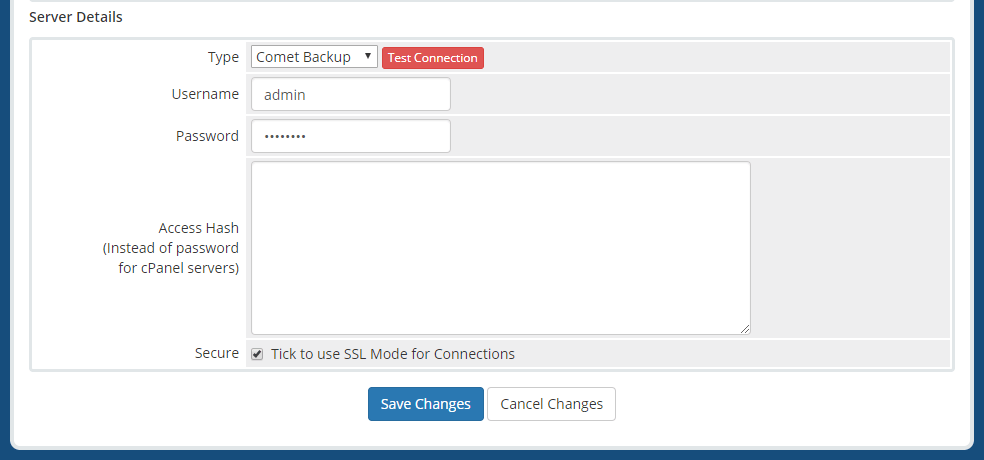
- You can use the Test Connection button to confirm whether your server is accessible using the provided address and credentials.
-
While still in the Servers area, click Create New Group and assign your server to your new server group.
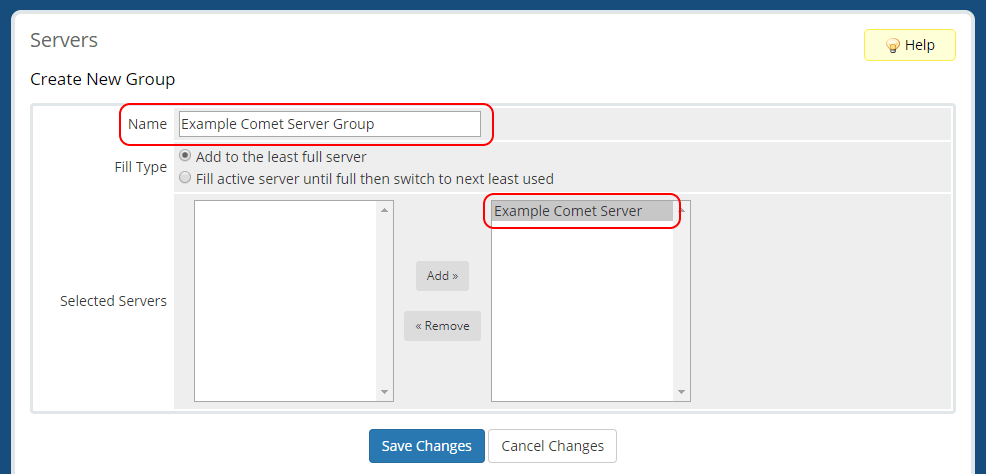
- We strongly recommend that you only have one server per Comet server group in WHMCS - having more than one server in a group may result in unexpected behaviour.
-
Navigate to Setup > Products/Services > Products/Services.
-
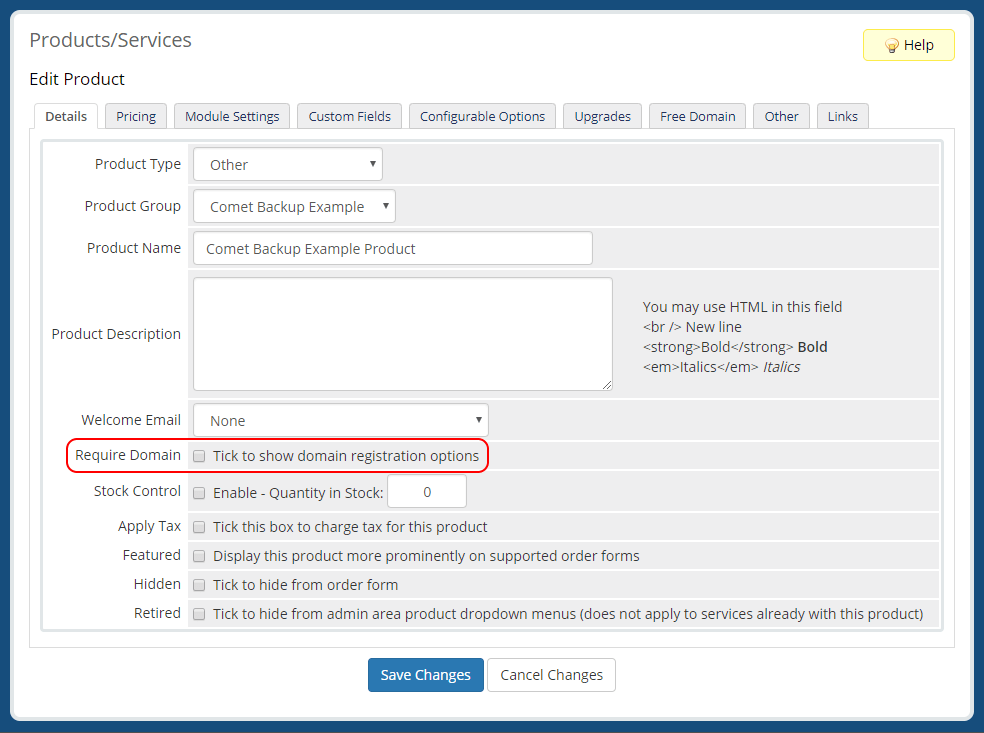
In the product's Details tab, we recommend disabling the Require Domain option.
-
In the product's Module Settings tab, select Comet Backup and choose the new server group.
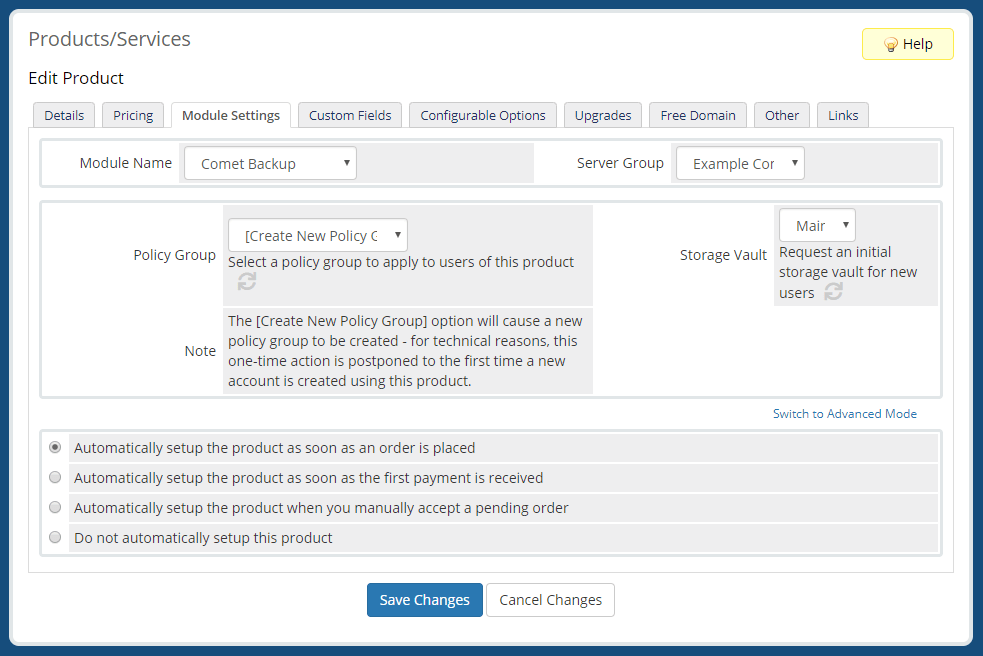
- If you wish for new orders to be automatically accepted and new accounts to be immediately created on the Comet server, you should select Automatically setup the product as soon as an order is placed (or Automatically setup the product as soon as the first payment is received if you want to require payment first) in the Module Settings tab.
-
If you wish to allow your users to specify custom usernames or custom passwords, visit your product's Custom Fields tab.
-
To allow custom usernames, under Add New Custom Field:
- Set Field Name to
Username - Set Field Type to
Text Box - Set Validation to
/^.{6}/- Comet requires usernames to contain at least 6 characters, which this validation rule enforces. If this is not set correctly, short usernames may result in a silent failure; WHMCS will allow the user to complete the order process, but the new service will be marked as Pending and a 'CreateAccount' failure will be logged to the Utilities > Module Queue page.
- Enable the options for both Required Field and Show on Order Form.
- You should ideally set a Description explaining the 6 character length requirement, and any other limitations that you may have implemented via the Validation field.
- If you also have a custom field for user passwords, you may wish to set Display Order to a lower number than the corresponding value applied to the Password field, in order to ensure that Username is displayed first.
- Click Save Changes to add your new custom field.
- Set Field Name to
-
To allow custom passwords, under Add New Custom Field:
- Set Field Name to
Password - Set Field Type to
Password - Set Validation to
/^.{8}/- Comet requires passwords to contain at least 8 characters, which this validation rule enforces. If this is not set correctly, short passwords may result in a silent failure; WHMCS will allow the user to complete the order process, but the new service will be marked as Pending and a CreateAccount failure will be logged to the Utilities > Module Queue page.
- Enable the options for both Required Field and Show on Order Form.
- You should ideally set a Description explaining the 8 character length requirement, and any other limitations that you may have implemented via the Validation field.
- If you also have a custom field for usernames, you may wish to set Display Order to a higher number than the corresponding value applied to the Username field, in order to ensure that Password is displayed first.
- Click Save Changes to add your new custom field.
- Set Field Name to
-
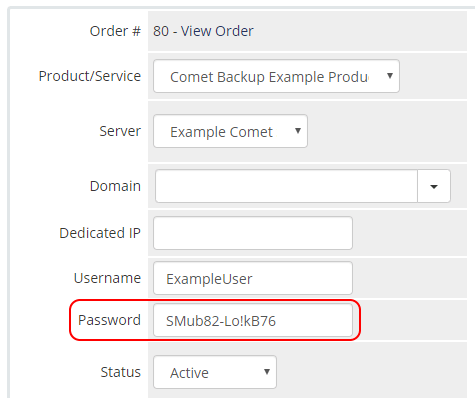
Please note that service passwords in WHMCS are not obscured from the Admin area.
-
-
Select a policy group and storage vault if desired, and save your changes.
- If the
[Create New Policy Group]..option is selected, this will cause a new policy group to be created and assigned on the Comet server with the following options:- Storage vault creation / editing / deletion disallowed.
- This helps to ensure that users cannot avoid storage vault quotas assigned via WHMCS.
- Available storage vault types are restricted to the Comet server type, preventing reassignment of an existing vault to a different type.
- Password changes via the client software are disallowed, although WHMCS administrators and Comet Server administrators may reset user passwords.
- This requires users to manage their passwords via WHMCS, keeping the WHMCS password on record in sync with the actual password on the Comet server.
- Storage vault creation / editing / deletion disallowed.
- New policy groups will be created the first time the module attempts to assign them to a new account.
- If the
-
This product can now be used to provision and manage Comet accounts from WHMCS.
Configurable options are presented to your users during sign-up. The Comet provisioning module for WHMCS currently supports configurable options for maximum device limits, protected item quotas, and storage vault quotas.
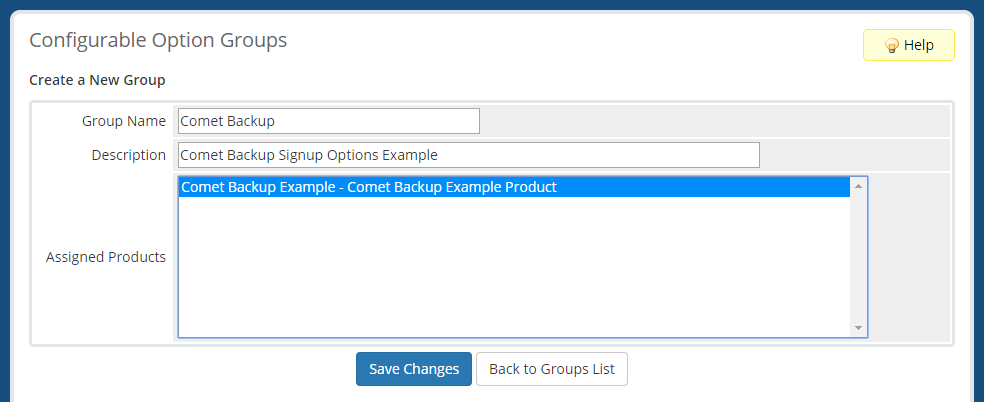
- Navigate to Setup > Products/Services > Configurable Options and click Create a New Group.
- Enter a Group Name and Description, select your new product in the Assigned Products list, then click Save.
- Click Add New Configurable Option.
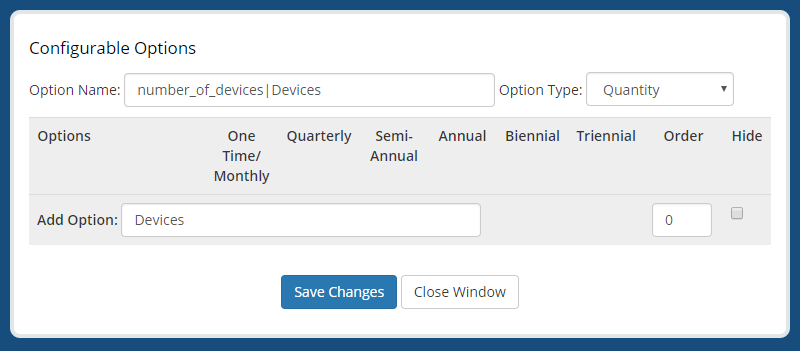
- Enter an Option Name. You must choose from the following list, with the left-side preceding "
|" being an exact match, and the right side being the label your customers will see when ordering a product:number_of_devices|Devicesprotected_item_quota_gb|Protected Items Quota (GB)storage_vault_quota_gb|Initial Storage Vault Quota (GB)
- Set Option Type to Quantity.
- In Add Option, enter
GBorDevicesdepending on the option you're configuring. - Click Save Changes.
- Enter desired values for minimum and maximum quantities in Minimum Quantity Required and Maximum Allowed respectively.
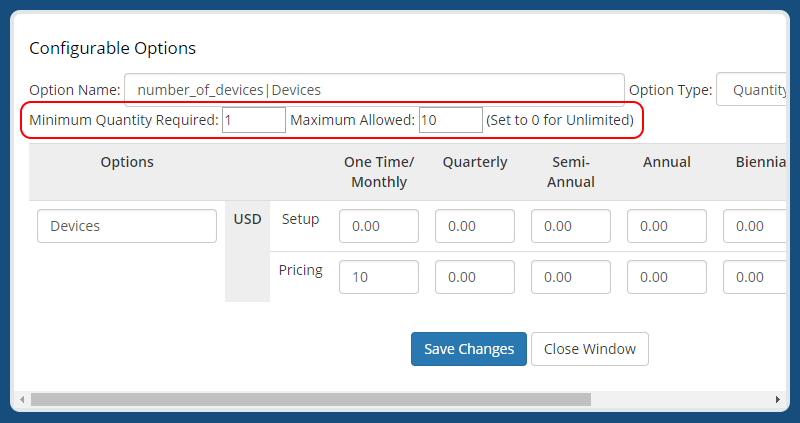
- If this is intended to be a hidden option, simply set both quantities to your desired value. The hidden status can be set at the group level.
- Enter desired per-unit pricing.
- Click Save Changes again, then Close Window.
- Repeat steps 3 to 10 again for additional desired restrictions as per step 4.
There are some WHMCS settings that we recommend customising in order to achieve the best possible experience with the Comet Provisioning Module for WHMCS.
- If you don't allow users to select their own passwords (see step 12 of the Installation and Configuration section of this documentation), WHMCS will automatically generate a new password for the service. If you have elected to use this password selection method, we recommend that you configure your Comet product in WHMCS to send a welcome email using either the Other Product/Service Welcome Email or a custom email template, and for you to customise the template for this to include at least the service password.
- To add your user's service password to a welcome email template:
- Visit the Email Templates page.
- Either edit a template from the Product/Service Messages section of the page, or add a new template to that section using the Create New Email Template option.
- We recommend that you either customise your Other Product/Service Welcome Email, or add a new template.
- Add
{$service_password}to your template in order to display the password in emails using this template. - Save your changes.
- To send a welcome email for a product:
- Visit the Edit Product page for the product.
- Navigate to the Details tab.
- Select your welcome email template under the Welcome Email setting.
- We recommend that you set Minimum User Password Strength to
90or higher in order to enforce passwords that meet Comet's minimum user password strength.- This can be configured in the Security tab of the Setup > General Settings page.
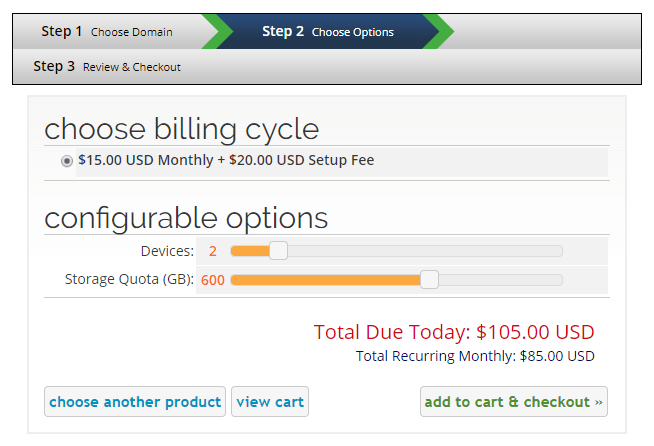 Selecting new service options for Comet
- Choose your Comet product from cart.php (e.g. http://your_whmcs_url.com/cart.php).
- Options will present based on the Configurable Options that you have assigned to the product.
- Complete order.
- Depending on the product configuration as per step 11 of Installation and Configuration, the module create command may run.
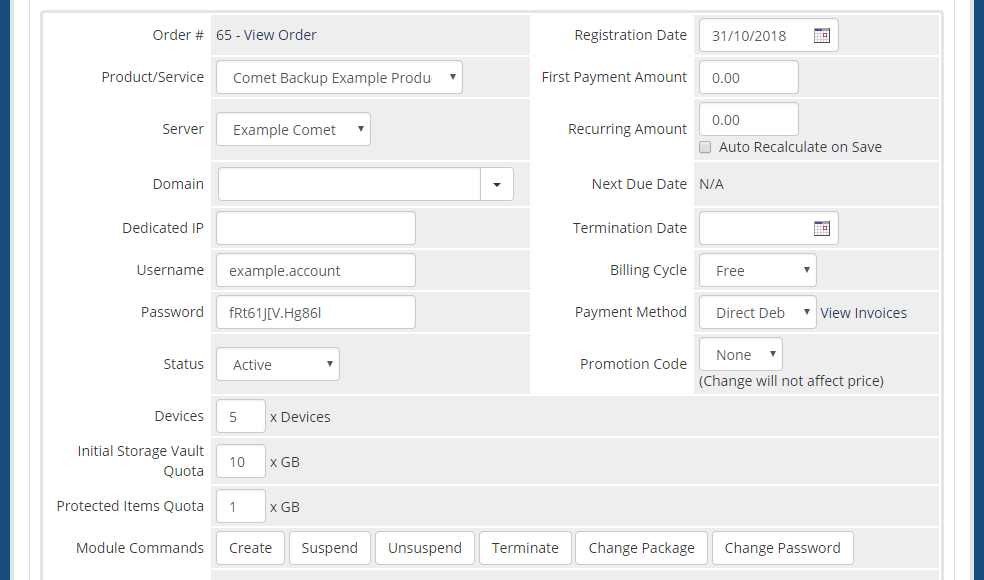
Viewing client service options from the admin area
- Set the new user password in the customer's Products/Services tab.
- If you're allowing users to specify their own passwords (see step 12 of the Installation and Configuration section of this documentation), you should set the Password field displayed below the Addons configuration options to avoid unexpected results (if set, the service password value will overwrite the custom value when the Change Password action is performed).
- If you're using automatically generated WHMCS service passwords, you should set the Password field displayed above the Status setting.
- Save your changes.
- Run the Change Password action from the module commands area.
- Set the new protected item / storage vault / device quota values in the customer's Products/Services tab.
- Save your changes.
- Run the Change Package action from the module commands area.
All other module commands can be run directly from a customer's Products/Services tab without the need to perform additional steps such as saving first.


