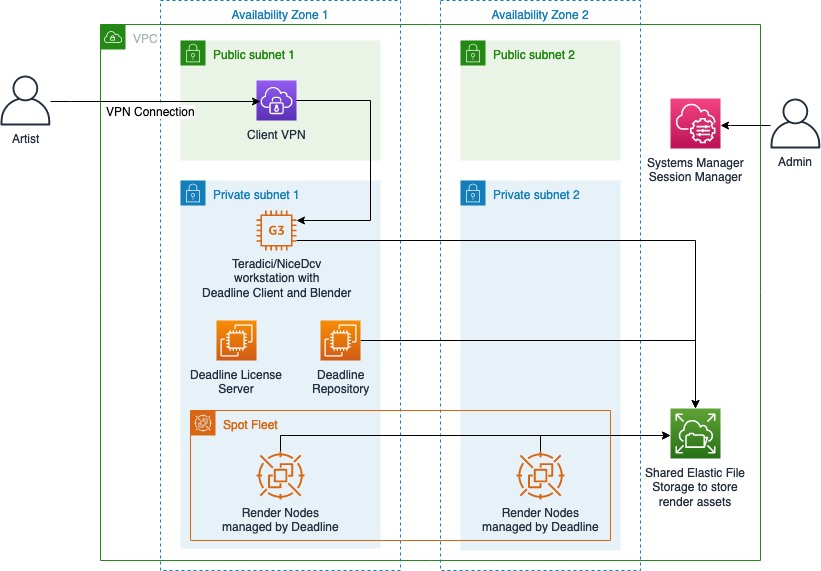
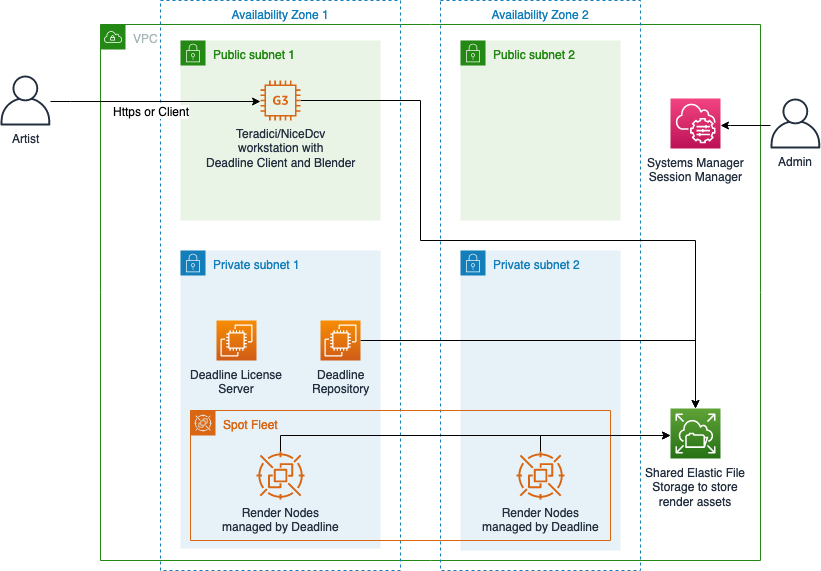
This solution deploys an AWS Cloud environment that helps media and entertainment organizations with burst rendering workloads. This CloudFormation template will deploy and setup AWS ThinkBox Deadline Database and Repository, Workstation, License Server, and Render nodes.
The solution can deploy either Teradici PCoIP or NiceDCV Linux AMI workstation. Also there is an option to place workstation in a Private subnet and connect to it via AWS ClientVpn.
Furthermore, the solution comes with Blender installation scripts, which is a popular open-source software for 3D modeling, animation, rendering and more...
Workstation in Private Subnet
- To deploy the application you will require an AWS account. If you don’t already have an AWS account, create one at https://aws.amazon.com by following the on-screen instructions. Your access to the AWS account must have IAM permissions to launch AWS CloudFormation templates that create IAM roles.
- If deploying an AWS Client VPN endpoint. You must generate a server/client certificate and upload those certificates to AWS Certificate Manager. Click here and follow the instructions in Mutual authentication to create client and server certificates.
- Configuration to AWS Client VPN is done via AWS CLI. You need to install and configure AWS CLI if you are planning to use Client VPN.
The environment is deployed as an AWS CloudFormation template.
Note You are responsible for the cost of the AWS services used while running this sample deployment. There is no additional cost for using this sample. For full details, see the pricing pages for each AWS service you will be using in this sample. Prices are subject to change.
-
Deploy the latest CloudFormation template by following the link below for your preferred AWS region:
It will take about 13 minutes for the deployment to finish.
-
If prompted, login using your AWS account credentials.
-
You should see a screen titled Create Stack at the Specify template step. The fields specifying the CloudFormation template are pre-populated. Click the Next button at the bottom of the page.
-
On the Specify stack details screen you may customize the following parameters of the CloudFormation stack:
-
Stack name has been pre-populated with
aws-digital-content-creation-render-environmentname. You can change this and provide own stack name.Parameter label Default Description Availability Zones Requires inputThe list of Availability Zones to use for the subnets in the VPC. Select two Availability Zones from your list. VPC name dcc-vpc The name of the VPC. VPC CIDR 10.0.0.0/16 The CIDR block for the VPC. Public Subnet 1 CIDR 10.0.0.0/24 The CIDR block for the Public Subnet located in Availability Zone 1 of the VPC. Public Subnet 2 CIDR 10.0.1.0/24 The CIDR block for the Public Subnet located in Availability Zone 2 of the VPC. Private Subnet 1 CIDR 10.0.2.0/24 The CIDR block for the Private Subnet located in Availability Zone 1 of the VPC. Private Subnet 2 CIDR 10.0.3.0/24 The CIDR block for the Private Subnet located in Availability Zone 2 of the VPC. Create VPN Endpoint false Should the CloudFormation create a Client VPN Endpoint. If set to true,workstation will be placed in Private Subnet and you have to set up server and client certificates in AWS Certificate Manager, please follow instructions how to set this up here.Client CIDR for VPN Endpoint 10.50.0.0/20 If creating Client VPN endpoint in the solution, specify the IPv4 address range. It should be in CIDR notation from which to assign client IP addresses. The address range cannot overlap with the local CIDR of the VPC in which the associated subnet is located, or the routes that you add manually. ACM Server Certificate ARN N/A If Client VPN is set to true, please provide your server certificate ARN, e.g.arn:aws:acm:xxxxxACM Client Certificate ARN N/A If Client VPN is set to true, please provide your client certificate ARN, e.g.arn:aws:acm:xxxxxTarget Network CIDR for VPN Endpoint 10.0.0.0/16 If creating Client VPN endpoint in the solution, specify the IPv4 address range, in CIDR notation, of the network for which access is being authorized. Workstation instance type g4dn.xlarge The EC2 instance type for the Deadline workstation. Workstation connection manager teradici Specify whether you want to run Teradici PCoIP or NiceDcv server to connect to the workstation. Workstation EBS volume size 100 Volume size of workstation instance, in GiB. Workstation access CIDR 10.0.0.0/16 CIDR block of an on-premise IP address. Input your network's current public or private IP depending if the Workstation is being placed in a public or private subnet. EC2 user password Requires inputThe ec2-user password for remote access to NICEDCV workstation server and to access Deadline Repository samba share. Render scheduler instance type m5.2xlarge The EC2 instance type for the Deadline repository. Deadline application version 10.1.3.6 The version of Deadline application. License server instance type m5.large The EC2 instance type for the Deadline License server. License server version 1.1 The version of License server. Deadline license key 123456789012 If you have license key, add it here. Render node instance type c5.4xlarge,c4.4xlarge The EC2 instance type for the Deadline Render nodes Render node capacity 2 The number of instances in the Spot Fleet. ArtefactBucketName aws-digital-content-creation-render-environment S3 bucket name for the application assets. Contains Deadline installation software. Environment DEV The type of environment to tag your infrastructure with. You can specify DEV (development), TEST (test), or PROD (production). -
When completed, click Next.
-
Configure stack options if desired, then click Next.
-
On the Review screen, you must check the boxes for:
- "I acknowledge that AWS CloudFormation might create IAM resources"
- "I acknowledge that AWS CloudFormation might create IAM resources with custom names"
- "I acknowledge that AWS CloudFormation might require the following capability: CAPABILITY_AUTO_EXPAND"
These are required to allow CloudFormation to create a Role to allow access to resources needed by the stack and name the resources in a dynamic way.
-
Click Create Change Set.
-
On the Change Set screen, click Execute to launch your stack.
You may need to wait for the Execution status of the change set to become AVAILABLE before the Execute button becomes available.
-
Wait for the CloudFormation stack to launch. Completion is indicated when the Stack status is CREATE_COMPLETE.
You can monitor the stack creation progress in the "Events" tab.
To connect to workstation in Public Subnet follow the steps below:
- Note the WorkstationIP displayed in the Outputs tab of the root stack (it is the one without word NESTED).
- Based on Connection manager selected:
- Teradici log in:
- Install the Teradici PCoIP client from Teradici Software and Mobile Clients
- In PCoIP client for Host Address or Code, paste the WorkstationPublicIP
- UserName: centos
- Password: provide same password as used in EC2 user password parameter.
- NiceDcv log in:
- On the web browser or in the NICE DCV Client, paste the WorkstationIP address
- UserName: ec2-user
- Password: provide same password as used in EC2 user password parameter.
- Teradici log in:
To connect to workstation in Private Subnet you will need to set up VPN client.
The configuration file includes the Client VPN endpoint and certificate information required to establish a VPN connection. You must provide this file to the clients who need to connect to the Client VPN endpoint to establish a VPN connection. The client uploads this file into their VPN client application.
To download and prepare the Client VPN endpoint configuration file (AWS CLI)
- Note the ClientVpnEndpointID displayed in the Outputs tab of the root stack (it is the one without word NESTED).
- Navigate to the folder with server and client certificates you have created as part of the Prerequisites in step 2.
cd ~/custom_folder/ - Download the Client VPN endpoint configuration file.
AWS_REGION="the region you deployed CloudFromtaion stack into, e.g. us-east-1" ENDPOINT_ID="paste the id from step one" aws ec2 export-client-vpn-client-configuration --client-vpn-endpoint-id ${ENDPOINT_ID} --output text > client-config.ovpn --region ${AWS_REGION} - Append the client certificate and key to the Client VPN endpoint configuration file.
cat >> client-config.ovpn
cert ~/custom_folder/client1.domain.tld.crt
key ~/custom_folder/client1.domain.tld.key

CTRL+C
- Verify that you have all the files in
~/custom_folder/directory.ls -l ca.crt client-config.ovpn client1.domain.tld.crt client1.domain.tld.key server.crt server.key
Now that we have VPN configuration file ready, the last step is to install VPN client on your machine. The following procedure shows how to establish a VPN connection using the Tunnelblick client application on a macOS computer.
brew search tunnelblick
brew cask install tunnelblick
Once the client is installed, please follow the AWS Connect to VPN documentation.
Follow the same steps as in Connect to Workstation deployed in Public Subnet
Now you’ve got most of the pieces together, it’s a good idea to test the setup to make sure you can submit a render from your workstation, have the Render Scheduler pick it up, and run the render on your Worker.
For this part, you will use Blender to render something.
Follow the instructions to:
- set up Worker Nodes
- set up Blender and submit a job
See Local Development guide to get a copy of the project up and running on your local machine for development and testing purposes.
The solution has been tested using taskcat the tool that tests AWS CloudFormation templates.
Install taskcat
pip install taskcat
You need to package the templates to S3 before you can run the test below. See Getting Started instructions.
From within project root directory run:
taskat test run
You can modify the taskcat configuration file with your own tests here .taskcat.yml
Follow these steps to clean up created resources:
- In the CloudFormation console, select the the root stack you have created. For example
aws-digital-content-creation-render-environment. - The root stack will handle the deletion of all the children stacks for you.
- In the top right corner, click on Delete.
- In the pop up window click on Delete stack.
- You can click the refresh button a few times until you see in the status DELETE_COMPLETE.
Contributions are more than welcome. Please read the code of conduct and the contributing guidelines.
See the list of contributors who participated in this project.
This library is licensed under the MIT-0 License. See the LICENSE file. - see the LICENSE file for details.


