This guide will show you how to deploy a self-hosted Vaultwarden server with Docker on a Linux server usgin the NGINX Proxy Manager as a reverse proxy.
- Docker
curl -fsSL https://get.docker.com -o get-docker.sh
sudo sh get-docker.shUse the docker-compose.yml file present in this repository to deploy the Vaultwarden server. You just need to change the .env files with your own values.
- Create a new directory for the Vaultwarden data and configuration files.
sudo mkdir -p /opt/vwmkdir vaultwarden
cd vaultwarden- Clone the repository.
git clone https://github.com/Rapha-Borges/deploy-vaultwarden.git .- Create the ADMIN Token using a temporary container
docker run --rm -it vaultwarden/server /vaultwarden hash
Insert your password and copy the token generated to the .env file. E.g.:
VAULTWARDEN_ADMIN_TOKEN='$argon2id$v=19$m=65540,t=3,p=4$eE4WeLxol1ODKg/1EZF6vN6xaKkbStz+6aMalproaC0$7UZak49fRr3r/tK63DLgnSlzIFoEHyk0tFhfETcTe3E'Save your password in a safe place. You will need it to access the admin panel.
- Validate and personalize the Vaultwarden Backup
.envfile present atvaultwarden/.env.
This docker-compose.yml file has a backup service that will create a backup of the Vaultwarden server using rclone to upload to a cloud storage.
Run the rclone container configuration and follow the instructions to configure the server.
IMPORTANT: The remote name default must be BitwardenBackup. If you want to use another name, set this at the .env file.
docker run --rm -it \
  --mount type=volume,source=vaultwarden-rclone-data,target=/config/ \
  ttionya/vaultwarden-backup:latest \
rclone configdocker compose up -d- Access the Vaultwarden server using the server IP.
To access all features of the Vaultwarden server, you need to use a TLS certificate. We will use the NGINX Proxy Manager present at the docker compose file to create a reverse proxy and manage the SSL certificate.
- Access the NGINX Proxy Manager web interface.
HTTP:       http://<server-ip>:81
Email:      admin@example.com
Password:   changeme
- Create a new proxy host.
http://<server-ip>:81/nginx/proxy
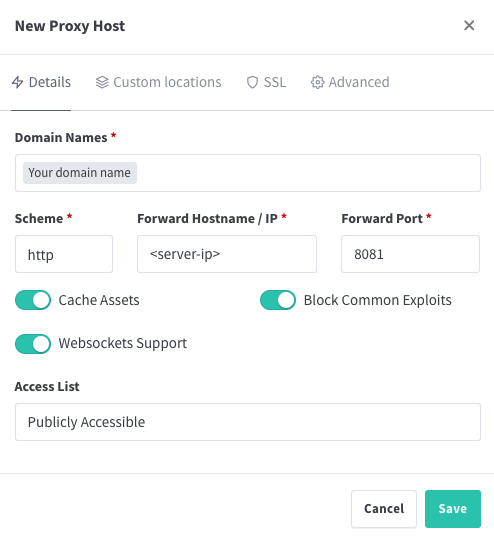
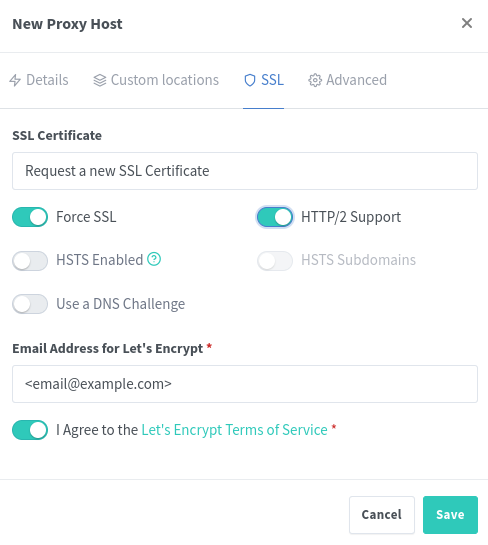
- Fill the form as the images below.
- Access the Vaultwarden server using the domain name. Now you should see the SSL certificate and be able to use all the features of the Vaultwarden server.
- Access the Vaultwarden server admin panel.
https://<domain-name>/admin
-
Use the same password used to generate the ADMIN token.
-
Change at least this following settings:
- Domain URL:
https://<domain-name> - Allow invitations: [x] Default: true
- Access the Vaultwarden server admin panel.
https://<domain-name>/admin
-
Go to the
Userstab -
Invite a new user using the email.
- Just create a new account using the email at
https://<domain-name>
Some users may have problems with the time zone even after setting the time zone at the .env file. The following steps can be used to set the time zone manually.
- Set the host time zone.
sudo timedatectl set-timezone <time-zone>- Restart the Vaultwarden server.
docker compose restart- Check the date and time at the
ttionya/vaultwarden-backupcontainer:
docker exec vaultwarden-backup-1 dateIf the time is not correct, follow the next steps.
- Access the
vaultwarden-backupcontainer.
docker exec -it vaultwarden-backup-1 /bin/sh- Set the time zone at the container.
apk add tzdata
cp /usr/share/zoneinfo/<time-zone> /etc/localtime
echo "<time-zone>" > /etc/timezone
date


