Demo using Salesforce CLI hooks to replace metadata values with an environment variable during a deploy.
See the file src/hooks/predeploy/metadataReplace.ts to view the hook code.
To use this demo: build and link the plugin and then push or pull custom object metadata files. Their description fields will be updated to maintain a different description between local and remote obejcts.
To use, install the Salesforce CLI and run the following commands.
Verify the CLI is installed
  $ sfdx (-v | --version)
Install the metadata-hook-demo plugin
  $ sfdx plugins:install metadata-hook-demo
To run a command
  $ sfdx [command]
To build the plugin locally, make sure to have yarn installed and run the following commands:
Clone the repository
  $ git clone git@github.com:salesforcecli/plugin-metadata-hook-demo
Install the dependencies and compile
  $ yarn install
  $ yarn prepack
Link your plugin to the sfdx cli
  $ sfdx plugins:link
To verify
  $ sfdx plugins
The example for creating a predeploy Salesforce CLI hook shows how to replace the description of a metadata type with the value of an environment variable. The hook runs only when pushing files to an org with the force:source:push command. See the metadataReplace.ts TypeScript file for the code described in this section so you can follow along. The process to create a hook is similar to the oclif process.
Import the Hook and Command classes.
import { Command, Hook } from '@oclif/config';
Then declare the types you use in your code.
type HookFunction = (this: Hook.Context, options: HookOptions) => any;

type HookOptions = {
  Command: Command.Class,
  argv: string[],
  commandId: string,
  result?: PreDeployResult
}

type PreDeployResult = {
  [aggregateName: string]: {
    mdapiFilePath: string;
    workspaceElements: {
      fullName: string;
      metadataName: string;
      sourcePath: string;
      state: string;
      deleteSupported: boolean;
    }[];
  };
};
The HookOptions type contains the values that are returned after the hook fires:
Command: The class name of the command that ran, such asPushCommand.argv: String array of the arguments that were passed to the command, such as-m ApexClassor-o.commandId: The CLI command that ran, such asforce:source:push.result: An object that contains information about what just happened.
The PreDeployResult type describes the result object for a predeploy hook. Each hook type returns a different result type. For example, the predeploy hook fires after the CLI converts your source files to Metadata API format but before it sends the files to the org. It returns an array of the converted metadata types and the associated source format files.
Most of the property names of the various result types describe themselves, such as PostOrgCreateResult.expirationDate and PreRetrieveResult.packageXmlPath. But a quick word about the aggregateName and workspaceElements properties:
aggregateNamerefers to a single representation in metadata format of, for example, a custom object.workspaceElementsis an array of source format files for the same custom object, each file describing the associated fields, layouts, and so on.
Use these returned values in your code to implement your logic. For example, this code checks for the CLI command that fired the hook:
if (options.commandId === 'force:source:push') {
This code iterates through the result and executes the updateObjectDesription function on each element to update the description of both the object in the org and the local source file:
    if (options.result) {
      Object.keys(options.result).forEach(mdapiElementName => {
        console.log('Updating the ' + mdapiElementName + ' object');
        let mdapiElement = options.result![mdapiElementName]!;

        // Update the object in the org (the metadata that is being deployed)
        updateObjectDescription(mdapiElement.mdapiFilePath);

        // Update the object locally
        updateObjectDescription(mdapiElement.workspaceElements[0].sourcePath);
      });
    }
  }
};
We recommend using the Visual Studio Code (VS Code) IDE for your plugin development. Included in the .vscode directory of this plugin is a launch.json config file, which allows you to attach a debugger to the node process when running your commands.
To debug the hello:org command:
If you linked your plugin to the sfdx cli, call your command with the dev-suspend switch:
$ sfdx hello:org -u myOrg@example.com --dev-suspendAlternatively, to call your command using the bin/run script, set the NODE_OPTIONS environment variable to --inspect-brk when starting the debugger:
$ NODE_OPTIONS=--inspect-brk bin/run hello:org -u myOrg@example.com- Set some breakpoints in your command code
- Click on the Debug icon in the Activity Bar on the side of VS Code to open up the Debug view.
- In the upper left hand corner of VS Code, verify that the "Attach to Remote" launch configuration has been chosen.
- Hit the green play button to the left of the "Attach to Remote" launch configuration window. The debugger should now be suspended on the first line of the program.
- Hit the green play button at the top middle of VS Code (this play button will be to the right of the play button that you clicked in step #5).
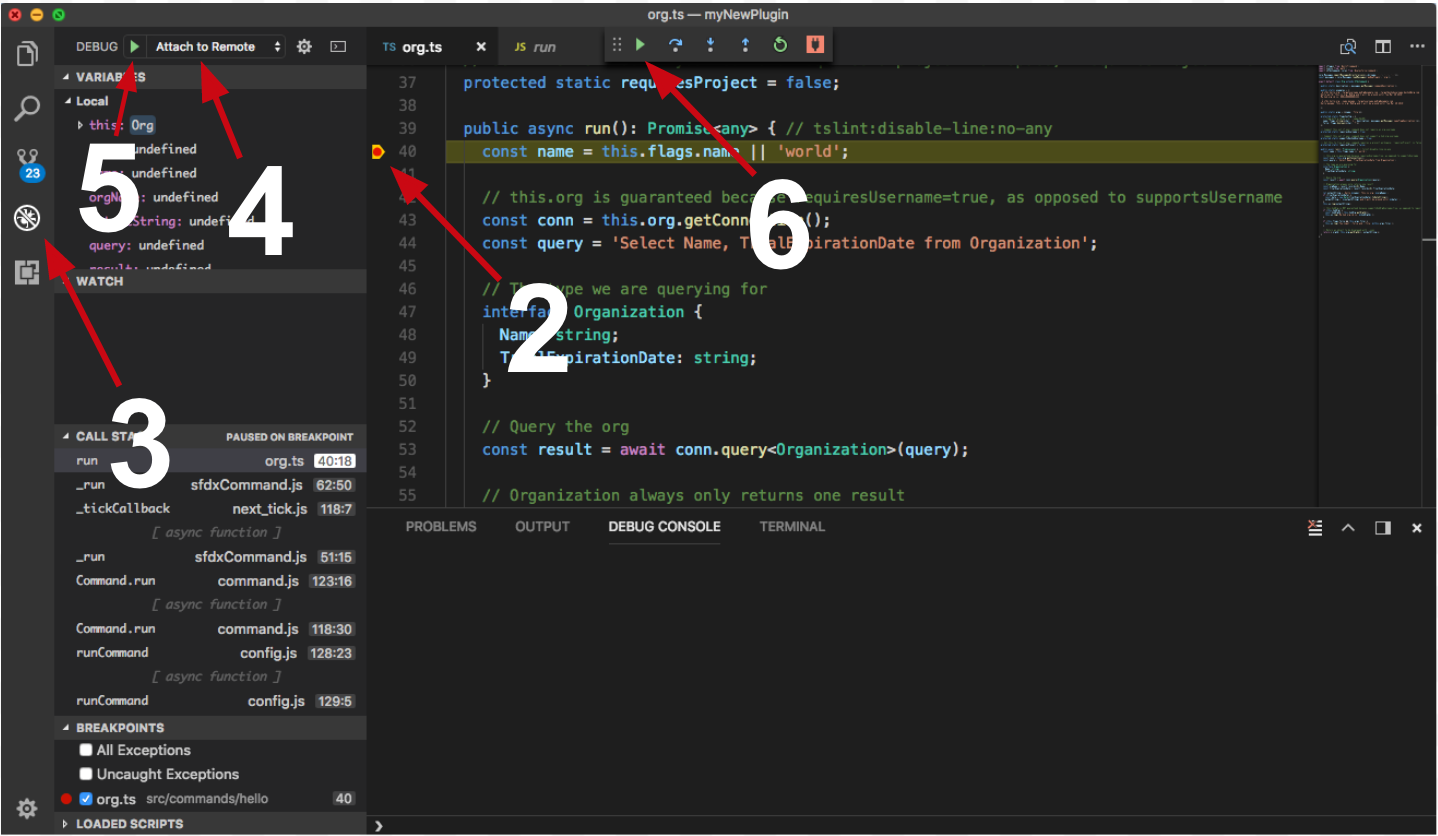
Congrats, you are debugging!
