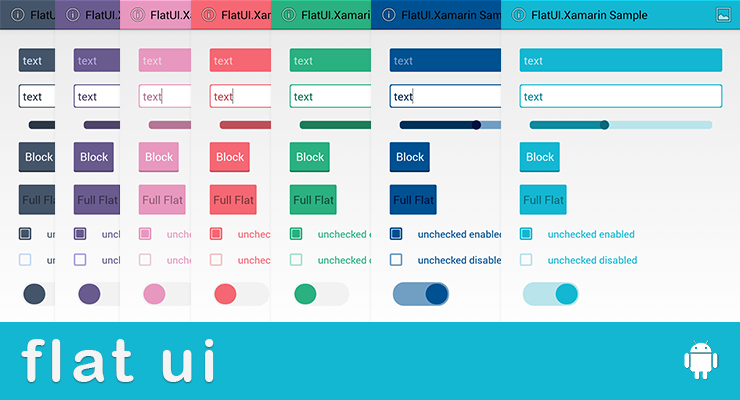
##FlatUI - Xamarin.Android##
FlatUI Port for Xamarin.Android of CengaLabs FlatUI Kit by @eluleci
###Features###
- Very easy to use
- Many themes built in
- Create custom themes in only a few lines of code
- Change themes on the fly
- ActionBar gets themed too
###Getting Started###
To use FlatUI, all you need to do is replace some of your normal widgets with the FlatUI version
Your normal button:
<Button
  android:id="@+id/buttonBlock"
  android:layout_width="wrap_content"
  android:layout_height="wrap_content" />
Now becomes:
<FlatUI.FlatButton
  android:id="@+id/buttonBlock"
  android:layout_width="wrap_content"
  android:layout_height="wrap_content" />
NOTE: FlatUI only works on Android 4.x+!
###Changing Themes###
You can set the theme a number of ways:
- Call
FlatUI.SetActivityTheme(FlatTheme.Sky());to theme all controls the same in the activity - Set the attribute on the widget in the layout file:
flatui:theme="sky" - Programmatically set each widget's theme:
myFlatButton.Theme = FlatTheme.Sky();
###FlatUI Widgets###
There are a number of 'flat' versions of android widgets available that inherit from their normal counterparts:
- FlatEditText
- FlatTextView
- FlatToggleButton
- FlatRadioButton
- FlatCheckBox
- FlatSeekBar
- FlatButton
###Custom Themes### It's very easy to make custom themes:
//Create a custom theme very easily!
var customJabbrTheme = new FlatUI.FlatTheme () {
    DarkAccentColor = Android.Graphics.Color.ParseColor("#00103f"),
    BackgroundColor = Android.Graphics.Color.ParseColor("#003259"),
    LightAccentColor = Android.Graphics.Color.ParseColor("#005191"),
    VeryLightAccentColor = Android.Graphics.Color.ParseColor("#719fc3")
};

//Set your theme programmatically
FlatUI.SetActivityTheme(this, customJabbrTheme);
###ActionBar###
Finally, the ActionBar can also be themed:
FlatUI.FlatUI.SetActionBarTheme (this, FlatUI.FlatUI.DefaultTheme, false);###Layout File Attributes###
If you want, you can specify some of the attributes for the FlatUI widgets directly in your Android Layout axml files.
First, make sure you add the xmlns:flatui namespace to your root Layout item like this:
<LinearLayout xmlns:android="http://schemas.android.com/apk/res/android"
    xmlns:flatui="http://schemas.android.com/apk/res-auto"
    android:orientation="vertical"
    android:layout_width="fill_parent"
    android:layout_height="fill_parent"> ...
Now, you can set attributes on various FlatUI widgets like this:
    <FlatUI.FlatEditText
        android:id="@+id/edittextFlat"
        android:layout_width="match_parent"
        android:layout_height="wrap_content"
        flatui:fieldStyle="flat"
        flatui:cornerRadius="3dip"
        flatui:fontWeight="bold" />
Here's a list of all the attributes you can set in your layout file for the various FlatUI widgets:
- FlatEditText: fieldStyle, cornerRadius,textPadding, fontFamily, fontWeight, textApperance
- FlatSeekBar: none
- FlatButton: textAppearance, textPadding, cornerRadius, isFullFlat
- FlatCheckBox: cornerRadius, size, fontFamily, fontWeight
- FlatRadioButton: size, fontFamily, fontWeight
- FlatToggleButton: size
###Changes###
- Nov. 30, 2013 - Initial Release
###Thanks###
Big thanks goes to @eluleci for his initial work on the original Java version of FlatUI: https://github.com/eluleci/FlatUI
