This is an alarm system integration for Home Assistant. It provides a user interface for setting your own alarm system completely from the browser.
This is an integration for the alarm_control_panel domain in HA.
It allows to combine existing sensors for creating a security system for your house.
The integration is comparable with the Manual Alarm in HA, but also has some additional features that makes it easier to use.
- Fully compatible with Home Assistant and the Alarm Panel Card.
- Has an integrated panel for complete management via UI (no YAML required).
- No restarts required when making changes.
- Can set up to 4 arm modes (armed_away, armed_home, armed_night, armed_custom_bypass), each with configurable delays and security perimeter.
- Supports configuring your existing HA entities as security sensors. These sensors will be watched automatically.
- Allows setting up multiple users with individual pincode and permission levels.
- Will restore its previous state after restart of HA.
- Receive push notifications when anything changes in the alarm.
- Activate a siren when the alarm is triggered.
Click to show installation instructions
- Install files:
- Using HACS:
In the HACS panel, go to integrations and click the big orange '+' button. Search for 'Alarmo' and click \'Install this repository in HACS'. - Manually:
Download the [latest release](https://github.com/nielsfaber/alarmo/releases) as a zip file and extract it into the `custom_components` folder in your HA installation. - Restart HA to load the integration into HA.
- Go to Configuration -> Integrations and click the big orange '+' button. Look for Alarmo and click to add it.
- The Alarmo integration is ready for use. You can find the configuration panel in the menu on the left.
Click to show updating instructions
- Update the files:
- Using HACS:
In the HACS panel, there should be an notification when a new version is available. Follow the instructions within HACS to update the installation files. - Manually:
Download the latest release as a zip file and extract it into thecustom_componentsfolder in your HA installation, overwriting the previous installation.
- Using HACS:
- Restart HA to load the changes.
- (Optional) Verify the version number.
- Verify version of the backend:
In HA, go to Configuration -> Integrations. In the Alarmo card, you should see a link with '1 device', click it. In the table click the 'Alarmo' device, and you should see the Device info. The 'firmware version' represents the installed version number. - Verify version of the frontend:
In the Alarmo configuration panel, the version number is displayed in the top right. If the version does not match with the backend version, your browser has an outdated version stored in the cache.
To clear the cache, you should do a force refresh of your browser.
- Verify version of the backend:
Click to show uninstall instructions
- Remove Alarmo from HA:
In HA go to Configuration -> Integrations. In the Alarmo card, click the button with the 3 dots, and click 'Delete'. - Remove the files:
-
When installed with HACS:
In the HACS panel go to integrations and look for Alarmo. Click the button with the 3 dots and click 'Uninstall'. -
When installed manually:
In thecustom_componentsdirectory, remove the 'alarmo' folder.
-
When installed with HACS:
- Restart HA to make all traces of the component dissapear.
- Add support for skipping the arming delay.
- Implement lock-out time when too many incorrect pincodes are entered.
- Add security to the configuration panel.
- Add the project to HACS.
- Add support for bypassing failed sensors.
- MQTT support for control + status reporting of the system from 3rd party applications.
- Extend support for action configuration.
- Adding translations for push notifications and the frontend.
The following diagram describes the operational states of the alarm and provides a simplified overview of the functionality.
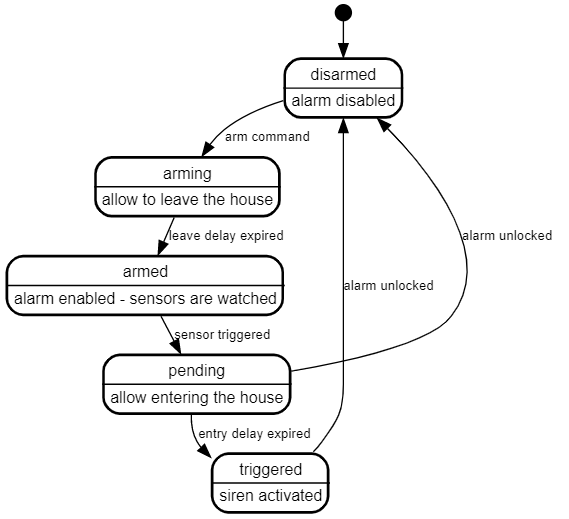
The alarm can be activated (armed) in a certain mode. This mode defines a certain set of sensors and represents the security zone (or perimeter).
The following modes are supported:
- Armed away
- Armed night
- Armed home
- Armed custom bypass (let's just call it armed custom from now on)
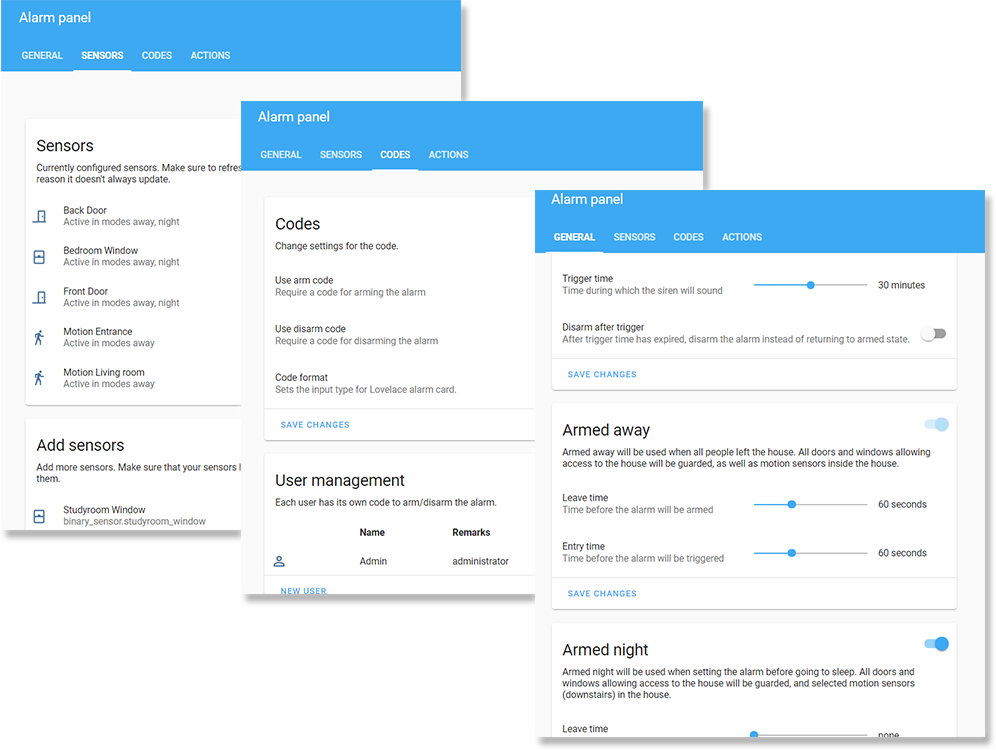
In the tab general you can find the settings for each mode. There are flip switches to enable/disable modes.
After installing Alarmo the entity alarm_control_panel.alarmo shall be added to HA.
You can use this entity together with the Alarm panel card, or in conjuction with automations to automatically arm/disarm the alarm.
The Alarmo entity follows the state definitions as defined by HA:
| State | Description |
|---|---|
disarmed |
The alarm is disabled/off. |
arming |
The alarm is arming. After the leave delay has expired, the alarm will be armed. |
armed_away |
The alarm is armed in away mode. |
armed_home |
The alarm is armed in home mode. |
armed_night |
The alarm is armed in night mode. |
armed_custom_bypass |
The alarm is armed in custom mode. |
pending |
The alarm is pending. After the entry delay has expired, the alarm will be triggered. |
triggered |
The alarm is triggered. |
unavailableunknown |
Something is wrong. Check the logs for more information. |
The Alarmo entity defines the following attributes:
| Attribute | Default value | Example value when set | Description |
|---|---|---|---|
arm_mode |
null |
armed_away |
The current active arm mode. Defined in all states except disarmed. |
changed_by |
null |
Niels |
User who last armed or disarmed the alarm. Detected from the entered code. Cleared when alarm is armed or disarmed without a code. |
open_sensors |
null |
{binary_sensor.backdoor: on} |
Dictionary of sensors with their entity-ID + state, that caused the alarm to change state. Set when arming attempt failed (due to one or more sensors). Set when alarm is triggered (only first sensor that caused the triggering is stored). |
bypassed_sensors |
null |
[binary_sensor.backdoor] |
List of sensors that are temporarily excluded from the alarm, due to arming in force. |
Currently Alarmo supports sensors of type binary_sensor. Alarmo will check the device class of each sensor, and only supports sensors that are related to security.
Available sensors should show up automatically in the sensors tab in the Add sensors card. Simply check the sensors that you wish to include in the alarm, and click 'add to alarm'. Review the configuration for each sensor in the sensors card.
When the alarm is armed with an immediate sensor, this sensor will trigger the alarm directly instead of waiting for the (optional) entry delay.
Example of use cases: in mode armed away you would normally leave and enter the house via a door. If a window is opened when the alarm is armed, this means bad news. The siren should be enabled ASAP.
Note: an immediate sensor must be off before you can enable the alarm. It is not allowed to be on while you are leaving the house.
When marking a sensor as always-on, it will always be able to trigger the alarm, even when the alarm is disarmed. The triggering occurs as soon as the sensor is activated and entry delays will be ignored.
This functionality is intended for safety sensors, such as fire detectors.
The allow-open property allows a sensor to be in the active state, while (and after) the alarm is armed. Setting this property is not the same as bypassing a sensor, since as soon as the sensor returns to the inactive state, it is capable of triggering the alarm. The property only ignores the initial state of the sensor.
This property is intended for motion sensors, which have a relatively long period before they return to inactive state, after the zone is clear. By setting this property, it is possible to set a leave delay that is lower than the reset period of this sensor.
By default, the alarm has no code and can be locked and unlocked by anyone who has access to HA. It is recommended to set a code for disarming the alarm as minumum security level.
To do so, go to the codes tab, and enable the setting 'use disarm code'.
Next, set up a user and give it a name and code. It is recommended to use the same name as your HA account, but this is not required.
A code can be a sequence of digits (4 or more) or contain a mix of letters, characters etc. Make sure to use a code that matches with the code format setting in the codes tab. This setting is detected by the alarm panel card, and will automatically show either a number pad or a text field.
Your code is stored completely secure. It is encrypted in the same way as your login credentials, and stored in the HA storage registry. When you enter a code, this will be encrypted too, and the encrypted values will be compared for a match. So it is impossible to recover your pin code. This also means that if you lose your pincode, you cannot unlock the alarm (there is no backup code!)
Currently, the administrator has no additional rights to a normal user.
This property is reserved for future use.
Alarmo supports MQTT for external control of the alarm. This function is intended for third-party alarm panels (such as a touch screen in the hallway).
The MQTT support needs to be enabled before it can be used.
The state topic shall be used to publish state changes.
Alarmo will send the current state of the Alarmo entity as payload (string). See here for the complete list of payloads.
The command topic can be used to control Alarmo through MQTT.
The following commands/payloads are supported:
- DISARM
- ARM_AWAY
- ARM_HOME
- ARM_NIGHT
- ARM_CUSTOM_BYPASS
If Alarmo is configured to require a pincode or password for the command, the payload must be formatted as JSON with the following format:
{command: "<my command>", code: "<my pin or password>"}
If the provided payload does not have the correct format, lacks a code when it is required or contains a wrong code, the command is ignored. In other cases, you should see a change in the state topic.
Alarmo features a built-in panel for managing push notifications. It can be found in the actions tab.
This feature has the same effect as defining an automation in HA that is triggered by a state change of the alarm_control_panel.alarmo entity.
It is only intended to provide a more integrated means of setting up your alarm.
This function adds buttons to a push message, that can be clicked to interact with Alarmo.
Alarmo has built-in support for actionable push notification with the 'failed to arm' condition.
Example:
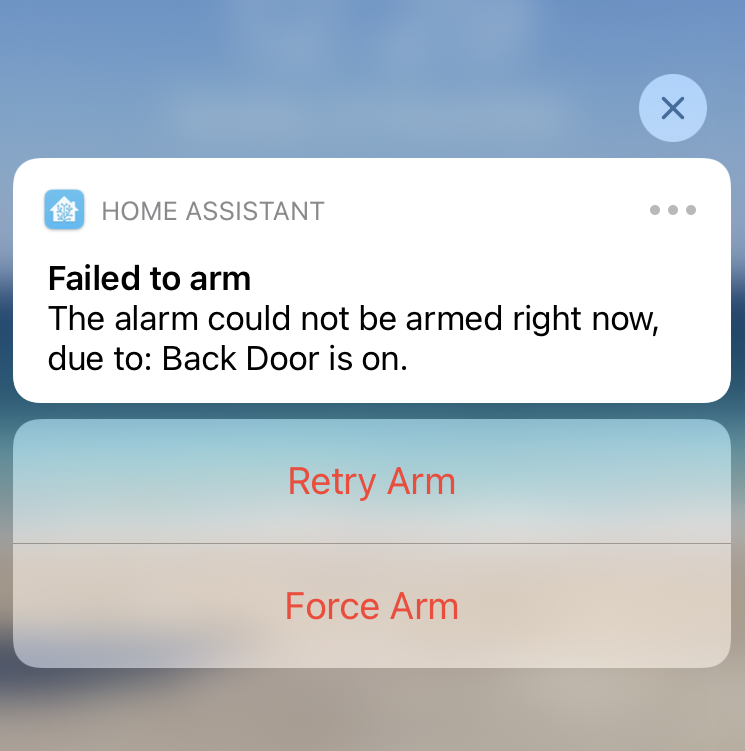
The 'Retry Arm' option will repeat the command that failed before. You could use it if you solved the issue in the mean time.
The 'Force Arm' option will repeat the command that failed before. The sensor/sensors that failed, shall be ignored while the alarm is armed.
For iOS devices
Step 1: Add this to the configuration.yaml file:
ios:
  push:
    categories:
      - name: Alarm Arm Failure
        identifier: alarmo_arm_failure
        actions:
          - identifier: ALARMO_RETRY_ARM
            title: Retry Arm # feel free to change this text
            destructive: true
          - identifier: ALARMO_FORCE_ARM
            title: Force Arm # feel free to change this text
            destructive: true
Step 2: Restart HA to make the configuration effective.
Step 3: In the Alarmo notifications editor, create a notification for the 'Failed to arm' event. Choose your iOS device as target.
Step 4: Go to YAML mode. Look for the part that has service_data, and extend it as follows:
    service_data:
      ... # your message and title should be here already
      data:
        push:
          category: ALARMO_ARM_FAILURE
For Android devices Step 1: In the Alarmo notifications editor, create a notification for the 'Failed to arm' event. Choose your Android device as target.
Step 2: Go to YAML mode. Look for the part that has service_data, and extend it as follows:
    service_data:
      ... # your message and title should be here already
      data:
        actions:
          - action: ALARMO_RETRY_ARM
            title: Retry Arm # feel free to change this text
          - action: ALARMO_FORCE_ARM
title: Force Arm # feel free to change this textAlarmo features a built-in panel for managing device actions. It can be found in the actions tab.
This feature has the same effect as defining an automation in HA that is triggered by a state change of the alarm_control_panel.alarmo entity.
It is only intended to provide a more integrated means of setting up your alarm.
The actions are currently limited to turning on or turning off a HA entity. For more advanced actions, you can use the built-in YAML editor to define your own HA service call.
The Lovelace alarm panel card is an excellent companion for Alarmo. It is highly recommended to use it for controlling the alarm.
This card will show you the current state of the alarm, and will allow you to enter a pin (the format is automatically detected).
Make sure that the card is configured with the same modes (they are referred to as states in the card), as you have set up in Alarmo.
There is currently no functionality in place to detect this setting automatically.