Integrates cpenv with Shotgun Toolkit.
cpenv is used to manage plugins, project dependencies and environment variables through the use of modules. Modules are simple folders containing a dependency like Arnold for Maya and a module.yml file that includes environment variables. Modules can be as complex or as simple as you would like.
The simplest module is a folder containing a module.yml that sets some environment variables.
A complex module may include all platform varieties of a particular plugin. The module.yml file can set environment variables that use the $PLATFORM variable to choose which plugin to provision at runtime.
- Create required app fields on first launch
- Store modules directly in your shotgun site
- Localize modules when launching applications
- Build Environments (a list of modules) to be activated per job and toolkit engine.
- Drag and drop modules to build environments.
- Preview combined environment variables.
- Import Environments from other jobs, making it easy to setup new jobs.
The example_config folder includes modifications you need to make to your Shotgun Toolkit config in order to get cpenv working. The module_entity and environment_entity keys will be specific to your shotgun site.
- home_path: Where to store modules locally. Defaults to a local path available across all users on your machine. You may choose to use a network location here, so that all users in a network share modules.
- module_paths: List of additional paths used to lookup modules.
- module_entity: Name of the CustomNonProjectEntity named "Module".
- environment_entity: Name of the CustomEntity named "Environment".
- Browse to site-preferences
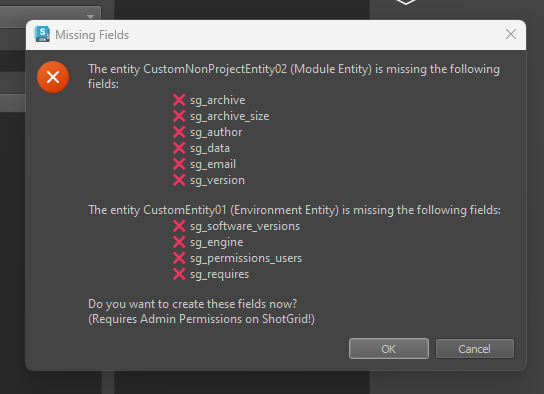
The app will ask you if you want to automatically create the required app fields when you launch the app.

If you prefer to create them manually, here are the fields you need to add.
- Add the following fields to the Module Entity.
- Open env/includes/settings/tk-cpenv.yml.
- Set the value of the
module_entityto match theCustomNonProjectEntityyou enabled. This would beCustomNonProjectEntity01according to the image above. - Set the value of the
environment_entityto match theCustomEntityyou enabled. This would beCustomEntity03according to the image above.
Use the cpenv cli tool to create, test, and publish modules to your shotgun site. Only modules published to your site will appear in the Set Modules dialog.
In order to publish to your shotgun site, you'll need to configure a ShotgunRepo.
- Create a Shotgun script. Make sure the name of your script makes it clear what it will be used for, I named mine "cpenv".
- Execute the following cli command using your own repo_name, baseurl, script_name, api_key and module_entity.
> cpenv repo add my_shotgun --type=shotgun --base_url=https://my.shotgunstudio.com --script_name=cpenv --api_key=<your_script_key> --module_entity=CustomNonProjectEntity01
If all is well, you should now see your new ShotgunRepo when running cpenv repo list.
Let's create a quick test module named "my_first_module" in a temporary directory.
> mkdir tmp
> cd tmp
> cpenv create my_first_module
...
> cd my_first_module
Next open the module.yml file and modify the environment section.
Tip: If you use sublime text use
subl .to open the current directory in sublime text. You can also usecpenv edit "some_module"to quickly open a published module in sublime text. You can configure your own text editor by setting theCPENV_EDITORenvironment variable.
name: my_first_module
version: 0.1.0
description: 'My very first module'
author: 'Me'
email: 'me@memail.com'
requires: []
environment:
  MY_FIRST_VAR: 'HelloWorld'
Include an icon.png file and that will be used as a thumbnail when you publish your module.
Activate your module to test it. You can use cpenv activate . to activate the current working directory.
> cpenv activate .
# Windows Powershell
> $env:MY_FIRST_VAR
# Bash
> echo $MY_FIRST_VAR
Now that we have a working module, let's publish it to Shotgun.
> cpenv publish my_first_module

  [0] cwd - C:/Users/user
  [1] user - C:/Users/user/AppData/Local/cpenv/modules
  [2] home - C:/ProgramData/cpenv/modules
  [3] my_shotgun - https://my.shotgunstudio.com

Choose a repo to publish to [2]: 3
This should upload your module to Shotgun and you'll be able to see it in the Set Modules dialog.
To quickly verify that your module has been uploaded, you can use the cpenv list command.
Visit the cpenv repository for more info.
- Create an Environment and set an engine for it.
- Drag and drop modules to build your Environment. The order of the modules here is important. Modules later in the list can override environment variables set earlier in the list. You can drag and drop to reorder them or move them back to the Available Modules list to remove them from the environment.
- Use the Preview Environment tool to view the combined environment variables for your Environment.
-
Use the Permissions dialog to restrict access to an Environment to certain users. This is great for development when you need to test an Environment before pushing it out to everyone.


- Users will be prompted to select an Environment when they launch an application if they have permissions to multiple Environments for an engine.

-
Optionally restrict the Environment to certain software versions by enter the versions into the "Software Versions" field. Leaving it blank will make the Environment apply to all versions of the selected Engine's software. For example if you entered "2020 2022" for a "tk-maya" Environment, that would be activated for either Maya 2020 or Maya 2022.
-
Save your changes! You're ready to launch some software.


