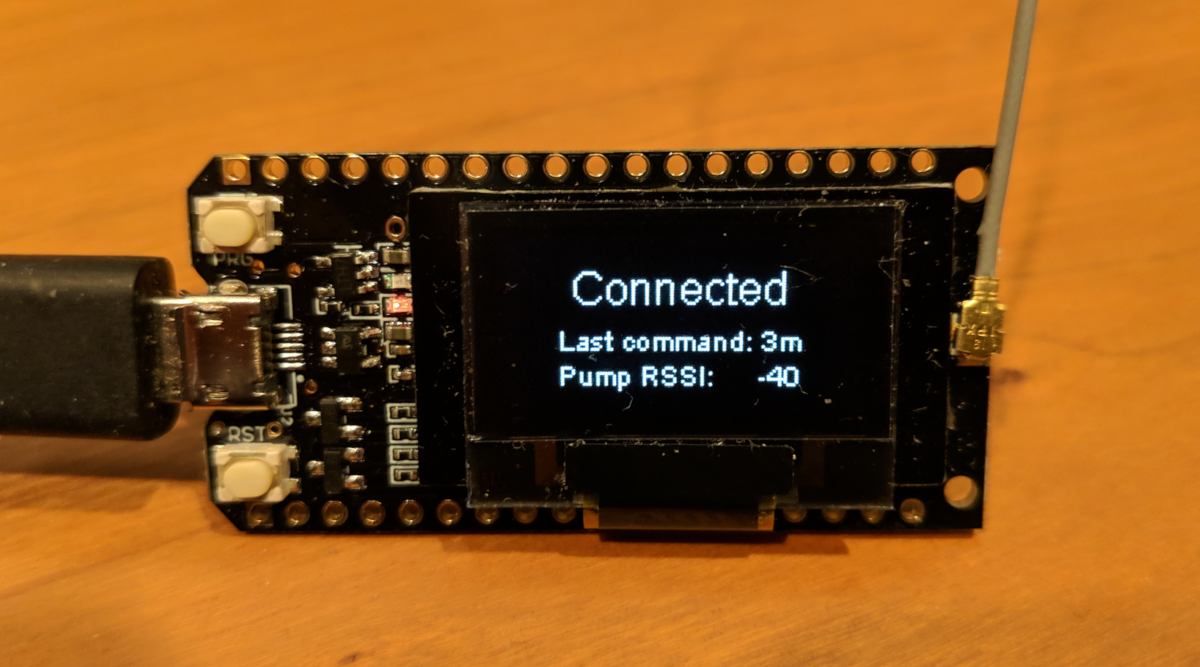
This repository contains very preliminary code, intended for collaboration among developers. It is not ready for end users and may be subject to rebasing without notice.
This project has been developed and tested on a TTGO ESP32 868/915 MHz LoRa OLED module (version 1 only, see below!), which contains an ESP32 SoC, an RFM95 LoRa radio, a 128x64 pixel SSD1306 OLED display, and a LiPo battery charger.
The module has two push-buttons. One is hard-wired to reset the board; the other is available as an input or interrupt source.
They are available from AliExpress, Banggood, and numerous others.
The current code does not work on the TTGO version 2 module due to different pin assignments.
The ESP32 SoC contains both WiFi and Bluetooth radios. This project currently uses only the Bluetooth LE support.
The radio chip (HopeRF RFM95 / Semtech SX1276) is marketed for LoRa applications, but also supports OOK and FSK modulation. The OOK capability is used by this project to communicate with Medtronic insulin pumps. It may also be possible to use the FSK support and a 433 MHz version of the module to communicate with OmniPod insulin pumps: if anyone pursues that, please let me know.
Attach an appropriate antenna to the U.FL connector on the module before using this software.
The module can be powered via the micro-USB connector or with a 3.7V LiPo battery.
The battery connects to a 2-pin female JST 1.25mm connector. Note that this is smaller than the 2.0mm connectors used on Adafruit and SparkFun LiPo batteries.
This repository contains git submodules (in the components subdirectory).
Unless you cloned this repository with the --recursive option,
those submodules won't be initialized yet.
Use this command to initialize them:
git submodule update --init --recursive
and this command to check their status:
git submodule status --recursive
-
Follow these instructions to install the ESP-IDF development environment.
-
Build and flash one of the example applications to make sure you have a working setup.
-
Type
makein the top level of this repository -
Change to the
projectsubdirectory -
Build the project by running
make -j -
Flash the project to your ESP32 module by running
make flash
Run Loop on your iPhone or run the dev branch of AndroidAPS on your Android phone. GNARL should show up when you scan for a RileyLink.
GNARL will show messages on the OLED display when your phone connects and disconnects. Pushing the button will display the current status. GNARL may not respond to the button press immediately if it is communicating with the pump, due to scheduling priorities.
This repository contains a few applications ("projects" in ESP-IDF terminology) besides GNARL:
-
blinkblinks the onboard LED -
sleepuses the ESP32 "lightweight sleep" mode and wakes up when a timer goes off or the button is pressed -
oledtestdraws text in various sizes on the OLED display -
regtestreads the RFM69 registers and prints them on the serial console -
snifferreceives Medtronic packets and prints them on the serial console -
pumpstatdisplays the status of a Medtronic insulin pump when you press the button -
bletestis a simple BLE server that can be queried with a tool like nRF Connect -
mmtunefinds the frequency at which the pump responds with the strongest signal and displays the results graphically -
pumpclockretrieves the time from a Medtronic insulin pump and uses it to display a digital clock -
wificonnects to a WiFi network, obtains an IP address, and prints it on the serial console -
nightscoutretrieves recent entries from a Nightscout server and prints them on the serial console
To build the blink application, for example:
-
In the top level of this repository, type
make blink -
Change to the
projectdirectory and follow the same steps as above for building and flashing (make -jandmake flash)
After flashing applications that print information on the serial console,
run make monitor to see the output.
Some of the applications require the pump serial number or frequency
to be defined in the include/pump.h file.
It should look like this:
#define PUMP_ID		"123456"	// pump serial number (note that this is a string constant)
#define PUMP_FREQUENCY	916500000	// pump frequency
#define MMTUNE_START	916300000	// starting frequency for mmtune scans
The WiFi configuration is hard-coded in the include/wifi_config.h file as follows:
#define WIFI_SSID	"network name"
#define WIFI_PASSWORD	"network password"
Nightscout server information is defined ininclude/nightscout_config.h as follows:
// DNS hostname, not a URL
#define NIGHTSCOUT_HOST		"your.nightscout.hostname"

// 40-character SHA-1 hash of your Nightscout API secret
#define NIGHTSCOUT_API_SECRET	"0123456789abcdef0123456789abcdef01234567"
The SSL layer requires the root certificate used by the Nightscout
server to be available at compile time in the file include/root_cert.pem.
You can extract it from the output of this command:
openssl s_client -showcerts -connect NIGHTSCOUT_HOST:443 </dev/null
The root certificate is the last one in the chain.
The local time zone is hard-coded in the include/timezone.h file.
For example:
#define TZ "EST5EDT,M3.2.0/2,M11.1.0"
The time zone must be in one of the first two formats specified here. In particular, the "America/New_York" format is not supported.
