Custom bio links for creatives who love coding. Made this first to use for my own weblinks vjy.me/lnk
A perfect custom alternative for linktree, bio and other shortner platform. Check live version here nxtlnk.xyz
Pull requests are always welcome. In case you want inspiration or new features on what to add, check out the issues for feature requests.
Coffee fuels coding ☕️
Table of Contents
- Usage
- Quick Start
- Manual Setup
- Getting Started
- Images
- Update Bio
- Update Links
- Frontend
- SEO
- Google Analytics
- Custom Domain
- Favicon
- Contributors
nxt-lnk template used to create your custom bio link and self-host on Vercel or Netlify using your own domain. Need little understanding of code :) ☕
Usually, you don't need to worry a lot about coding if you're just updating information in BioData.js and LinkData.js. To deep dive know more Next.js and React official documentaion.
For customization used styled components. If you want to customize styling you can learn more here.
Template auto support dark-mode depending on system cofig.
Run the following command to create a new project with this template:
yarn create next-app your-app-name -e https://github.com/realvjy/nxt-lnk
# or
npx create-next-app your-app-name -e https://github.com/realvjy/nxt-lnkUse any editor to work on editing. I use vscode
First, run the development server:
npm run dev
# or
yarn dev
Open http://localhost:3000 with your browser to see the result.
Important files to edit or update info
data/BioData.js All basic info update here
data/LinksData.js Contain all the links
Components/WebLinks.js UI and stylesheet
Components/icons/index.js Contain all SVG icon compo
You can start editing the page by modifying data/BioData.js and data/LinksData.js. The page auto-updates as you edit the file.
All images stored inside public folder of the project.
Example from BioData.js :
const bioData = [
    {
        name: 'vijay verma',
        username: '@realvjy',
        url: 'https://vjy.me',
        titleImg: true,
        avatar: '/avatar.png',
        nftAvatar: true,
        description: 'A short description/bio about you goes here',
        subdesc: 'This is secondary description. If you do not need, you can remove it',
        newProductUrl: 'https://vjy.me/lnk',
        newProduct: true,
    },
];

export default bioData;
Avatar
Just replace avatar.png. 200x200px will be good.
Hex/NFT avatar view
nftAvatar: true enable hex shape on avatar image.
nftAvatar: false made it in oval shape.
Title
By default titleImg: true and it look for title.svg. Replace svg with logo logo. Make sure to use title.svg name.
Featured banner
newProductUrl and newProduct used for getting featured banner. You can replace the image newproduct.png with any design you like.
newProduct: true show banner. Default is true make it false to hide.
Example from LinksData.js :
const webLinks = [
    // All social profile
    {
        title: 'Twitter',
        url: 'https://twitter.com/realvjy',
        type: 'social',
        icon: '/twitter.svg',
        on: true
    },
    ...
    ...

    {
        title: 'Instagram',
        url: 'https://instagram.com/realvjy',
        type: 'social',
        icon: '/insta.svg',
        on: true
    }
];
export default webLinks;
Enable/Disable Social Media
Find type: social and change on:true|false
| Title | on (default) |
|---|---|
Twitter |
true |
Instagram |
true |
Dribbble |
false |
Medium |
false |
Github |
true |
Youtube |
false |
Behance |
true |
Figma |
true |
Linkedin |
false |
Mastodon |
false |
Hive Social |
false |
Post.news |
false |
Setting on: true show the social icon.
The social media icons are arranged in a single row at the top of the page below description. If you want to use as list, chagne type to type: 'other'
Add new Social Media link create a new block by copying this
    {
        title: 'Social Name',
        url: 'https://link.com/whateverurl',
        type: 'social',
        icon: '/newiconname.svg',
        on: true
    }
Update all info and make sure to add a newiconname.svg file in public folder.
Then you have to add new section to frontend components/WebLinks.js
All frontend customization done inside components/WebLinks.js. If you wante to update and add new section just look this file and update according to your need.
Update section
Look for Section codes. Like if you want to change install type to featured Update the type: 'featured' in LinkData.js then update all install related code in WebLinks.js to featured
// Collect all links filter by type - social, project, nft and other etc=
// get data for install section
const install = allLinks.filter((el) => {
  return el.type === "install" && el.on
});

...
...

{/* Featured Section */ }
<LinkSection>
  <h3>{install[0].type}</h3>
  {
    install.map((i) => {
      return (
        <Link href={i.url} passHref key={i.title}>
          <LinkBox>
            <LinkTitle><img src={i.icon} style={{ filter: 'var(--img)' }} /> {i.title}</LinkTitle> <NewUp />
          </LinkBox>
        </Link>
      )
    })
  }
</LinkSection>
{/* End Featured Section */ }
Add New section
Add new section with specific type in Linkdata.js. Then copy LinkSection Code to create new section in WebLinks.js file. Make sure to create get data of that section as well.
Already added next-seo. All you have to do is update next-seo.config.js file. Make sure to add direct link of preview.jpgfile, like - https://vjy.me/preview.jpg.
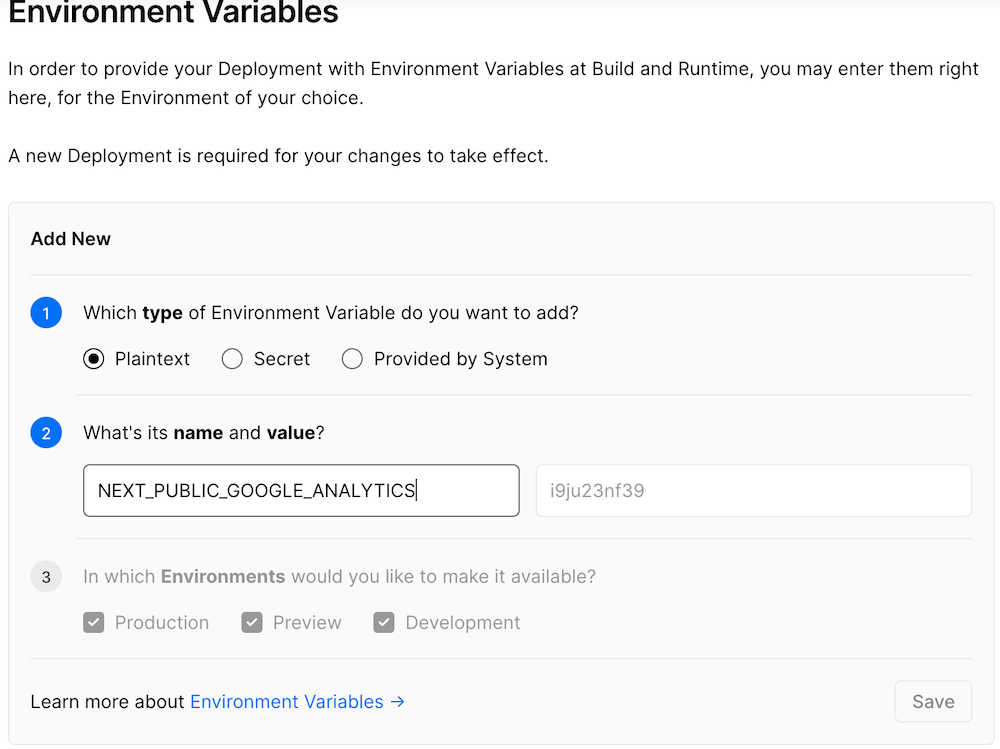
In Vercel, you can set this by going to your project, then Settings and finally Environments Variables. To get GA 4 code G-ZXX0000XXX follow these steps
By default vercel give you a subdomain with your project name like - nxtlnk.vercel.app. But you can add own domain.
Vercel/Netlify give you option to add any domain to the deployed project like vjy.me/lnk or nxtlnk.xyz. All you have to do is follow official Vercel documentaion or Netlify Documentaion
Create a favicon.ico file and place inside public folder. I use favicon.io
Created by realvjy. You are always welcome to share your feedback on twitter or any social media platform.
If you want to contribute. Just create a pull request.


