Simple Flask backend server with RETE algorithm implementation that allows the loading of custom rules.
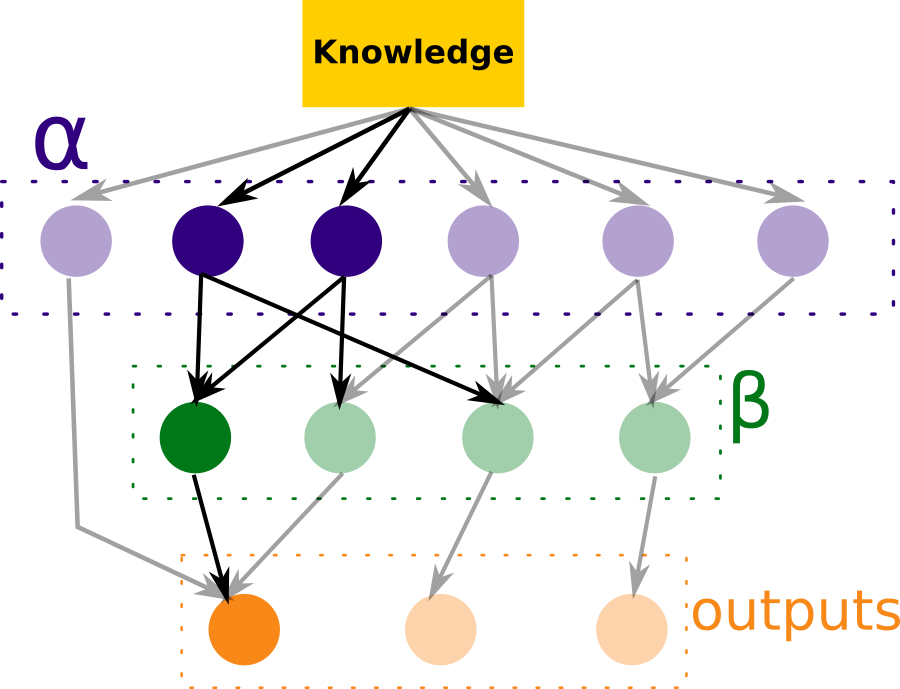
This algorithm uses three different layers: the Alpha Memory, the Beta Memory and the outputs. When information (called Knowledge) is received, the nodes in both the Alpha and Beta memories evaluate it in order to activate a node in the output layer, which contains an inference result for the current knowledge.
If we wanted to draw this architecture, it would be something like this:
As the diagram shows, the Beta Memory evaluates the state of the nodes stored in the Alpha Memory; this means that to enable beta nodes, it is necessary to first enable all it's related alpha nodes. Another important thing to note from this diagram is that both alpha nodes and beta nodes can activate an output node, meaning that the use of the Beta Memory is completely optional.
An example of how we would get to an output could be:
Here, we can see that the current state of our Knowledge enabled two alpha nodes, which enabled at the same time a beta node, which finally enabled an output node that holds an inference result.
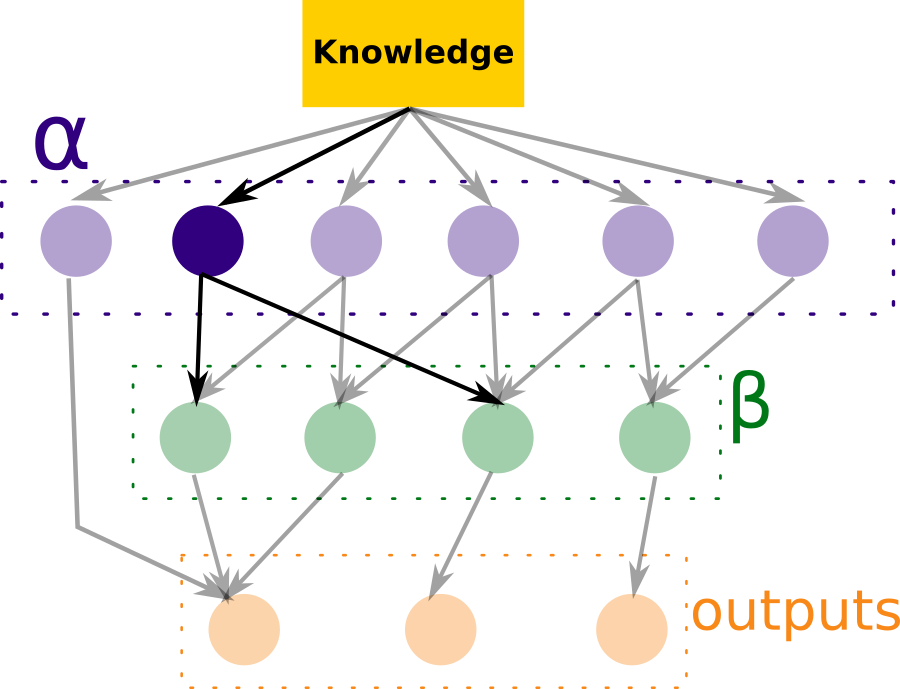
If the current Knowledge was not enough to return an inference result, then we would need to extend said Knowledge. For that, the algorithm returns a list of all the fields it currently doesn't know and at least one node needs to become enabled. The following diagram is an example of such situation:
Both the Alpha and Beta memories erase the nodes that could never be turned on based on the current knowledge.
Say we had node A in Alpha Memory, which evaluated that the field age was bigger than
10 and that the field weight was less than 50. If we knew that age=9, then we
would be sure that node A will never be enabled; therefore, we could remove it from
the Alpha Memory. The same would apply to the Beta Memory. Say we had node B, which
evaluated that both nodes A and K from the Alpha Memory were enabled; in the previous
scenario, that Beta node would never be enabled; therefore we could remove it too from
the Beta Memory.
Each of the entities presented in the previous section have a counterpart in our implementation:
- The alpha nodes are called simply
nodes. - The beta nodes are called
joints. - The output nodes are called
outputs.
The conditions to enable a node, the enabled nodes needed to enable a joint and which
output is enabled by each of both nodes and joints must all be indicated in the rules
object. This object can be both defined in the default session files (in
/resources/rules.json) or in the HTTP POST request body that has to be sent to start
a session.
The rules object is composed by the three aforementioned elements:
{
  "nodes": [],
  "joints": [],
  "outputs": []
}
The composition of each of these objects is as follows:
{
  "id": "Age",
  "conditions": [
    {
      "field": "age",
      "value": 18,
      "operation": "bt"
    }
  ],
  "output": "Grown Ass"
}
Where id is how this node will be referred by across the stack, the conditions
indicate how to enable it (joined by an AND clause) and the output, which is
optional, refers to a node from the output layer and indicates which of those would
be turned on if this node was enabled.
{
  "id": "Income and Destinations",
  "nodes": [
    "Income",
    "Number of destinations"
  ],
  "output": "Patagonia"
}
Given that joints are not referred to anywhere in the algorithm, the id is not
really necessary, but it's always good to have ids (just in case we needed to debug).
The nodes list holds the ids of those nodes that have to be enabled in order for
the joint in question to be enabled. Finally, the output field is the same as in
nodes.
{
  "id": "Patagonia",
  "object": {}
}
The id of an output is what should be found in the output field of both joints
and nodes. The object field is a free object where you should put whatever you
want to return as an inference result.
Having created this for a Q&R flow (question and recommendation, just invented that),
this implementation has also support for questions. This means that you could give the
application a map of field: question and it would return that question every time
that field needs to be asked. It was thought to make a generic-enough Front End that
could handle any set of rules.
To start a session, you'll need to POST a body with the inference rules and, optionally, the related questions.
POST /start
{
  "rules": {},
  "questions": null
}
As a result, you will obtain a session id in the response body:
{
  "session_id": "f0f84ee50901433ea35ceb9bcaaadeec"
}
An example request can be found in /resources/example_request.json.
Once the session was created (you can use the session id default if you wish, loading
the rules in the resources files), you can start the search for an inference result
by posting new knowledge. This can be done this way:
POST /forward/<session_id>
{
  "field_name1": "value",
  "field_name2": "value",
  "field_nameN": "value"
}
In response to this kind of request, you may obtain three different responses:
- A list of fields to ask and their related questions, which are optional:
{
  "needed_fields": [
    {
      "field_name": "age",
      "question": "What is the traveler's age?"
    },
    {
      "field_name": "income",
      "question": "What is your approximate income?"
    }
  ]
}- An inference result object:
{
  "inference_result": {}
}- A message indicating that no inference result is possible based on the current knowledge:
{
  "message": "No recommendation found for the given data"
}To run the server, you may need to install some things first. To do so, you can run
make install-core-libraries, which will install python3.8 and python3.8-venv.
Then, you will also need to set up the venv. You can do this by running make prepare. Finally, to start the Flask server, run make run.
Obviously, if you have python3.8 and flask in your system, just do
python3.8 app.py.
Assuming you have everything ready to run a React App, run npm install and
npm start from the frontend directory to start the application.


