The aim of this Intel OpenVINO based application is to controls the mouse pointer based on movement of eyes with the help of:
- Face Detection Model
- Facial Landmarks Detection Model
- Head Pose Estimation Model
- Gaze Estimation Model
Th input can be provided as an camera feed or as a video.
-
To get started download the Intel OpenVINO API. For all kind of help on Intel OpenVINO visit
-
Once all the above things are done, download the starter files.
-
Extract the files, and "cd" into the folder.
-
Downloading Models In order to proceed with the model we need to download all the 4 models. Note: Since we need to check the project on diffrenent precisions, hence i have not specified "--precision"
a. for Face Detection Model
python3 <openvino directory>/deployment_tools/tools/model_downloader/downloader.py --name "face-detection-adas-binary-0001"b. for landmarks-regression-retail-0009
python3 /opt/intel/openvino/deployment_tools/tools/model_downloader/downloader.py --name "landmarks-regression-retail-0009"c. for head-pose-estimation-adas-0001
python3 /opt/intel/openvino/deployment_tools/tools/model_downloader/downloader.py --name "head-pose-estimation-adas-0001"d. for gaze-estimation-adas-0002
python3 /opt/intel/openvino/deployment_tools/tools/model_downloader/downloader.py --name "gaze-estimation-adas-0002" -
Execute the following command, inorder to install the required dependencies
python3 -m pip install -r requirenment.txt -
Inorder to check for performance measure, install Intel DL Workbench and Intel VTune Profiler.
-
You can download Intel DL Workbench from here
-
You can download VTune Amplifier from here
In order to start programming run the following:
To set up the virtual enviornment
source /opt/intel/openvino/bin/setupvars.sh
to run the OpenVINO application
python3 main.py -f ../intel/face-detection-adas-binary-0001.xml -fl ../intel/landmarks-regression-retail-0009.xml -hp ../intel/head-pose-estimation-adas-0001.xml -g ../intel/gaze-estimation-adas-0002.xml -i ../bin/demo.mp4 -pt 0.6 -d "CPU" -fg 3
To set up the virtual enviornment
call "c:\Program Files (x86)\IntelSWTools\openvino\bin\setupvars.bat"
to run the OpenVINO application
echo "python main.py -f ../intel/face-detection-adas-binary-0001.xml -fl ../intel/landmarks-regression-retail-0009.xml -hp ../intel/head-pose-estimation-adas-0001.xml -g ../intel/gaze-estimation-adas-0002.xml -i ../bin/demo.mp4 -pt 0.6 "
python main.py -f ../intel/face-detection-adas-binary-0001.xml -fl ../intel/landmarks-regression-retail-0009.xml -hp ../intel/head-pose-estimation-adas-0001.xml -g ../intel/gaze-estimation-adas-0002.xml -i ../bin/demo.mp4 -pt 0.6 -d "CPU" -fg 3
-
-f, --face_detection_model
path of the face detection model xml file required = True
-
-fl, --facial_landmark_model
path of the landmarks detection model xml file required = True
-
-hp, --head_pose_model
path of head position model xml file required = True
-
-g, --gaze_estimation_model
path of gaze estimatiob model xml file required = True
-
-i, --input
path of the input file, or you can provide 'CAM', if you wish to provide the camera feed required = True
-
-l, --cpu_extension
path of the cpu extension file required = False
-
-pt, --prob_threshold
the value of threshold value, the result above this value should be returned by the model required = False
-
-fg, --perf_flag
Return the performance of individual layers "1 for face detection" "2 for Facial landmark detection" "3 for Head Pose Estimation" "4 for Gaze Estimation" required = False
-
-d, --device
name of the device (CPU/GPU/VPU/FPGA) on which we wish to run the inference required = True
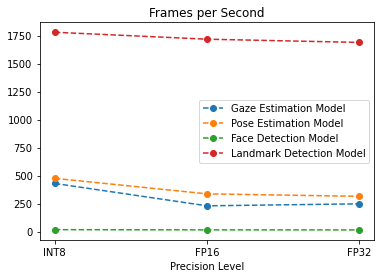
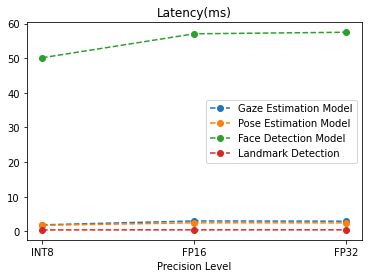
- Gaze Estimation Model
Precision level FPS Latency(ms) Total Execution Time (sec) INT 8 429.98 1.89 20.00306 FP16 230.25 3.03 20.00457 FP32 247.96 2.95 20.0031 - Face Detection Model
Precision level FPS Latency(ms) Total Execution Time (sec) INT 8 17.41 50.12 20.05071 FP16 15.53 57.04 20.08651 FP32 15.13 57.49 20.09231 - Head Pose Estimation Model
Precision level FPS Latency(ms) Total Execution Time (sec) INT 8 475.4 50.12 20.05071 FP16 337.17 57.04 20.08651 FP32 314.91 57.49 20.09231 - Landmarks Detection Model
Precision level FPS Latency(ms) Total Execution Time (sec) INT 8 1779.73 0.43 20.0008 FP16 1717.70 0.45 20.00058 FP32 1788.89 0.45 20.00073
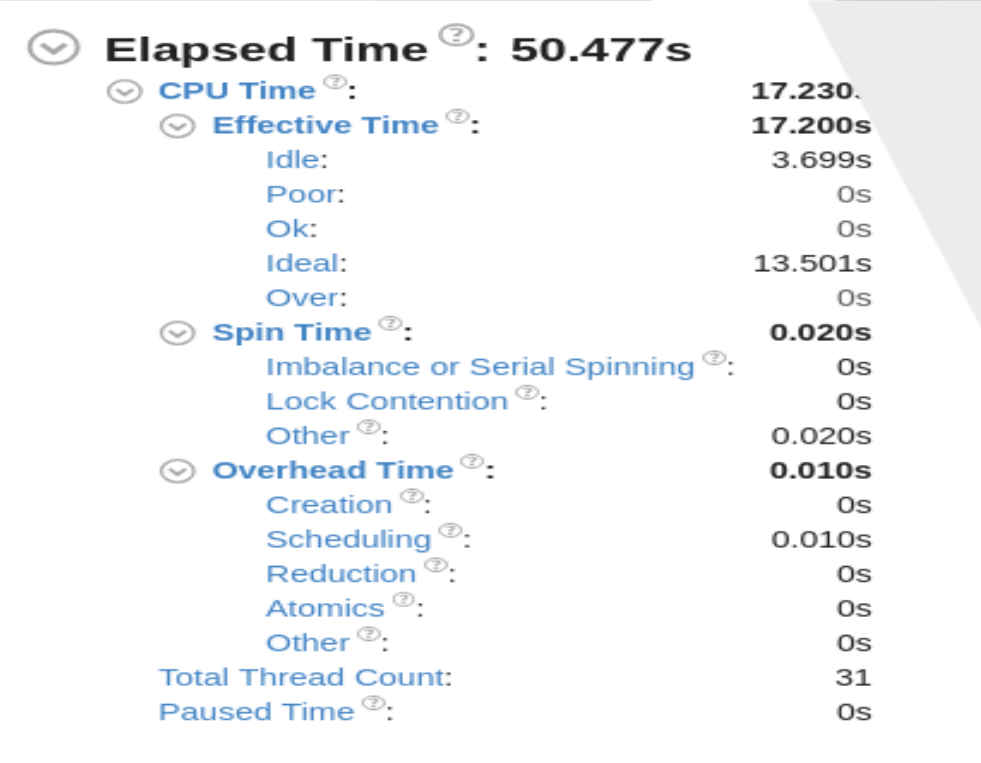
- As it can been see in the Total time that the whole application tooks is 50.477sec, i.e. less than one minute. Oout of which a total of 17.230 sec of CPU Time.
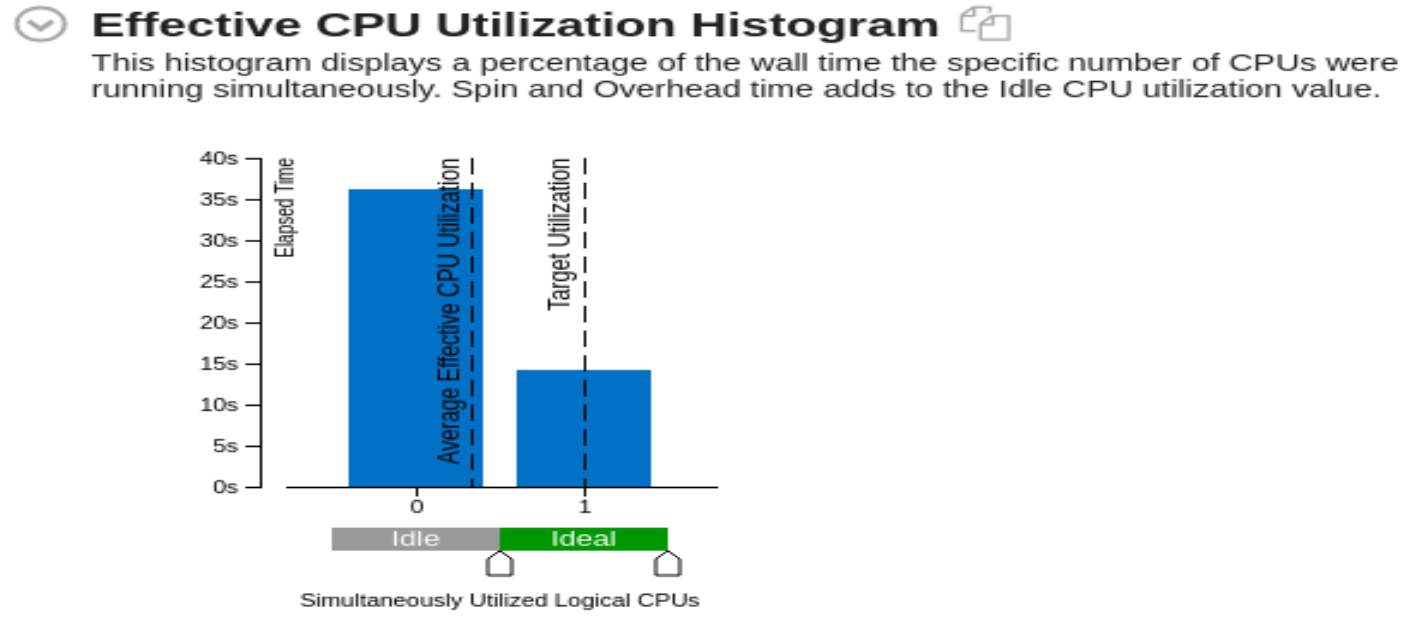
- Out of this 17.230 CPU time, it was ideal for 21% of time.
- A Total of 31 threads were used during the whole processing.
- A seprate command line option '-fg" is provided to write the time taken by each layer of a specific layer to a JSON file. The following option will write to the seprate designed file, all the reports will be saved into the "reports" folder "1 for face detection" "2 for Facial landmark detection" "3 for Head Pose Estimation" "4 for Gaze Estimation"
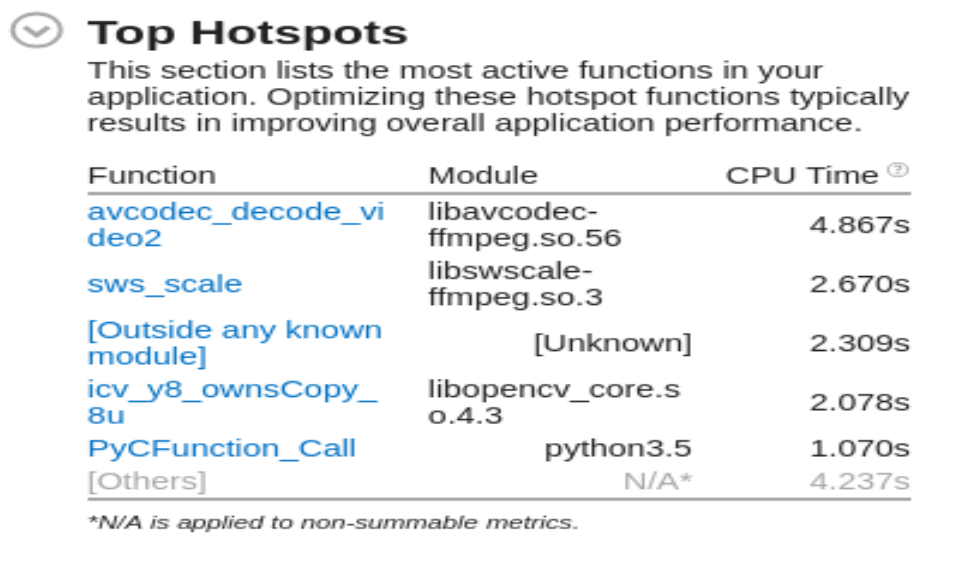
- As seen the Top hotspots has been found out using Intel Vtune Amplipher, and the biggest hotspot came out to be "avcodes_decode_video2:.
- The application can process both video as well as live camera feed.
- If there is more than one face detected, it extracts only one face and do inference on it and ignoring other faces.

