In this Code Pattern, you will learn how to build a framework which can act as an intermediator in connecting Watson services to WhatsApp messenger, to enable mobile users to leverage watson services through a messenger app.
You will learn to build a framework and how to connect Watson Machine Learning service, deploy a simple house price prediction model and access it from your WhatsApp messenger.
When you have completed this code pattern, you will understand how to:
- Integrate IBM Watson Services to WhatsApp.
- Deploy Application to IBM Cloud Foundry.
- Deploy Machine Learning models to Cloud Object Storage.
- Manage Machine Learning models in IBM Watson Studio.
-
User sends a message through WhatsApp.
-
The message is redirected to Twilio Programmable Messaging service.
-
Twilio Programmable Messaging service will further forward the message to the framework hosted on IBM Cloud.
-
The framework interacts with the Watson Machine Learning service to get the response.
-
Watson Machine Learning service does the necessary computation and returns a response accordingly.
-
The framework processes the response and converts it to user readable format and forwards it Twilio.
-
Twilio forwards this message as a reply on WhatsApp.
-
The user will receive this as a response from Watson Machine Learning service on WhatsApp.
- Clone the repo.
- Deploy the framework on IBM Cloud Foundry.
- Create Twilio service.
- Create Watson services.
- Configure credentials.
- Deploy the House Price Prediction model.
Clone the augment-watson-services-to-whatsapp repo locally. In a terminal, run:
git clone https://github.com/IBM/augment-watson-services-to-whatsappWe’ll be using the folder backend-for-whatsapp
-
Before you proceed, make sure you have installed IBM Cloud CLI in your deployment machine.
-
From the cloned repo, goto backend-for-whatsapp directory in terminal, and run the following commands to deploy the Application to IBM Cloud Foundry.
$ cd backend-for-whatsapp/- Log in to your IBM Cloud account, and select an API endpoint.
$ ibmcloud loginNOTE: If you have a federated user ID, instead use the following command to log in with your single sign-on ID.
$ ibmcloud login --sso- Target a Cloud Foundry org and space:
$ ibmcloud target --cf- From within the backend-for-whatsapp directory push your app to IBM Cloud.
$ ibmcloud cf push whatsapp-server-
The manifest.yml file will be used here to deploy the application to IBM Cloud Foundry.
-
On Successful deployment of the application you will see something similar on your terminal as shown.
Invoking 'cf push'...

Pushing from manifest to org manoj.jahgirdar@in.ibm.com / space dev as manoj.jahgirdar@in.ibm.com...

...

Waiting for app to start...

name:              whatsapp-server
requested state:   started
routes:            whatsapp-server.xx-xx.mybluemix.net
last uploaded:     Sat 16 May 18:05:16 IST 2020
stack:             cflinuxfs3
buildpacks:        python

type:            web
instances:       1/1
memory usage:    256M
start command:   python app.py
     state     since                  cpu     memory           disk           details
#0   running   2020-05-16T12:36:15Z   25.6%   116.5M of 256M   796.2M of 1
- Once the app is deployed you can visit the
routesto launch the application.
-
At this point, you will have successfully deployed the framework on IBM Cloud. Now lets access it and see how it looks like.
-
Visit the
URLin your browser to access the framework.
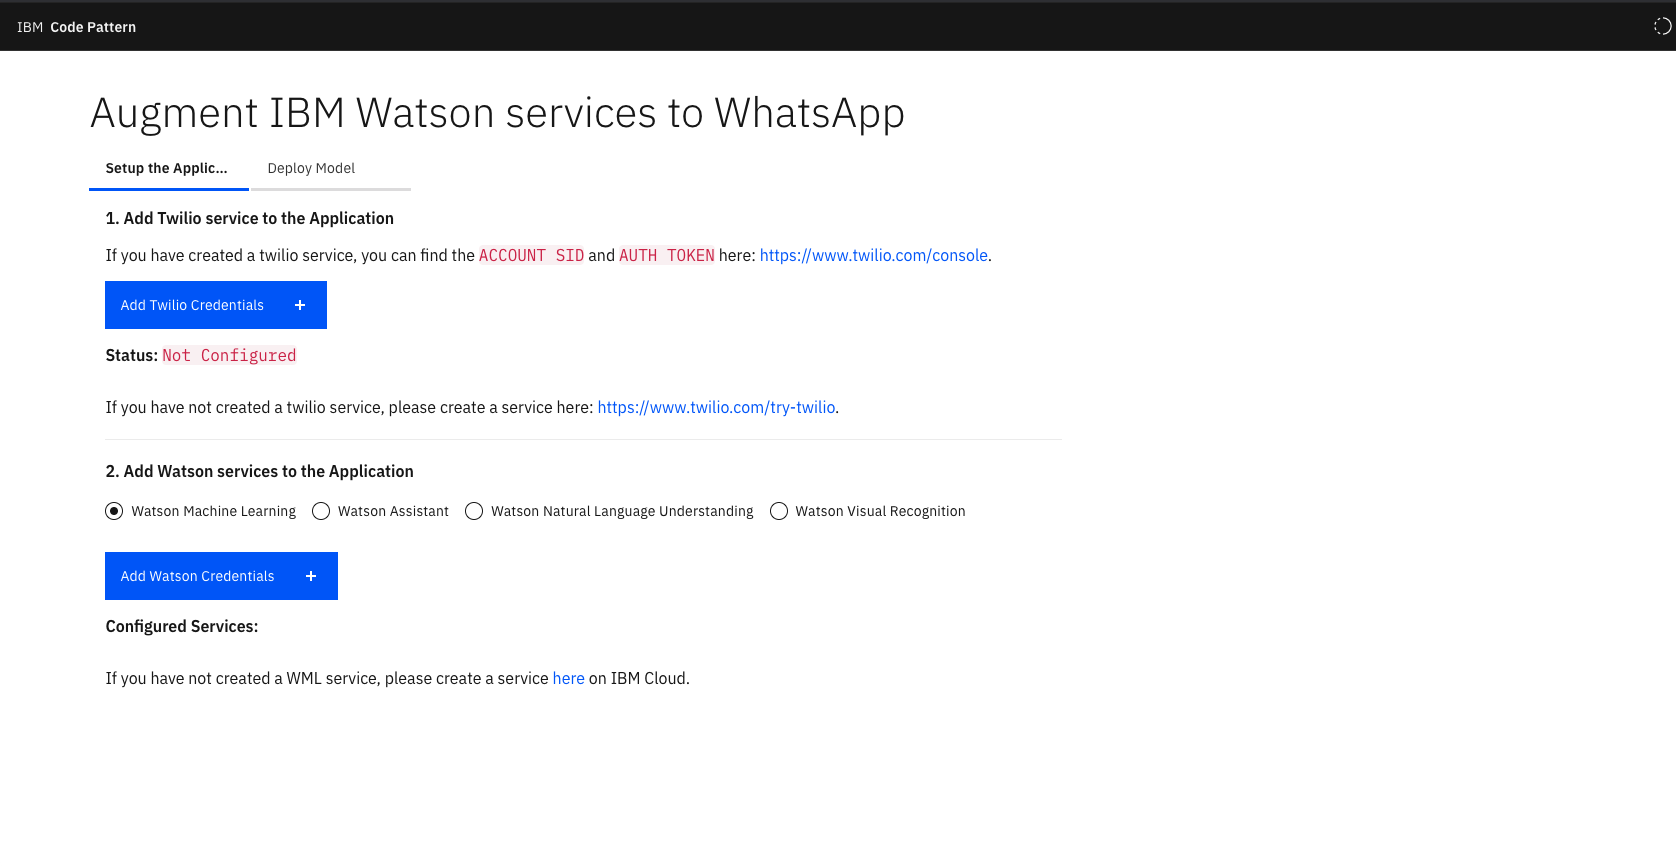
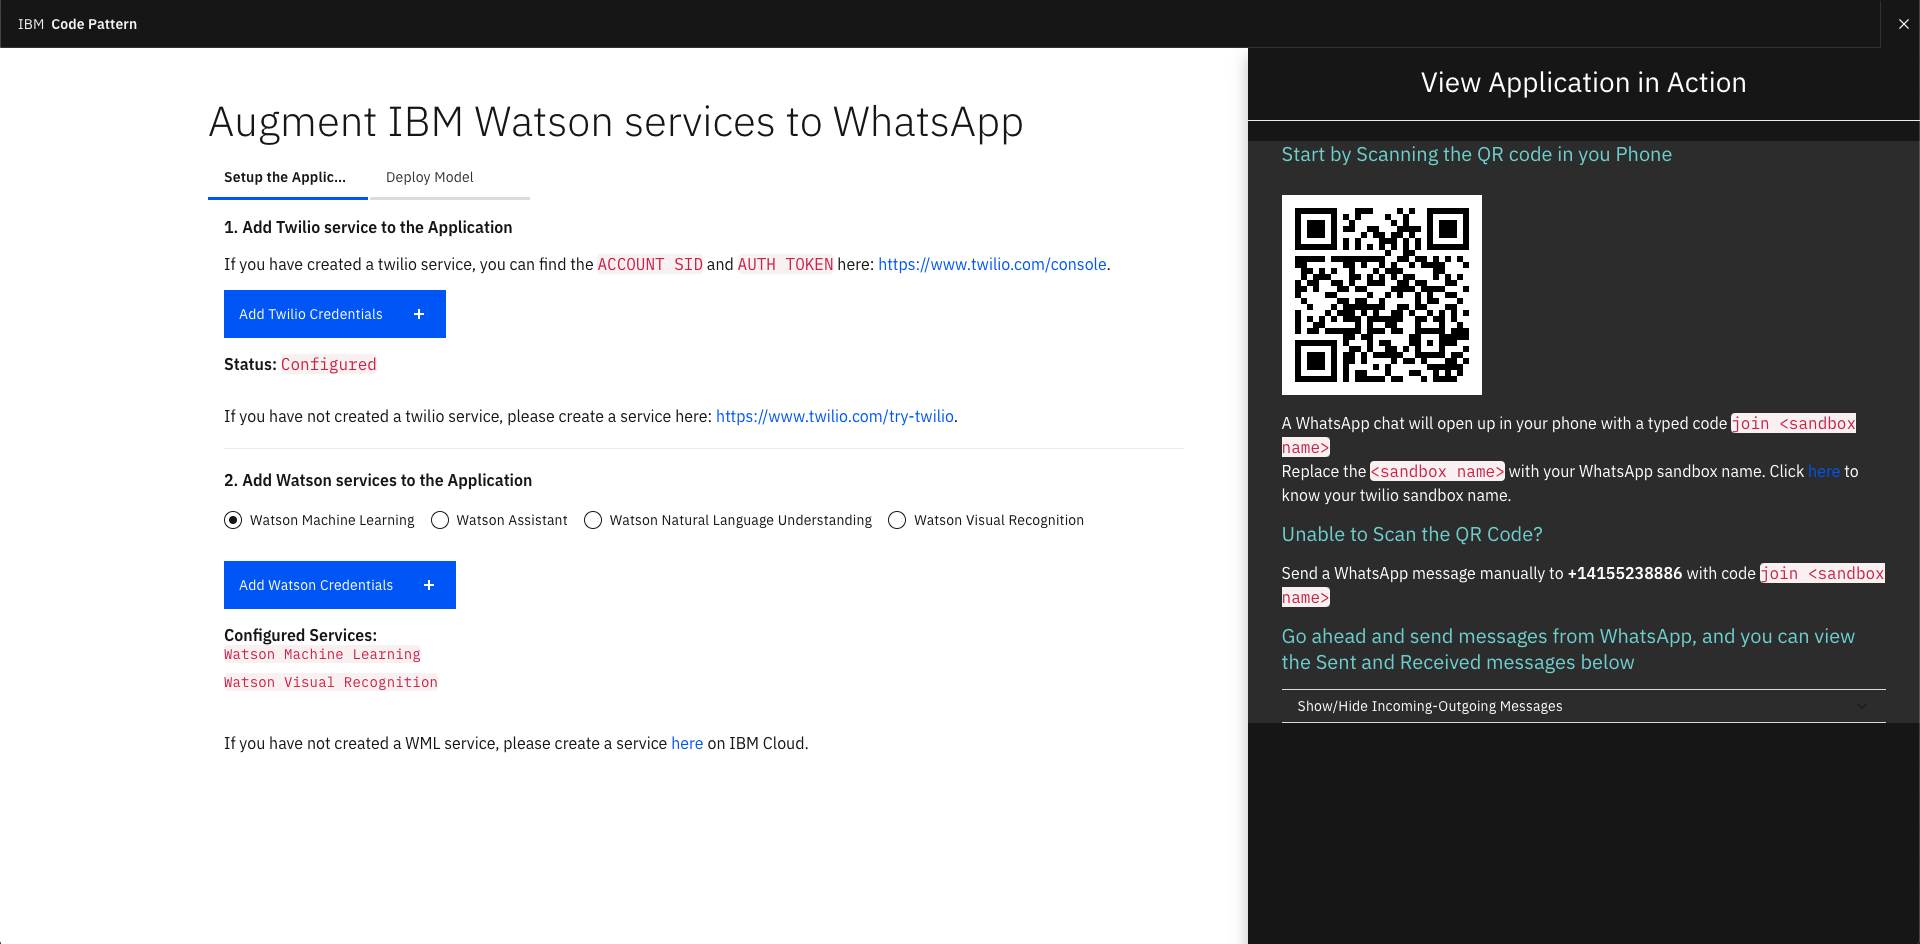
- You will now have access to the framework through which you can configure Twilio and Watson services.
-
In this code pattern, the scope is restrected to Watson Machine Learning service, hence you will learn how to deploy a simple house price prediction model and access it from your WhatsApp messenger.
-
Before deploying the model, you will have to create a Twilio service, steps for which are given below.
Twlio is a SaaS offering that provides APIs to make and receive calls or text messages. As there are no APIs from WhatsApp directly availabe to send and receive WhatsApp messages programmatically, you will learn how to use Twilio's messaging service APIs that provides gateway to communicate with WhatsApp programmatically. Lets start by creating a free Twilio service.
- Create a free Twilio service here: https://www.twilio.com/try-twilio.
NOTE: - Once you create a Twilio service, you will have to verify your email id as well as your phone number.
-
Once email id is verified you will be prompted to enter your phone number, submit that and you will get an OTP on your registered number, enter that back to verify.
-
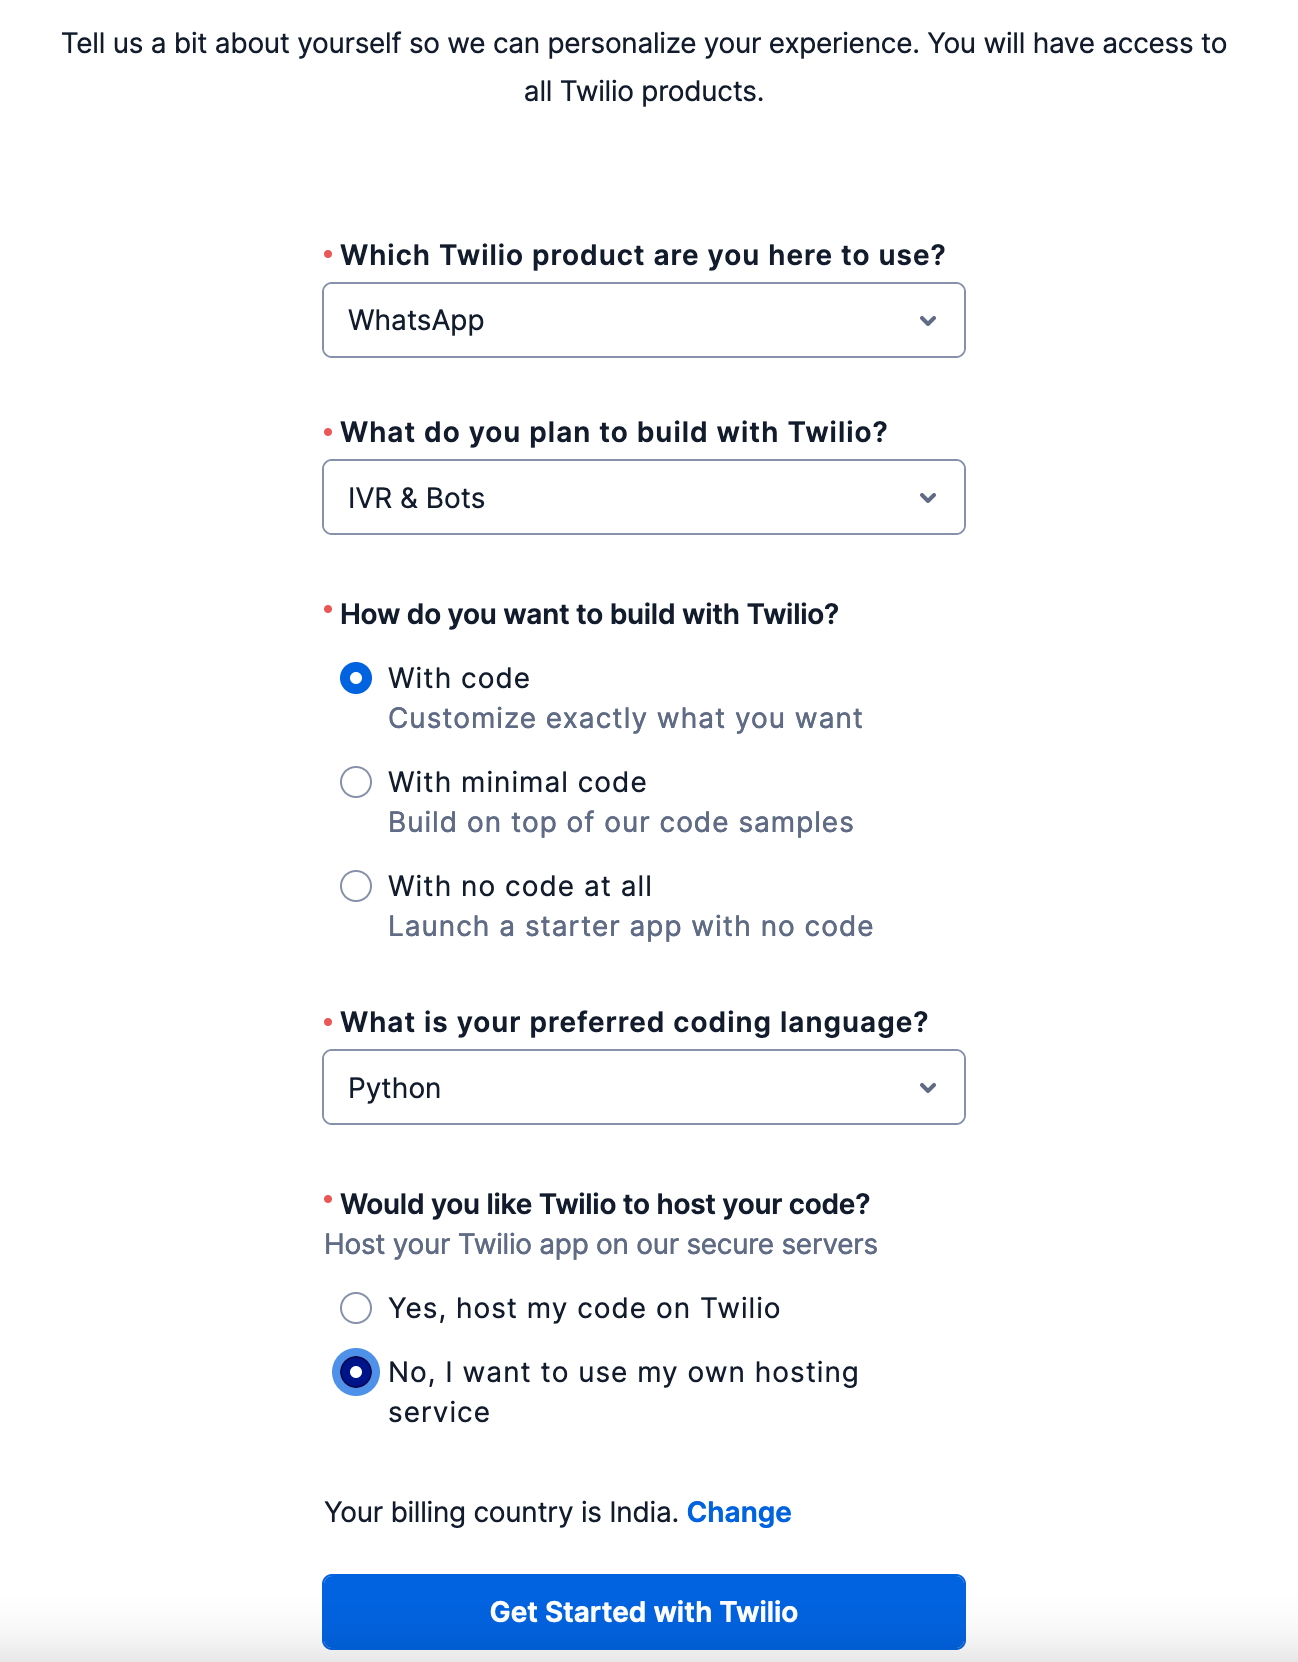
On successful verification you should see a welcome greeting message, additionally you will see some questions, select as described below.
Questions Answers Which Twilio product are you here to use? WhatsApp What do you plan to build with Twilio? IVR & Bots How do you want to build with Twilio? With code What is your preferred coding language? Python Would you like Twilio to host your code? No, I want to use my own hosting service -
Visit the Whatsapp section in Twilio https://www.twilio.com/console/sms/whatsapp/sandbox
-
You will see a popup box reqsuesting you to Activate Your Sandbox, click on I agree checkbox and click Confirm.

-
The sandbox for WhatsApp will appear, make a note of the
Sandbox Namewhich will be prefixed with join, click on Settings on the left panel and select WhatsApp Sandbox Settings.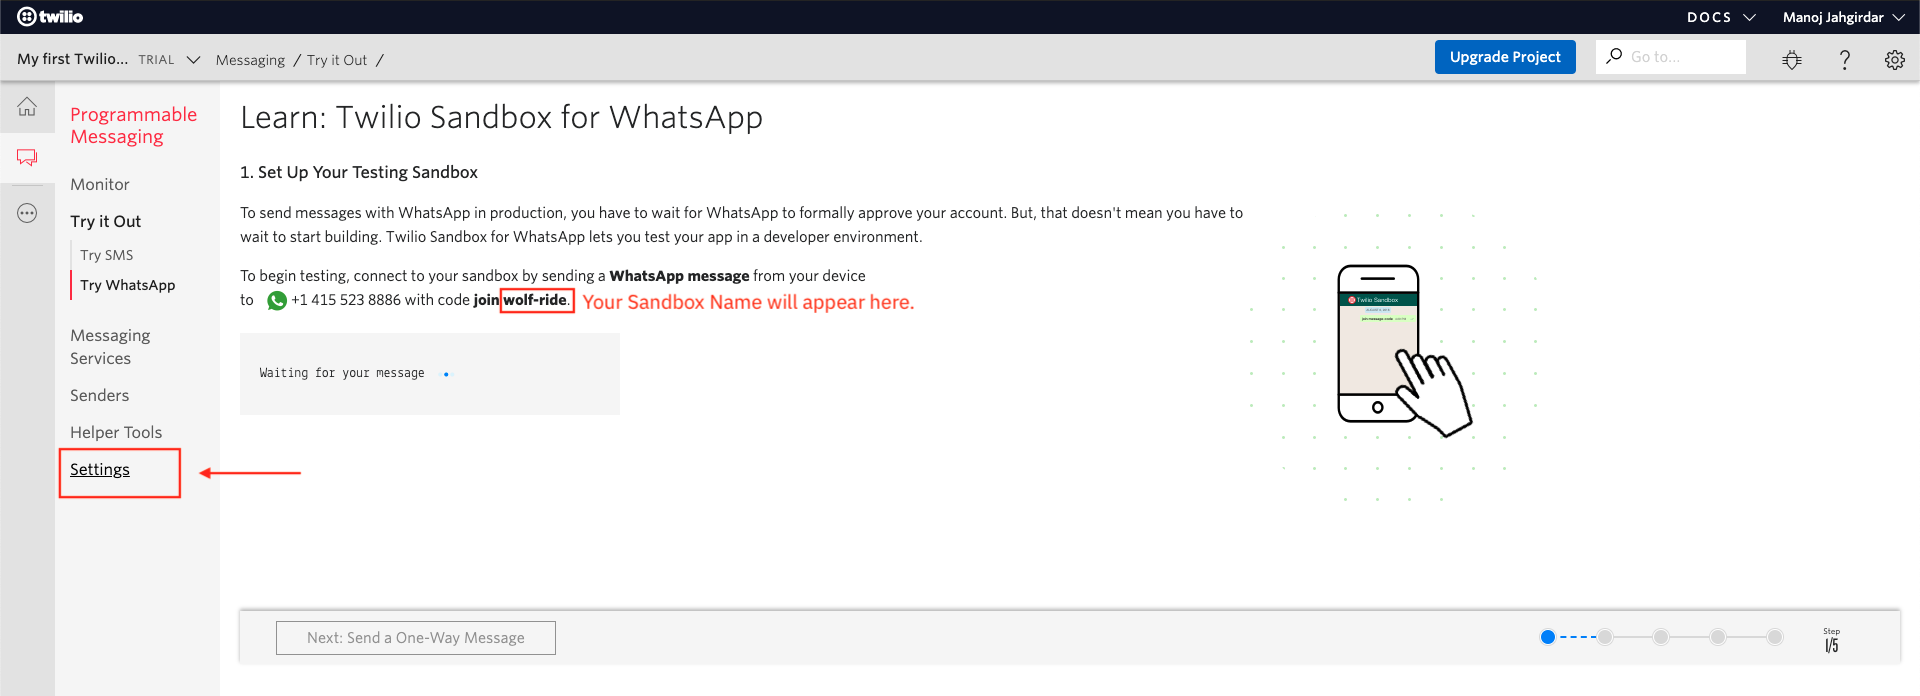
-
In WhatsApp Sandbox Settings page, under Sandbox Configuration, there will be a field called WHEN A MESSAGE COMES IN, replace the existing URL in that field with the
URLobtained by deploying the Python Application from Step 3, finally click on Save to save the configuration.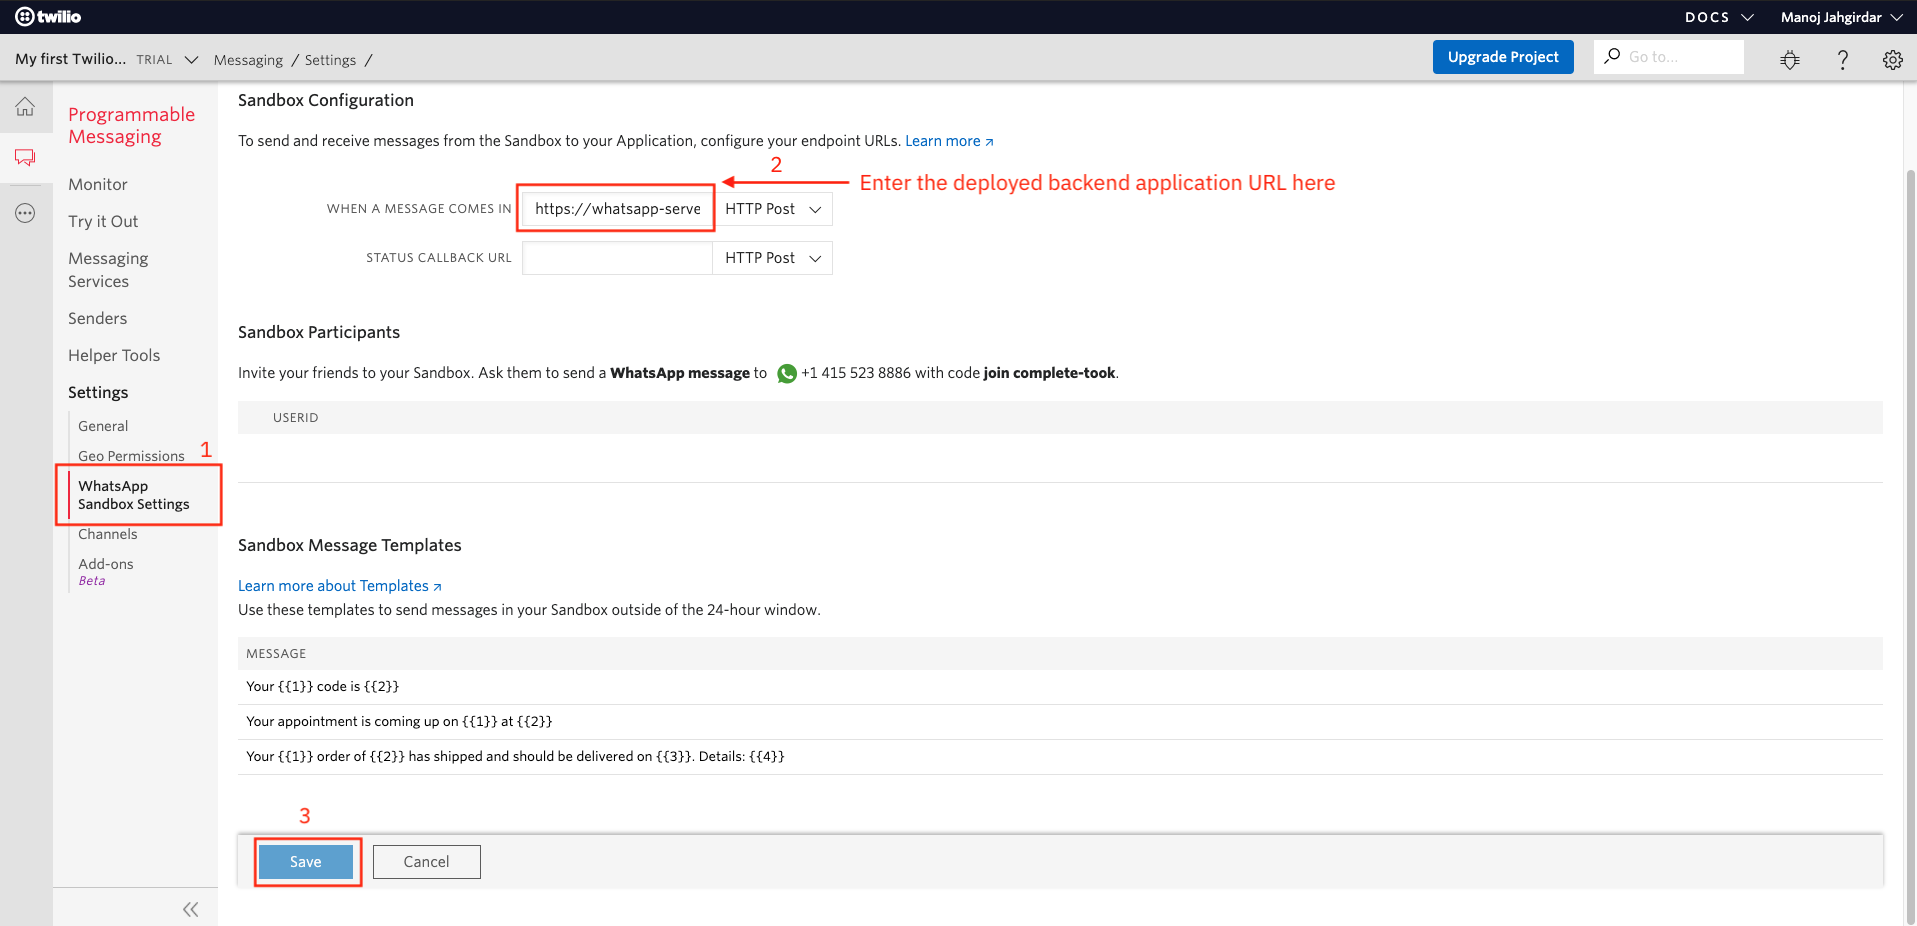
NOTE: Sometimes the changes are not saved in Twilio WhatsApp Sandbox Settings even after clicking on save, reload the page to enusre the
URLthat you have entered in WHEN A MESSAGE COMES IN field is reflecting over there. If you still see the old URL over there then enter theURLfrom Step 3 again and save it.
-
Now the Backend server is configured in Twilio, any message that you send from WhatsApp from this point will go to the backend server via Twilio WhatsApp Sandbox. However to reply back to you from WhatsApp the backend server needs to establish connection with Twilio.
-
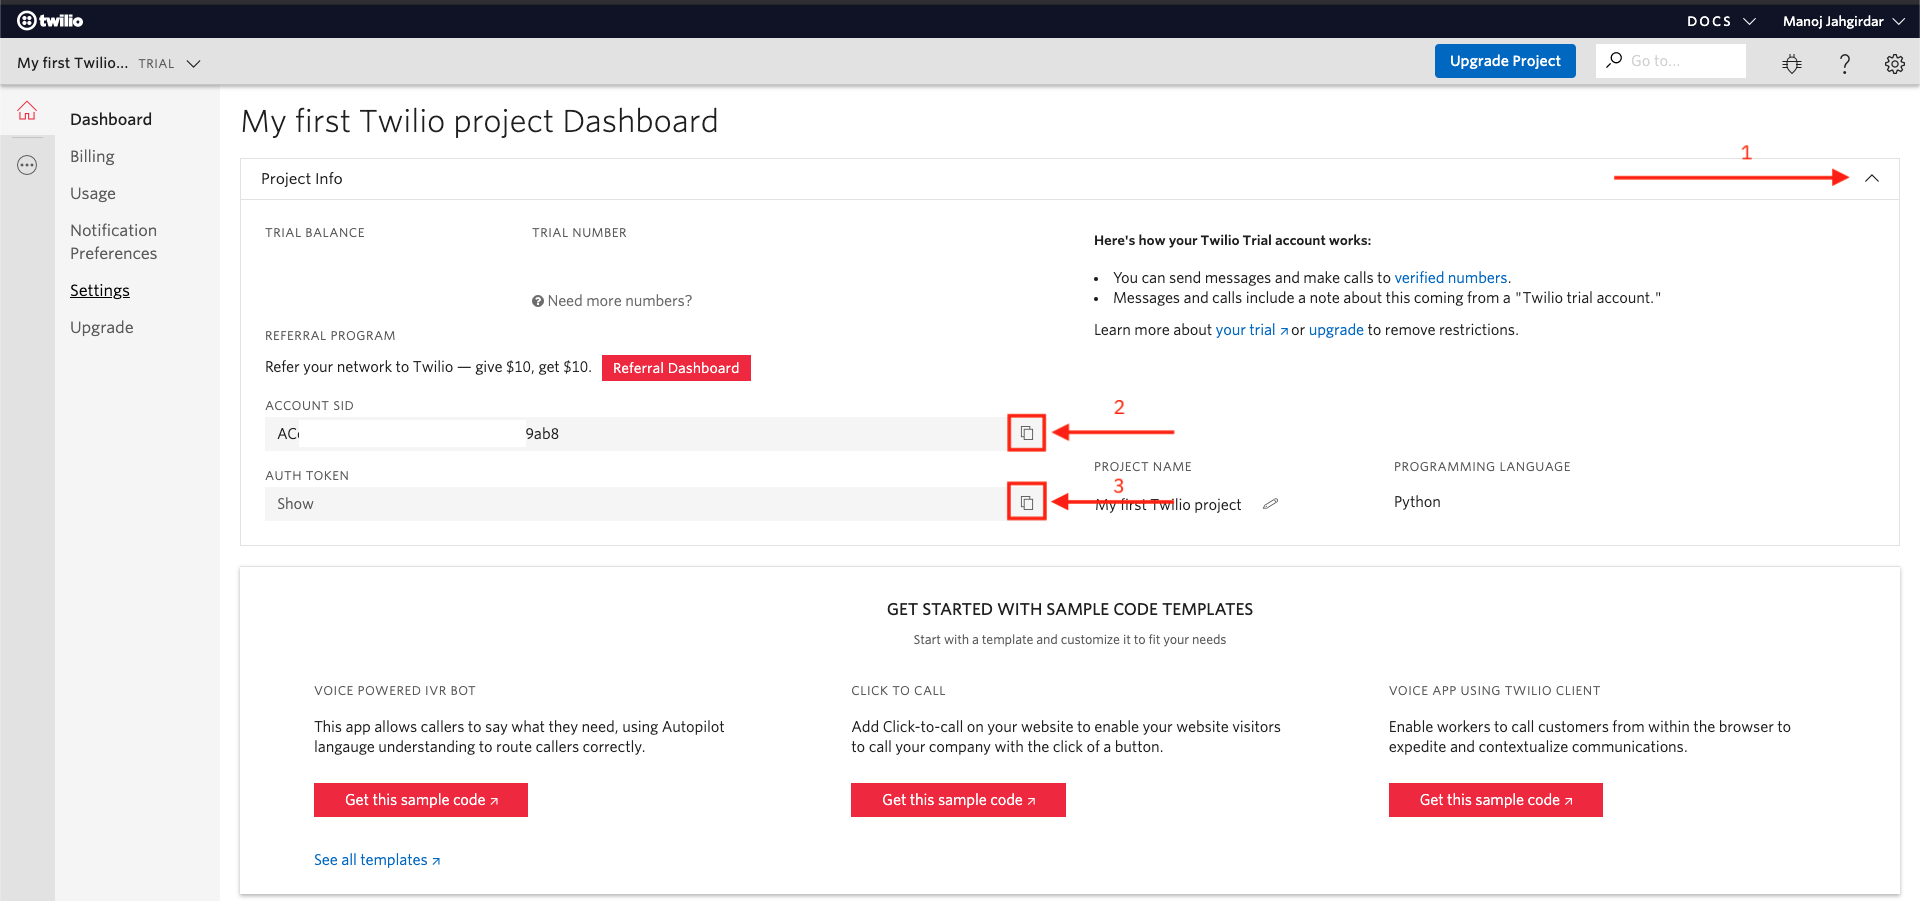
To establish connection between the backend server and Twilio we need to get the
account_sidandauth_tokenfrom Twilio. -
Visit https://www.twilio.com/console and expand the Project Info tab. You will see the
ACCOUNT IDandAUTH TOKEN, copy it in some notepad as it will be used in Step 5.
-
At this point, you should have the
Sandbox Name,account_sidandauth_tokenfrom Twilio service. -
Now lets create the required watson services.
Create the following services:
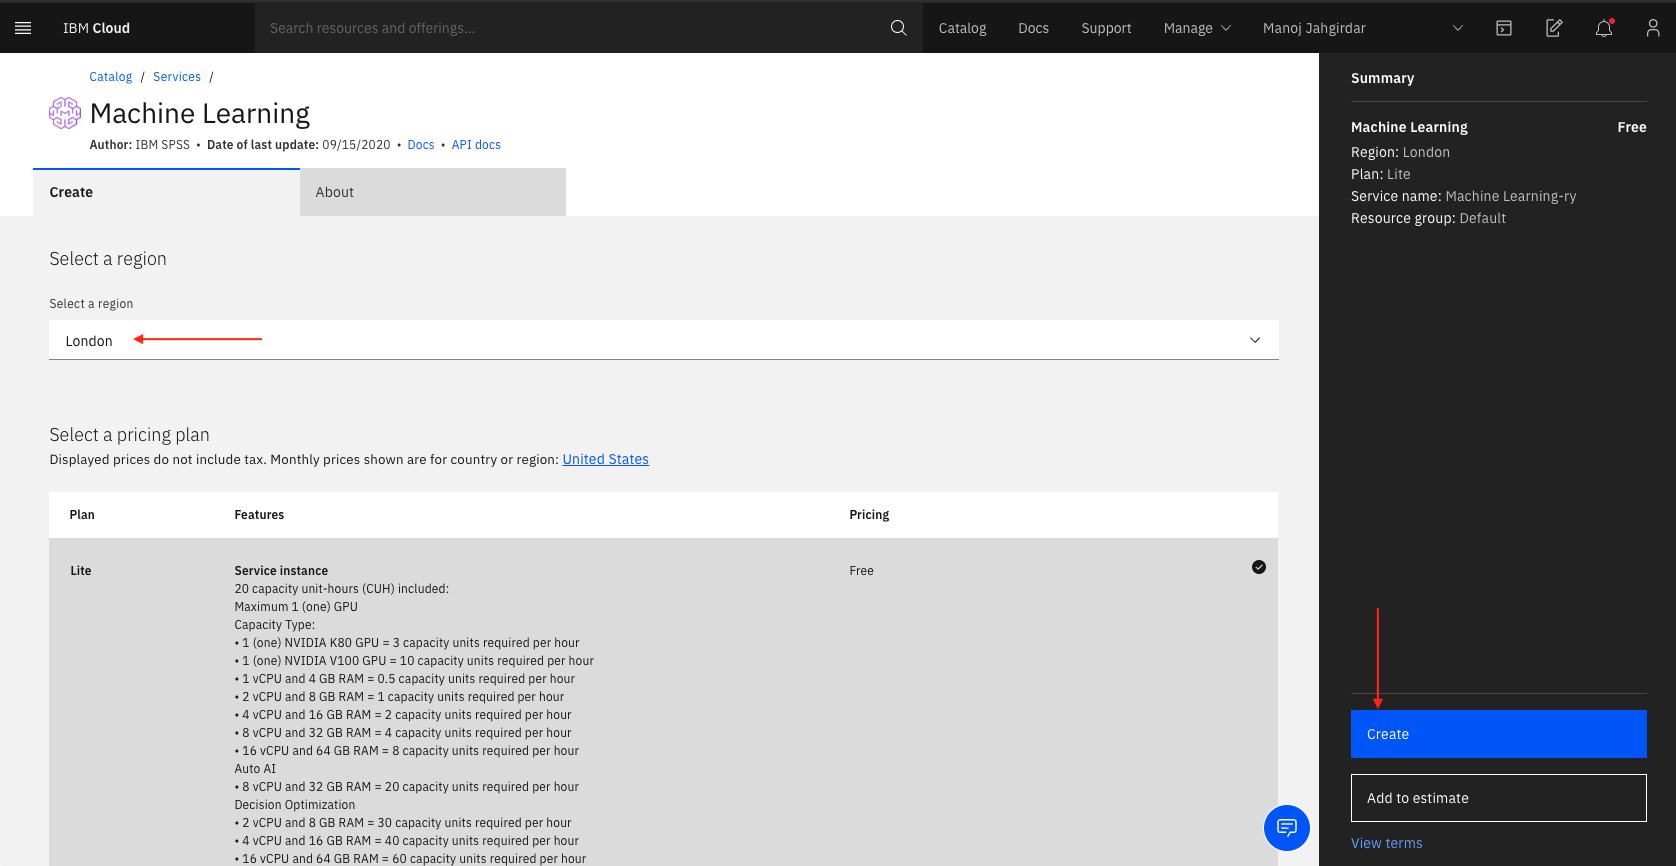
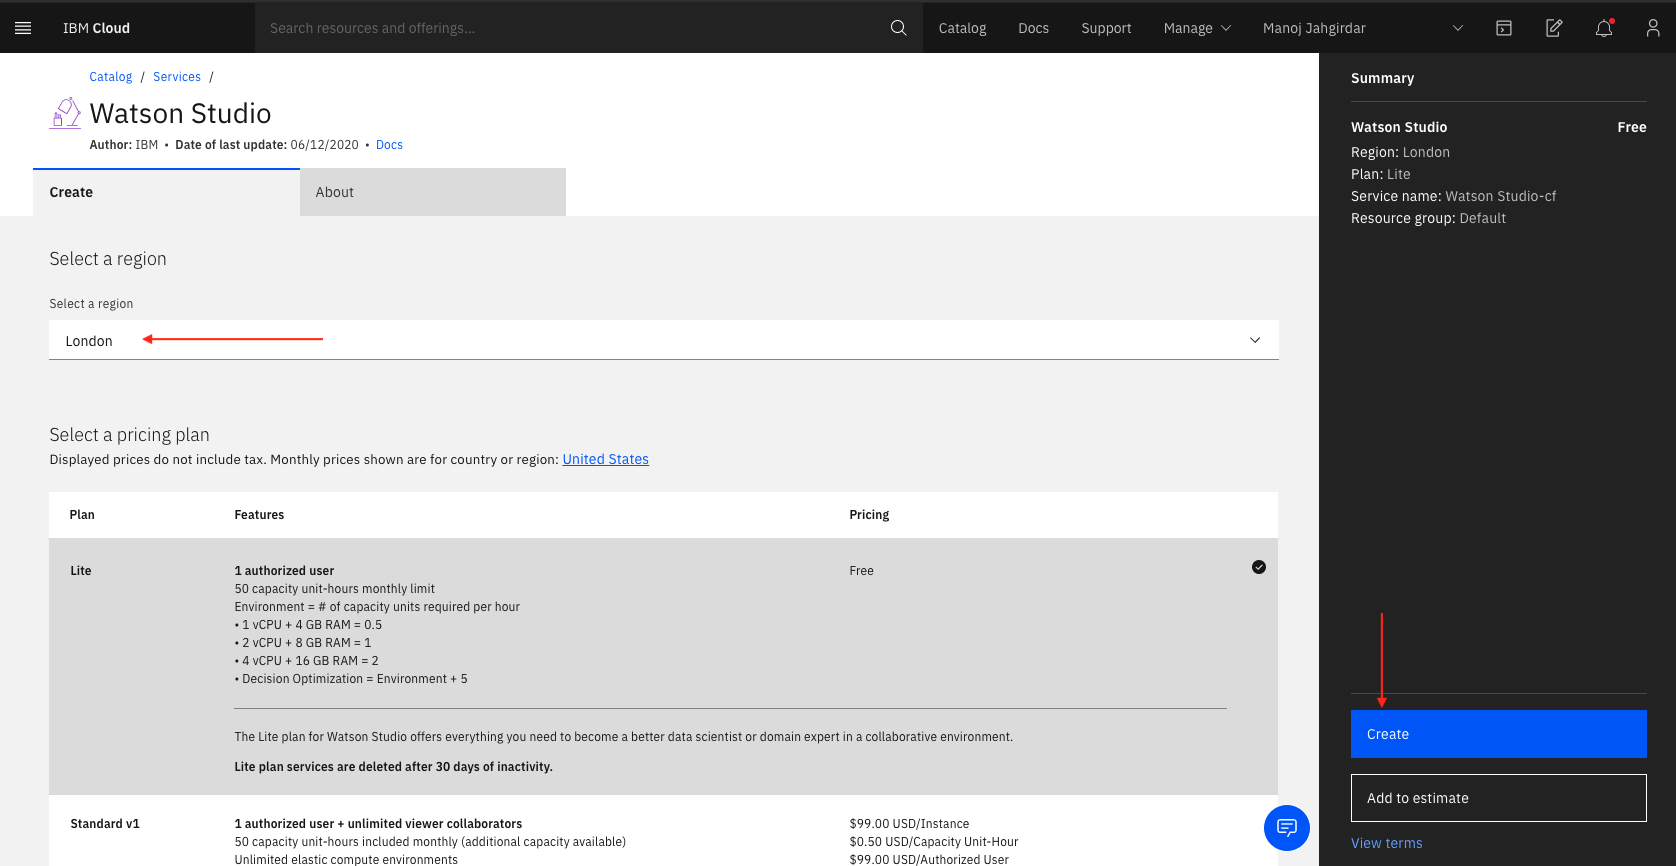
- Login to IBM Cloud, and create a Watson Machine Learning service, select region as
Londonand click on create as shown.
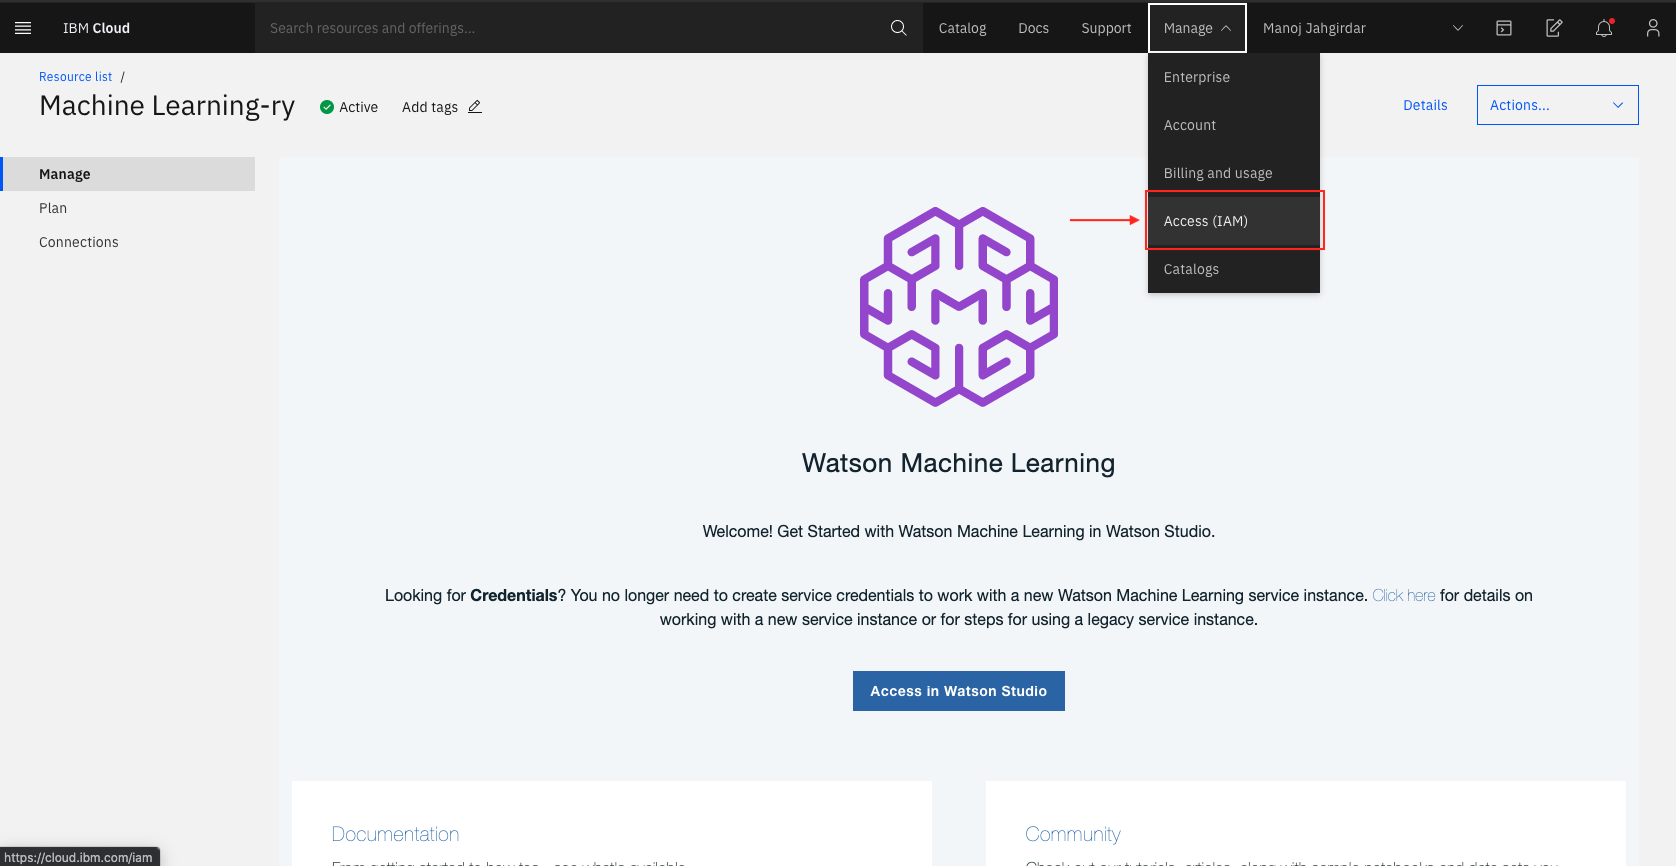
- Once the service is created, click on the Manage tab and select Access (IAM), the cloud Identity and Access Management page will be displayed.
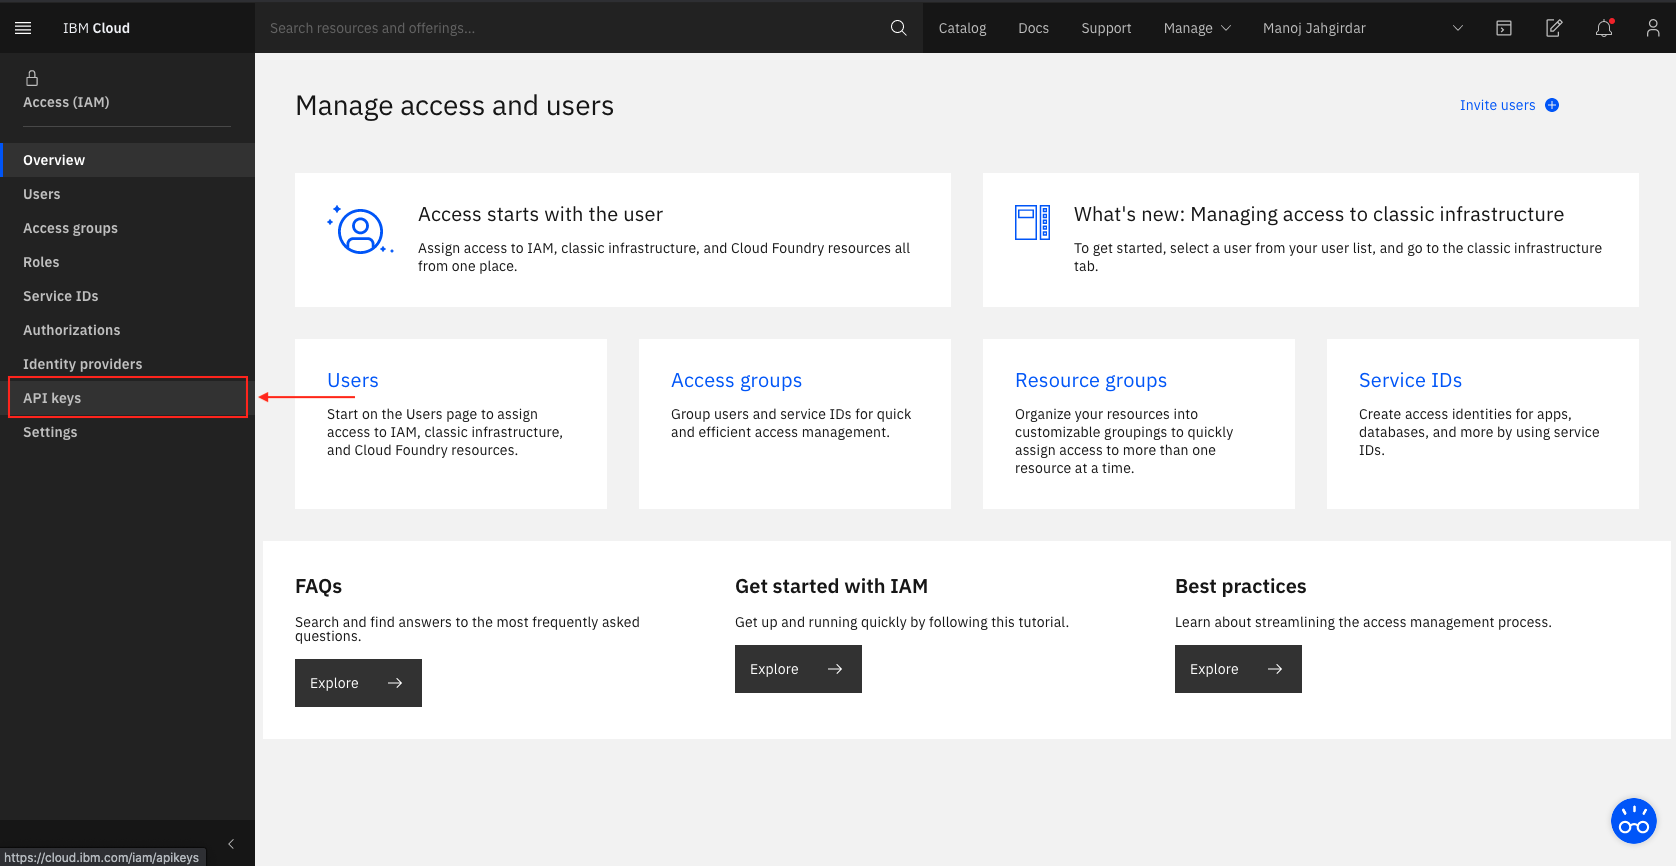
- Click on API keys on the left panel as shown.
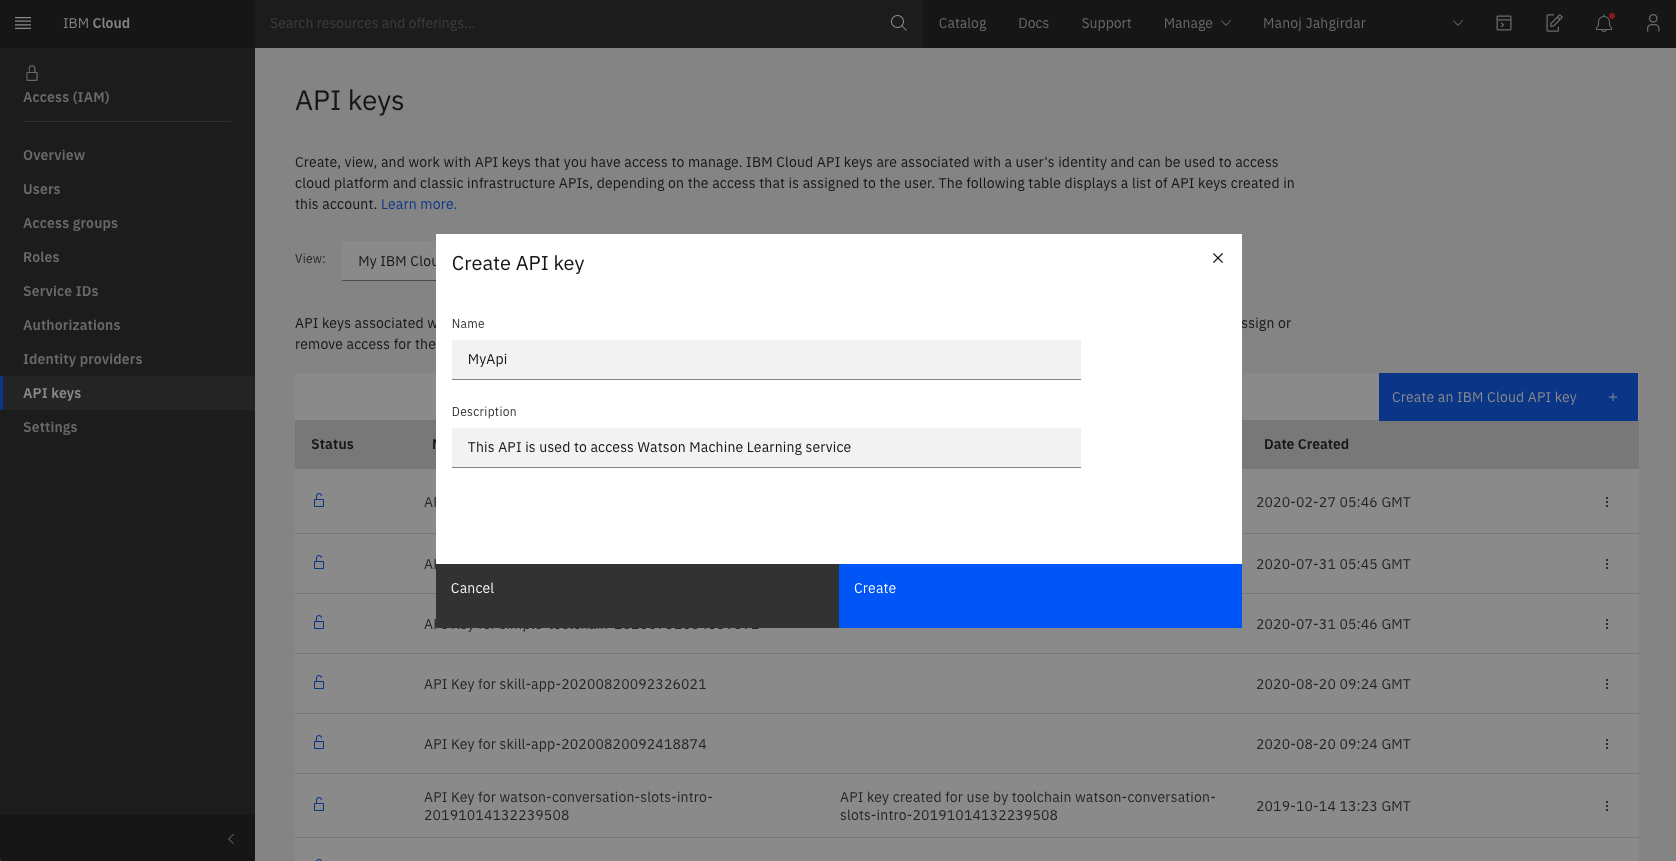
- In API keys, click on Create an IBM Cloud API key and give a Name and Description Accordingly as shown.
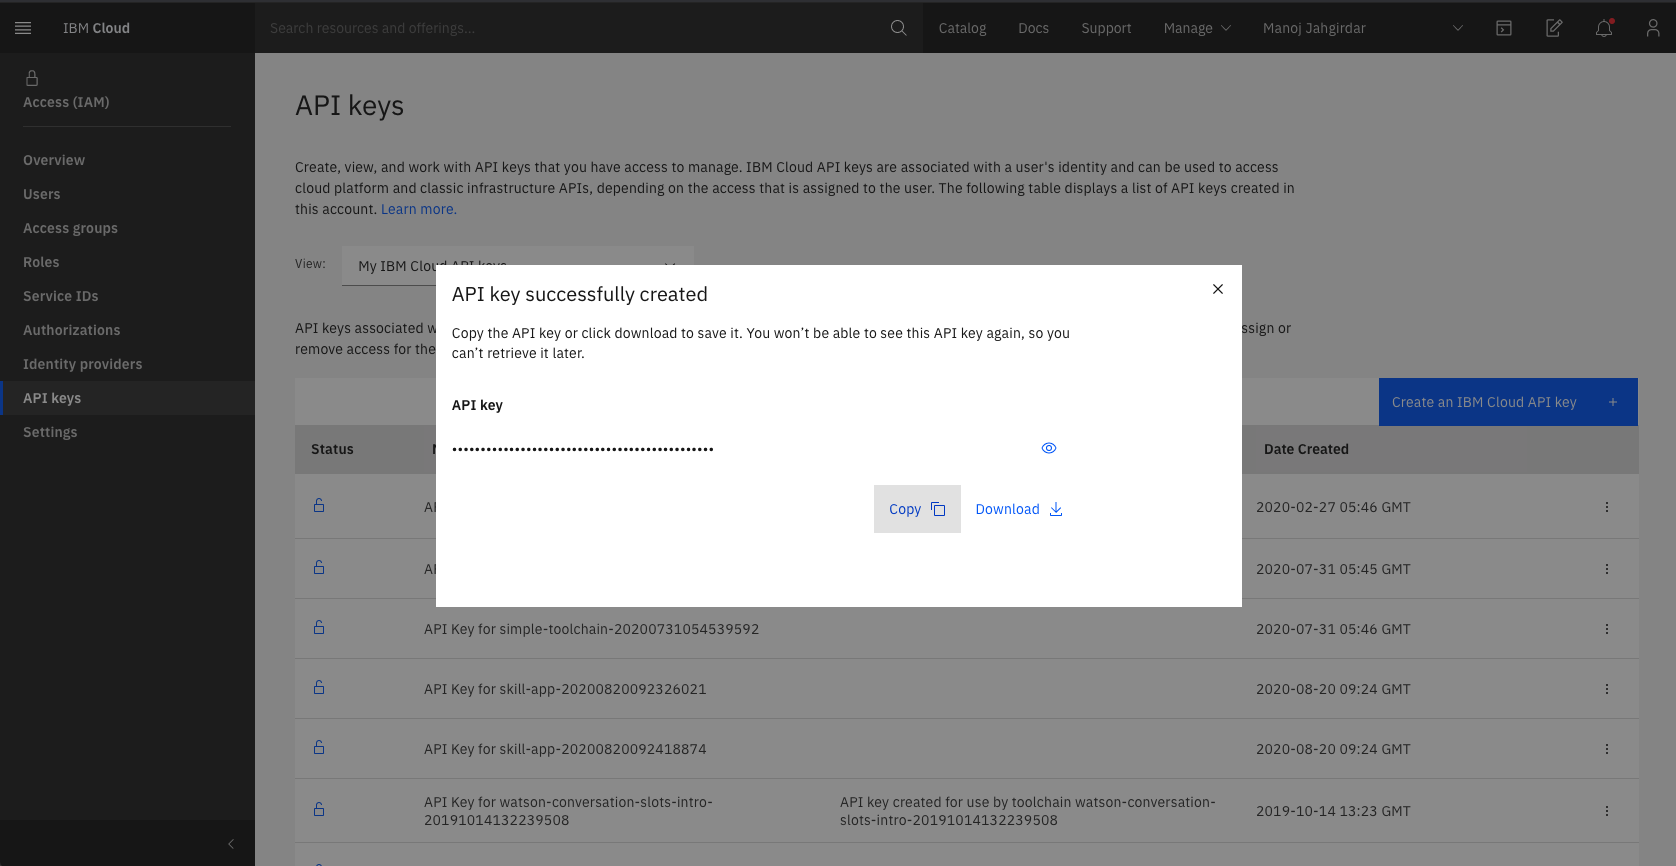
- Once the API key is generated Successfully, copy the key in any text editor as it will be used in Step 5.
NOTE: The API key will not be visible once the dialog box is dismissed, you can Download the API key to keep it handy just in case you loose the copied key.
- Back to IBM Cloud, create a Watson Studio service, select region as
Londonand finally click on create as shown.
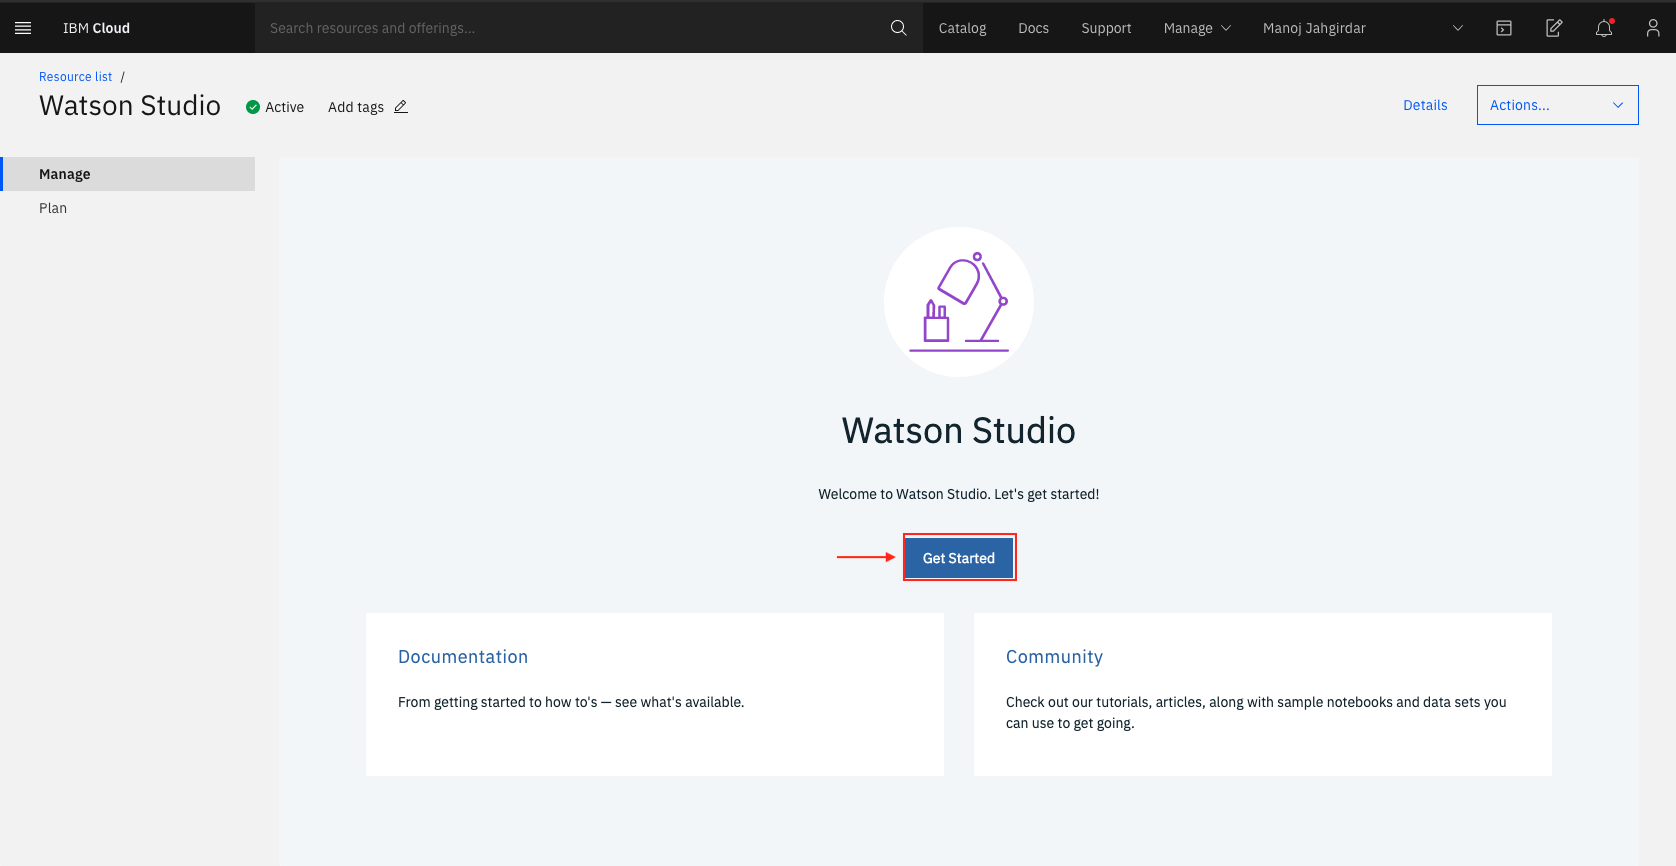
- Once the service is created, click on Get Started to provision an IBM Cloud Pak for Data instance.
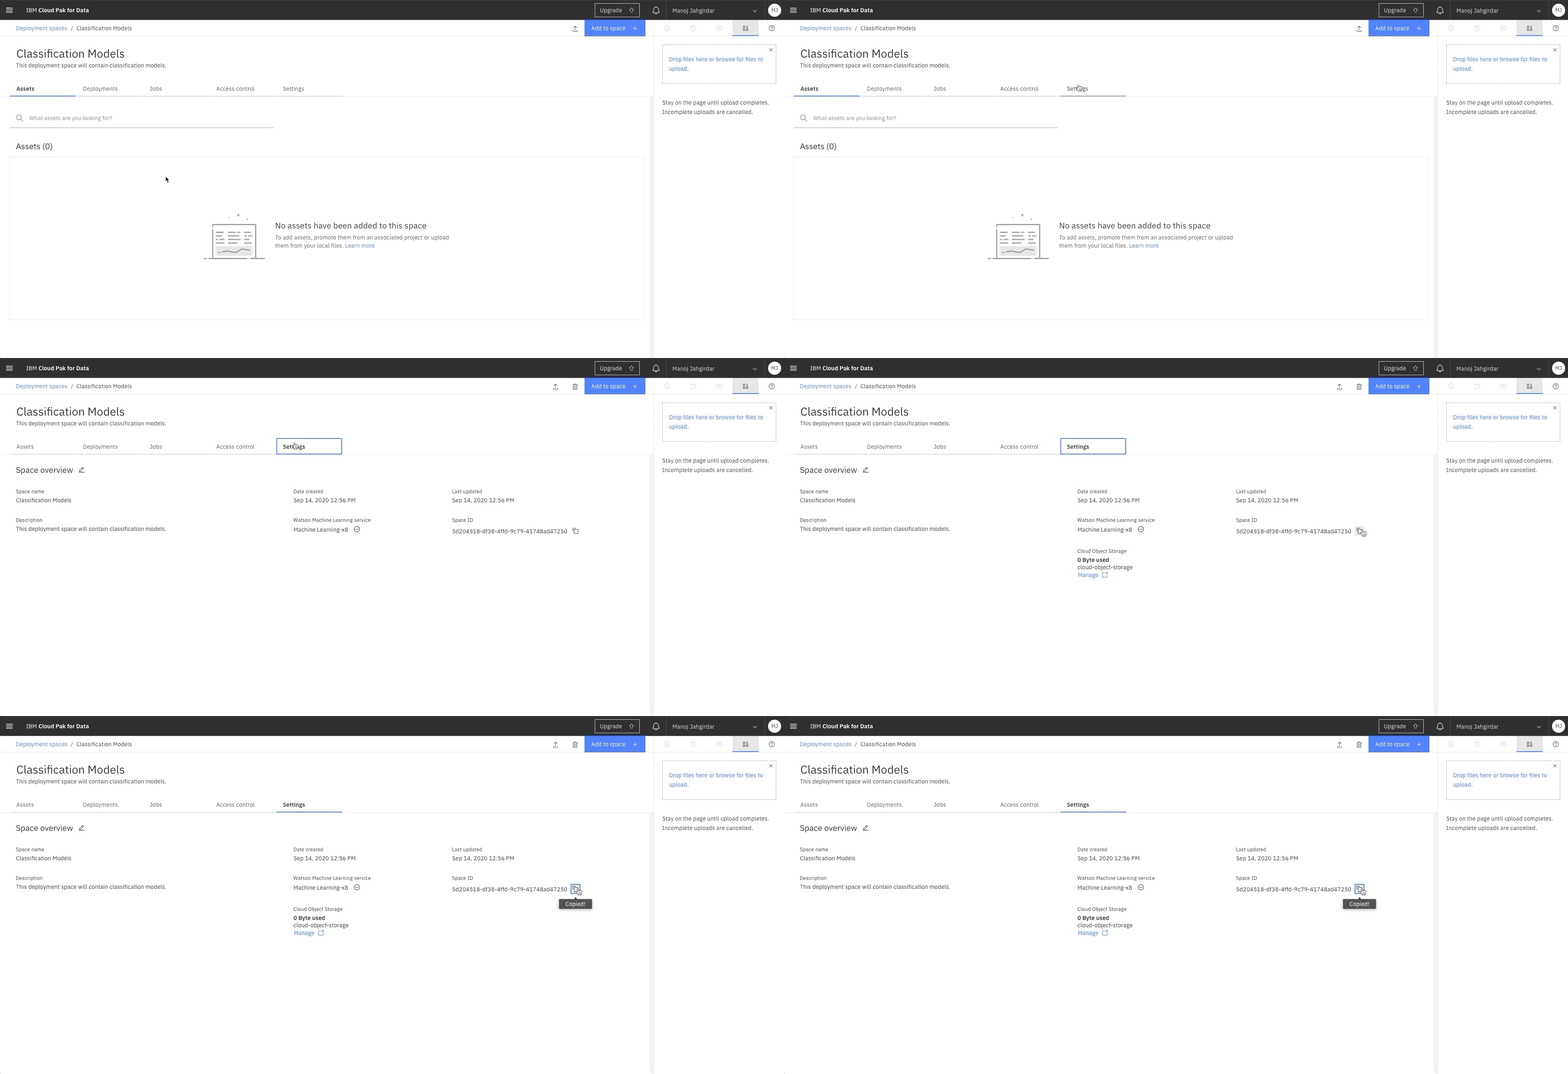
- In Watson Studio / IBM Cloud Pak for Data, click on the hamburger menu on the top left corner and select Deployment spaces > View all spaces.
-
In deployment spaces, click on New deployment space +.
-
Select Create an empty space when prompted.
-
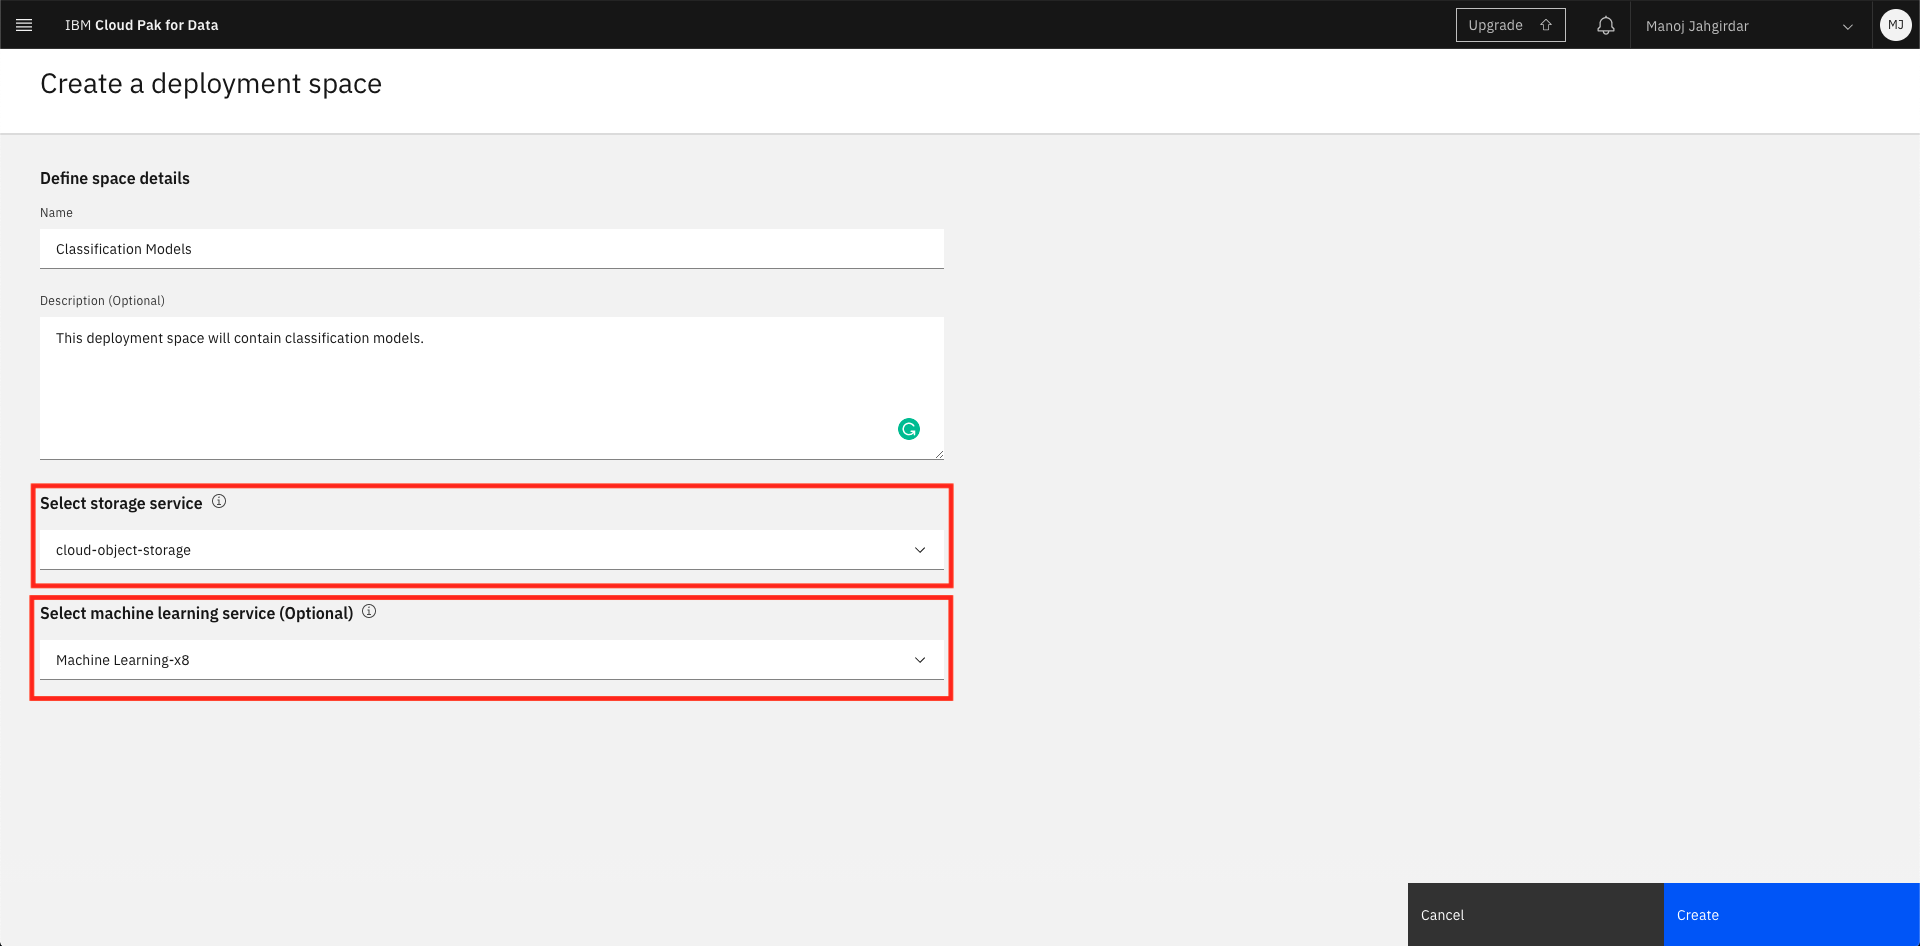
Make sure you select the appropriate Cloud object storage service as well as Machine learning service.
NOTE: In v4 Machine learning assets are stored in Cloud Object Storage rather than in the Watson Machine Learning repository.
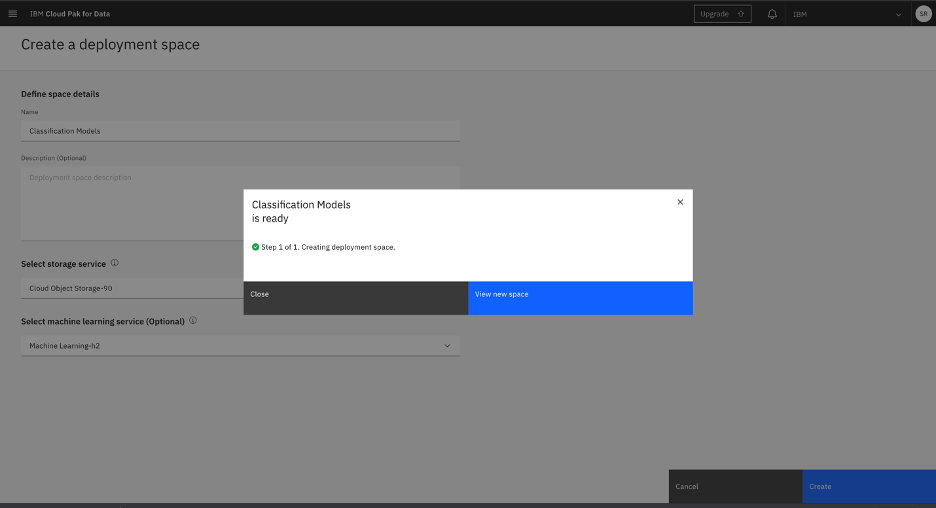
- Once the deployment space is created, click on View Space to view the details.
- Click on Settings and copy the
space IDas it is required in Step 5.
Learn more about deployment space here.
- At this point, you should have the
API keyand theSpace IDcopied in any notepad as these will be used in the next step.
-
In Step 3, you will have created the twilio service and obtained the credentials and in Step 4, you will have also created the Watson machine learning service and obtained the credentials, now you can add the credentials to the framework by following the simple steps stated below.
-
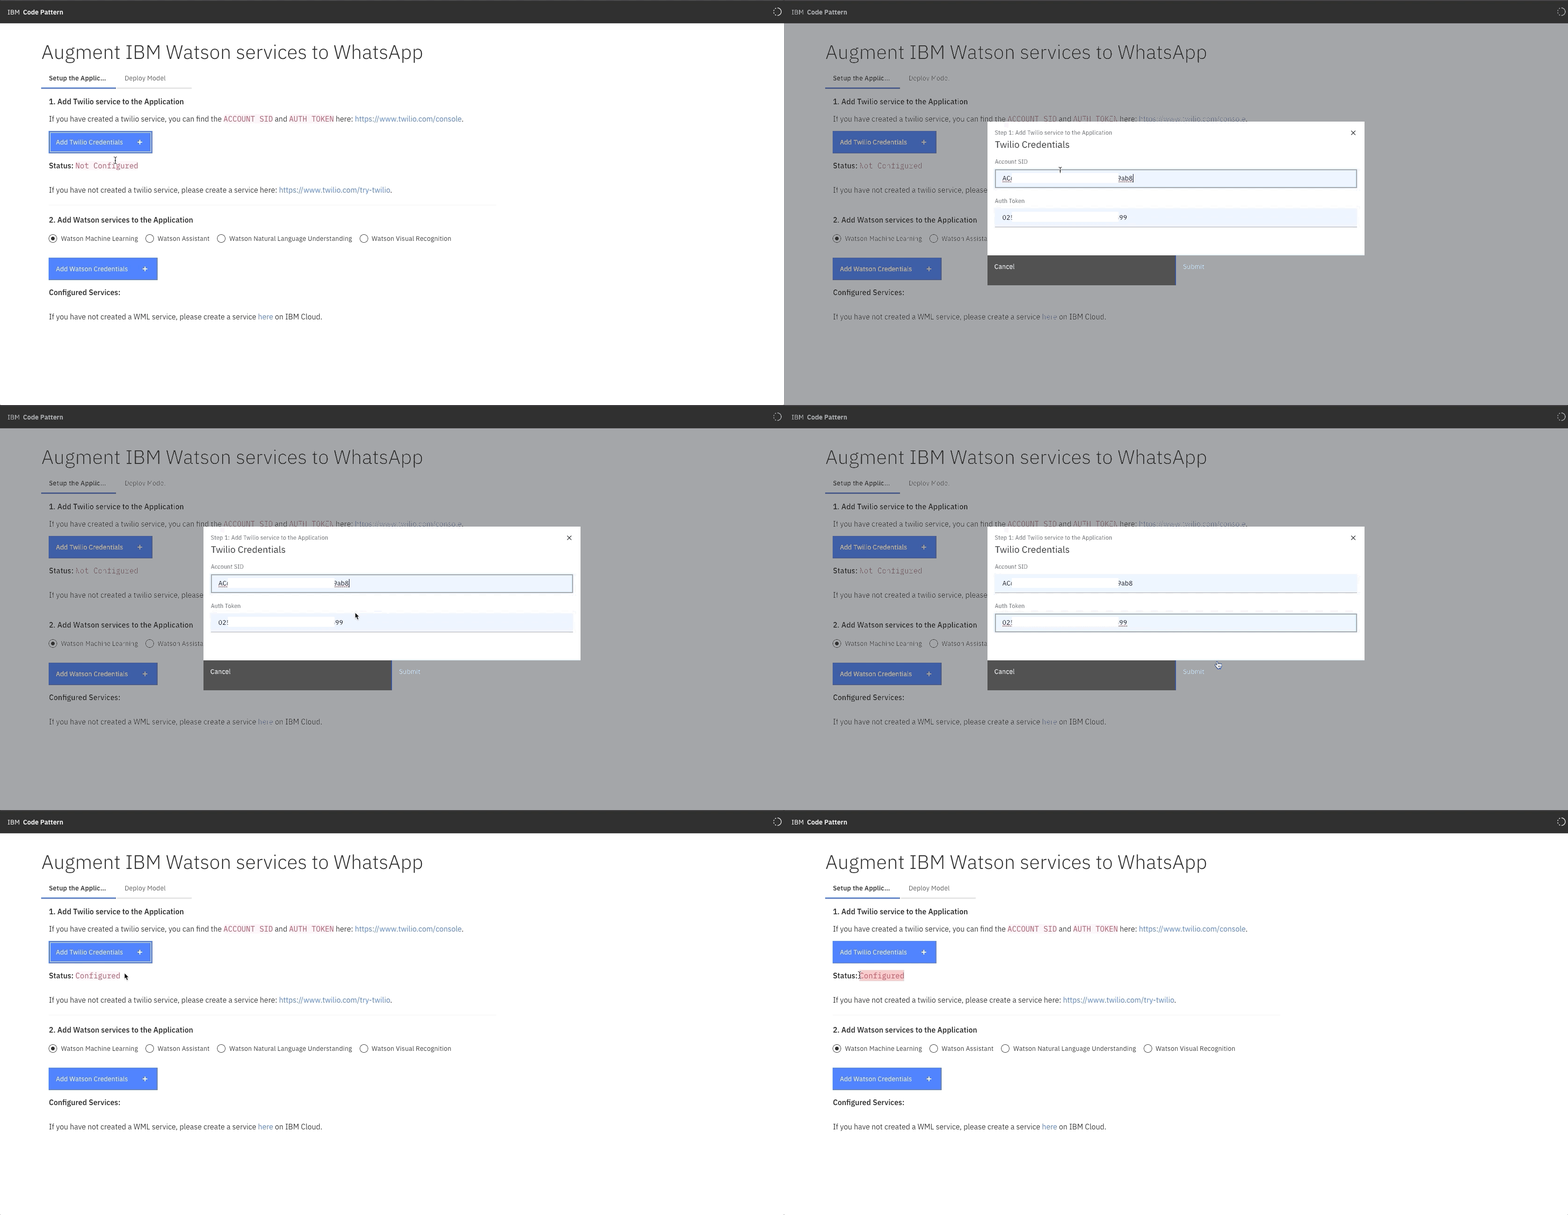
Back to the framework, under Add Twilio service to the Application, click on the Add Twilio Credentials button and insert the twilio
account_sidandauth_tokenwhich were generated from Step 3 and finally click on Submit. You will now see the status asConfigured.
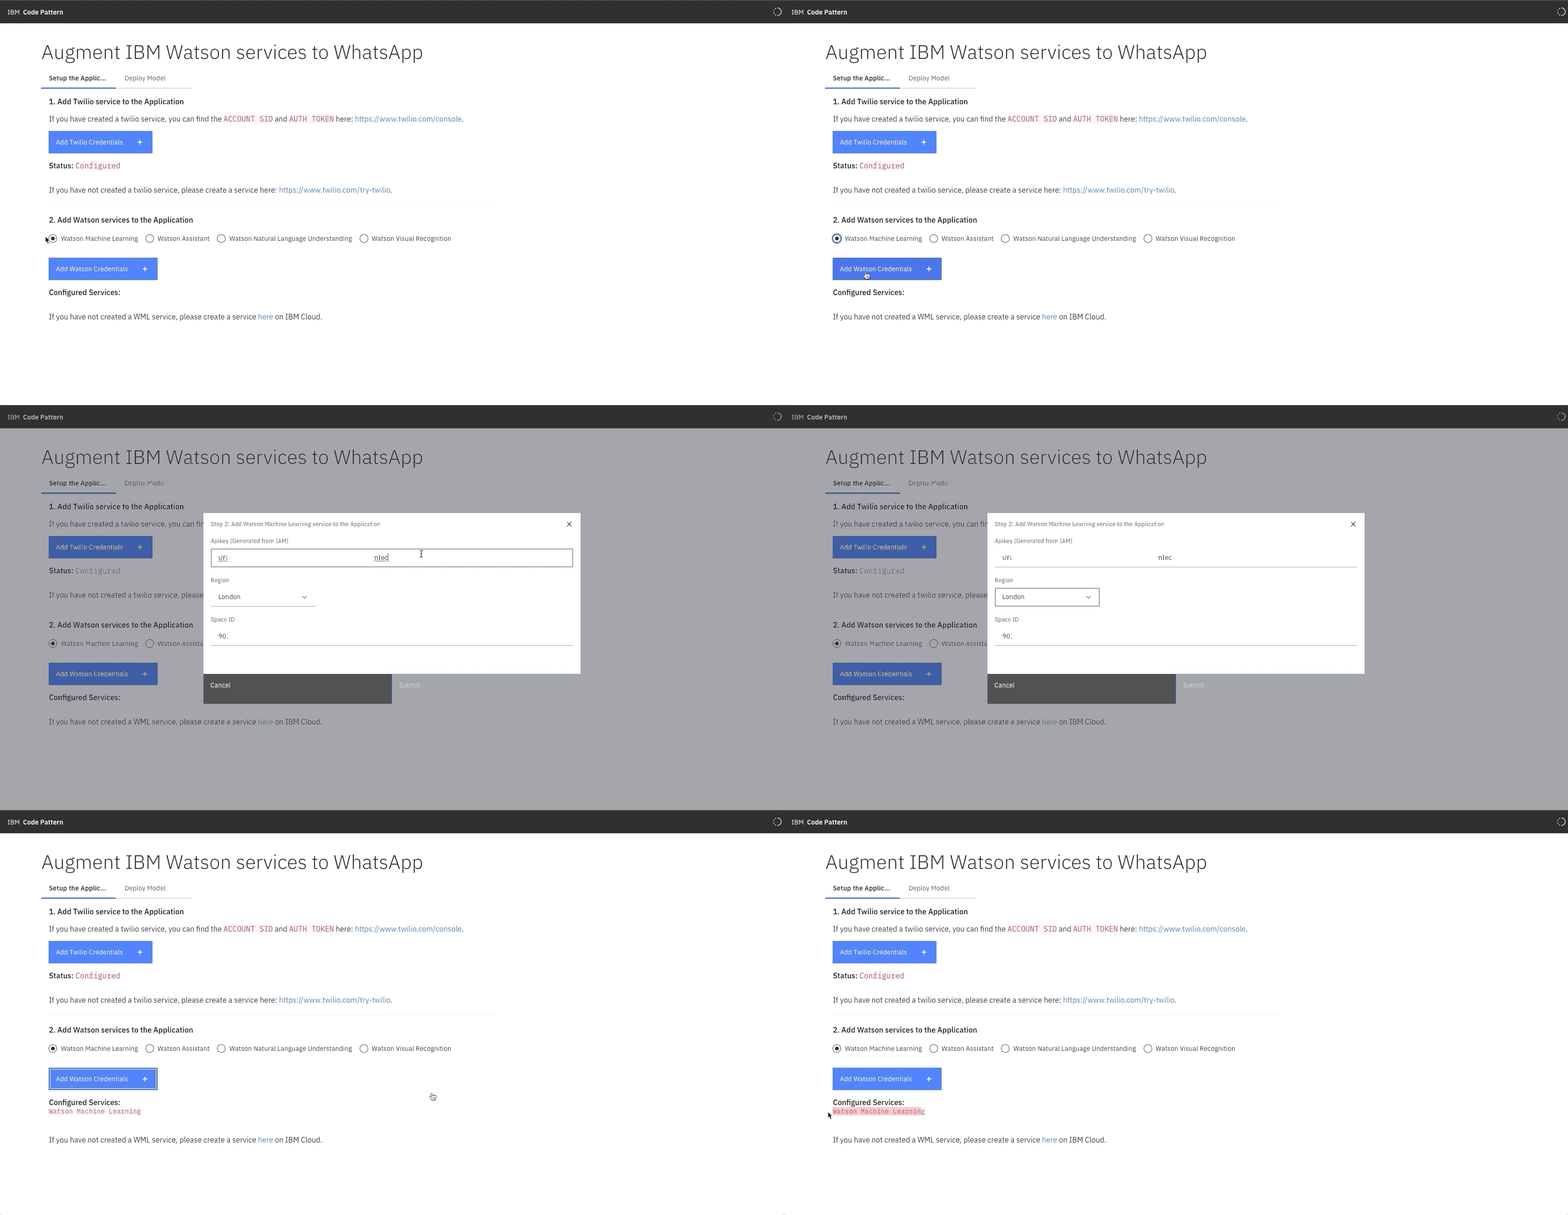
- Similarly, under Add Watson services to the Application, select the Watson Machine Learning radio button and click on Add Watson Credentials button, here add the
apikey,regionandspace_idwhich were generated from Step 4 and finally click on Submit. You will now seeWatson Machine Learningunder Configured Services.
-
At this point, you have successfully configured the framework that connects Watson services to WhatsApp.
-
In this code pattern as we have scoped to demonstrate only the Watson Machine Learning service, we have also provided a sample house price prediction model that can be deployed.
-
Now that the framework is configured, you can deploy the sample model from the framework.
-
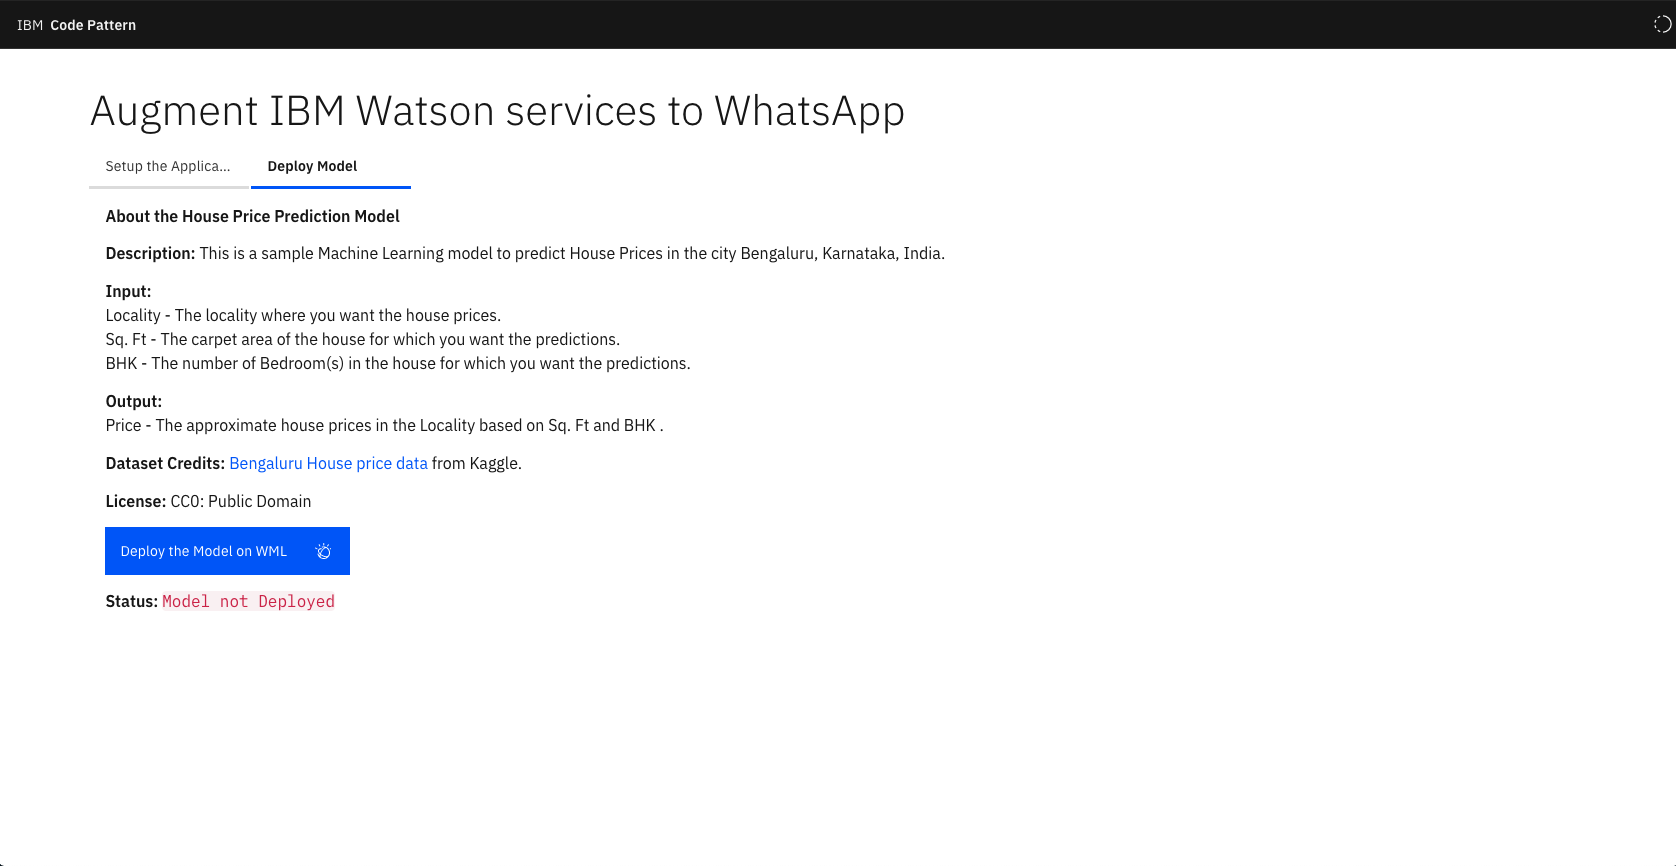
The sample model is a House Price Prediction model built to predict house prices in the city Bengaluru, Karnataka, India.
NOTE: The main aim of this code pattern is to demonstrate how IBM Watson Services can be plugged into WhatsApp and not about how to build Machine Learning models for which we already have other code pattens, hence we are limiting the scope to a basic model. With some minor code changes you can use any Machine Learning models.
- In the framework, click on the Deploy Model tab, and you will see the details of the model.
NOTE: The dataset for the sample house price prediction model is taken from Kaggle, credits to Bengaluru House price data from Kaggle and it is under the License of CC0: Public Domain.
- Click on Deploy the Model on WML button and wait for the Status to change.
Note: It will take couple of minutes for the model to get deployed, please be patient.
-
Once the model is deployed you will see a Status as
Deployed, Model ID: xxx-xxx-xxx. -
At this point, all the setup is completed and now its time to explore what you just built!
- In the framework, you will see View Application in Action tab.
-
Scan the QR code in your Phone to open the WhatsApp chat with Twilio's messaging API.
-
A WhatsApp chat will open up in your phone with a typed code
join <sandbox name>. -
Replace the
<sandbox name>with yourSandbox Nameobtained from Step 4 and send the message.
NOTE: If you are unable to scan the QR code, save the phone number +14155238886, open WhatsApp and send a message to the saved number with code
join <sandbox name>.
The workflow of the app is as follows:
NOTE: The user has to follow the exact same workflow for the WhatsApp to reply as intended.
At the end of the code pattern you will have learnt how to build a framework that connects WhatsApp to any Watson service on IBM Cloud, you can add other Watson services to the framework just by creating the desired service, adding the credentials in the framework and writing a code block leveraging the service in a serverless cloud function action, to learn more about adding more services to the framework, you can refer to Augment Watson Visual Recognition service with WhatsApp.
This code pattern is licensed under the Apache License, Version 2. Separate third-party code objects invoked within this code pattern are licensed by their respective providers pursuant to their own separate licenses. Contributions are subject to the Developer Certificate of Origin, Version 1.1 and the Apache License, Version 2.


