This repo is used to contain all the Firebase cloud functions for the SunNUS 22 mobile app. It facilitates backend functions to our application, thus allowing us develoepers to call them without invoking them from the application itself.
If you would like to learn more about the project in general or need a starting point, you may refer to the docs repo.
If you would like to learn more about how the frontend is built, you may refer to the app repo.
This repo has two main directories: functions and tests.
functions contain the logic for the onRequest and onCall backend functions.
tests contain testing files that can be executed in node for the respective cloud functions.
Pre-requisites:
More detailed explanations on installation process can be found in docs repo.
Clone the repo. A folder called cloud should appear. After cloning the repo, install
node packages by running yarn in these directories:
cloudcloud/functionscloud/tests
Then log in into firebase using the CLI: (assuming you're in cloud)
cd functionsyarn firebase login
Pre-requisites:
- Basic understanding of HTTP requests and response
- Firebase cloud functions
Here's an example workflow of how I write a helloWorld cloud function.
It is recommended to complete the tutorial in order as they build on the same example.
- Setting up server-side
- Setting up client tester
- Export a new
onRequestfunctionhelloWorldincloud/functions/src/helloWorld.ts
export const helloWorld = https.onRequest(async (req, res) => {
  console.debug('hello, server!')
  res.json({
    message: 'hello, requester!',
    serverReceived: req.body,
  })
})
Here, we are creating a type of cloud function, taking the form of an onRequest.
Users who wish to call this function can attach a message in the request object req, and it will be reflected in the response res.
More will be elaborated on in the later parts.
-
Add it to the list of cloud functions to be used by exporting it in
cloud/functions/src/development.ts. -
Spin up a local emulator server
Linux/ MacOS:
cd functions && yarn serveWindows:
cd functions && yarn start:functions- Your terminal should show a list of local urls, one of which ends in
helloWorld.
- Go to that link in your browser. After loading, both your terminal and your browser should have the output as specified in the function above.
- Congrats! 🎉 You've just written your very first cloud function!
To avoid needing to navigate to the link each time, you can use a simple node.js request sender and run it locally.
Let us continue by building on the helloWorld function built previously.
- Navigate to
cloud/tests/srcand create a new file calledhelloWorld.ts.
const fn = 'development-helloWorld'
timestamp(fn)

const request = { message: 'requester to server, over!' }

axios.post(cloud(fn), request).then((res) => {
  console.debug(res.data)
})
Here, we are referencing the cloud function we have just added to development. We can then use axios to run our HTTP request. Previously, we did not attach a request and as such, our serverReceived did not return anything. Let us now attach a message to our request payload.
- Create a script in
cloud/tests/package.jsonto build and run it. You may do so by creating an alias (i.e shortcut for the command) For example, let us call our aliashwforhelloWorld. This way, we can simply callyarn hwinstead of runningyarn tsc && node lib/helloWorld.
- Let us test the function by running the following:
cd tests && yarn tsc && node lib/helloWorld.ts

# or simply (if alias is set up correctly)
cd tests && yarn hw
A message should pop up in your terminal with a timestamp, showcasing the function called as well as the response object.
-
Congrats! 🎉 You've just written your very first test function using node and axios!
-
Let us take it a step further and pass in parameters into our cloud function. The function should now echo a hello back to the user.
- Modify your
helloWorldto return a message reflecting the name attached to the request payload. Attach the name you want to return as a property of the request object inindex.
// helloWorld.ts
message: `hello, ${req.body.name}!`,

// index.ts
const request = { name: 'Khang' }- Run the function as before, now you have successfully learnt how to attach parameters onto your request body!
Alternatively, you may download API Clients such as Postman or Insomnia and form a payload from there.
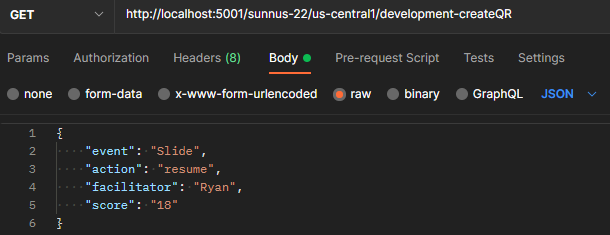
Supplying inputs from Postman example:
Using createQR.ts as an example, the cloud function requires four parameters to be supplied.
You may supply them in a JSON object in the GET request as follows:
{
   "event": "Slide",
   "action": "resume",
   "facilitator": "Ryan",
   "score": "18"
}Here are some useful aliases to run, for a more comprehensive list, refer to the respective package.json files.
| command | description |
|---|---|
| yarn cu | create users |
| yarn ct | create teams |
| yarn au | attach users to teams |
| yarn att | assign TSS teams their slots |
| yarn cs | create schedule |
| command | description |
|---|---|
| yarn dau | delete all users |
| yarn dat | delete all teams |
| yarn ds | delete schedule |
Contact the tech lead to get the link to the google sheets.
- Download registration csvs from Google Sheets
- createTeams
- createUsers
- Place them into the
tests/src/csvand commit the changes- Do ensure that the data is correct!


