
In this exercise, we'll practice collaborating effectively as a team with git workflows.
Clonethis repository. DO NOTforkit.- Buckle up.
One of the main advantages of being comfortable with git is that it allows you the ability to collaborate with teams through organizations and shared repositories hosted here on Github. Git is used for Version Control, which allows us to save versioned copies of our project codebases as we add to them. Typically, we'll store these codebases here on Github. However, git also allows for collaboration.
Take a second to think about how we've been receiving and submitting homework in this course.
- Forking and cloning a repository
- Adding changes and commiting them
- Pushing to our forked remote repository
- Finally, making a pull request on the main repository with our changes
In actuality, we've been doing git collaboration all along! In the case of our homework, we've been using the fork and pull request method of collaboration.
We'll be using the central repository feature branch method of collaboration for our group projects in this course. While this is the way we'll be collaborating in this course, there are other methods out there.
When starting a new group project with a feature branch workflow, what we'll need to do first is add collaborators to the project.
To add collaborators on a repository:
- Click on the
Settingstab at the top right of the page - Within settings, click on the section titled
Manage Access - You'll see a button for inviting people and organizations
- Click on it and enter in the collaborators you'd like to work with on the project
- Once you invite them, they'll need to respond to the invite email sent to their email associated with their Github account

With a feature branch workflow, we'll be sharing a central repository with a main branch and doing our work in separate branches before merging it into the main branch of the project. To create our own, separate branches for the project, we'll be using this command:
git checkout -b your-branch-nameThe -b flag tells the checkout command to create a new branch if one with that name doesn't already exist
Let's take 5 minutes to read about Checkout.
So to break things down, let's cover the steps of how we'll be using this workflow for our group projects:
- Your group will choose a git czar/boss/lord/etc. to manage pull requests made on the central repository
- Once the central project repository has been created, you'll need to add everyone working on the project as a collaborator and you'll each
clonethe repository. Make sure NOT toforkit - Next, within your local directory, you'll create a new branch for the project that you'll be working on, separate from
maingit checkout -b my-branch
- From there, you'll treat that branch as if it were your own project, adding commits and pushing your code to it
- Finally, when you've completed a feature and are ready to
mergeit intomain, you'll need to make aPull Requestfrom your branch on Github - Your git czar/boss/lord/etc. will review your pull request and merge it into the
mainbranch from there - After the feature has been merged, your whole group will pull down the new code to their branches with:
git pull origin main
- Rinse and repeat, projects are never finished!
That's all good and fine, but what if we run into merge conflicts???
Oh no! There's a merge conflict and I don't know what to do!
With your team, you'll often run into an issue with your pull requests where some members of your team have conflicting code, which will cause merge conflicts when you're merging them into the main branch.
First, let's talk about a general strategy of how to not end up there. Prevention is always the better option!
1. Don't work on the same files at the same time. If you do, you'll probably end up
having to deal with merge conflicts.

2. Communicate. Make sure everyone in your team knows who is working on what and
when they are working on it.

3. Always pull down new features that have been merged into `main`. If one of your
team members has merged in a new feature, make sure to pull it down right away, so
you'll have the most up-to-date version of the codebase. That way, you won't waste
time adding in redundant changes.

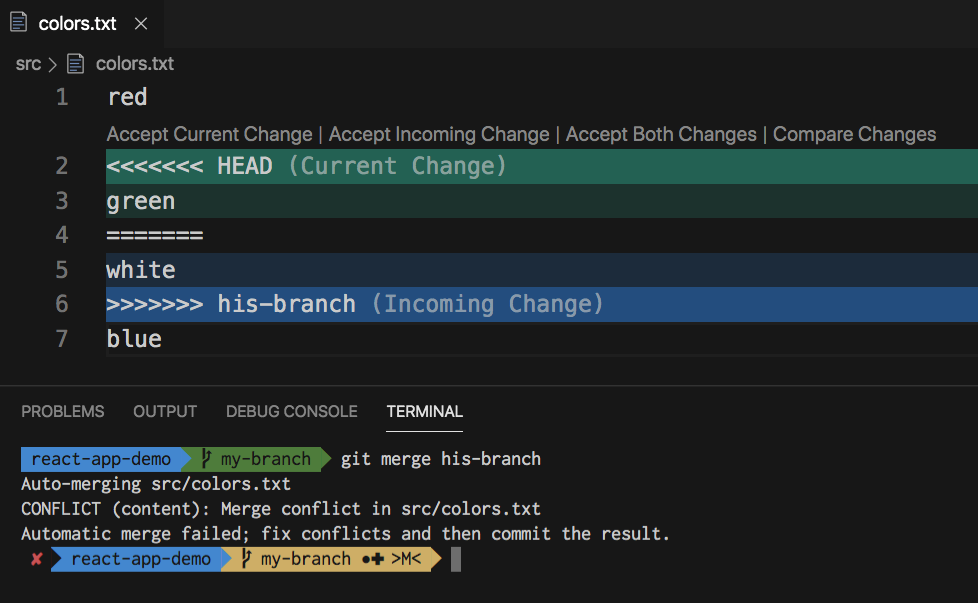
In the event that you do end up with a merge conflict don't panic, they can be fixed. First let's break down what a merge conflict looks like.
<<<<<<< HEAD
Adding some content to mess with it later
Append this text to initial commit
=======
Changing the contents of text file from new branch
>>>>>>> feature-branch
The ======= line is the “center” of the conflict. All the content between the center and the <<<<<<< HEAD line is content that exists in the current branch (main) which the HEAD ref is pointing to.
Alternatively, all content between the center and >>>>>>> feature-branch is content that is present in our merging branch.
To resolve our merge conflict, we can:
- Manually remove the unnecessary part from any one of the branches, and only consider the content of the branch that is important for further use, along with removing the “conflict dividers” from our file.
- Click on one of the options for accepting changes
- Choose Current Change if you don't want the new changes causing the conflict
- Choose Incoming Change if you do want the new changes that are causing the conflict
Once the conflict has been resolved, we can use the git add command to move the new changes to the staging area, and then git commit to commit the changes.
This fix can be done either in your text editor (VS Code) or from the Github GUI.
Let's practice making our own branches and adding in some features!
First you'll need to make a branch. Use git checkout to create your own branch named your first name in your cloned local repository. For example:
git checkout -b andreCool! Now let's make some some changes.
- In the
namesdirectory, add in a new .txt file with your first name as well. Example:touch andre.txt
- Now we'll add a little content to the file. We can edit the file in VS Code or from the command line like:
echo "Here is a line of text in the file." >> andre.txt
Go ahead and add, commit, and push those changes up to your branch. Now we'll practice making pull requests together.
In this lesson, we learned about git workflows, in particular feature branch workflows, which we'll be using for group projects in this cohort. We also covered how merge conflicts happen, what they look like, how to prevent them, and how to fix them.