
This tool was written for the purpose of allowing plot scale measurements to be extracted automatically from most high-resolution forest point clouds from a variety of sensor sources. Such sensor types it works on include Terrestrial Laser Scanning (TLS), Mobile Laser Scanning (MLS), Terrestrial Photogrammetry, Above and below-canopy UAS Photogrammetry or similar. Very high resolution Aerial Laser Scanning (ALS) is typically on the borderline of what the segmentation tool is capable of handling at this time. If a dataset is too low resolution, the segmentation model will likely label the stems as vegetation points instead.
There are also some instances where the segmentation model has not seen appropriate training data for the point cloud. This may be improved in future versions, as it should be easily fixed with additional training data.
A video showing the outputs of the tool is provided here: https://youtu.be/rej5Bu57AqM
You will need to install all packages in the requirements.txt file.
If using Anaconda, create a clean environment and activate it. In Anaconda Prompt, type the following (replacing the path to FSCT and your desired environment name as needed):
cd PATH_TO_FSCT-MAIN_DIRECTORY
conda create --name YOUR_ENVIRONMENT_NAME_HERE python==3.9
conda activate YOUR_ENVIRONMENT_NAME_HERE
conda install pip
pip install -r requirements.txt
This should hopefully install all required packages for you. These are the instructions for Windows 10 and Linux. I have not tested this on Mac. If someone with a Mac tests this and it works (or doesn't), please let me know!
If you have any difficulties or find any bugs, please get in touch and I will try to help you get it going. Suggestions for improvements are greatly appreciated.
If you do not have an Nvidia GPU, please set the use_CPU_only setting in run.py to True.
Open the "run.py" file and set num_procs and batch_size appropriately for your computer hardware. Adjust the parameters if needed or leave them as they are.
Run the "run.py" file. This will ask you to select 1 or multiple ".las" files. If all goes well, you will have a new directory in the same location as the ".las" file/s you selected and once complete, this will contain the following outputs.
Start with small plots containing at least some trees. The tree measurement code will currently cause an error if it finds no trees in the point cloud.
Plot_Report.html and Plot_Report.md
A summary of the information extracted. Nicer to look at than the processing report, but still a bit ugly in Version 1.
Future versions may make this a bit nicer/add data tables/etc.
tree_data.csv
Basic measurements of the trees.
-
Headings are as follows (all units are in metres or cubic metres for volume) [x_tree_base, y_tree_base, z_tree_base, DBH, CCI_at_BH, Height, Volume_1, Volume_2, Crown_mean_x, Crown_mean_y, Crown_top_x, Crown_top_y, Crown_top_z, mean_understory_height_in_5m_radius]
-
CCI_at_BH stands for Circumferential Completeness Index at Breast Height. CCI is simply the fraction of a circle with point coverage in a stem slice as illustrated below. This provides an indication of how complete your stem coverage is. In a single scan TLS point cloud, you cannot get a CCI greater than 0.5 (assuming the cylinder fitting was not erroneous), as only one side of the tree is mapped. If you have completely scanned the tree (at the measurement location), you should get a CCI of 1.0 (the highest possible CCI).
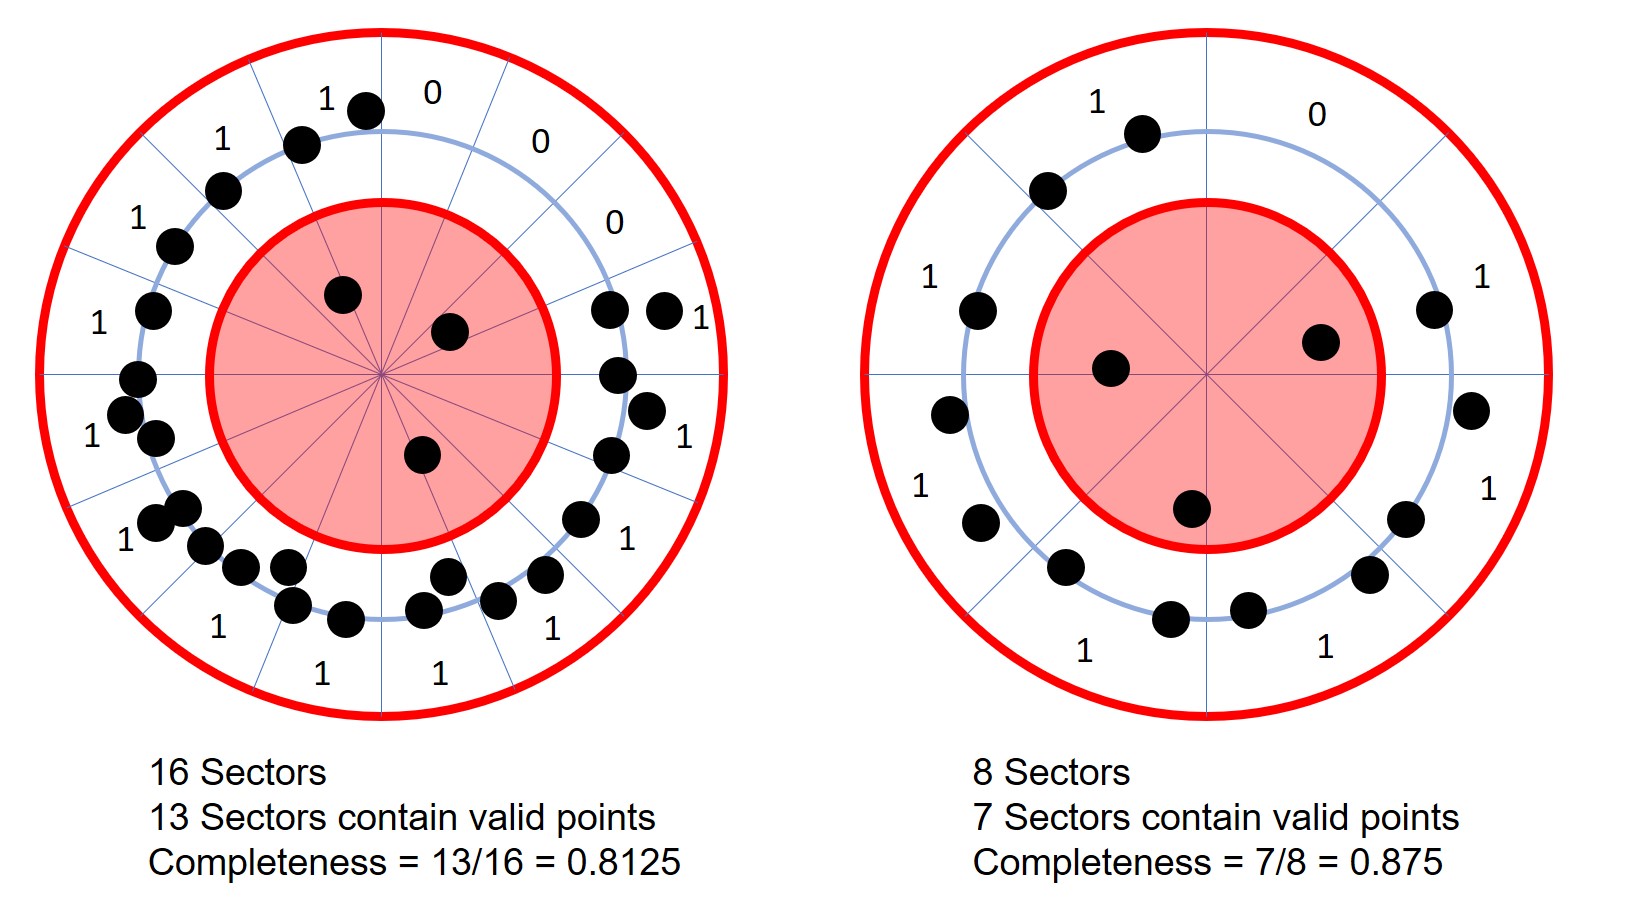 The figure is from this paper: https://doi.org/10.3390/rs12101652 if you would like a more detailed explanation of the idea.
 -
Volume_1 is the sum of the volume of the fitted cylinders.
-
Volume_2 is the volume of a cone (with a base diameter equal to the DBH and height from 1.3 m up to the tree height) + the volume of a cylinder (with a diameter of DBH and 1.3 m tall). This avoids the possibility of a short and shallow angled cone resulting from a short tree with a large DBH.*

taper_data.csv
This is simply the largest diameter at a range of given heights above the DTM for each stem.
All measurements are in metres.
Headings are PlotId, TreeId, x_base, y_base, z_base, followed by the measurement heights.
processing_report.csv
Summary information about the plot and the processing times. Be aware: if you open this while processing and FSCT
attempts to write to the open file, it will throw a permission error.

DTM.las Digital Terrain Model in point form.

cropped_DTM.las Digital Terrain Model cropped to the plot_radius.
working_point_cloud.las The subsampled and cropped point cloud that is fed to the segmentation tool.

segmented.las The classified point cloud created by the segmentation tool.

segmented_cleaned.las The cleaned segmented point cloud created during the post-processing step.
terrain_points.las Semantically segmented terrain points.
vegetation_points.las Semantically segmented vegetation points.
ground_veg.las Ground vegetation points.
cwd_points.las Semantically segmented Coarse woody debris points.
stem_points.las Semantically segmented stem points.
cleaned_cyls.las Point-based cylinder representation with a variety of properties. Saved as CSV as well for convenience/ease of use.
cleaned_cyl_vis.las A point cloud visualisation of the circles/cylinders defined in cleaned_cyls.las
Essentially makes circles out of points for every measurement in cleaned_cyls.

stem_points_sorted.las Stem points assigned by tree_id. **This is a simple output at the moment and will not give
highly reliable results. This current iteration may be useful for generating instance segmentation training datasets,
however, this will likely require you to manually correct it to be of high enough quality for training data.
veg_points_sorted.las Vegetation assigned by tree_id. Ground points are given a tree_id of 0. This is a simple
output at the moment and will not give highly reliable results. This current iteration may be useful for generating
instance segmentation training datasets, however, this will likely require you to manually correct it to be of high
enough quality for training data.
text_point_cloud.las A point cloud text visualisation of TreeId, DBH, height, CCI at breast height, Volume_1 and
Volume_2. It's a bit dodgy, but it works in any point cloud viewer without fuss.
tree_aware_cropped_point_cloud.las If you specify a plot_radius and a plot_radius_buffer, this will trim the point
cloud to the plot_radius. See the Tree Aware Plot Cropping section in User Parameters for more information on this mode.

Warning: FSCT is computationally expensive in its current form. Fortunately, it is still considerably faster than a human at what it does.
It is strongly recommended to have a CUDA compatible GPU (Nvidia) for running this tool. This can be run on CPU only, but expect inference to take a long time. CPU also appears to give worse semantic segmentation results than GPU. I did not expect this and I do not know why this is the case. If you have any ideas about why they are so different, please let me know!
It should be able to be run on most modern gaming desktop PCs (or decently powerful laptops).
I use the following setup and the computational times are tolerable:
- CPU: Intel i9-10900K (overclocked to 4.99GHz all cores).
- GPU: Nvidia Titan RTX (24 GB vRAM)
- RAM: 128 GB DDR4 at 3200 MHz (If you run out of RAM, try increasing your page file size (Windows) or swap size (Linux))
Hopefully in time, I'll be able to make this more efficient and less resource hungry.
plot_centre
[X, Y] Coordinates of the plot centre (metres). If "None", plot_centre is the centre of the bounding box of the point cloud. Leave at None if not using.
plot_radius
If 0 m, the plot is not cropped. Otherwise, the plot is cylindrically cropped from the plot centre with plot_radius + plot_radius_buffer. Leave at 0 if not using.
plot_radius_buffer
This is used for "Tree Aware Plot Cropping Mode". Leave at 0 if not using.
The purpose of this mode is to simulate the behaviour of a typical field plot, by not chopping trees in half if they are at the boundary of the plot radius.
We first trim the point cloud to a radius where the initial trim radius = plot_radius + plot_radius_buffer. For example, we might want a 4 m plot_radius. If we use a 2 m plot_radius_buffer, the point cloud will be cropped to 6 m radius initially. FSCT will then use the measurement information extracted from the trees in that 6 m radius point cloud, to check which tree centres are within the 4 m radius. This allows a tree which was just inside the boundary, to extend 2 m beyond the plot boundary without losing points. If we used a simple radius trim at 4 m, trees which were just inside the boundary may be cut in half.

This mode is used if plot_radius is non-zero and plot_radius_buffer is non-zero.
PlotId
The "PlotId" is taken from the filename of the input point cloud, so name files accordingly.
batch_size
The number of samples in a batch used for the deep learning inference. This number depends on the amount of GPU memory you
have. If you set this too high, you will run out of GPU memory. As a rough guide, I can fit 18-20 on an Nvidia Titan RTX GPU with 24 GB GPU
RAM.
Please Note: Until I add some nicer handling of this section, you must set batch_size>=2.
num_cpu_cores
The number of CPU cores you have/wish to use. Set to 0 by default, which means using ALL cores.
ground_veg_cutoff_height
Any vegetation points below this height are considered to be understory and are not assigned to individual trees.
veg_sorting_range
Vegetation points can be, at most, this far away from a cylinder horizontally to be matched to a particular tree.
sort_stems
If you don't need the sorted stem points, turning this off speeds things up. Veg sorting is required for tree height measurement, but stem sorting isn't necessary for general use.
stem_sorting_range
Stem points can be, at most, this far away from a cylinder in 3D to be matched to a particular tree.
taper_measurement_height_min
The starting height for the output taper measurements.
taper_measurement_height_max
Taper measurements are extracted up to this height above the DTM.
taper_measurement_height_increment
The increment of the taper measurements.
taper_slice_thickness
The cleaned cylinders (in the point based representation) within +/- 0.5 * taper_slice_thickness are found. The largest radius within this slice is used as the diameter for that particular height.
delete_working_directory
Generally leave this on. Deletes the files used for segmentation after segmentation is finished.
You may wish to turn it off if you want to re-run/modify the segmentation code so you don't need to run pre-processing every time.
run.py This is how you should interface with the code base under normal use.
combine_multiple_output_CSVs.py This will get
all "plot_summary.csv" files and combine them into one CSV. This will be saved in the highest common directory
of the selected point clouds.
run_tools.py A few helper functions to clean up run.py.
tools.py Other helper functions used throughout the code base.
preprocessing.py Performs subsampling of the input point cloud and handles the slicing and dicing of the point
cloud into samples the segmentation model can work with.
model.py The segmentation model modified from the Pytorch Geometric implementation of Pointnet++.
inference.py Performs the semantic segmentation on the samples and then reassembles them back into a full point
cloud.
post_segmentation_script.py Creates the Digital Terrain Model (DTM) and uses this and some basic rules to clean the
segmented point cloud up. Creates the class specific point clouds (terrain, vegetation, CWD and stem points).
measure.py Extracts measurements and metrics from the outputs of the post_segmentation_script.
report_writer.py Summarises the measurements in a simple report format.
- Young trees with a lot of branching do not currently get segmented correctly.
- Some extremely large trees do not currently get measured properly as the rules don't always hold.
- FSCT is unlikely to output useful results on low resolution point clouds.
- Very high resolution Aerial LiDAR is about the lowest it can currently cope with. If your dataset is on the borderline, try setting low_resolution_point_cloud_hack_mode (in other_parameters.py) to 4 or 5 and rerunning. It's an ugly hack, but it can help sometimes.
- Segmentation does often miss some branches, but usually gets the bulk of them.
- Small branches are often not detected.
- Completely horizontal branches/sections may not be measured correctly from the method used.
If you wish to cite this work, please use the below citation. If citing for something other than a scientific journal, feel free to link to the GitHub instead.
Krisanski, S.; Taskhiri, M.S.; Gonzalez Aracil, S.; Herries, D.; Muneri, A.; Gurung, M.B.; Montgomery, J.; Turner, P. Forest Structural Complexity Tool—An Open Source, Fully-Automated Tool for Measuring Forest Point Clouds. Remote Sens. 2021, 13, 4677. https://doi.org/10.3390/rs13224677
Please feel free to use/modify/share this code. If you can improve/evaluate the code somehow and wish to make a paper of it, please do! I might not have a chance to make many improvements going forward after my PhD, but I will try to keep it maintained.
If you can share your improvements, that would be great, but you are not obligated. Commercial use of FSCT is also permitted.
FSCT relies heavily on the segmentation model working properly. Training your own model may help expand the utility of FSCT to additional datasets outside of the original training set I used.
Unless you modify the code, training data must be provided as a .las file. This file must have a "label" column, with integer based labels as follows: 1: Terrain, 2: Vegetation, 3: Coarse woody debris, 4: Stems/branches.
Look at a "segmented.las" or "segmented_cleaned.las" file (an output of FSCT in normal use) as an example of what the training data must look like. It is strongly recommended to use FSCT to label your data, THEN correct it manually.
Note: manually segmenting/correcting point clouds is extremely tedious. The original dataset took me ~3-4 weeks to label from scratch... I use CloudCompare's segmentation tool for manually correcting the training data. You should start by loading the terrain_points.las, vegetation_points.las, cwd_points.las, and stem_points.las. I may eventually add an explanation video of how I do this, but for now, you will need to work out a way to do this. Importantly, take great care to label consistently. Sloppy labelling may result in your model not learning what you want it to learn. Small details can matter.
Take your chosen point cloud, and chop it into train, validation and test slices. You may choose to slice them as 50%, 25% and 25% respectively, but use your discretion.
- Save each slice as a .las file.
- Place the "train" slice into the directory
FSCT/data/train_dataset/ - Place the "validation" slice into the directory
FSCT/data/validation_dataset/ - Place the "test" slice into the directory
FSCT/data/test_dataset/
You can have multiple point clouds in the above directories, and during preprocessing, they will all be placed in the respective sample directories FSCT/data/*_dataset/sample_dir/
Set the parameters: preprocess_train_datasets, preprocess_validation_datasets and preprocess_test_datasets to True (or 1).
Run the train.py file and it will generate the samples for you. After running this the first time, set the above to False (or 0) to avoid preprocessing them again and duplicating them in the sample_dir directories.
For each labelled point cloud you wish to use for training, you must slice it into a chunk for training (most of the point cloud), and a chunk for validation. Place the training chunk into the "data/train_dataset/" directory.
Note: Preprocessing will add files to the respective sample_dir directory, but does not yet delete them. This is important if you re-run the preprocessing step.
I have already preprocessed some point clouds located in the train_dataset directory. I have created another training dataset and wish to preprocess it so I can use it for training.
I have 2 options:
Option A: move the already processed point clouds out of the train_dataset directory. Leave the sample_dir directory as it was. Add the new training point cloud into the train_dataset directory. Set the preprocess_train_datasets parameter to 1 and run the script. As you moved the previously processed point clouds out of the train_dataset directory, they will not be processed, and just the new point cloud will be pre-processed and added to the sample_dir directory. Set the preprocess_train_datasets parameter back to 0 and proceed as you wish.
Option B: Leave your previously processed training point clouds in the train_dataset directory, add your new training point cloud to this directory also. Manually delete the contents of the sample_dir directory and re-run preprocessing for all of the training point clouds.
Options A and B achieve the same thing, but option A is more efficient, as you are not pre-processing everything from scratch again. Option B is likely necessary if you wish to remove a sample point cloud from the dataset.
While most users of FSCT aren't likely to be training their own models, I plan to improve this process. Please see here for future work enhancements planned: #4
You can either let the script continue on after the preprocessing step, or stop it, turn off the preprocessing modes and rerun. Be sure to set the parameters according to your computer's specs. If you have CUDA errors, reduce the batch size or switch to CPU mode. If you don't have an Nvidia GPU, you must use CPU mode, but training will be very slow...
The training_monitor.py script will plot the loss and accuracy of the model. You must run this simultaneously in a separate terminal/python console to the training script.
Note: the training process will take several days on a powerful desktop computer.
Simply change the model_filename in other_parameters.py to the model you named in train.py.
FSCT is already capable of producing reasonably well segmented point clouds (within the stated limitations). By leveraging FSCT to automatically segment point clouds, it seems likely that the model could almost train itself into a more consistent and robust state through the use of carefully designed data augmentations.
Get in touch and if it works well, I'll happily add it to the model collection of this repo.
This code is likely far from optimal, so if you find errors or have ideas/suggestions on improvements/better practices, they would be most welcome!
This research was funded by the Australian Research Council - Training Centre for Forest Value (IC150100004), University of Tasmania, Australia.
Thanks to my supervisory team Assoc. Prof Paul Turner and Dr. Mohammad Sadegh Taskhiri from the eLogistics Research Group and Dr. James Montgomery from the University of Tasmania.
Thanks to Susana Gonzalez Aracil, David Herries from Interpine Group Ltd (New Zealand) https://interpine.nz/, Allie Muneri and Mohan Gurung from PF Olsen (Australia) Ltd. https://au.pfolsen.com/, who provided a number of the raw point clouds and plot measurements used during the development and validation of this tool.
The deep learning component uses Pytorch https://pytorch.org/ and Pytorch-Geometric https://pytorch-geometric.readthedocs.io/en/latest/#
The first step is semantic segmentation of the forest point cloud. This is performed using a modified version of Pointnet++ https://github.com/charlesq34/pointnet2 using the implementation in Pytorch-Geometric as a starting point provided here: https://github.com/rusty1s/pytorch_geometric/blob/master/examples/pointnet2_segmentation.py