CardScan iOS installation guide
- Requirements
- Installation
- Permissions
- Configure CardScan (Swift)
- Using CardScan (Swift)
- iOS 10 and older (Swift)
- Configure CardScan (Objective C)
- Using CardScan (Objective C)
- iOS 10 and older (Objective C)
- Authors
- License
- Objective C or Swift 4.0 or higher
- iOS 11 or higher (supports development target of iOS 10.0 or higher)
CardScan is available through CocoaPods. To install it, add the following line to your Podfile:
pod 'CardScan'Or if you're using Stripe:
pod 'CardScan'
pod 'CardScan/Stripe'
Next, install the new pod. From a terminal, run:
pod install
When using Cocoapods, you use the .xcworkspace instead of the
.xcodeproj. Again from the terminal, run:
open YourProject.xcworkspace
CardScan uses the camera, so you'll need to add an description of camera usage to your Info.plist file:
The string you add here will be what CardScan displays to your users when CardScan first prompts them for permission to use the camera.
Alternatively, you can add this permission directly to your Info.plist file:
<key>NSCameraUsageDescription</key>
<string>We need access to your camera to scan your card</string>
Configure the library when your application launches:
import UIKit
import CardScan

@UIApplicationMain
class AppDelegate: UIResponder, UIApplicationDelegate {

    func application(_ application: UIApplication, didFinishLaunchingWithOptions launchOptions: [UIApplicationLaunchOptionsKey: Any]?) -> Bool {
    	ScanViewController.configure()
        // do any other necessary launch configuration
        return true
    }
}To use CardScan, you create a ScanViewController, display it, and
implement the ScanDelegate protocol to get the results.
import UIKit
import CardScan

class ViewController: UIViewController, ScanDelegate {
    @IBAction func scanCardButtonPressed() {
        guard let vc = ScanViewController.createViewController(withDelegate: self) else {
	    print("This device is incompatible with CardScan")
	    return
	}

        self.present(vc, animated: true)
    }

    func userDidSkip(_ scanViewController: ScanViewController) {
        self.dismiss(animated: true)
    }

    func userDidCancel(_ scanViewController: ScanViewController) {
        self.dismiss(animated: true)
    }

    func userDidScanCard(_ scanViewController: ScanViewController, creditCard: CreditCard) {
    	let number = creditCard.number
	let expiryMonth = creditCard.expiryMonth
	let expiryYear = creditCard.expiryYear

	// If you're using Stripe and you include the CardScan/Stripe pod, you
  	// can get `STPCardParams` directly from CardScan `CreditCard` objects,
	// which you can use with Stripe's APIs
	let cardParams = creditCard.cardParams()

	// At this point you have the credit card number and optionally the expiry.
	// You can either tokenize the number or prompt the user for more
	// information (e.g., CVV) before tokenizing.

        self.dismiss(animated: true)
    }
}CardScan makes heavy use of CoreML, which Apple introduced in iOS 11. You can include the CardScan library in any projects that support a development target of iOS 10.0 or higher, but it will only run on devices that are running iOS 11 or higher.
To check if a device supports CardScan at runtime, use the
ScanViewController.isCompatible method:
if !ScanViewController.isCompatible() {
    self.scanCardButton.isHidden = true
}
Configure the library when your application launches:
#import "AppDelegate.h"
@import CardScan;

@implementation AppDelegate

- (BOOL)application:(UIApplication *)application didFinishLaunchingWithOptions:(NSDictionary *)launchOptions {
    [ScanViewController configure];
    return YES;
}

@endTo use CardScan, you create a ScanViewController, display it, and
implement the ScanDelegate protocol to get the results.
#import "ViewController.h"
@import Stripe;

@interface ViewController ()

@end

@implementation ViewController

- (IBAction)scanCardPress:(id)sender {
    UIViewController *vc = [ScanViewController createViewControllerWithDelegate:self];
    [self presentViewController:vc animated:YES completion:nil];
}

- (void)userDidSkip:(ScanViewController * _Nonnull)scanViewController {
    [self dismissViewControllerAnimated:YES completion:nil];
}

- (void)userDidCancel:(ScanViewController * _Nonnull)scanViewController {
    [self dismissViewControllerAnimated:YES completion:nil];
}

- (void)userDidScanCard:(ScanViewController * _Nonnull)scanViewController creditCard:(CreditCard * _Nonnull)creditCard {
    NSString *number = creditCard.number;
    NSString *expiryMonth = creditCard.expiryMonth;
    NSString *expiryYear = creditCard.expiryYear;

    // If you're using Stripe and you include the CardScan/Stripe pod, you
    // can get `STPCardParams` directly from CardScan `CreditCard` objects,
    // which you can use with Stripe's APIs
    STPCardParams *cardParams = [creditCard cardParams];

    // At this point you have the credit card number and optionally the expiry.
    // You can either tokenize the number or prompt the user for more
    // information (e.g., CVV) before tokenizing.

    [self dismissViewControllerAnimated:YES completion:nil];
}

@endCardScan makes heavy use of CoreML, which Apple introduced in iOS 11. You can include the CardScan library in any projects that support a development target of iOS 10.0 or higher, but it will only run on devices that are running iOS 11 or higher.
To check if a device supports CardScan at runtime, use the
ScanViewController.isCompatible method:
if (![ScanViewController isCompatible]) {
    self.scanCardButton.isHidden = true
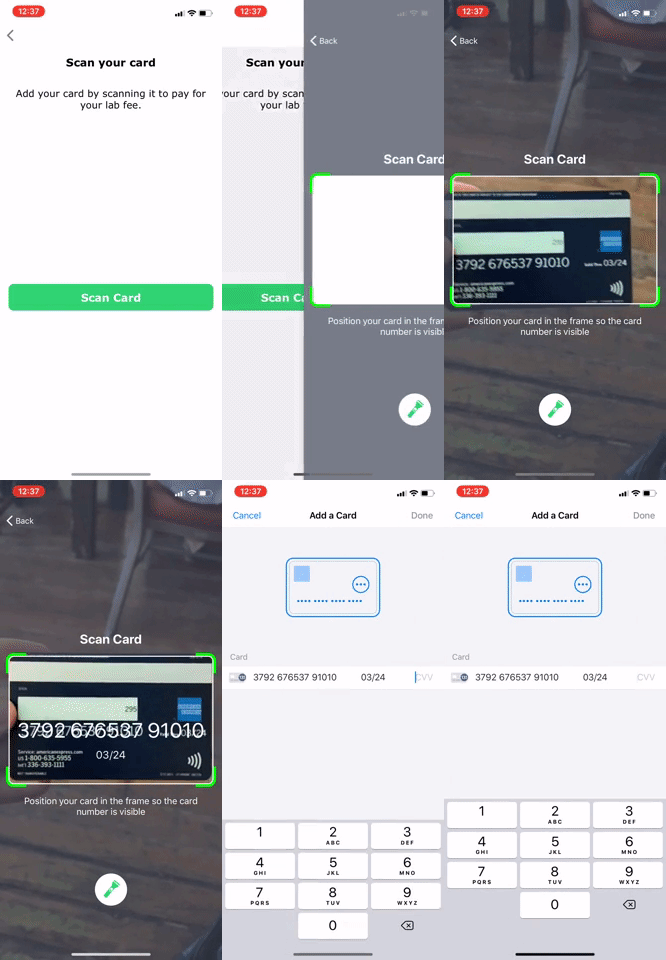
}When added to your app successfully, you should see the card numbers being passed into your payment form. This is what it looks like using a standard Stripe mobile payment form:
Sam King, Jaime Park, and Andy Li
CardScan is available under the BSD license. See the LICENSE file for more info.


