NetsBlox
NetsBlox is a visual programming language which allows people to develop networked programs.
Overview
Netsblox is an extension of Snap! which allows users to use some distributed computing concepts and develop network-enabled apps. That is, users can create apps that can interact with other instances of Netsblox. An introduction to the new networking capabilities can be found here
Currently, we have support for messages where a message is like a Snap! event except contains an additional data payload. For example, in the Tic-Tac-Toe example, the user is able to create a "TicTacToe" message which contains row and column fields corresponding to the row and column that of the user's move.
Along with the events and messages, we also currently support remote procedure calls. RPC's are implemented as REST endpoints on the server which can perform some of the more challenging computation for the student (allowing support to make more complicated apps) as well as providing access to extra utilities not otherwise available to the student.
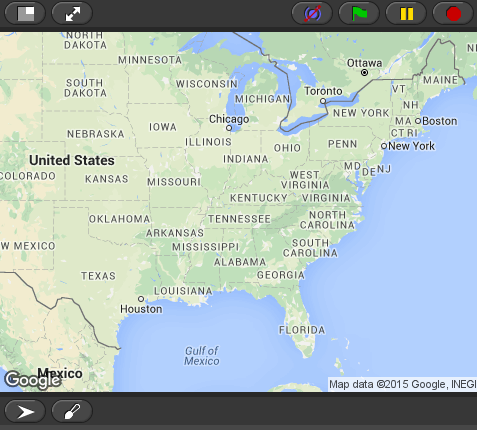
For example, you can import the Map utilities service which gives the user access to Google Maps with a map of (latitude), (longitude) with zoom (zoom) block:
This results in the stage costume changing:
Installation
The recommended method of installation is using Docker as explained below. Otherwise, native installation instructions are also available.
Docker
NetsBlox requires access to MongoDB and a file system (for blob storage). MongoDB can be started using Docker:
docker run -d -p 27017:27017 -v /abs/path/to/data:/data/db mongo
where /abs/path/to/data is a path on the host machine where the project content and media will be stored.
NetsBlox can then be started with
docker run -it -p 8080:8080 -e MONGO_URI='mongodb://172.17.0.1:27017/netsblox' -v /path/to/directory/for/media:/blob-data netsblox/server
where /path/to/directory/for/media is the directory on the host machine to store the project content and media.
In order to enable specific RPCs which use external APIs, you may have to set environment variables using the -e flag (like -e GOOGLE_MAPS_KEY=myGoogleMapsKey) or pass in a list of environment variables through a file using --env-file. The list of all the environment variables are explained in the RPC Support section below.
Note that addressing directories and files in windows is different from linux. For example the direcotry divider is \ as opposted to /
Next, just navigate to localhost:8080 in a web browser to try it out!
Development with Docker
Setup and start MongoDB as described in the last step.
Pull in and create a container running the base image for NetsBlox
docker run -it -p 8080:8080 -e MONGO_URI='mongodb://172.17.0.1:27017/netsblox' -v my/netsblox/dir/path:/netsblox --name nb-base netsblox/base /bin/bash
Helpful commands:
- start stop the container:
docker start nb-basedocker stop nb-base - attach to the container to run commands:
docker attach nb-baseand detach by sending EOL: Ctrl+d
Finally attach to the instance and follow native installation. You can run the server in dev mode using ENV=dev npm run dev
Access and edit the source files at the address you specified in the beginning my/netsblox/dir/path
Native
Before installing, NetsBlox requires nodejs (>= 8) and a MongoDB database. By default, NetsBlox will expect MongoDB to be running locally (this can be changed by setting the MONGO_URI environment variable).
Server protocol can also be set through SERVER_PROTOCOL environment variable.
Host should be set using HOST=.mydomain.com.
First clone the repository and install the dependencies.
git clone https://github.com/NetsBlox/NetsBlox.git --recursive
cd NetsBlox
npm install
Finally, start the server with npm start and navigate to localhost:8080 in a web browser to try it out!
RPC Support
RPCs that are using 3rd party API's often require getting an API key from the given 3rd party API. After obtaining a key, the appropriate environment variable should be set to given key value:
Required Environment Variables for RPCs
- Maps
GOOGLE_MAPS_KEYshould be set to an API key from the Google Static Maps
- Air Quality
AIR_NOW_KEYshould be set to an API key from AirNow
- Weather
OPEN_WEATHER_MAP_KEYshould be set to an API key from OpenWeatherMap
- NASA
NASA_KEYshould be set to an API key from NASA
- Traffic
BING_TRAFFIC_KEYshould be set to an API key from Bing Traffic
- Twitter
TWITTER_BEARER_TOKENshould be set to an API key from Twitter
- Pixabay
PIXABAYshould be set to an API key from Pixabay
To simplify this process (and to keep your ~/.bashrc clean), these values can be stored in a .env file in the project root directory and they will be loaded into the environment on starting NetsBlox.
Examples
After opening the browser, click the file button in the top left and click on Examples to check out some example networked apps!

