The goal of this project was to use odometry for the robot's next configuration, design a trajectory for the end-effector of the youBot (four-mecanum robot base with a 5R robot arm), and incorporate feedback control for the youBot to pick up a cube and place it in a new location. The full project description can be found here.
The project was split into four milestones:
- Return the next configuration, given the current configuration and controls
- Generate the end-effector trajectory to pick up the cube and place it at the goal configuration
- Use feedback control to drive the youBot to each end-effector configuration
- Run the simulation in CoppeliaSim and finetune the PI controller gains
The nextState function takes the current configuration (chassis phi, x, y, 5 joint angles, and 4 wheel angles), controls (5 joint speeds and 4 wheel speeds), dt, and max_speed as inputs. It returns the next configuration one timestep later, which includes the new chassis state, arm joint angles, and wheel angles. The equations for this milestone were found in the Modern Robotics textbook.
- eulerStep: returns the new wheel and joint positions, given the current positions and speeds
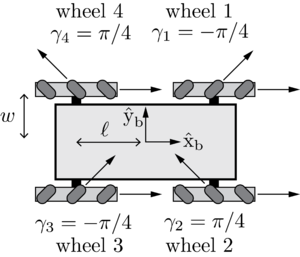
- odometry: calculates the new chassis position and orientation, using the kinematic model for the base


From there, the F matrix is the pseudoinverse of the H matrix, and the body twist Vb = FΔθ. The updated chassis state can be found using the equation qk+1 = qk + Δq, using the following equations for Δq:


The motion_planning function takes the current end-effector configuration, initial cube location, and final cube location as inputs (all relative to the space frame). Running the main function generates a trajectory.csv file to pick up the cube and place it in a new location, using the provided ScrewTrajectory function from the modern_robotics library. For the grasp and standoff positions, I included functions to rotate and translate the SE(3) configuration relative to the cube position.
These are the waypoints generated for the end-effector trajectory:
- A trajectory to move the gripper from its initial configuration to a "standoff" configuration a few cm above the block.
- A trajectory to move the gripper down to the grasp position.
- Closing of the gripper.
- A trajectory to move the gripper back up to the "standoff" configuration.
- A trajectory to move the gripper to a "standoff" configuration above the final configuration.
- A trajectory to move the gripper to the final configuration of the object.
- Opening of the gripper.
- A trajectory to move the gripper back to the "standoff" configuration.
The feedbackControl function calculates the commanded twist for the youBot to drive to each end-effector configuration from the trajectory, and returns the controls needed for the commanded twist. These are the inputs and output from the function:
Inputs:
- X: current actual end-effector configuration (Tse)
- Xd: current end-effector reference configuration Xd (Tse_d)
- Xd_next: reference configuration at next timestep in ref trajectory
- Kp, Ki: PI gain matrices
- dt: timestep between ref trajectory configurations
- currentConfig: (phi,x,y,J1,J2,J3,J4,J5,W1,W2,W3,W4,gripper)
- errorIntegral: sum of all error twists over time
Outputs:
- V: commanded end-effector twist, expressed in end-effector frame
- controls: joint speeds and wheel speeds to reach the target end-effector configuration
Most of the equations for this milestone were provided in the project description, along with test inputs to test the feedback control. The commanded twist was found from:

After calculating the Jacobian matrix, the controls were found from:

I implemented joint limits for joints 3 and 4 to avoid self-collisions. If either joint exceeded the [-2,2] range (in radians), these columns were set to 0 for the Jacobian and the controls were recalculated. If I tightened the tolerance further, the robot could not reach the cube.
To avoid singularities or unreasonable speeds calculated from the Jacobian, I also added a pinv_tol function which changed any values below the tolerance to zero, and returned the pseudoinverse.
This function uses the motion_planning function to generate a planned trajectory for end-effector configurations. Next, it loops through these end-effector configurations to get the chassis, arm, wheel, and gripper configurations at each iteration.
For the feedbackControl function, X is the end-effector configuration calculated from the currentConfig. The controls are found using feedbackControl, and the next configuration is found using nextState. These configurations are saved in youBot.csv and can be played with scene 6 in CoppeliaSim. To run the full code, run the following:
python full_program.py
To try different values with this function, the initial configuration, Kp and Ki gains can be changed in youBot_init.py (lines 15, 33, and 34). The cube configurations can also be adjusted in lines 29 and 30. Depending on how far away the cubes are placed, the Tf in trajectory_generation.py might need to be updated as well (line 95).
For the feedforward only case, I used (0, 0, 0, 0, -0.2, 0.2, -1.6, 0, 0, 0, 0, 0, 0) as the initial robot configuration:

The initial robot configuration for the best, overshoot, and new_task cases was (pi/6, -0.1, 0.1, 0, -0.2, 0.2, -1.6, 0, 0, 0, 0, 0, 0), with an initial angular error of 30 degrees and total linear error of 0.2 m.
For the best case, I used Kp = 5 and Ki = 0. The error converged with a quick settling time and no overshoot:


For the overshoot case, I used Kp = 2 and Ki = 5, and the error oscillated with overshoot before converging:


For the new task case, I kept Kp = 5 and Ki = 0 and changed the cube configurations. To play this file in CoppeliaSim, the initial cube configuration needs to be changed to (x,y,z) = (1,1,0.025), and the goal configuration to (1,-1,0.025).

The CoppeliaSim Robotics Simulator can be downloaded here, and the scenes can be downloaded here.
This project uses numpy and the Modern Robotics library, which can be installed by running:
pip install modern_robotics
Using any of the youBot.csv files from the results folder, the simulation can be played in Scene 6 of the CoppeliaSim Robotics Simulator, by providing the full path of the file.