Protein Graph Library
This package provides functionality for producing a number of types of graph-based representations of proteins. We provide compatibility with standard formats, as well as graph objects designed for ease of use with popular deep learning libraries.
- Protein Graph Visualisation!
- RNA Graph Construction from Dotbracket notation
from graphein.construct_graphs import  ProteinGraph

# Initialise ProteinGraph class
pg = ProteinGraph(granularity='CA', insertions=False, keep_hets=True,
                  node_featuriser='meiler', get_contacts_path='/Users/arianjamasb/github/getcontacts',
                  pdb_dir='examples/pdbs/',
                  contacts_dir='examples/contacts/',
                  exclude_waters=True, covalent_bonds=False, include_ss=True)

# Create residue-level graphs. Chain selection is either 'all' or a list e.g. ['A', 'B', 'D'] specifying the polypeptide chains to capture

# DGLGraph From PDB Accession Number
graph = pg.dgl_graph_from_pdb_code('3eiy', chain_selection='all')
# DGLGraph From PDB file
graph = pg.dgl_graph_from_pdb_file(file_path='examples/pdbs/pdb3eiy.pdb', contact_file='examples/contacts/3eiy_contacts.tsv', chain_selection='all')

# Create atom-level graphs
graph = pg._make_atom_graph(pdb_code='3eiy', graph_type='bigraph')from graphein.construct_meshes import ProteinMesh
# Initialise ProteinMesh class
pm = ProteinMesh()
# Pytorch3D Mesh Object from PDB Code
verts, faces, aux = pm.create_mesh(pdb_code='3eiy', out_dir='examples/meshes/')
# Pytorch3D Mesh Object from PDB File
verts, faces, aux = pm.create_mesh(pdb_file='examples/pdbs/pdb3eiy.pdb')from graphein.construct_graphs import RNAGraph
# Initialise RNAGraph Constructor
rg = RNAGraph()
# Build the graph from a dotbracket & optional sequence
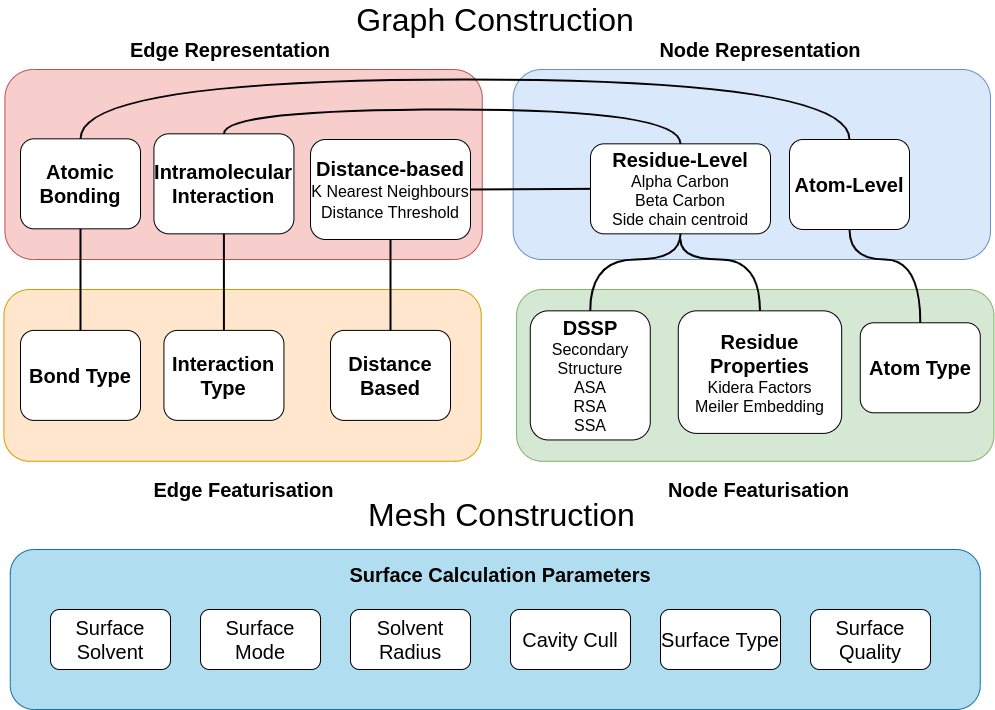
rna = rg.dgl_graph_from_dotbracket('..(((((..(((...)))..)))))...', sequence='UUGGAGUACACAACCUGUACACUCUUUC')Graphs can be constructed according to walks through the graph in the figure below.

granularity: {'CA', 'CB', 'atom'} - specifies node-level granularity of graph
insertions: bool - keep atoms with multiple insertion positions
keep_hets: bool - keep hetatoms
node_featuriser: {'meiler', 'kidera'} low-dimensional embeddings of AA physico-chemical properties
pdb_dir: path to pdb files
contacts_dir: path to contact files generated by get_contacts
get_contacts_path: path to GetContacts installation
exclude_waters: bool - retain structural waters
covalent_bonds: bool - maintain covalent bond edges or just use intramolecular interactions
include_ss: bool - calculate protein SS and surface features using DSSP and assign them as node features
-
Create env:
conda create --name graphein python=3.7
conda activate graphein
-
Install GetContacts
 # Install get_contact_ticc.py dependencies
 $ conda install scipy numpy scikit-learn matplotlib pandas cython seaborn
 $ pip install ticc==0.1.4

 # Install vmd-python dependencies
 $ conda install netcdf4 numpy pandas seaborn expat tk=8.5  # Alternatively use pip
 $ brew install netcdf pyqt # Assumes https://brew.sh/ is installed

 # Install vmd-python library
 $ conda install -c conda-forge vmd-python

 # Set up getcontacts library
 $ git clone https://github.com/getcontacts/getcontacts.git
 $ echo "export PATH=`pwd`/getcontacts:\$PATH" >> ~/.bash_profile
 $ source ~/.bash_profile

 # Test installation
 $ cd getcontacts/example/5xnd
 $ get_dynamic_contacts.py --topology 5xnd_topology.pdb \
                           --trajectory 5xnd_trajectory.dcd \
                           --itypes hb \
                           --output 5xnd_hbonds.tsv
  # Make sure you have git and conda installed and then run

  # Install get_contact_ticc.py dependencies
  conda install scipy numpy scikit-learn matplotlib pandas cython
  pip install ticc==0.1.4

  # Set up vmd-python library
  conda install -c https://conda.anaconda.org/rbetz vmd-python

  # Set up getcontacts library
  git clone https://github.com/getcontacts/getcontacts.git
  echo "export PATH=`pwd`/getcontacts:\$PATH" >> ~/.bashrc
  source ~/.bashrc
-
N.B. DGLLife requires
rdkit==2018.09.3conda install biopython conda install -c conda-forge rdkit==2018.09.3
-
Install DSSP:
We use DSSP for computing some protein features
$ conda install -c salilab dssp
-
Install PyTorch, DGL and DGL LifeSci:
N.B. Make sure to install appropriate version for your CUDA version
# Install PyTorch: MacOS
$ conda install pytorch torchvision -c pytorch                      # Only CPU Build

# Install PyTorch: Linux
$ conda install pytorch torchvision cpuonly -c pytorch              # For CPU Build
$ conda install pytorch torchvision cudatoolkit=9.2 -c pytorch      # For CUDA 9.2 Build
$ conda install pytorch torchvision cudatoolkit=10.1 -c pytorch     # For CUDA 10.1 Build
$ conda install pytorch torchvision cudatoolkit=10.2 -c pytorch     # For CUDA 10.2 Build

# Install DGL. N.B. We require 0.4.3 until compatibility with DGL 0.5.0+ is implemented
$ pip install dgl==0.4.3

# Install DGL LifeSci
$ conda install -c dglteam dgllife
-
Install PyTorch Geometric:
$ pip install torch-scatter==latest+${CUDA} -f https://pytorch-geometric.com/whl/torch-${TORCH}.html
$ pip install torch-sparse==latest+${CUDA} -f https://pytorch-geometric.com/whl/torch-${TORCH}.html
$ pip install torch-cluster==latest+${CUDA} -f https://pytorch-geometric.com/whl/torch-${TORCH}.html
$ pip install torch-spline-conv==latest+${CUDA} -f https://pytorch-geometric.com/whl/torch-${TORCH}.html
$ pip install torch-geometric
Where
${CUDA}and${TORCH}should be replaced by your specific CUDA version (cpu,cu92,cu101,cu102) and PyTorch version (1.4.0,1.5.0,1.6.0), respectivelyN.B. Follow the instructions in the Torch-Geometric Docs to install the versions appropriate to your CUDA version.
-
$ conda install -c schrodinger pymol
$ git clone https://github.com/cxhernandez/ipymol
$ cd ipymol
$ pip install .
N.B. The PyPi package seems to be behind the github repo. We require functionality that is not present in the PyPi package in order to construct meshes.
-
Install graphein:
$ git clone https://www.github.com/a-r-j/graphein
$ cd graphein
$ pip install -e .
Please consider citing graphein if it proves useful in your work.
@article{Jamasb2020,
  doi = {10.1101/2020.07.15.204701},
  url = {https://doi.org/10.1101/2020.07.15.204701},
  year = {2020},
  month = jul,
  publisher = {Cold Spring Harbor Laboratory},
  author = {Arian Rokkum Jamasb and Pietro Lio and Tom Blundell},
  title = {Graphein - a Python Library for Geometric Deep Learning and Network Analysis on Protein Structures}
}


