This project contains a number of self-contained TypeScript and JavaScript projects showcasing the different JavaScript runtime environments that can leverage the isomorphic multi-platform servicestack-client library in Web Apps, React Native Mobile Apps and Node.js server and test projects to enable effortlesss typed end-to-end API calls using a Server's generated TypeScript Add ServiceStack Reference DTOs and easily enable real-time notifications using the TypeScript ServerEvents Client.
The servicestack-client npm package can be used in either TypeScript or pure JavaScript projects and closely follows the design of the C#/.NET JsonServiceClient and C# ServerEventsClient in idiomatic JavaScript to maximize knowledge sharing and minimize native porting efforts between the different languages and platforms ServiceStack References supports.
The examples below explore the type benefits and value provided by the JsonServiceClient and ServerEventsClient which enables 100% code sharing of client logic across JavaScript's most popular environments.
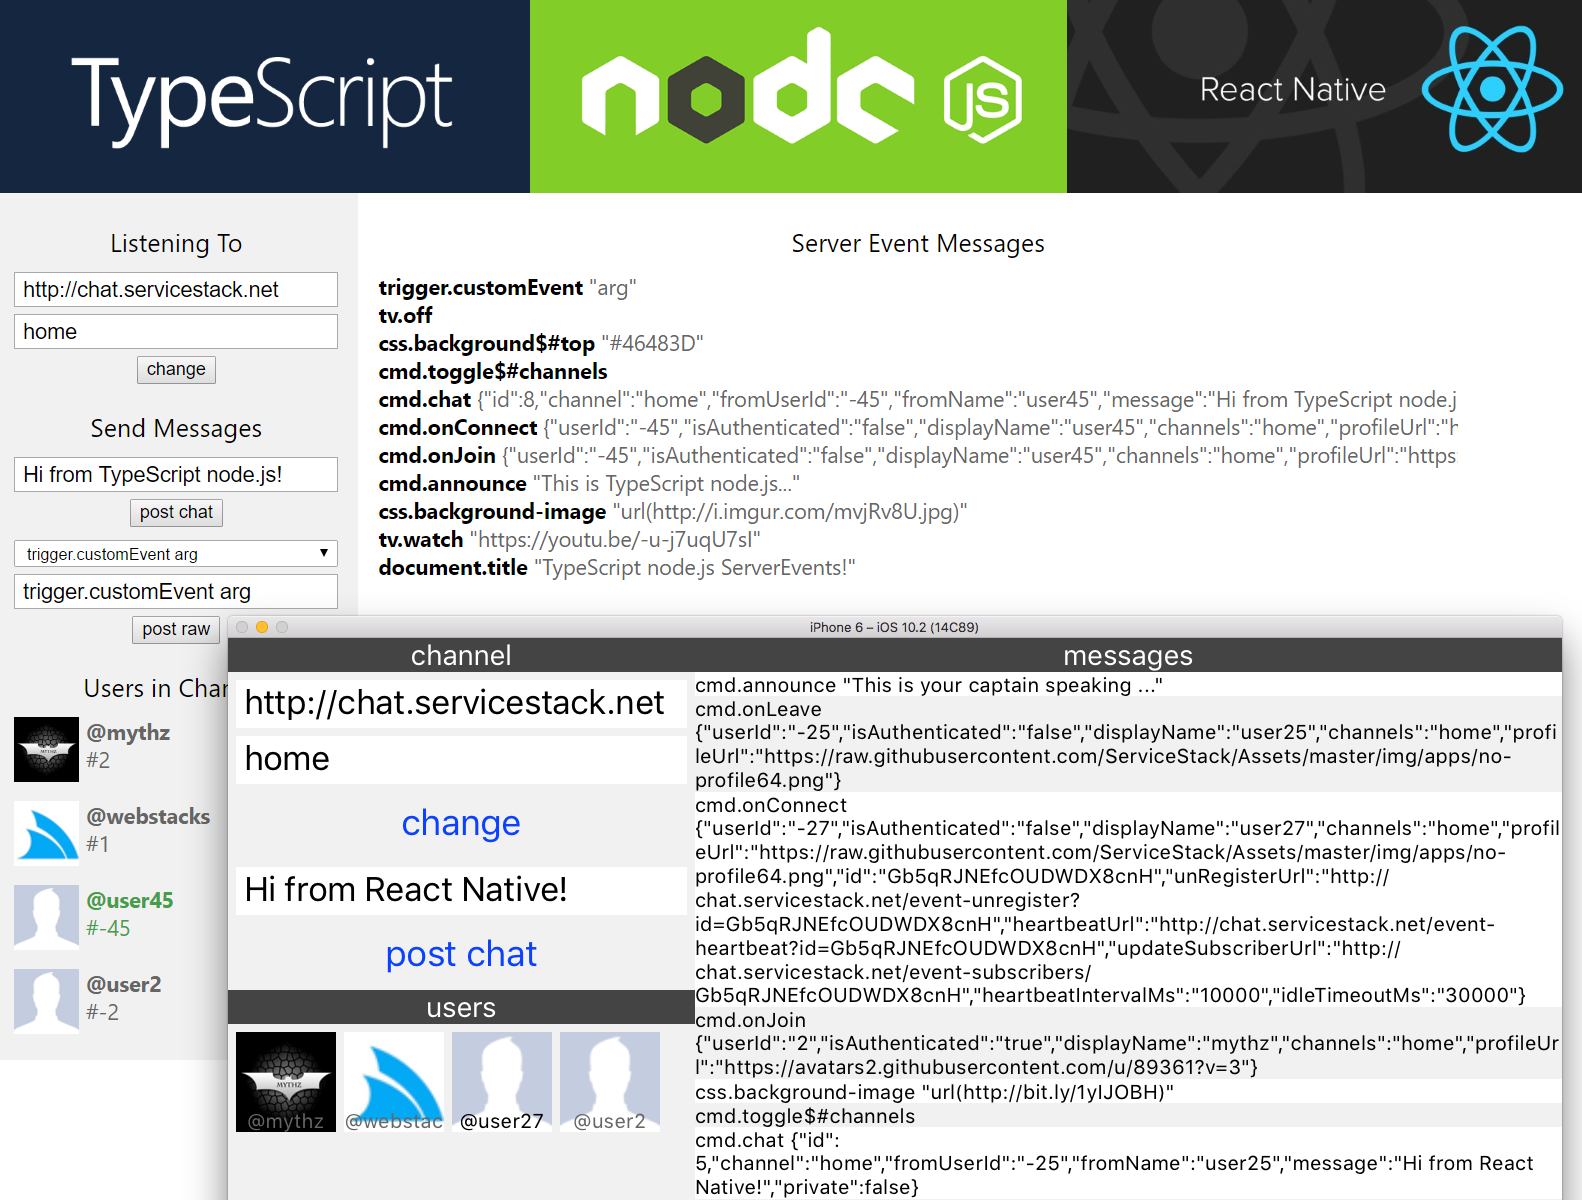
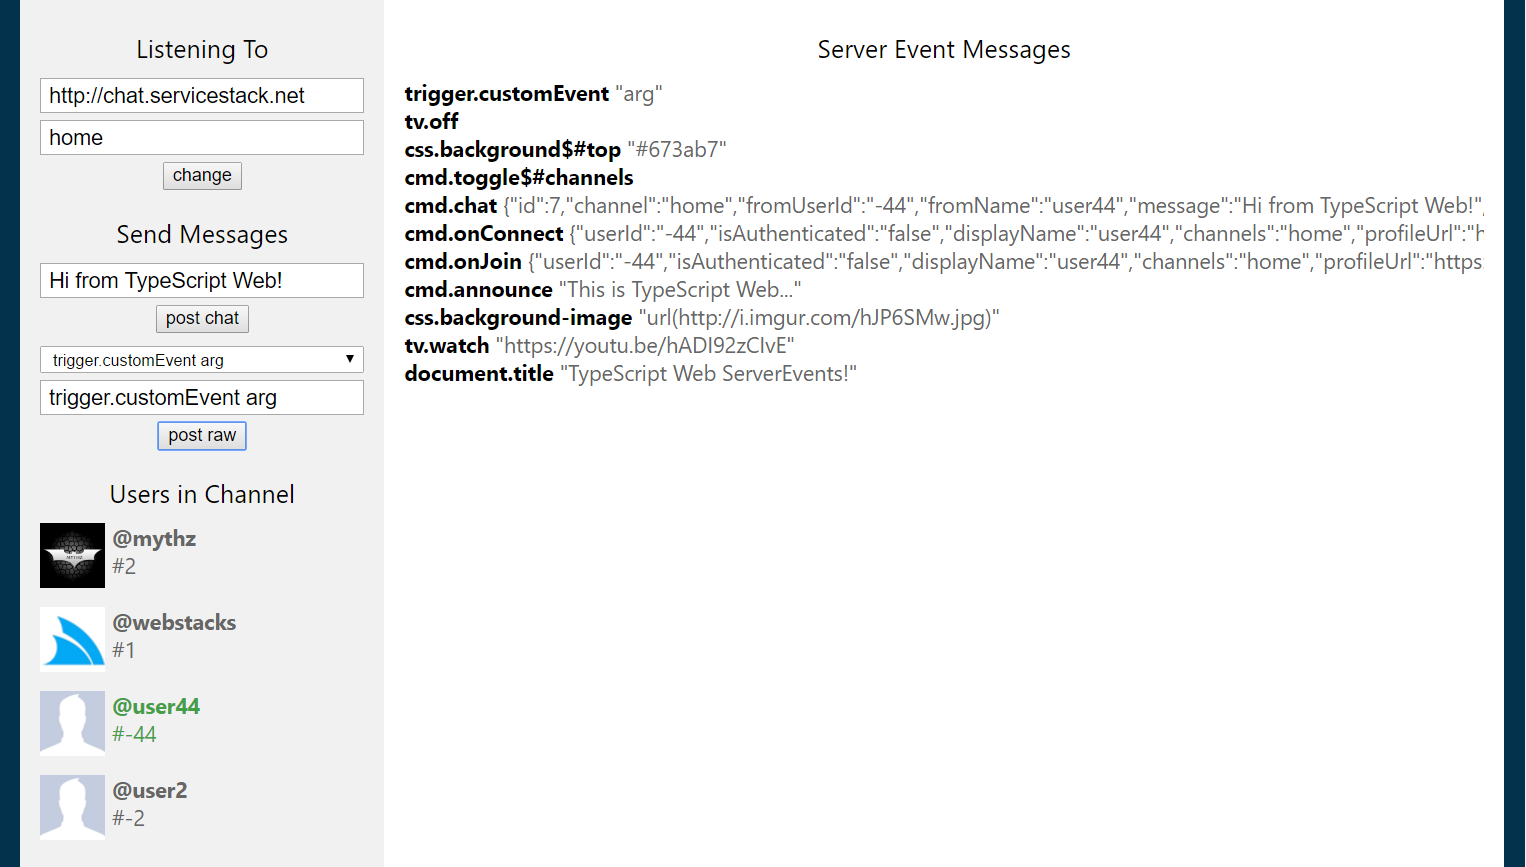
The Web Example App built with less than >100 lines of application code uses no external runtime library dependencies other than servicestack-client for its functional Web App that can connect to any CORS and ServerEvents-enabled ServiceStack instance and keep a real-time log of all messages sent to the subscribed channel whilst maintaining a synchronized Live list of Users currently subscribed to the same channel.
The Web App is made up of the 4 files below with all functionality maintained in app.ts:
- app.ts - Entire App Logic
- dtos.ts - Server generated DTOs from chat.servicestack.net/types/typescript
- index.html - Static HTML page
- default.css - Static default.css styles
The heart of the App that's driving all its functionality is the Server Events subscription below:
const startListening = () => {
    BASEURL = $("#baseUrl").value;
    CHANNEL = $("#channel").value;
    if (client != null)
        client.stop();

    console.log(`Connecting to ${BASEURL} on channel ${CHANNEL}`);
    client = new ServerEventsClient(BASEURL, [CHANNEL], {
        handlers: {
            onConnect: (e:ServerEventConnect) => {
                refresh(sub = e);
            },
            onJoin: refresh,
            onLeave: refresh,
            onUpdate: refresh,
            onMessage: (e:ServerEventMessage) => {
                addMessage(e);
                refreshMessages();
            }
        },
        onException: e => {
            addMessageHtml(`<div class="error">${e.message || e}</div>`);
        }
    }).start();
}Essentially just declarative configuration hooking up different Server Events to the handlers below which
adds any commands and messages to the channels MESSAGES list, updates the UI then refreshes the users list by calling the built-in client.getChannelSubscribers() API:
const $ = sel => document.querySelector(sel);
const $$ = sel => document.querySelectorAll(sel);
const $msgs = $("#messages > div") as HTMLDivElement;
const $users = $("#users > div") as HTMLDivElement;

const refresh = (e:ServerEventMessage) => {
    addMessage(e);
    refreshMessages();
    refreshUsers();
};

const refreshUsers = async () => {
    var users = await client.getChannelSubscribers();
    users.sort((x,y) => y.userId.localeCompare(x.userId));
    var html = users.map(x =>
        `<div class="${x.userId == sub.userId ? 'me' : ''}">
            <img src="${x.profileUrl}" /><b>@${x.displayName}</b><i>#${x.userId}</i><br/>
        </div>`);
    $users.innerHTML = html.join('');
};

const addMessage = (x:ServerEventMessage) => addMessageHtml(
    `<div><b>${x.selector}</b>
        <span class="json" title=${x.json}>${x.json}</span>
    </div>`);
const addMessageHtml = (html) => (MESSAGES[CHANNEL] || (MESSAGES[CHANNEL]=[])).push(html);
const refreshMessages = () => $msgs.innerHTML= (MESSAGES[CHANNEL]||[]).reverse().join('');To change the server and channel we want to connect to we just call startListening() again
when the change button is clicked or Enter key is pressed:
$("#btnChange").onclick = startListening;
$$("#baseUrl,#channel").forEach(x => x.onkeydown = e => e.keyCode == 13 ? startListening() : null);
Which will close the previous subscription and start a new one on the new server and channel. You can test connecting to another server by connecting to the .NET Core version of Chat at chat.netcore.io.
The Web App also makes Typed API Requests to send messages and commands to other users in the channels.
To make Typed API Requests we need to first download chat.servicestack.net TypeScript DTOs at /types/typescript:
curl http://chat.servicestack.net/types/typescript > dtos.ts
Once downloaded we can import the Request DTO's of the Services we want to call:
import { PostChatToChannel, PostRawToChannel } from "./dtos";Then just like all other supported
ServiceStack Reference languages
we just need to send a populated Request DTO using a generic JsonServiceClient - an instance of which is pre-configured with the same {baseUrl} at client.serviceClient:
const sendChat = () => {
    let request = new PostChatToChannel();
    request.from = sub.id;
    request.channel = CHANNEL;
    request.selector = "cmd.chat";
    request.message = $("#txtChat").value;
    client.serviceClient.post(request);
};
Which is called each time the chat button is pressed or Enter key is pressed:
$("#btnSendChat").onclick = sendChat;
$("#txtChat").onkeydown = e => e.keyCode == 13 ? sendChat() : null;To see our App in action we just need to launch a static Web Server in the /web directory which we
can use the command-line http-server to do by running:
cd web
http-server
To launch a HTTP Server at http://localhost:8080/ which you can now play with in your browser.
The vibrant ecosystem surrounding npm makes it the best place to develop Single Page Apps with best-of-class tools like Babel which you can run in the command-line with:
npm run watch
This will launch a background watcher to monitor your source files for changes and on save automatically
pipe them through the TypeScript compiler and bundle its output in /dist/bundle.js which
is the only .js source file our app references, that we can reload with F5 to see any changes.
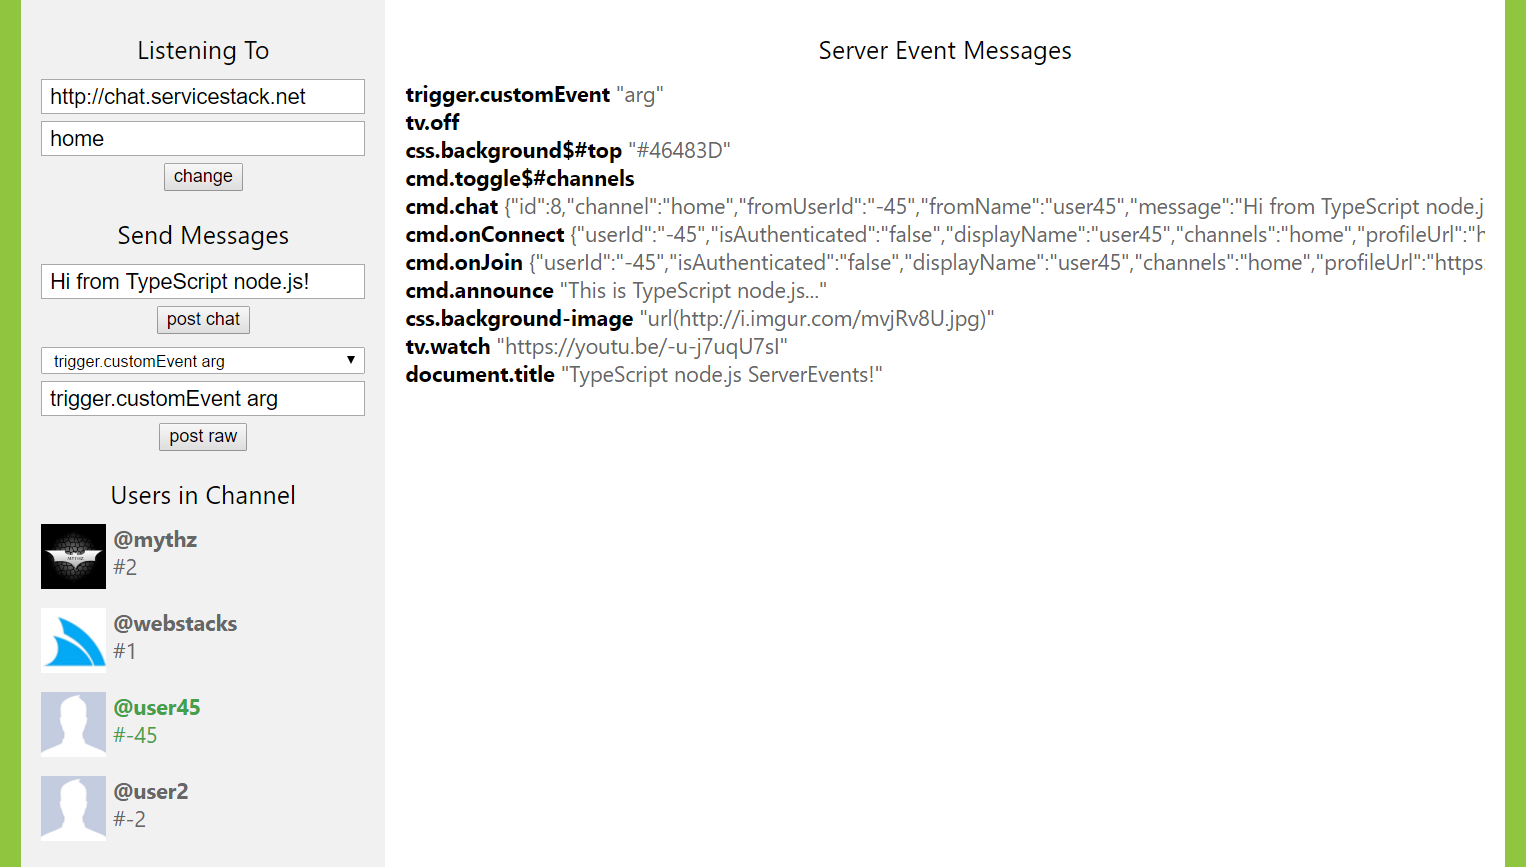
The /node server.js app has the same functionality as the Web App except instead of connecting to the chat.servicestack.net Events stream on the client, all connections are made in node.js and its only the server state that's sent to the client which uses it to render the UI.
As the functionality of the app remains the same we're able to reuse the existing DTOs, .html and .css from the Web App:
The difference is in the App's logic which is now split into 2 files with the node.js server.ts now
containing most of the App's functionality whilst the app.ts relegated to periodically updating the UI
with the node.js server state:
- server.ts - maintain all client and server events connection to chat.servicestack.net
- app.ts - periodically render node.js state to HTML UI
As our goal is to maintain the minimal dependencies in each App, the implementation of server.ts is
written against node.js's bare-bones http.createServer() directly without utilizing any external web
framework which makes the implementation more verbose but also easier to understand as it's not relying
on any hidden functionality contained in a 3rd Party server web framework.
A change we need to make given our App is now running in node.js instead of a browser is to import the
pure JavaScript eventsource polyfill to provide an EventSource implementation in node.js which we can import in the global scope in TypeScript with:
declare var global:any;
global.EventSource = require('eventsource');Whilst the environment is different the Server Events configuration remains mostly the same, but instead of
retrieving the connection info from Text boxes in a Web Page, it's instead retrieved from the queryString
passed when the client App calls the /listen handler, e.g:
"/listen": (req,res) => {
    const qs = url.parse(req.url, true).query;
    if (client) {
        client.stop();
        client = null;
    }
    BASEURL = qs["baseUrl"];
    CHANNEL = qs["channel"];
    console.log(`Connecting to ${BASEURL} #${CHANNEL}...`);
    client = new ServerEventsClient(BASEURL, [CHANNEL], {
        handlers: {
            onConnect: (e:ServerEventConnect) => {
                refresh(sub = e);
            },
            onJoin: refresh,
            onLeave: refresh,
            onUpdate: refresh,
            onMessage: (e:ServerEventMessage) => {
                addMessage(e);
            }
        },
        onException: e => {
            addMessageHtml(`<div class="error">${e.message || e}</div>`);
        }
    }).start();
    res.end();
},The handler implementations are more or less the same as the Web App albeit a bit simpler as it just needs to capture the Server Event messages without needing to concern itself with updating the UI:
var MESSAGES = [];
var USERS = [];

const refresh = (e:ServerEventMessage) => {
    addMessage(e);
    refreshUsers();
};
const refreshUsers = async () => {
    var users = await client.getChannelSubscribers();
    users.sort((x,y) => y.userId.localeCompare(x.userId));
    USERS = users.map(x => ({
        profileUrl: x.profileUrl,
        displayName: x.displayName,
        userId: x.userId
    }));
};
const addMessage = (x:ServerEventMessage) =>
    addMessageHtml(`<div><b>${x.selector}</b> <span class="json" title=${x.json}>${x.json}</span></div>`);
const addMessageHtml = (html:string) =>
    (MESSAGES[CHANNEL] || (MESSAGES[CHANNEL] = [])).push(html);
Syncing and rendering the UI is now the primary job of our clients app.ts which just polls the servers
/state every 100ms and inject it into the HTML UI:
const syncState = () => {
    client.get<any>("/state").then(state => {
        var html = state.users.map(x =>
            `<div class="${x.userId == state.sub.userId ? 'me' : ''}">
                <img src="${x.profileUrl}" /><b>@${x.displayName}</b><i>#${x.userId}</i><br/>
            </div>`);
        $users.innerHTML = html.join('');
        $msgs.innerHTML = state.messages.reverse().join('');
    });
};

setInterval(syncState, 100);
The /state handler just dumps our internal node.js state and collections to JSON:
"/state": (req, res) => {
    var state = {
        baseUrl: BASEURL,
        channel: CHANNEL,
        sub,
        messages: (MESSAGES[CHANNEL] || ['<div class="error">NOT CONNECTED</div>']),
        users: USERS
    };
    res.writeHead(200, { "Content-Type": "application/json" });
    res.end(JSON.stringify(state));
},As we can expect, making Typed API calls in node.js is the same as in a browser except the user data comes from a queryString instead of HTML Text INPUT fields:
"/chat": (req,res) => {
    const qs = url.parse(req.url, true).query;
    let request = new PostChatToChannel();
    request.from = sub.id;
    request.channel = CHANNEL;
    request.selector = "cmd.chat";
    request.message = qs["message"];
    client.serviceClient.post(request);
    res.end();
},
Back in our client app.ts, the event handlers remain exactly the same, the difference is in sendChat() implementation where instead of sending the Chat message itself, it tells the node server.ts to do it
by calling the local /chat service:
const sendChat = () => client.get("/chat", { message: $("#txtChat").value });

$("#btnSendChat").onclick = sendChat;
$("#txtChat").onkeydown = e => e.keyCode == 13 ? sendChat() : null;To run our node app we need to launch the compiled server.js App with:
cd node
node server.js
Which launches our node.js HTTP Server at http://localhost:8080/.
Since there's now a client and server component, we still need to run Babel to monitor our app.ts source
file for changes to regenerate the App's /dist/bundle.js:
npm run watch
But if we've made a change to server.ts we need to compile it by running:
tsc
Then we can re-run our server to see our changes:
node server.js
Arguably the most exciting platform you can build with JavaScript in recent times is Facebook's React Native where you can take advantage of React to develop Native iOS and Android Mobile Apps with Web App productivity. Thanks to Facebook's relentless focus on developer tooling and productivity, building rich native iOS and Android UI's can now be done at record speed in a fast iterative workflow with UI changes visible instantly.
The React Native Getting Started Guide will get you up and running with everything you need to start building Native Mobile Apps which is also pre-configured with Babel so you can take advantage of advanced ES6 and ES7 language features. It's command-line based tooling lets you use your preferred IDE or text editor - my preference is VS Code which is light-weight, cross-platform whilst providing a rich authoring experience.
For our Example React Native App we've stuck with React Native default of using JavaScript instead of TypeScript but still enjoys the same simplified programming model and concrete Types that servicestack-client enables.
Facebook has put in a lot of effort so that Web Developers can reuse their existing knowledge to become productive in React Native, but ultimately it's still limited by the Mobile platform it's running on where instead of HTML Elements in JSX Views you'll use Native Widgets with stylability limited to what each individual Widget supports instead of the flexibility, applicability and rich queryability of CSS.
Other challenges for developing for smart phones is a much smaller screen resolution a touch-focused UI so many existing React Web Apps are going to require significant UI rework to be adapted to a React Native Mobile App but otherwise many non-UI components will continue to benefit from great code-reuse.
Unlike Web Apps which splits behavior, layout and styles across multiple .ts, .html and .css files,
React Apps can be built using just JavaScript as seen in the single index.ios.js which contains the
App's entire functionality, layout and style in <200 Lines of JavaScript:
- index.ios.js - The entire App including all behavior, layout and styles
- dtos.js - Server DTOs from chat.servicestack.net/types/typescript and compiled into .js using
tsc
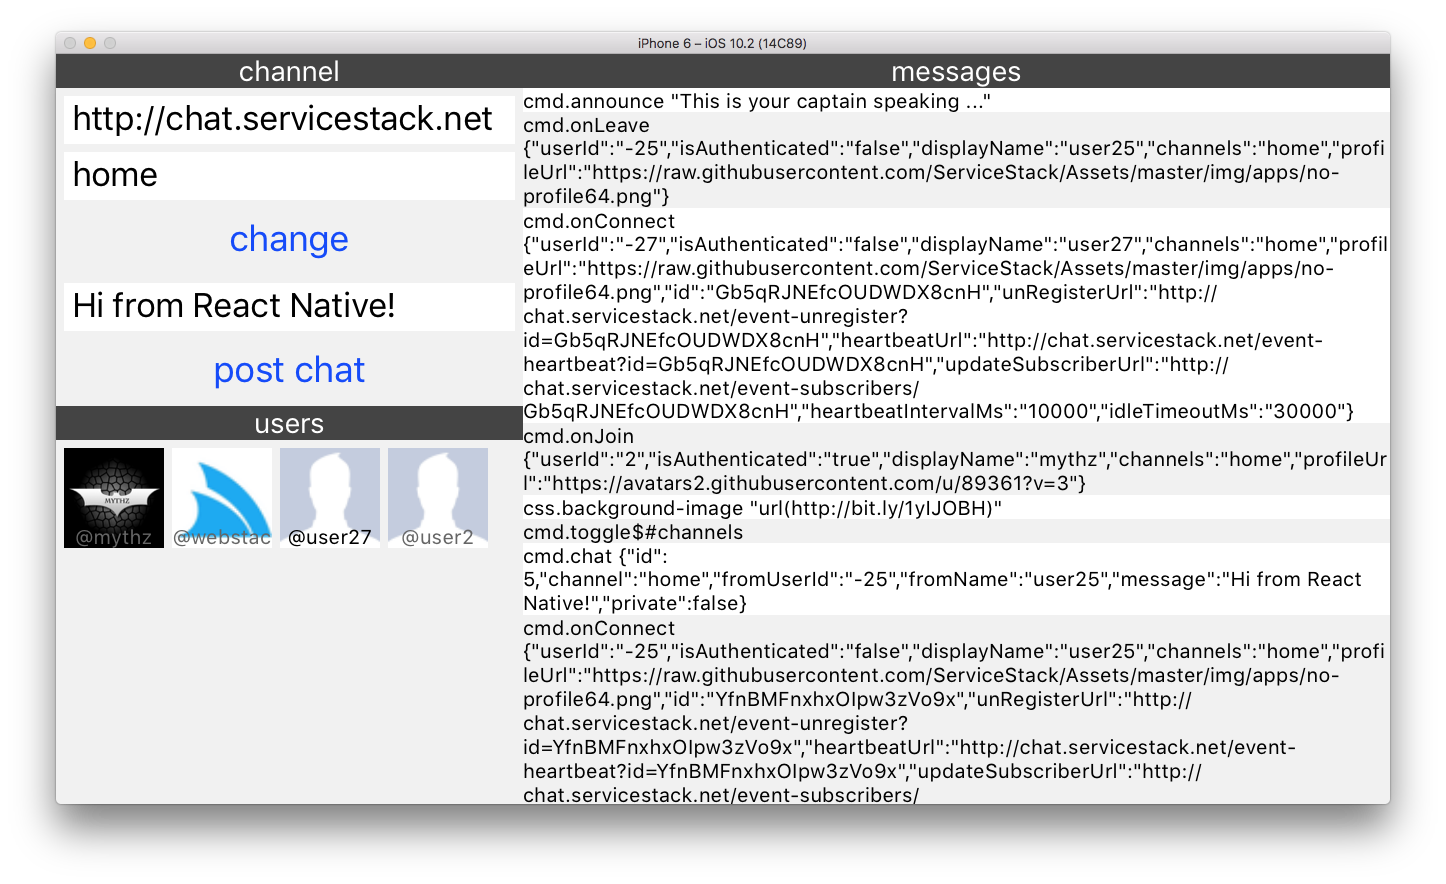
The smaller screen size means our React Native App adopts a more compact layout but otherwise retains similar functionality to the other Web Apps which looks like:
The W3C's EventSource doesn't exist in React Native and the
eventsource polyfill for node.js relies on core node.js dependencies which aren't available in React Native so we need to switch to one that does, luckily we can use the aptly named react-native-event-source for this.
Since it's faster, more reliable and predictable than npm, Facebook recommends using their own yarn package manager client which can be installed on each major Desktop OS. Once installed you can add npm packages with a simple:
yarn add react-native-event-source
Which is roughly equivalent to:
npm install react-native-event-source --save
Once installed it can be imported into the global scope with:
import EventSource from 'react-native-event-source';
global.EventSource = EventSource;The Server Events Configuration essentially remains the same, the primary differences are that it's defined inside a React Component so handlers are calling member methods and as it's using JavaScript all TypeScript Type annotations need to be removed:
startListening = () => {
    if (this.client)
      this.client.stop();

    console.log(`Listening on ${this.state.baseUrl}...`)
    this.client = new ServerEventsClient(this.state.baseUrl, [this.state.channel], {
      handlers: {
        onConnect: (e) => {
          e.heartbeatIntervalMs = 30000;
          this.refresh(this.sub = e);
        },
        onJoin: this.refresh,
        onLeave: this.refresh,
        onUpdate: this.refresh,
        onMessage: this.addMessage
      },
      onException: e => {
        console.log('onException', e);
        this.addMessageJsx(<Text style={styles.error}>{e.message || e + ""}</Text>);
      }
    }).start()
}
We've also extended the
heartbeatIntervalMsas thisEventSourceimplementation is based on XHR which in React Native terminates the XHR long-running connection to the Server Events/event-streamcausing it to auto-reconnect on each heartbeat. We'll continue investigating to find a more suitableEventSourceimplementation for React Native.
Whilst the purpose of the handlers remain the same, we start to see the implementation diverge in React Native where instead of HTML we're adding JSX and instead of Arrays our state is maintained in the React Component's state where it can automatically trigger re-rendering of the UI on each state change.
refresh = (e) => {
  console.log(e.cmd);
  this.addMessage(e);
  this.refreshUsers();
}

addMessage = (e) => {
  this.addMessageJsx(<Text style={styles.message}>{e.selector} {e.json}</Text>);
}

addMessageJsx = (jsx) => {
    var messages = this.state.messages;
    (messages[this.state.channel] || (messages[this.state.channel] = [])).push(jsx);
    this.setState({ messages, dataSource: ds.cloneWithRows(messages[this.state.channel]) })
}

refreshUsers = async () =>  {
  var users = await this.client.getChannelSubscribers();
  users.sort((x,y) => y.userId.localeCompare(x.userId));
  this.setState({
    users,
    dataSourceUsers: dsUsers.cloneWithRows(users)
  });
}
Given we're targeting resource-constrained mobile devices we've made some where channel messages are also being maintained in the ListViewDataSource below:
const ds = new ListView.DataSource({rowHasChanged: (r1, r2) => r1 !== r2});As it enables more efficient data processing and UI rendering of the messages ListView component.
Despite the React Native App being developed in JavaScript the syntax for making Typed API calls remains exactly the same for importing both the generic clients and servers typed DTOs.
Only one additional step is needed after importing the Servers TypeScript DTOs:
curl http://chat.servicestack.net/types/typescript > dtos.ts
Which is to compile it to JavaScript, done without any tsconfig by invoking the TypeScript compiler directly:
tsc dtos.ts
Now APIs can be consumed as normal by populating our Request DTO's and sending it using the generic JsonServiceClient:
import { ServerEventsClient } from 'servicestack-client';
import { PostChatToChannel } from './dtos';
sendChat = () => {
if (!this.state.txtChat || !this.sub)
return;
let request = new PostChatToChannel();
request.from = this.sub.id;
request.channel = this.state.channel;
request.selector = "cmd.chat";
request.message = this.state.txtChat;
this.client.serviceClient.post(request);
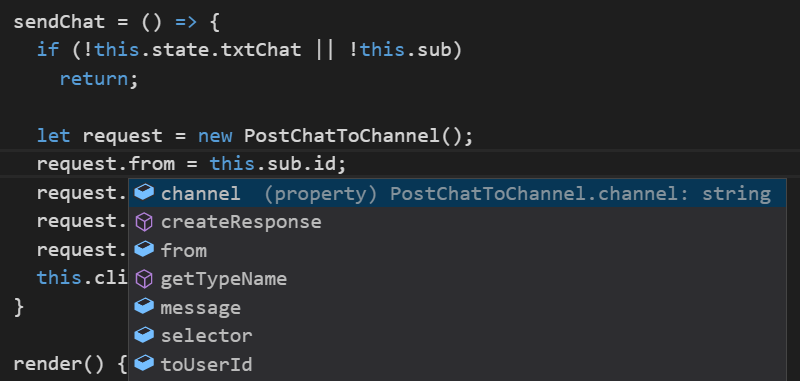
}In addition to 100% code reuse, we surprisingly also benefit from the original TypeScript definitions even in
plain JavaScript thanks to
VS Code's Salsa Engine
which provides the Language Services for both TypeScript and JavaScript source files in VS Code, so even
though there are no Type annotations in JavaScript it's still able to provide rich intelli-sense from the
original dtos.ts TypeScript sources:
Ctrl+Click on the Request DTO Type even navigates to the Type definition in dtos.ts despite none of the properties existing in the compiled
dtos.js
that's used at runtime.
Whilst the handler implementations differ slightly, the React Native UI needed to be completely rewritten
which now uses JSX Mobile Widgets instead of HTML/CSS that's now rendered in React-style instead of
jQuery-style UI binding where the entire UI is rendered in the App Component render() method.
Luckily React makes this both easy and highly functional, enabling the full power JavaScript's latest ES6/7 language features to create our View and seamlessly bind our Apps logic:
render() {
  var i = 0;
  return (
    <View style={{flex: 1, flexDirection: 'row'}}>
      <View style={{width: "35%", height: "100%", backgroundColor: '#f1f1f1', paddingTop: 0}}>
        <Text style={styles.h2}>channel</Text>
        <TextInput defaultValue={this.state.baseUrl} autoCapitalize="none" placeholder="{baseUrl}"
                   style={styles.textInput}
                   onChangeText={(baseUrl) => this.setState({ baseUrl })} />
        <TextInput defaultValue={this.state.channel} autoCapitalize="none" placeholder="{channel}"
                   style={styles.textInput}
                   onChangeText={(channel) => this.setState({ channel })} />
        <Button styles={styles.button} title="change" onPress={this.startListening} />
        <TextInput style={styles.textInput} defaultValue={this.state.txtChat} autoCapitalize="none"
                   onChangeText={txtChat => this.setState({ txtChat })} />
        <Button styles={styles.button} title="post chat" onPress={this.sendChat} />
        <Text style={styles.h2}>users</Text>
        <View style={{ flexDirection: 'row', flexWrap: 'wrap'  }}>
          {this.state.users.map(x =>
            (<Image key={x.userId} source={{ uri: x.profileUrl }} style={{ width: 50, height: 50,
                    marginTop:4, marginLeft:4 }}>
                <Text style={{color: (x.userId == (this.sub && this.sub.userId) ? '#000' : '#666'),
                  backgroundColor:'rgba(0,0,0,0)', marginTop:38, fontSize:10, textAlign:'center'}}>
                  @{x.displayName}
                </Text>
              </Image>)
          )}
        </View>
      </View>
      <View style={{width: "65%", height: "100%", backgroundColor: "#fff", paddingTop: 0}}>
        <Text style={styles.h2}>messages</Text>
        {(this.state.messages[this.state.channel] || []).length > 0
          ? (<ListView dataSource={this.state.dataSource} style={{ height: 100 }}
                        renderRow={x => <View style={i++ % 2 == 0 ? styles.row : styles.altRow}>{x}</View>} />)
          : null}
      </View>
    </View>
  );
}
The ultimate benefit of React still holds in React Native where it takes care of efficiently syncing your Component's state to its declarative UI leaving us to solely focus on how our App should look like for a given state whilst it transparently handles all the imperative mutations to transition the UI to each state.
To put the finishing touches on our App we need to give it some Style. Like React Web, styles are applied with a simple Object literal however styles in React Native are more limiting, they don't automatically cascade and there's fewer of them so you'll need to look at the avaialble Styles in each Element to find out which styles can be used.
However as they're Object literals that can be manipulated with JavaScript, there's several techniques and language features you can leverage to maintain and apply them. Styles can be applied in-line or in a separate StyleSheet, e.g:
const styles = StyleSheet.create({
  h2: {
    textAlign: "center",
    backgroundColor: "#444",
    color: "#fff",
  },
  button: {
    margin: 0,
    padding: 0,
  },
  textInput: {
    height: 24,
    backgroundColor: "white",
    margin: 4,
    marginBottom: 0,
    paddingLeft: 4
  },
  row: {
    backgroundColor: "#fff",
  },
  altRow: {
    backgroundColor: "#f1f1f1",
  },
  message: {
    fontSize: 10,
  },
  error: {
    fontSize: 10,
    color: "#f00"
  }
});You'll be using the react-native-cli command-line interface for running most tasks in React Native including Creating your React Native project and then running it, e.g:
react-native init AwesomeProject
cd AwesomeProject
react-native run-ios
After your project is created run react-native run-ios to launch it in the iOS Simulator. This takes
a while to first startup but after it's running you can make fast, iterative changes by saving then clicking
Command⌘ + R to instantly reload your App. This productive workflow is a joy and the fastest way I've
seen to rapidly develop Mobile UI's in a live running iOS App.
Debugging is also available by pressing Command⌘ + D in the iOS Simulator to bring up the Debug menu and
then clicking on the Debug JS Remotely menu item to open a debugging session in Chrome's Web Inspector
for a rich debugging experience. Interestingly when your App runs in iOS it uses Safari's JavaScriptCore
VM but when debugging in Chrome it uses V8 to run all JavaScript code and
communicate back to your iOS App via Web Sockets. The different environments can cause some discrepencies
like our EventSource connection which uses the XMLHTTPRequest implementation in Chrome which doesn't
have the heartbeat disconnection issues that the XMLHTTPRequest implementation in iOS has.
We hope you've found these Example App's useful, for more info on features available in servicestack-client checkout: