Faces have always intringued me. From reading Paul Ekman's 'Unmasking the face' to staring at my opponent's face across the ring unable to decide if he is really going to throw that punch, it is always exciting. After joining a 'Computational Machine Learning' course at 'Indian Institute of Science' we decided to go work on faces.
Facial keypoint recognition is not new and has been implemented before. I found an implementation in Lasagne by Daniel Nouri (http://danielnouri.org/notes/2014/12/17/using-convolutional-neural-nets-to-detect-facial-keypoints-tutorial/). I found the notes extremely helpful and used similiar ideas while implementing in keras (tensor flow).
Prerequisites
Data : Loading and Normalization.
First model : A Dense network with single hidden layer.
Testing a generated Model.
Second model : Using CNN's
Data Augmentation to improve training accuracy.
Changing learning rate and momentum over time
Using Dropout while training.
Third Model : Ensemble Learning with specialists for each feature.
Supervised pre-training
Conclusion
- Download the files from https://www.kaggle.com/c/facial-keypoints-detection/data. Copy the files to the 'data folder' before running any of the training code.
- Install python, numpy, matplotlib, pandas, keras and tensorflow.
- Install 'pydot' to visualize models from keras.
pip3 install pydot
- 'pydot' requires a system level installation of 'GraphViz'.
brew install Graphviz
The training dataset consists of 7,049 96x96 gray-scale images. The model is supposed learn to find the correct position (the x and y coordinates) of 15 keypoints, such as left_eye_center, right_eye_outer_corner, mouth_center_bottom_lip etc.... For some of the keypoints we only have about 2,000 labels, while other keypoints have more than 7,000 labels available for training.
The column containing the image pixels is reshaped into a 2D matrix. 1 refers to number of channels. Since this is a grey scale image its 1.
X = X.reshape(-1, 96, 96, 1)First Model : A Single Hidden Layer
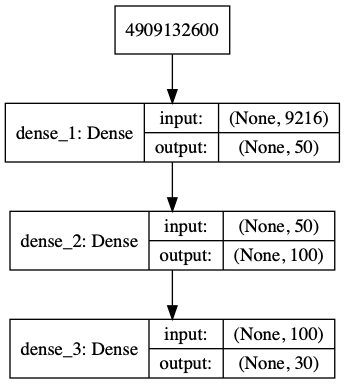
A model with the below configuration was used:
While training the output looks like this:
Epoch 395/400
1712/1712 [==============================] - 1s 416us/step - loss: 7.1303e-04 - get_categorical_accuracy_keras: 0.8037 - val_loss: 0.0030 - val_get_categorical_accuracy_keras: 0.7079
Epoch 396/400
1712/1712 [==============================] - 1s 432us/step - loss: 7.1268e-04 - get_categorical_accuracy_keras: 0.8072 - val_loss: 0.0030 - val_get_categorical_accuracy_keras: 0.7079
Epoch 397/400
1712/1712 [==============================] - 1s 433us/step - loss: 7.0165e-04 - get_categorical_accuracy_keras: 0.8096 - val_loss: 0.0031 - val_get_categorical_accuracy_keras: 0.7056
Epoch 398/400
1712/1712 [==============================] - 1s 429us/step - loss: 7.3057e-04 - get_categorical_accuracy_keras: 0.8078 - val_loss: 0.0030 - val_get_categorical_accuracy_keras: 0.7079
Epoch 399/400
1712/1712 [==============================] - 1s 427us/step - loss: 7.0383e-04 - get_categorical_accuracy_keras: 0.8160 - val_loss: 0.0030 - val_get_categorical_accuracy_keras: 0.7220
Epoch 400/400
1712/1712 [==============================] - 1s 436us/step - loss: 7.1510e-04 - get_categorical_accuracy_keras: 0.8078 - val_loss: 0.0030 - val_get_categorical_accuracy_keras: 0.7196
2140/2140 [==============================] - 0s 136us/step
-
Decision on number of layers and neurons : This dessertation by Jeff Heaton was used as a recommendation for the number of neurons and layers.
-
Initial attempt with an Adam optimizer and a learning rate of .1 resulted in an exploding gradients problem. The training converged after reducing the learnign rate to .01 and using 'clipnorm' to control gradient clipping.
-
The 'accuracy' metric throws an error regarding dimension. Providing an implementation to circumvent the same.
The logs of the training are here

There is a small amount of overfitting, but it is not that bad. In particular, we don't see a point where the validation error gets worse again, thus 'Early stopping', would not be useful. Regularization was not used to control overfitting either.
Based on MSE loss(Test) of .0029712174083410857, we'll take the square root and multiply by 48 again (since we had normalized locations from [-1, 1])
>>> import numpy as np
>>> np.sqrt(.0029712174083410857)*48
2.61642597999979While loading the model a custom object with the custom accuracy function needs to be passed. Otherwise, a 'Undefined metric function' error is thrown.
model = load_model(MODEL_PATH, custom_objects={'get_categorical_accuracy_keras': get_categorical_accuracy_keras})The prediction yields decent results as seen below:

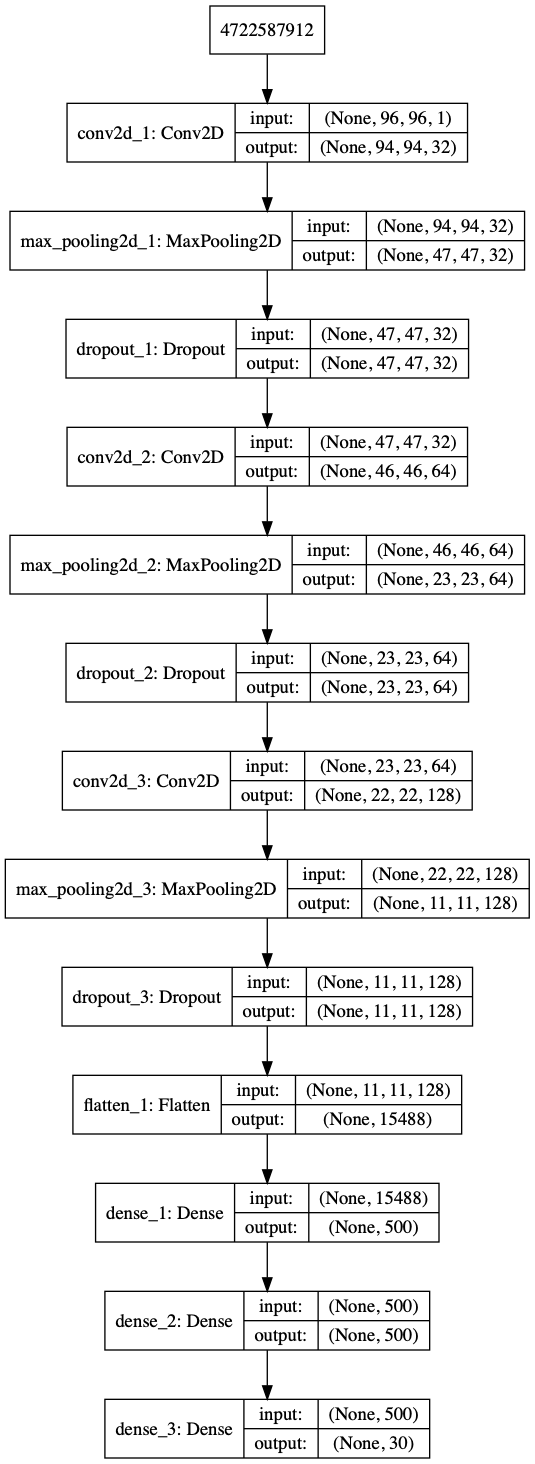
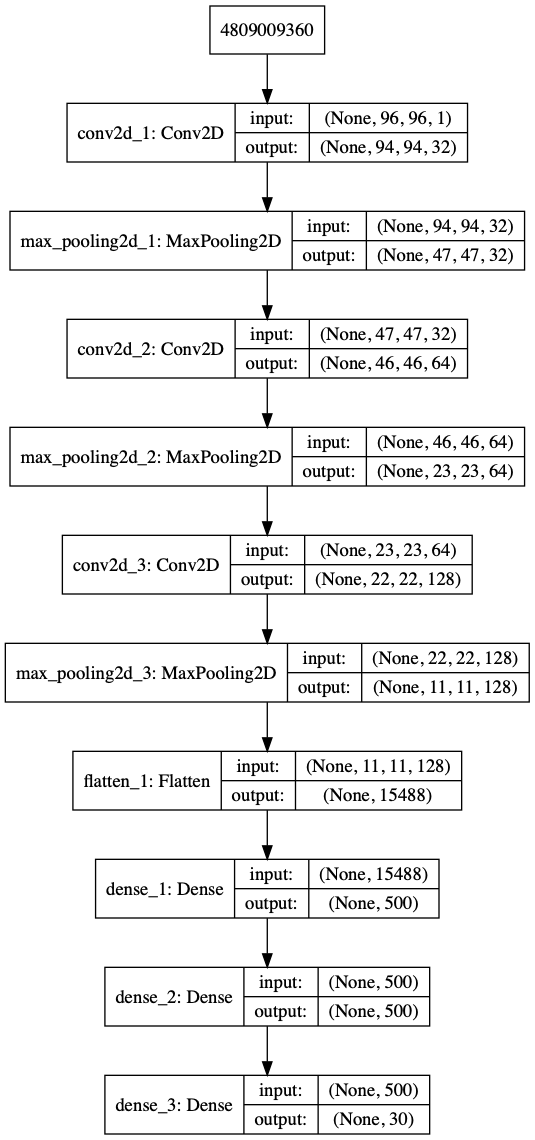
A model with the below configuration was used:
-
The input dimensions would match after setting 'data_format' to 'channels_last'. Also a flattening layer layer was required before the dense layers to keep the dimensions matched.
-
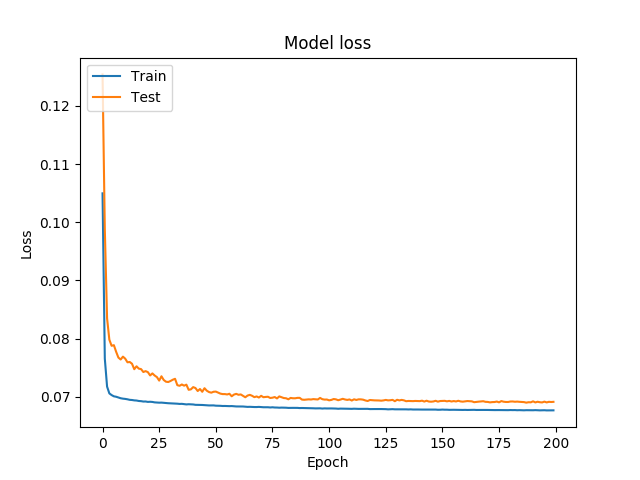
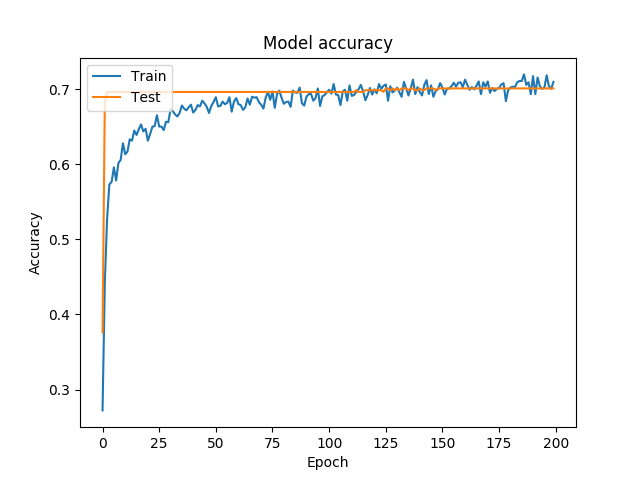
The training on a machine without a GPU took hours. The accuracy and gain did not improve by much after a few hundred epochs. Early stopping could be used.
The logs of the training are here
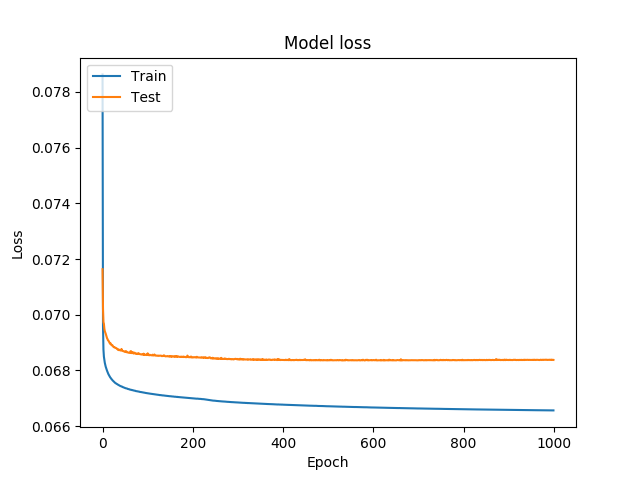
There is a small amount of overfitting, but it is not that bad. In particular, we don't see a point where the validation error gets worse again, thus 'Early stopping', would not be useful. Regularization was not used to control overfitting either.
>>> import numpy as np
>>> np.sqrt(.0029712174083410857)*48
2.61642597999979The loss of the model above is not low compared to the Dense Model. This can be attributed to a lot of rows with NA values being dropped. One way to get around this is to augment available data.
Here the images are flipped to increase the number of training data.
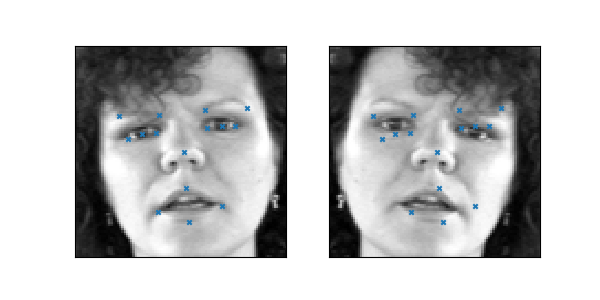
We can see that the target values also needs to be updated along with flipping the image.
Instead of training a single model, let's train a few specialists, with each one predicting a different set of target values. We'll train one model that only predicts left_eye_center and right_eye_center, one only for nose_tip and so on; overall, we'll have six models. This will allow us to use the full training dataset.
The six specialists are all going to use exactly the same network architecture. We will use 'Early stopping' since this training is going to take a while. Early stopping will be based on improvement(No improvement rather) in error. Additionally we will increase the momentum.
Both these involve callbacks during training.
history = model.fit(X, y, epochs=epochs, verbose=1, batch_size=batch_size, validation_split=.2, shuffle=True, callbacks=[csv_logger, checkpointer, update_momentum, early_stopping])

