This repository contains the code for the Squadcast Webhook Connectors and is intended to be used along with Webhooks V2. The repository supports :
- Slack
- Discord
- Trello
- Click Up
- Linear
- Telegram
- MatterMost
- Zulip
- Service Now
- git
- NodeJs | npm
- nodemon
bash dependencies.sh
Squadcast Webhook Connectors has authentication built-in. Users can choose between a user defined authKey or an automatically generated authKey.
-
User Defined authKey :- Inside the .env file, users need to define the
authKeyand change theuseAuthKeyvariable’s value to “yes”.
-
Auto generated authKey :- Once the Node Server is up and running, an
authKeywill be provided.
Note : Make sure that inside the .env file,
useAuthKeyvariable’s value is “no”
Users need to add authKey in the headers section of the Squadcast's Outgoing Webhooks. Eg. :

- Clone this repo
git clone https://github.com/highlyUnderrated/Squadcast-Webhook-Connectors- Install dependencies
npm install- Run
nodemon startURL : https://Server-IP-Address:5000/squadcast/connector/slack
Request Headers :-
- Slack URL can support multiple channels. To notify channels, just put integers as name of Key value pair & value should be the Slack Webhook. Eg. :

URL : https://Server-IP-Address:5000/squadcast/connector/discord
Request Headers :-
- Discord URL can support multiple channels. To notify channels, just put integers as name of Key value pair & value should be the Discord Webhook. Eg. :

URL : https://Server-IP-Address:5000/squadcast/connector/trello
Request Headers :-
-
To use the Trello webhook, just paste the URL mentioned above in Squadcast Webhook URl box. In the headers, just add "idList", "key" & "token" and their proper values. Eg. :

-
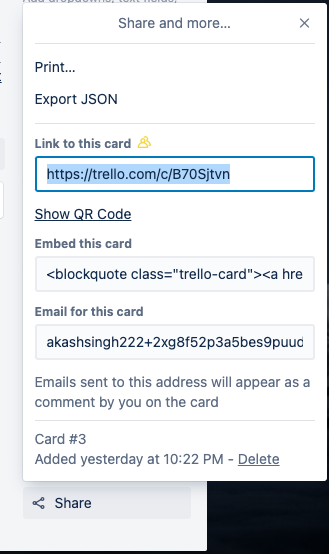
To see your idList, Open a card > Click on Share > Click on Export Json > You'll see a JSON which will contain idList.
-
Tip : To get you own token & key, navigate to : https://trello.com/app-key
URL : https://Server-IP-Address:5000/squadcast/connector/linear
Request Headers :-
-
Inside the .env file, users need to define the
linearAPIKeyand change theinitializeLinearClientvariable’s value to “yes”.
-
To use the Linear webhook, just paste the URL mentioned above in Squadcast Webhook URl box. Additionally, users can also define
priorityfor the issues. 1 is Urgent, 2 is High, 3 is Medium & 4 is Low. Eg. :
URL : https://Server-IP-Address:5000/squadcast/connector/mattermost
Steps :-
Important: Before starting, create your own MatterMost Incoming webhook. For that, navigate to Integrations > Incoming Webhooks > Add Incoming Webhook. Eg. :
- To notify a Channel, just paste the URL mentioned above in Squadcast Webhook URl box. In the headers, just add the Incoming Webhook as "webhook". Eg. :

URL : https://Server-IP-Address:5000/squadcast/connector/zulip
Steps :-
Important: Before starting, create your own Zulip Bot. Then add the bot in the respective organisation and Streams. Eg. :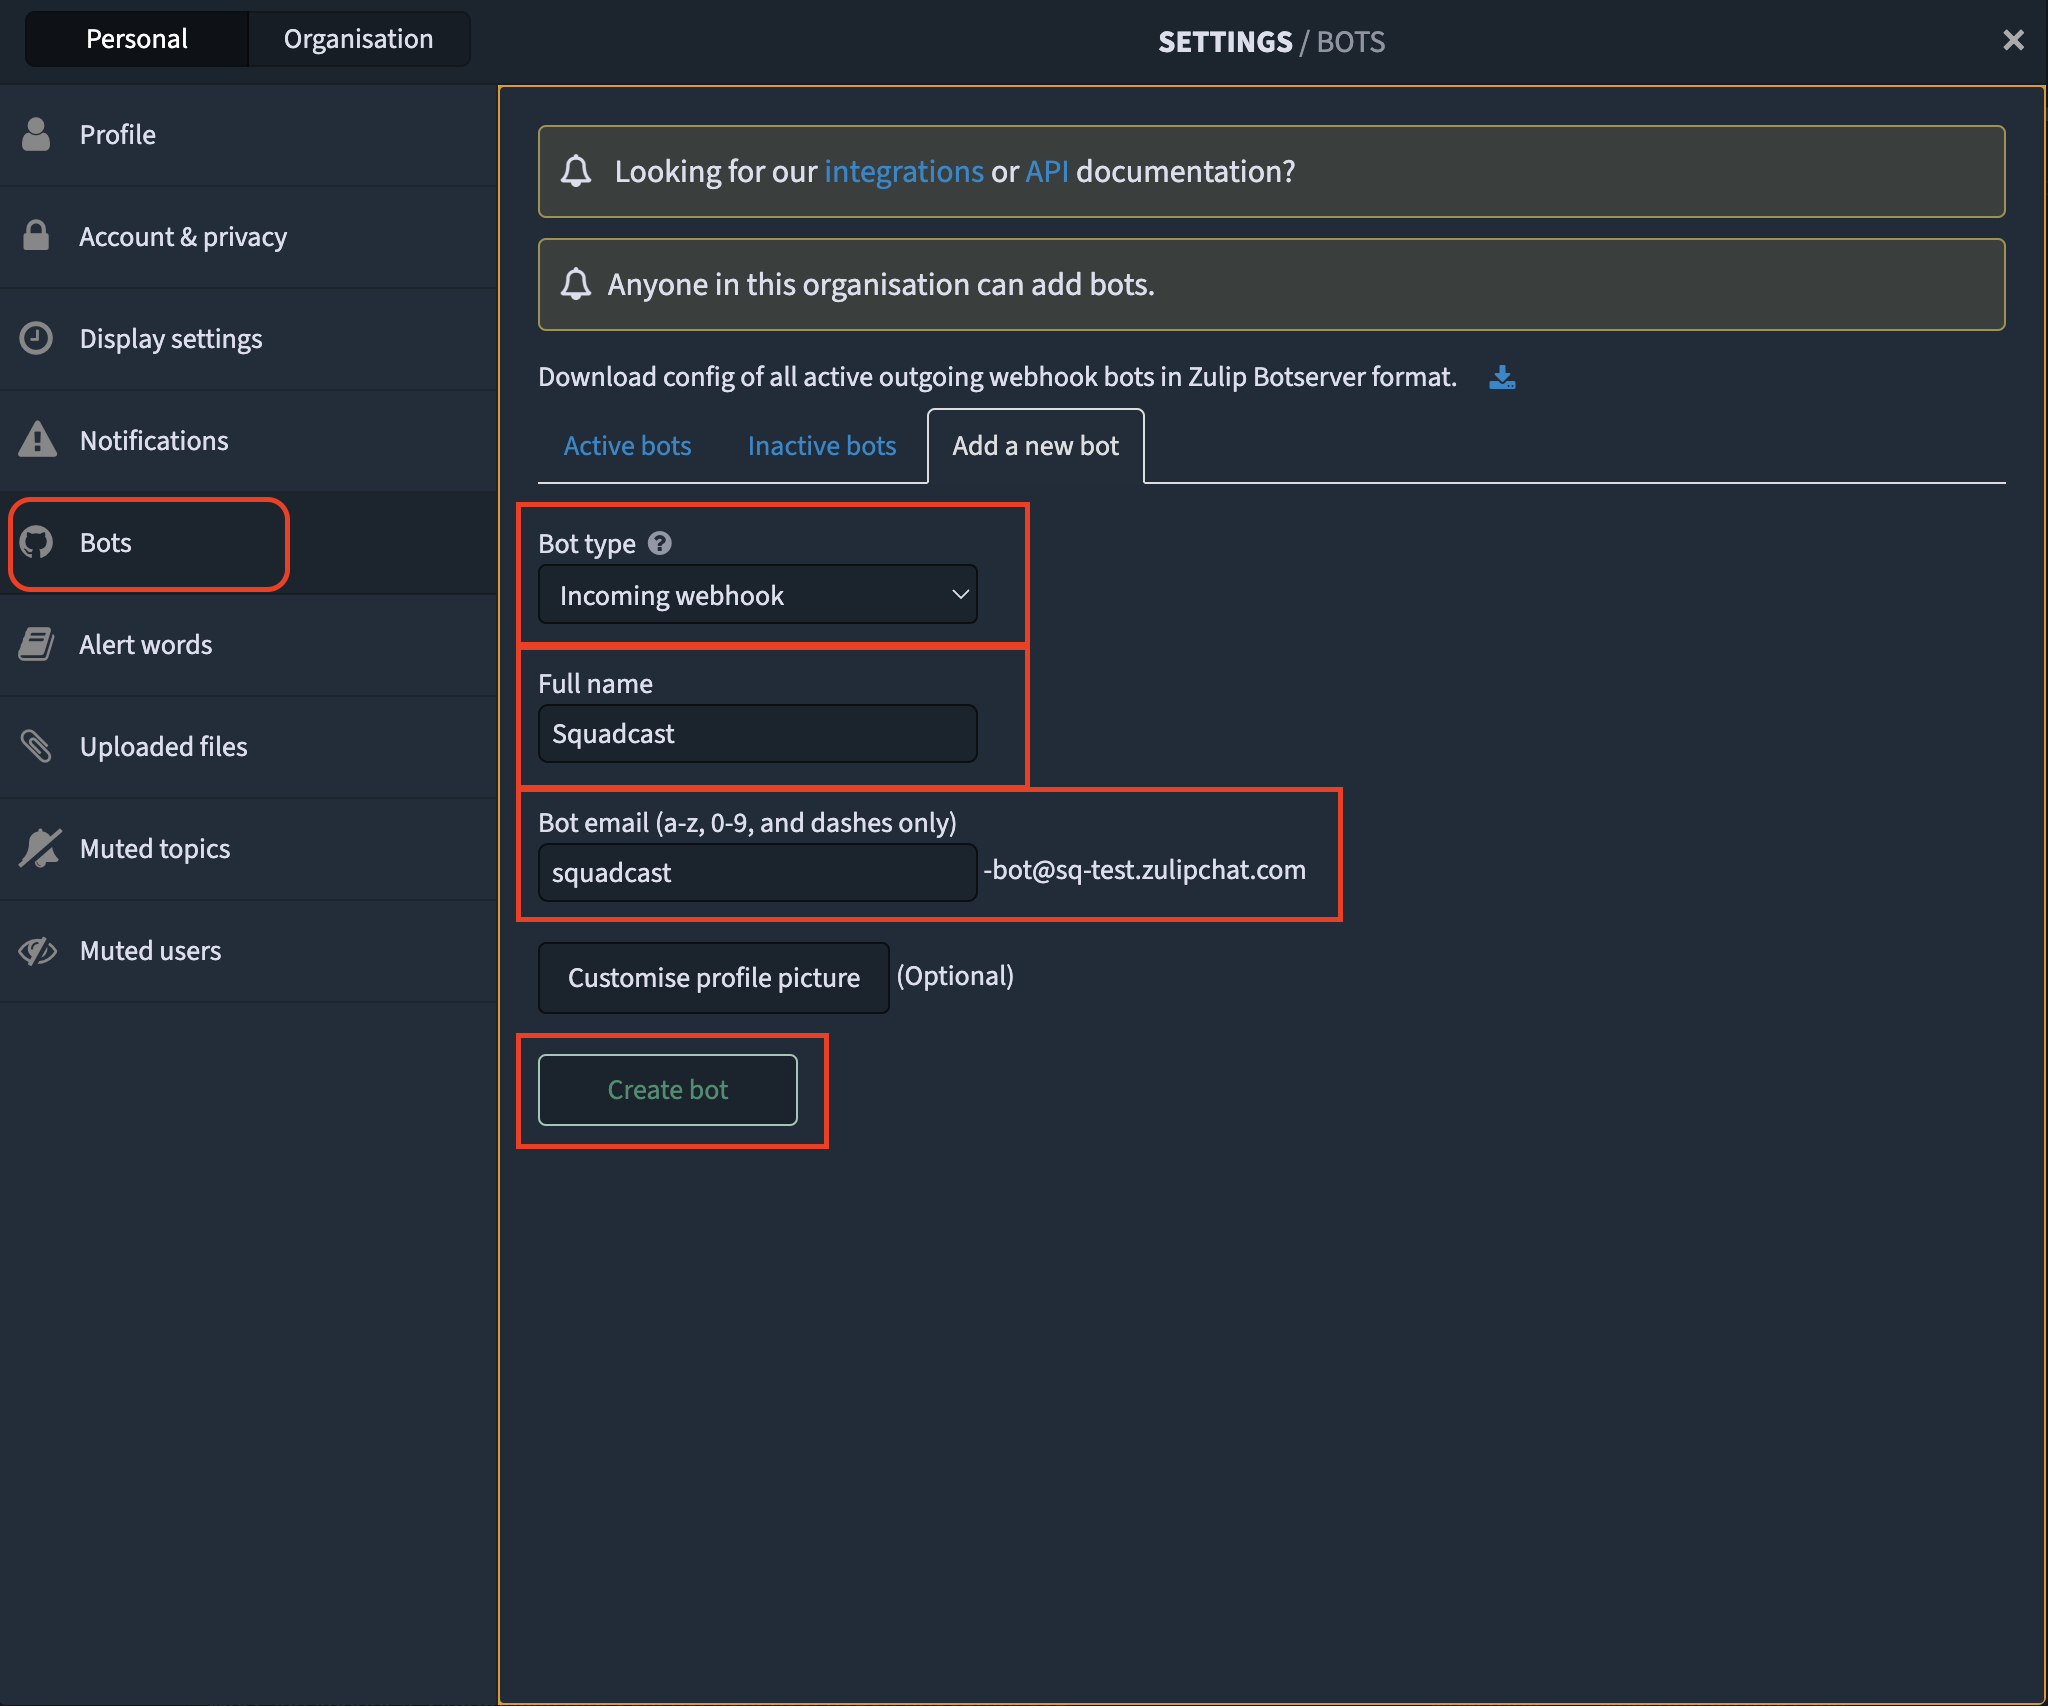
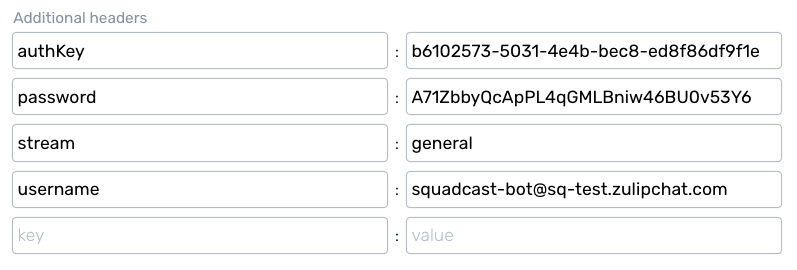
- To notify Stream and create a topic, just paste the URL mentioned above in Squadcast Webhook URl box. In the headers, just add the BOT EMAIL as "username", BOT API KEY as "password" & add the name of the STREAM as "stream". Eg. :
URL : https://Server-IP-Address:5000/squadcast/connector/servicenow
Request Headers :-
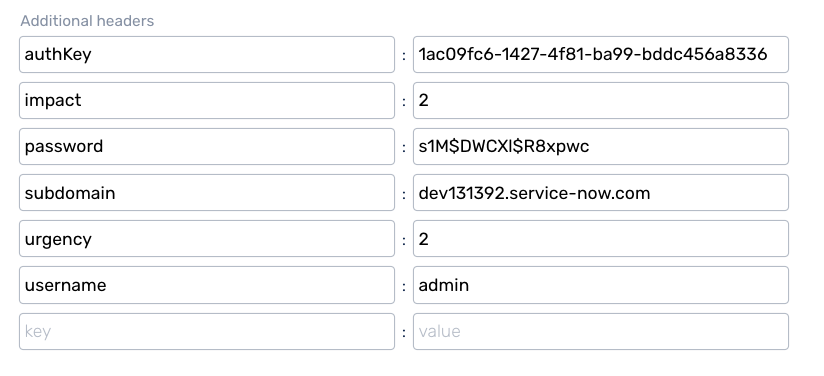
- To use the Service Now webhook, just paste the URL mentioned above in Squadcast Webhook URl box. In the headers, just add "subdomain", "urgency", "impact", "username" & "password" and their proper values. Eg. :
URL : https://Server-IP-Address:5000/squadcast/connector/telegram
Steps :-
Important: Before starting, create your own Telegram Bot : https://core.telegram.org/bots#6-botfather- Paste the Telegram Bot Token in the
telegram_bot_tokenin .env file. Also change thetelegram_bot_startvariable's value to "yes". Eg. :
- Now you can start the server, Refer Getting Started - Step 3.
- To use the Telegram webhook, just paste the URL mentioned above in Squadcast Webhook URl box. In the headers, just add "chatId" and its proper value. Eg. :

- Tip : To get you own chatId, follow this article : https://www.alphr.com/find-chat-id-telegram/
URL : https://Server-IP-Address:5000/squadcast/connector/clickup
Request Headers :-
- To use the Click Up webhook, just paste the URL mentioned above in Squadcast Webhook URl box. In the headers, just add "listId", "token" & "priority" and their proper values. Eg. :

Important: Priority is a number that corresponds to the Priorities available in the ClickUp UI. As in the ClickUp UI, priorities cannot be customized.1 is Urgent, 2 is High, 3 is Normal & 4 is Low.- Tip : To get your own Access Token & listId, refer https://jsapi.apiary.io/apis/clickup20/introduction/authentication.html
URL : https://Server-IP-Address:5000/squadcast/connector/email
Request Headers :-
- To use the email webhook, just paste the URL mentioned above in Squadcast Webhook URl box. In the headers, just add "from_email", "from_password", "to_email" & "SMTP" and their proper values. Eg. :

List of SMTP Providers Supported : -
- Service names are case insensitive : "126" "163" "1und1" "AOL" "DebugMail" "DynectEmail" "FastMail" "GandiMail" "Gmail" "Godaddy" "GodaddyAsia" "GodaddyEurope" "hot.ee" "Hotmail" "iCloud" "mail.ee" "Mail.ru" "Maildev" "Mailgun" "Mailjet" "Mailosaur" "Mandrill" "Naver" "OpenMailBox" "Outlook365" "Postmark" "QQ" "QQex" "SendCloud" "SendGrid" "SendinBlue" "SendPulse" "SES" "SES-US-EAST-1" "SES-US-WEST-2" "SES-EU-WEST-1" "Sparkpost" "Yahoo" "Yandex" "Zoho" "qiye.aliyun"
URL : https://Server-IP-Address:5000/squadcast/connector/update-escalation/rapid7
Request Headers :-
-
Rapid7 InsightIDR URL supports Reassigning of an incident based on the Priority. In the headers, just add "region", "x-refresh-token", "x-api-key", "reassignId" & "reassignType" and their proper values. Eg. :
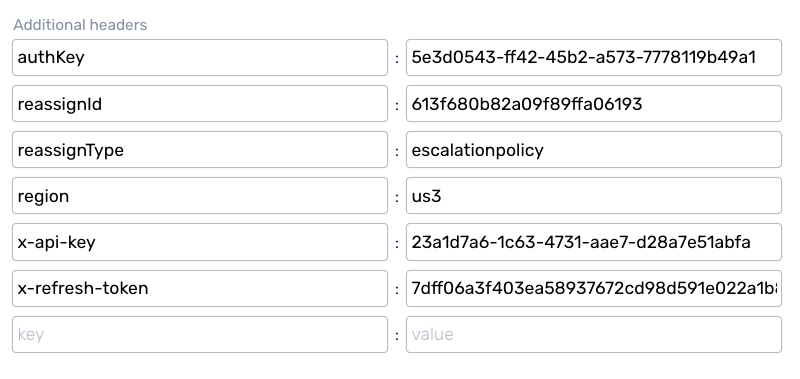
-
Tip : To get you own "x-api-key", go to Settings > API Keys > User Key > New User Key
URL : https://Server-IP-Address:5000/squadcast/connector/updatetag
Request Headers :-
