Disclaimer: LEGO® and Powered UP are trademarks of the LEGO Group of companies which does not sponsor, authorize or endorse this project.
EV3ForESP32 is an ESP32 Arduino libary for using both EV3 sensors and servo motors with an ESP32. The inital idea is to use it together with Legoino to build a custom Powered UP compatible hub which could reuse EV3 / NXT motors and sensors.
The basic work is done. Both motor control and sensor communication is implemented and tested. Both the IR sensor and the color sensor are tested.
The library is implemented for ESP32 boards. It may work with other Arduino compatible boards but currently relies on a FreeRTOS implementation to be present. Further hardware is required to drive motors and retrieve data from sensors. It is important to add the hardware because all sensors work at 5V but the ESP32 requires 3.3V at its inputs!
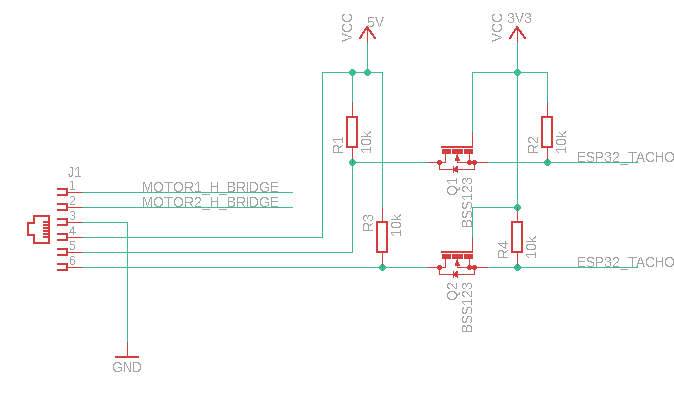
The level shifter to convert both quadrature encoder signals and uart communiction between 5V and 3V3 is a simple circuit using a mosfet (for prototypes you can use a 2N7000A) and two resistor per line.
For communication with NXT sensors remove the 10k pullups on the 5V side!
To drive the motors, I use a DRV8833 Dual H-Bridge Motor Driver (you can find simple boards for prototyping on the usual platforms). Its limits for both voltage and current are close to the ones for the EV3 motors, so its a perfect fit to drive two EV3 motors. But you can use any other motor driver.
You can connect both the inputs of the h-bridge and the 3V3 outputs of the level-shift circuit to any GPIO of the ESP32.
This project uses the PlatformIO platform to build and manage dependencies. Just get Visual Studio Code, install the PlatformIO extension and check out this project.
To use a motor simply create an instance of EV3RegulatedMotor with the GPIOs of the h-bridge and sensor.
EV3RegulatedMotor motor(ESP32_PWM1, ESP32_PWM2, ESP32_TACHO1, ESP32_TACHO2);In the setup() function just start the motor control
motor.start();Then you can simply set a direction and simple PWM value by using
void setPWM(boolean direction, uint8_t value);Or you can use the advanced features by retrieving the current positon or setting a target position the motor will head for using PID control. If the position control is not working, try to switch the PWM outputs (e.g. ESP32_PWM1, ESP32_PWM2).
 int64_t getPosition();
void setPosition(int64_t position);Lego has implemented a sumptuous protocol for the communication with the EV3 sensors. It consist of two phases. In the first phase the sensor introduces itself, all its supported modes, the target baudrate, the data format and so on, at a slow baudrate (2400 baud). After sensors self-introduction the host has to acknowledge the introduction and switch to the presented target baudrate. Then the host could finally switch the sensor to the desired mode and receive the data.
Fortunately some guys have decoded the protocol, so one can use the work from the leJOS Team and the documentation from EV3DEV.ORG to implement the communication.
For the whole implementation I used a callback-oriented architecture. The main class EV3SensorPort takes a Stream implementation (e.g HardwareSerial. The software serial implementation plerup/EspSoftwareSerial is working, too.) and a callback method to switch the baudrate of the Stream.
The begin method starts a new FreeRTOS task to start the self-introduction of the sensor. It takes one argument, a callback called after the introduction phase is finished and the the sensor is ready to receive the mode and deliver data. Using getCurrentConfig you can get all the information delivered by the sensor in the first phase. The type of sensor is the most interesting information (Color sensor = 29, IR Sensor = 33).
// SoftwareSerial swSer;
// EV3SensorPort sensor(&swSer, [](int v) { swSer.end(); swSer.begin(v, SWSERIAL_8N1, ESP32_TACHO2, ESP32_TACHO1); });
EV3SensorPort sensor(&Serial1, [](int v) { Serial1.begin(v, SERIAL_8N1, ESP32_TACHO2, ESP32_TACHO1); });

void setup() {
 sensor.begin([](EV3SensorPort *p) {
    Serial.print("Found sensor of type ");
    Serial.println(p->getCurrentConfig()->type, HEX);
  });
}
You can use methods like selectSensorMode to select one of the supported sensor modes and set a callback for new messages from the sensor using setMessageHandler.
The classes EV3ColorSensor and EV3IRSensor are thin wrappers around the EV3SensorPort providing a sensor specific API.
Currently there is support for the NXT Ultrasonic Sensor (distance sensor) and the HiTechnic IRLink sensor (enables to control LEGO Power Functions IR receiver).
The library uses the ESP32 Logging Library. Especially at verbose level, the library gives extensive information about the sensor configuration detected.
- Test the ultrasonic sensor
- Test the gyro sensor
- Add libraries for the ultrasonic and the gyro sensor
- Clean up code and add nice examples
WORK IN PROGRESS
