In case you want to deploy the below described lab on your local machine, then you need to make sure that the below tools/packages are installed:
- Docker Engine. The lab will be deployed as a Docker container, so a Docker engine is a must have. 😃 The easiest way is to install Docker Desktop :
- Git

- you can install Git Desktop on Mac/Windows
- on mac you can install the Git package via Brew:
brew install git
- Postman - or another API Client. Postman can be installed from here
- curl: typically already installed on your machine. You can check this with
curl --version
- Clone the API-Security GitHub repo and from within your terminal head into the api-security directory
git clone https://github.com/StevenDuckaert/api-security.git
- Pull the latest Kong image we will be using for the API Gateway
docker pull kong - To make image management easier, it is always recommended to tag the image. In the below command we tag the Kong image with kong-gw
docker image list | grep kongdocker tag <<id-from_the_above_output>> kong-gw - We'll create a Docker network to ensure all containers are provisioned into the same network
docker network create noname_default - Start a Cassandra container in the just created Docker network
docker run -d --name kong-db --network=noname_default -p 9042:9042 cassandra:3 - Once the Cassandra container is up - this typically takes less then 10 seconds, we will need to populate the DB
docker run --rm \ --network=noname_default \ -e "KONG_DATABASE=cassandra" \ -e "KONG_PG_HOST=kong-db" \ -e "KONG_PG_USER=kong" \ -e "KONG_PG_PASSWORD=kong" \ -e "KONG_CASSANDRA_CONTACT_POINTS=kong-db" \ kong-gw kong migrations bootstrap - You can now start the Kong Gateway
docker run -d --name kong \ --network=noname_default \ -e "KONG_DATABASE=cassandra" \ -e "KONG_PG_HOST=kong-db" \ -e "KONG_PG_USER=kong" \ -e "KONG_PG_PASSWORD=kong" \ -e "KONG_CASSANDRA_CONTACT_POINTS=kong-db" \ -e "KONG_PROXY_ACCESS_LOG=/dev/stdout" \ -e "KONG_ADMIN_ACCESS_LOG=/dev/stdout" \ -e "KONG_PROXY_ERROR_LOG=/dev/stderr" \ -e "KONG_ADMIN_ERROR_LOG=/dev/stderr" \ -e "KONG_ADMIN_LISTEN=0.0.0.0:8001, 0.0.0.0:8444 ssl" \ -e "KONG_PlUGINS=bundles" \ -p 8000:8000 \ -p 8443:8443 \ -p 8001:8001 \ -p 8444:8444 \ kong-gw - When the container is up, you can verify the Kong GW via:
curl -i -X GET --url http://127.0.0.1:8001/servicesThe output should be similar to:HTTP/1.1 200 OK Date: Wed, 14 Jul 2021 09:17:02 GMT Content-Type: application/json; charset=utf-8 Connection: keep-alive Access-Control-Allow-Origin: * Content-Length: 23 X-Kong-Admin-Latency: 224 Server: kong/2.5.0 {"next":null,"data":[]}%
There are several projects whereby you can quickly explore API vulnerabilities. The one I really like and which will be used in this lab is the VAmPI project. This is a vulnerable API made with Flask and it includes vulnerabilities from the OWASP top 10 vulnerabilities for APIs. It includes a switch on/off to allow the API to be vulnerable or not while testing. The image we will pull has the ON switch configured. You can find a bit more details about the vulnerabilities at erev0s.com.
Deploy the vulnerable API environment
docker run -d --name vulnerable_api --network noname_default -p 5000:5000 stevenduckaert/api-security:vulnerable
You can test the vulnerable api by hitting:
curl -i -X GET http://127.0.0.1:5000
-
Create a Kong service
curl -i -X POST http://127.0.0.1:8001/services \ --data name=lab-vampi \ --data url='http://host.docker.internal:5000' -
Verify the Kong Service connection
curl -i http://127.0.0.1:8001/services/lab-vampi -
Create a Kong route
curl -i -X POST http://127.0.0.1:8001/services/lab-vampi/routes \ --data 'paths[]=/v1' \ --data name=v1 -
We will define a rate limiting policy of 5 hits per minute
- Configure Rate Limiting
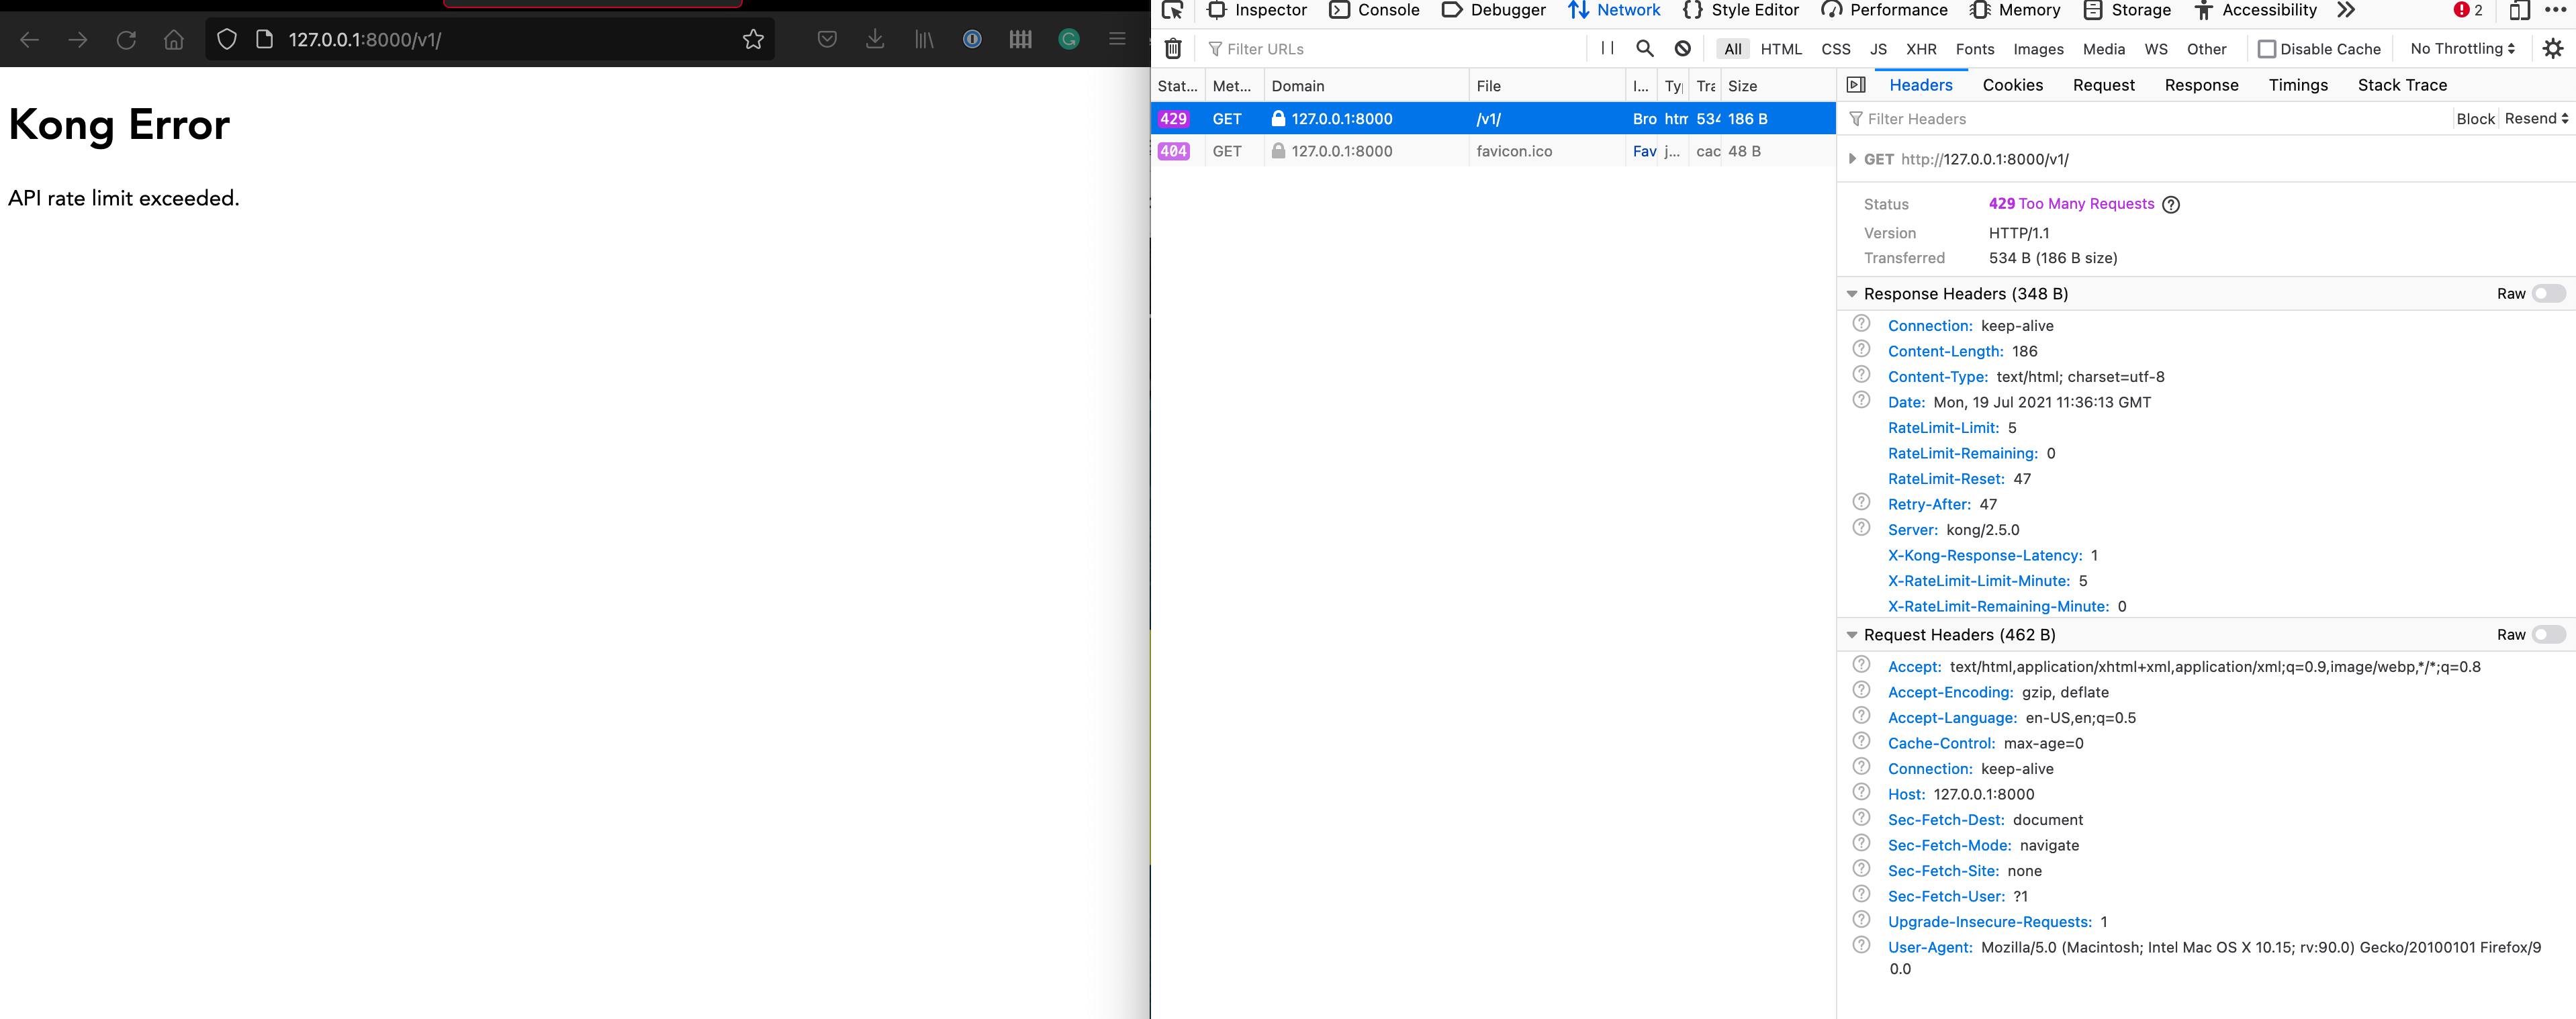
curl -i -X POST http://127.0.0.1:8001/plugins \ --data name=rate-limiting \ --data config.minute=5 \ --data config.policy=local - You can test the configured rate limiting for the v1 route by issuing:
after 5 times it should indicate that the API rate limit is reached. You should see something like:
curl -i -X GET http://127.0.0.1:8000/v1/HTTP/1.1 429 Too Many Requests Date: Wed, 14 Jul 2021 11:57:16 GMT Content-Type: application/json; charset=utf-8 Connection: keep-alive X-RateLimit-Limit-Minute: 5 RateLimit-Remaining: 0 RateLimit-Reset: 44 Retry-After: 44 RateLimit-Limit: 5 X-RateLimit-Remaining-Minute: 0 Content-Length: 41 X-Kong-Response-Latency: 5 Server: kong/2.5.0 "message":"API rate limit exceeded"
You can also check the API rate limit "result" from within your browser:
- You can show the service config by issuing
curl -i http://127.0.0.1:8001/services/lab-vampi
- Configure Rate Limiting
-
We will also configure authentication for the Kong v1 route
-
Enable Authentication on v1 route
curl -X POST http://127.0.0.1:8001/routes/v1/plugins --data name=key-auth -
You can try to access the route by issuing
curl -i http://127.0.0.1:8000/v1If all is well, then you should get a message stating that an API key was not found in the request.
"message":"No API key found in request" -
To solve this, we need to create a Kong API Consumer. In the below example we name the consumer consumer
curl -i -X POST http://127.0.0.1:8001/consumers/ \ --data username=consumer \ --data custom_id=consumer -
Create an API auth key for consumer named apikey
curl -i -X POST http:/127.0.0.1:8001/consumers/consumer/key-auth \ --data key=apikey -
You can validate the v1 route with the created consumer key (apikey)
curl -i http://127.0.0.1:8000/v1/ -H 'apikey:apikey' -
Optionally, you can disable authentication for route v1
- First you need to get UUID of the authentication plugin
curl -X GET http://127.0.0.1:8001/routes/v1/plugins/ - With the plugin UUID you can now issue:
curl -X PATCH http://127.0.0.1:8001/routes/v1/plugins/<<uuid>> --data enabled=false - Optionally, you can enable authentication for route v1
curl -X PATCH http://127.0.0.1:8001/routes/v1/plugins/<<uuid>> --data enabled=true
- First you need to get UUID of the authentication plugin
-

ℹ️ Note the difference when you hit the API via it's 'native' port 5000 vs hitting the same API via the Kong gateway (over port 8000)
❯ curl -i http://127.0.0.1:5000

HTTP/1.0 200 OK
Content-Type: application/json
Content-Length: 356
Server: Werkzeug/1.0.1 Python/3.9.6
Date: Wed, 14 Jul 2021 17:15:48 GMT

{ "message":...} %
❯ curl -i http://127.0.0.1:8000/v1/ -H 'apikey:apikey'
HTTP/1.1 200 OK
Content-Type: application/json
Content-Length: 356
Connection: keep-alive
RateLimit-Reset: 9
X-RateLimit-Remaining-Minute: 3
X-RateLimit-Limit-Minute: 5
RateLimit-Remaining: 3
RateLimit-Limit: 5
Server: Werkzeug/1.0.1 Python/3.9.6
Date: Wed, 14 Jul 2021 17:15:52 GMT
X-Kong-Upstream-Latency: 6
X-Kong-Proxy-Latency: 16
Via: kong/2.5.0

{ "message": ... } %
To be added
The postman collection file contains all the requests needed to 'play' with your vunerable API environment. Just go to the import option and select the .json file:


Steps to reproduce:
- Open the Postman collection and head to the folder -Step_by_step-BOLA
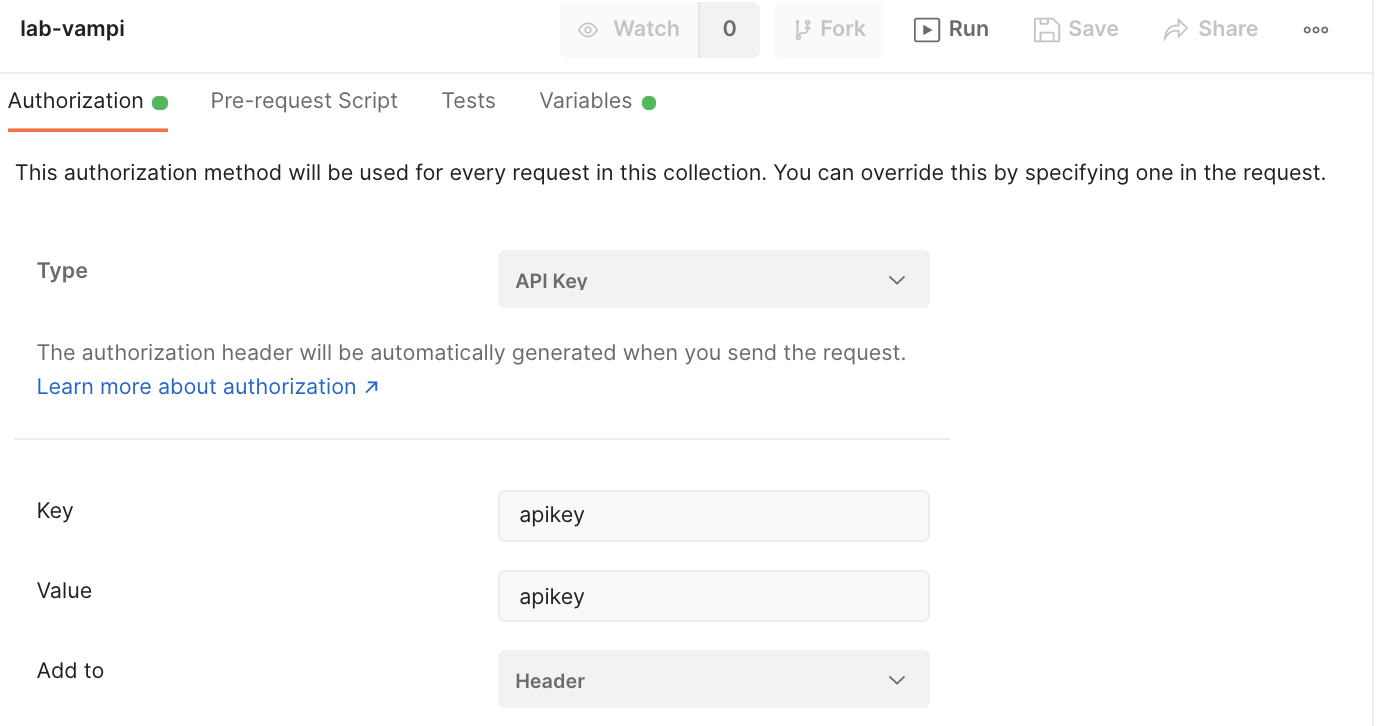
- You will notice that some of the APIs have the Inherit auth from parent set. You can check the config of the "parent auth" here:
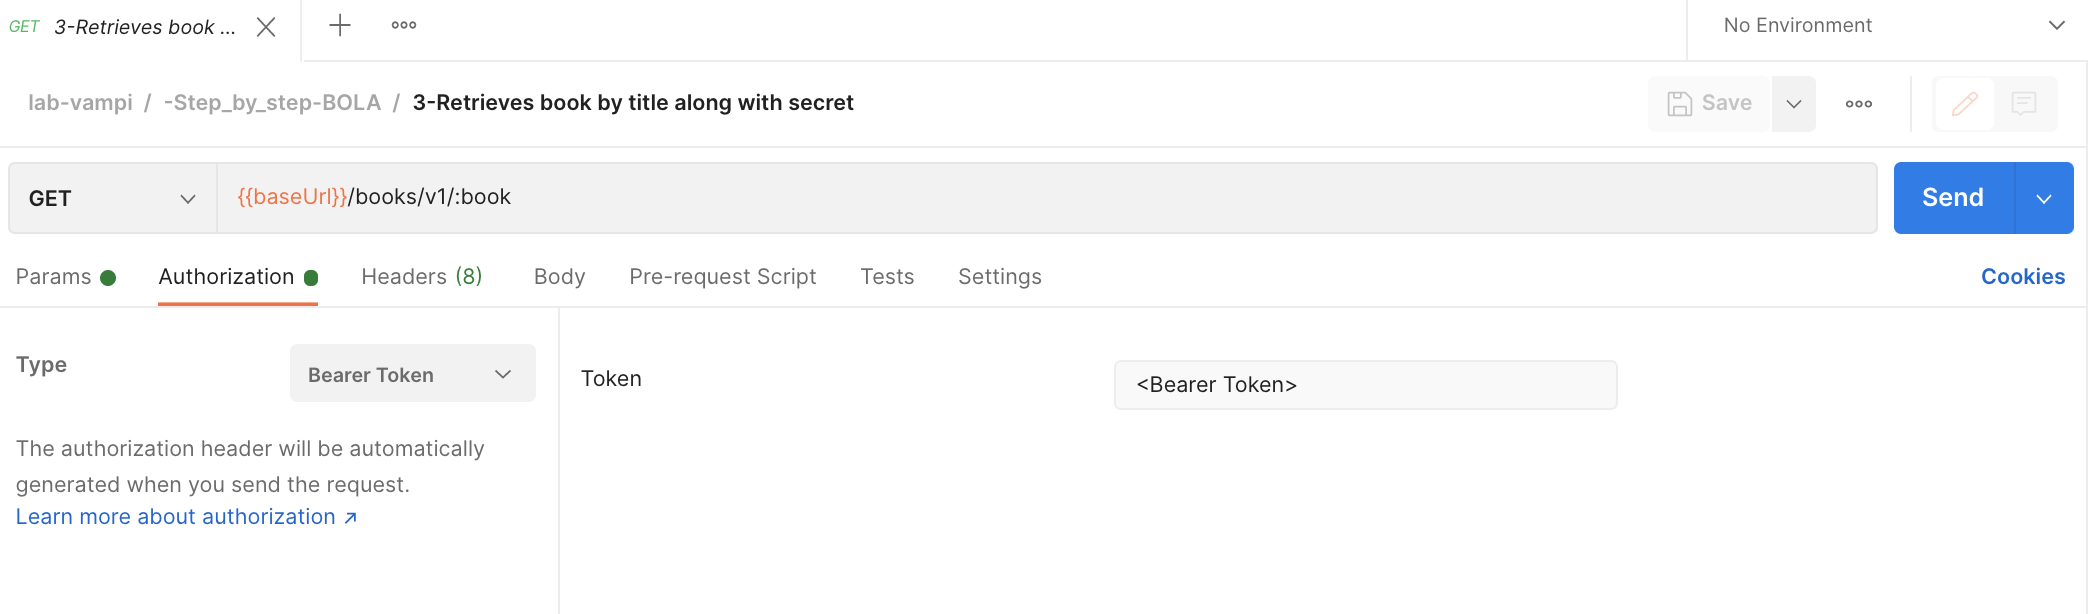
- Some APIs will have the Bearer Token Auth Type. It will be clear why this is set like this later on.
- the
{{baseUrl}}is configured to point to your Kong gateway & route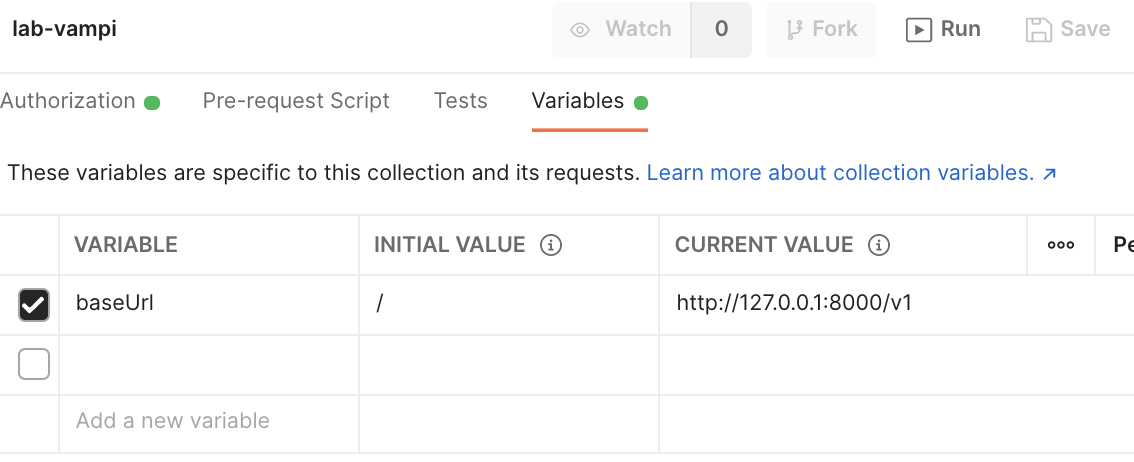
- You will notice that some of the APIs have the Inherit auth from parent set. You can check the config of the "parent auth" here:
- Hit the GET
{{baseUrl}}/endpoint which you can find in the request named0-Vulernable API - Home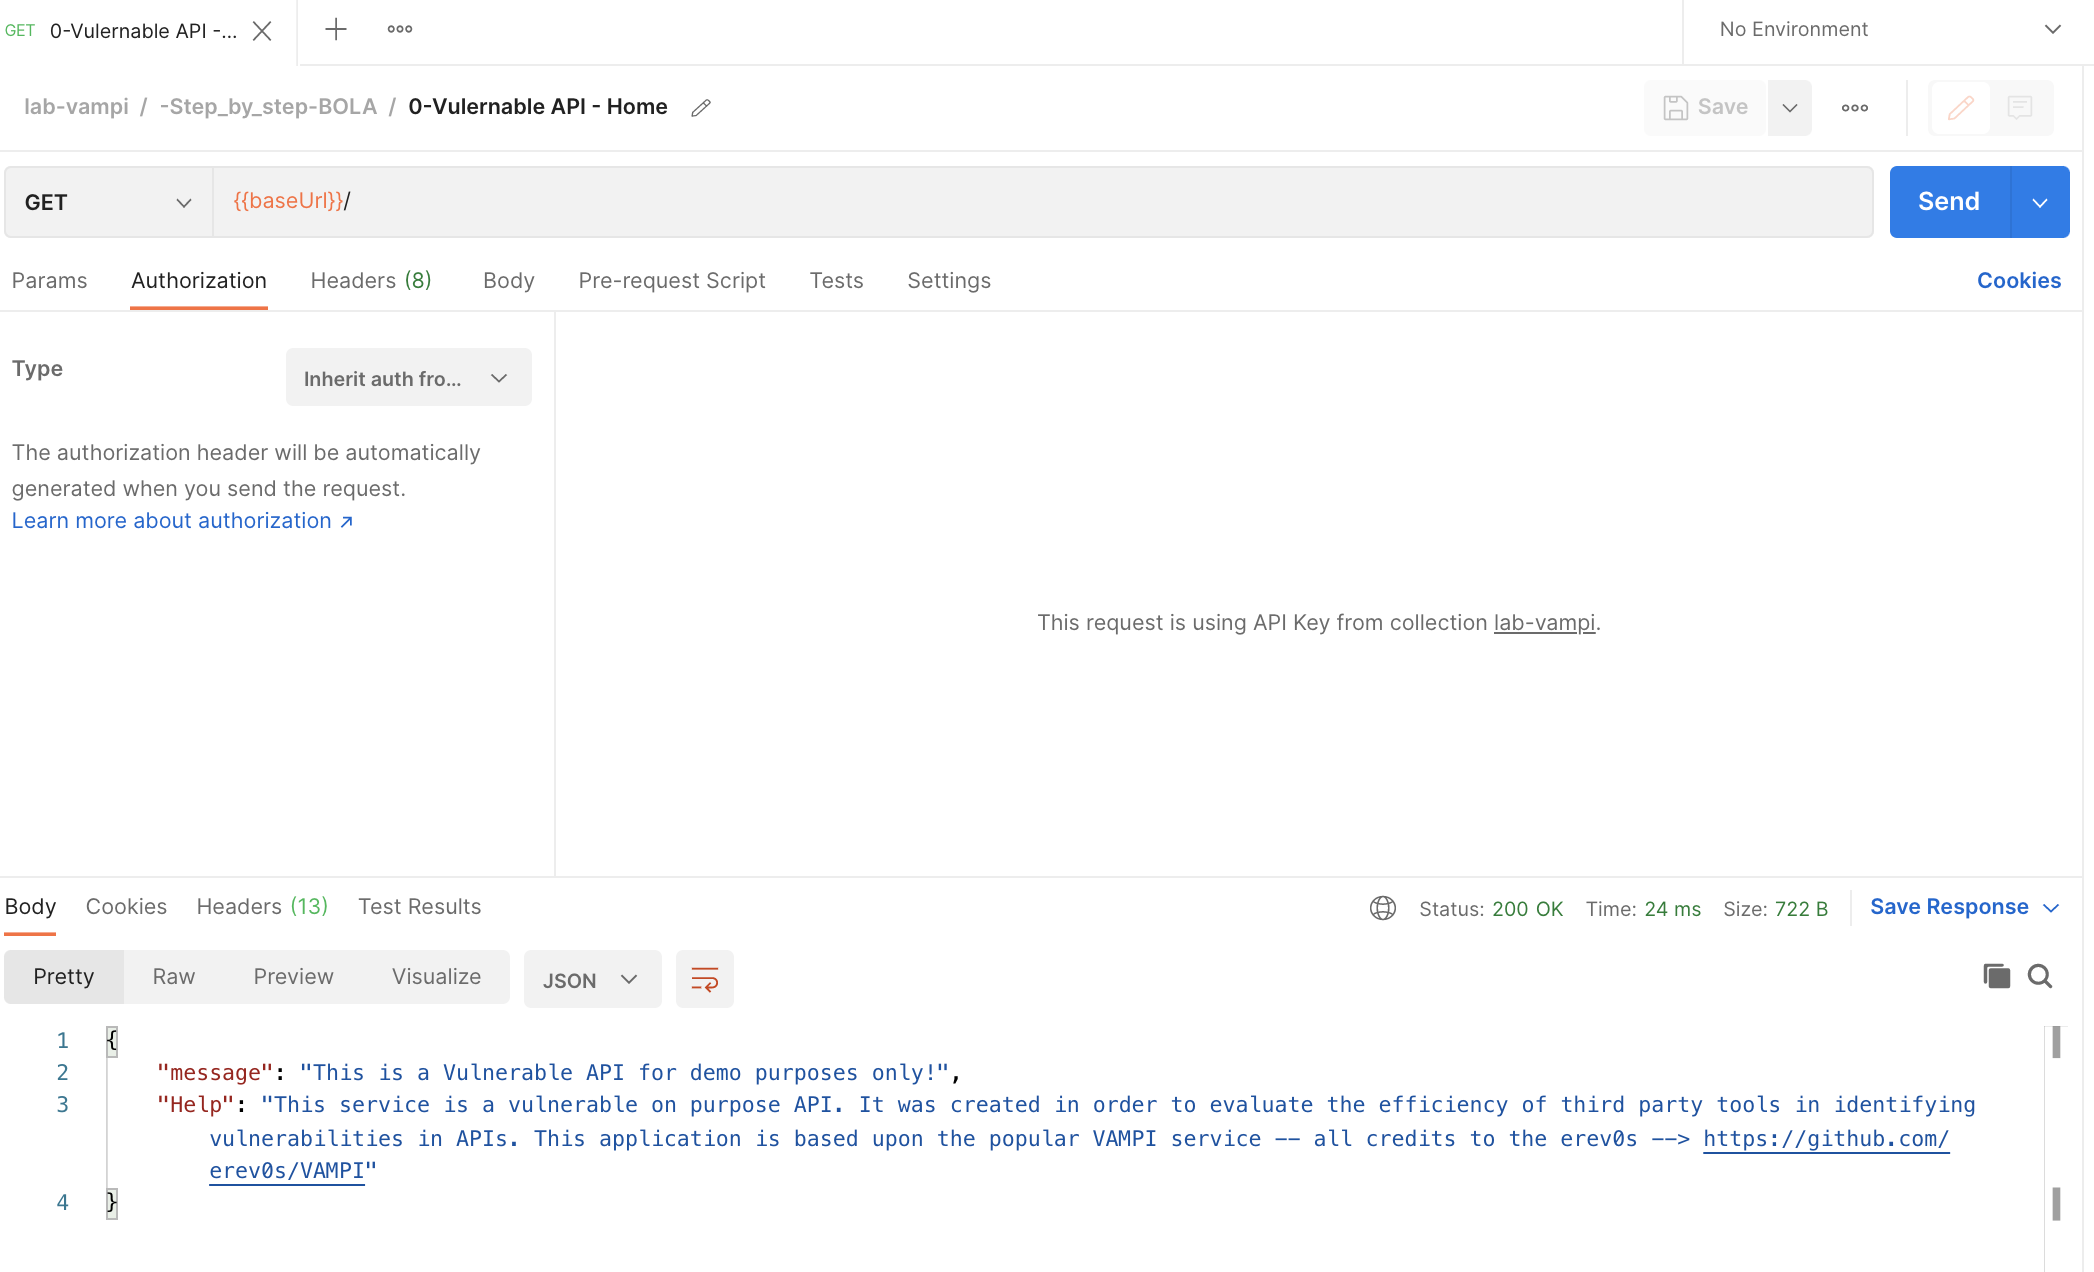
- Hit the GET
{{baseUrl}}/books/v1endpoint which you can find in the request named1-Retrieves all booksand note which book is owned by the individual users.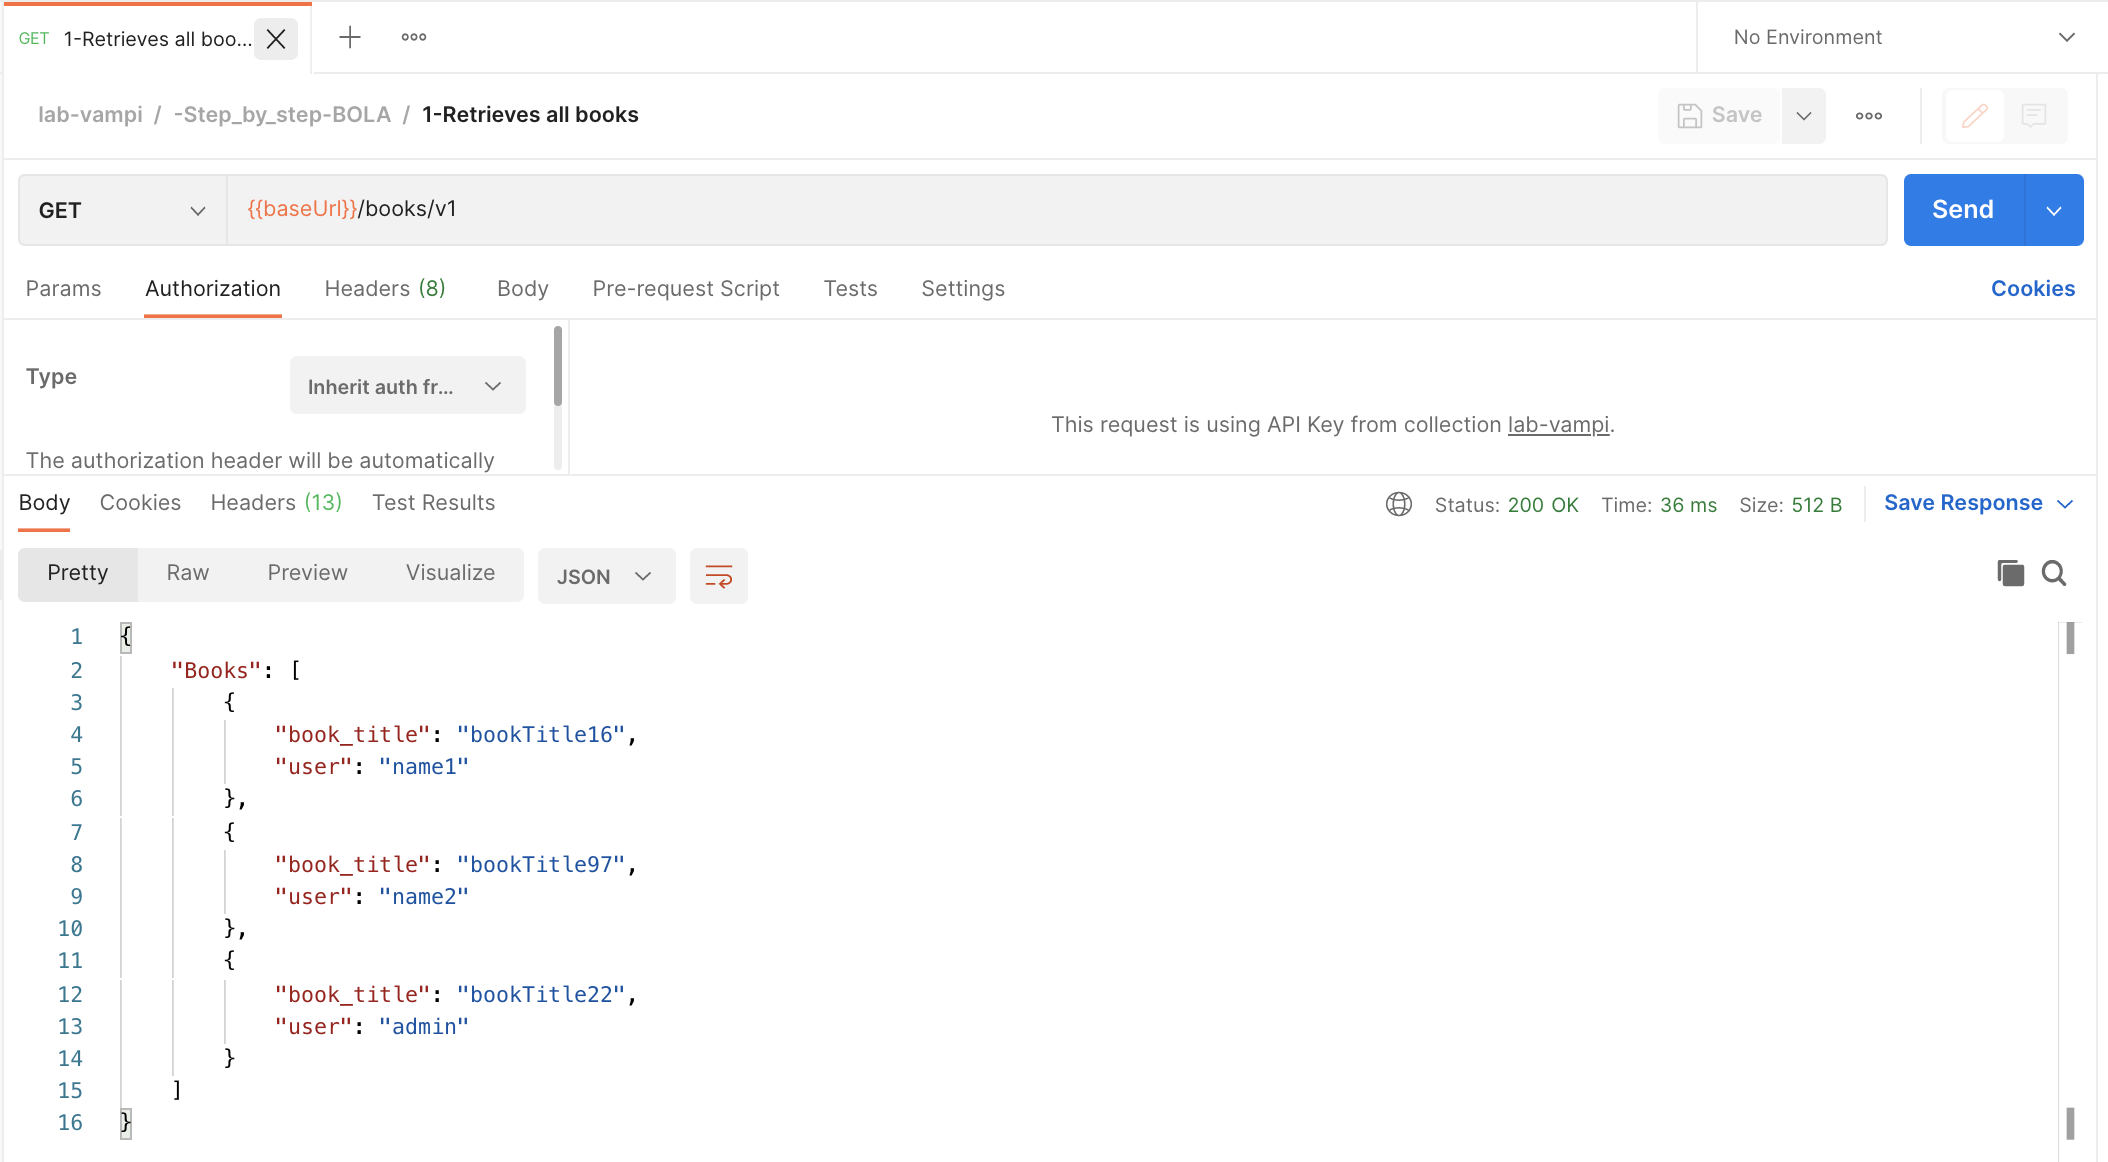
- Login to the service by hitting the POST
{{baseUrl}}/users/v1/loginendpoint which you can find in the request named2-Login to Vulnerable APIDo complete the body of the request with a username and password. Once you hit that, copy the bearer token of the user.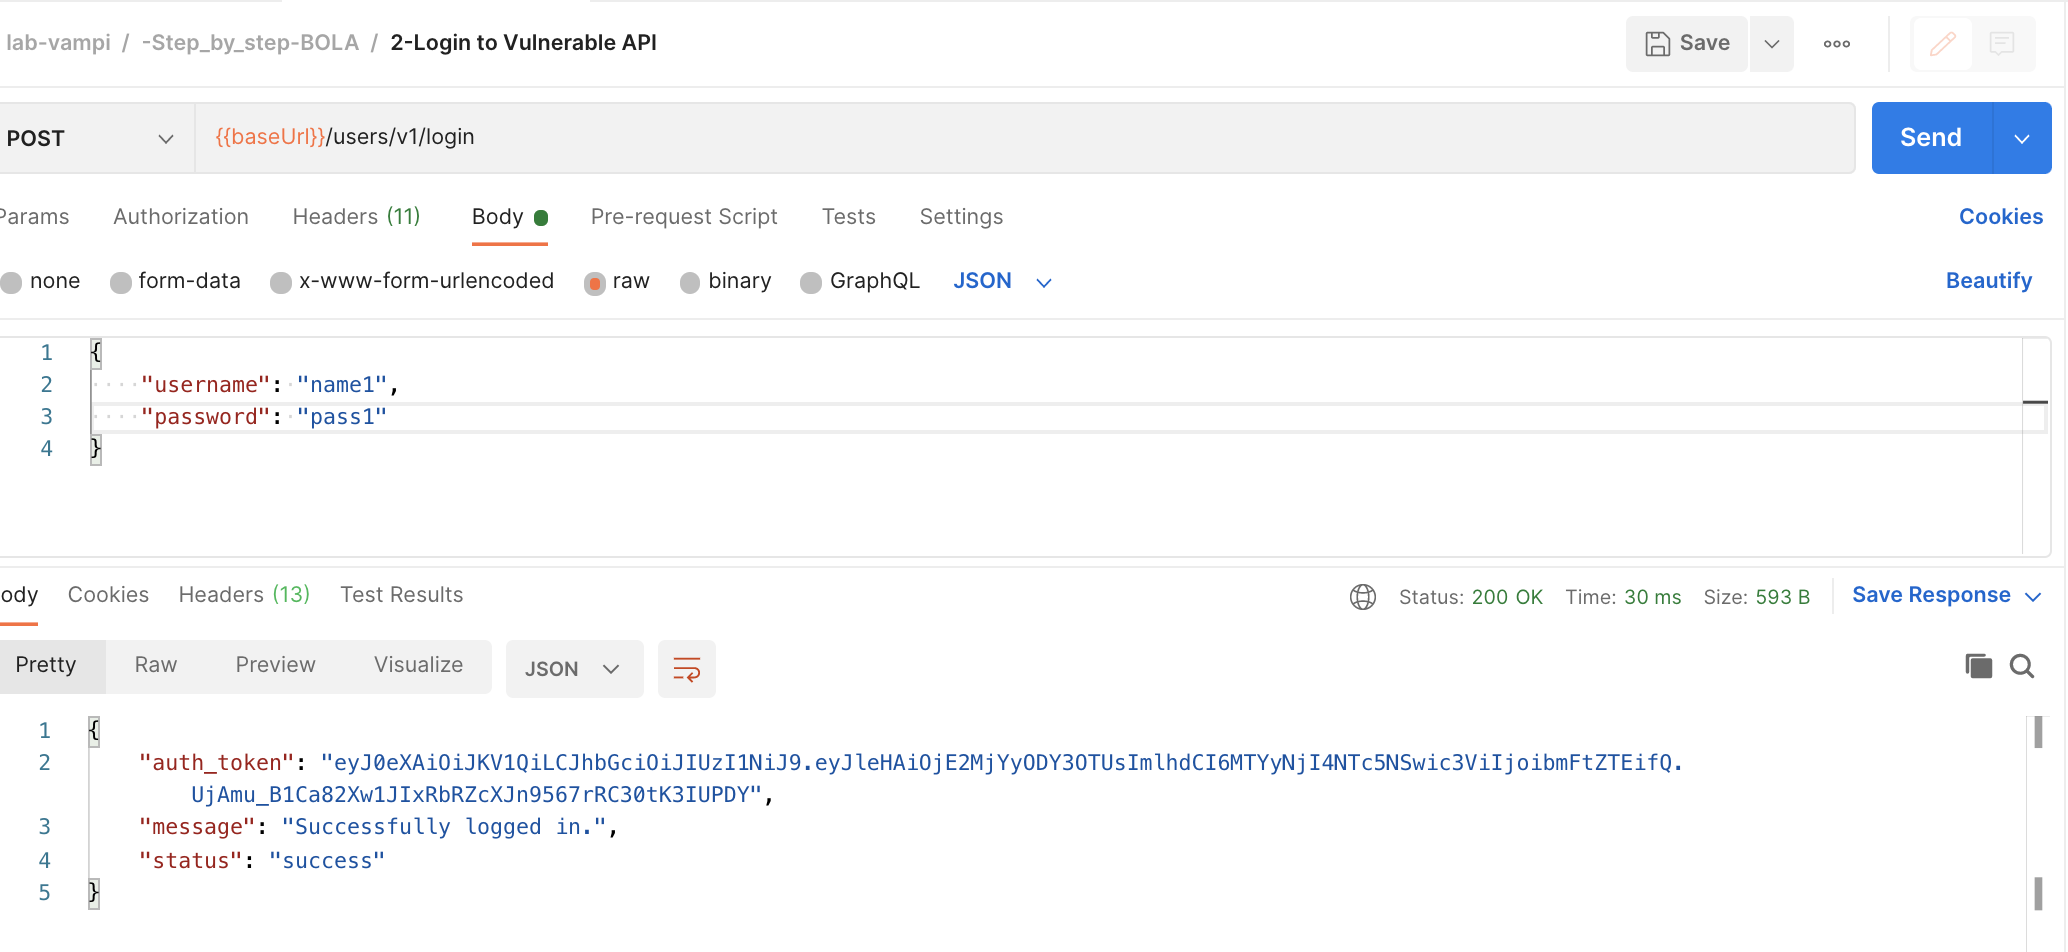
- Now we are gonna retrieve the book associated with the user and the associated secret using the collected Bearer Token by hitting the GET
{{baseUrl}}/books/v1/:bookendpoint. Ensure that you have copied the bearer token in theAuth Typeand that you have anapikey:apikeyconfigured in the headers. You also need to complete the path variablebookwith one of the book titles.


- 💣 And here come's the BOLA 💣
Do exactly as step 6, but now with a book associated to another user.
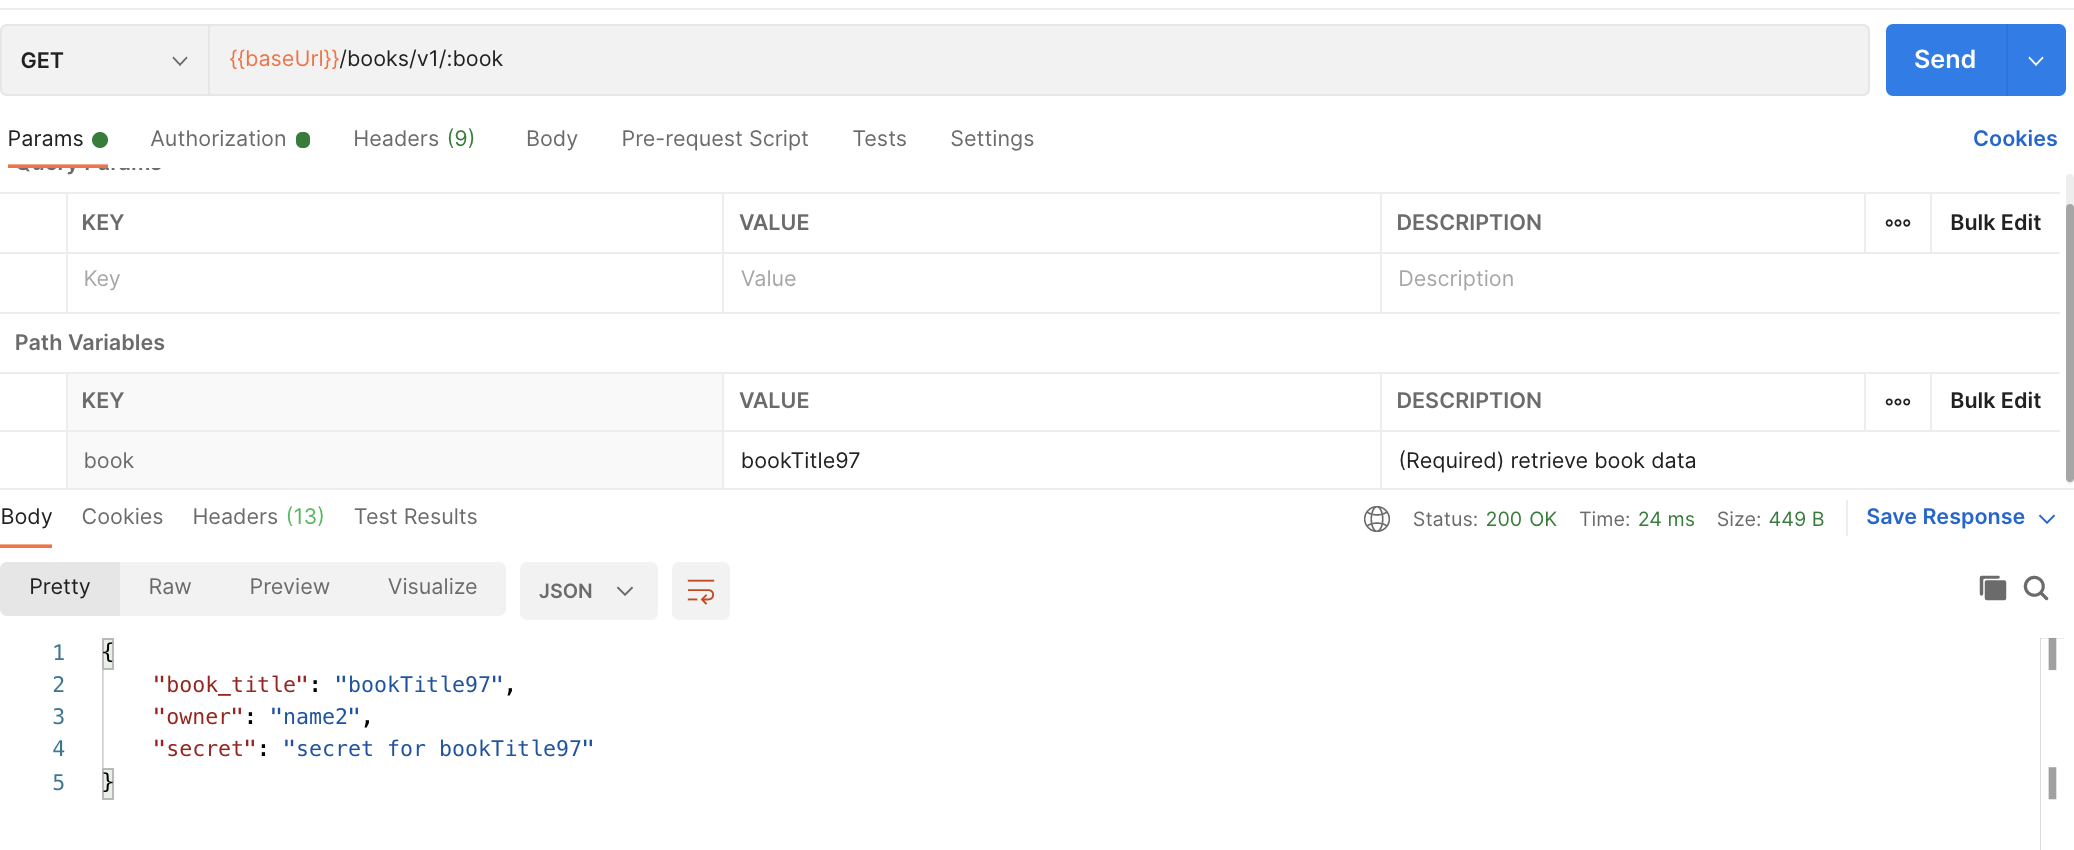
⚠️ BOOM! You were able to collect the secret from someone else. So in short: You are authenticated into the system (bearer token) but you can access non-authorized data!


Steps to reproduce:
- Open the Postman collection and head to the folder -Step_by_step-Unauth_passwd_change
- You will notice that some of the APIs have the Inherit auth from parent set. You can check the config of the "parent auth" here:
- Some APIs will have the Bearer Token Auth Type. It will be clear why this is set like this later on.
- the
{{baseUrl}}is configured to point to your Kong gateway & route
- You will notice that some of the APIs have the Inherit auth from parent set. You can check the config of the "parent auth" here:
- Hit the GET
{{baseUrl}}/endpoint which you can find in the request named0-Vulernable API - Home - Hit the GET
{{baseUrl}}/users/v1/_debugendpoint which you can find in the request named1-Retrieves all details for all usersand note usernames and passwords.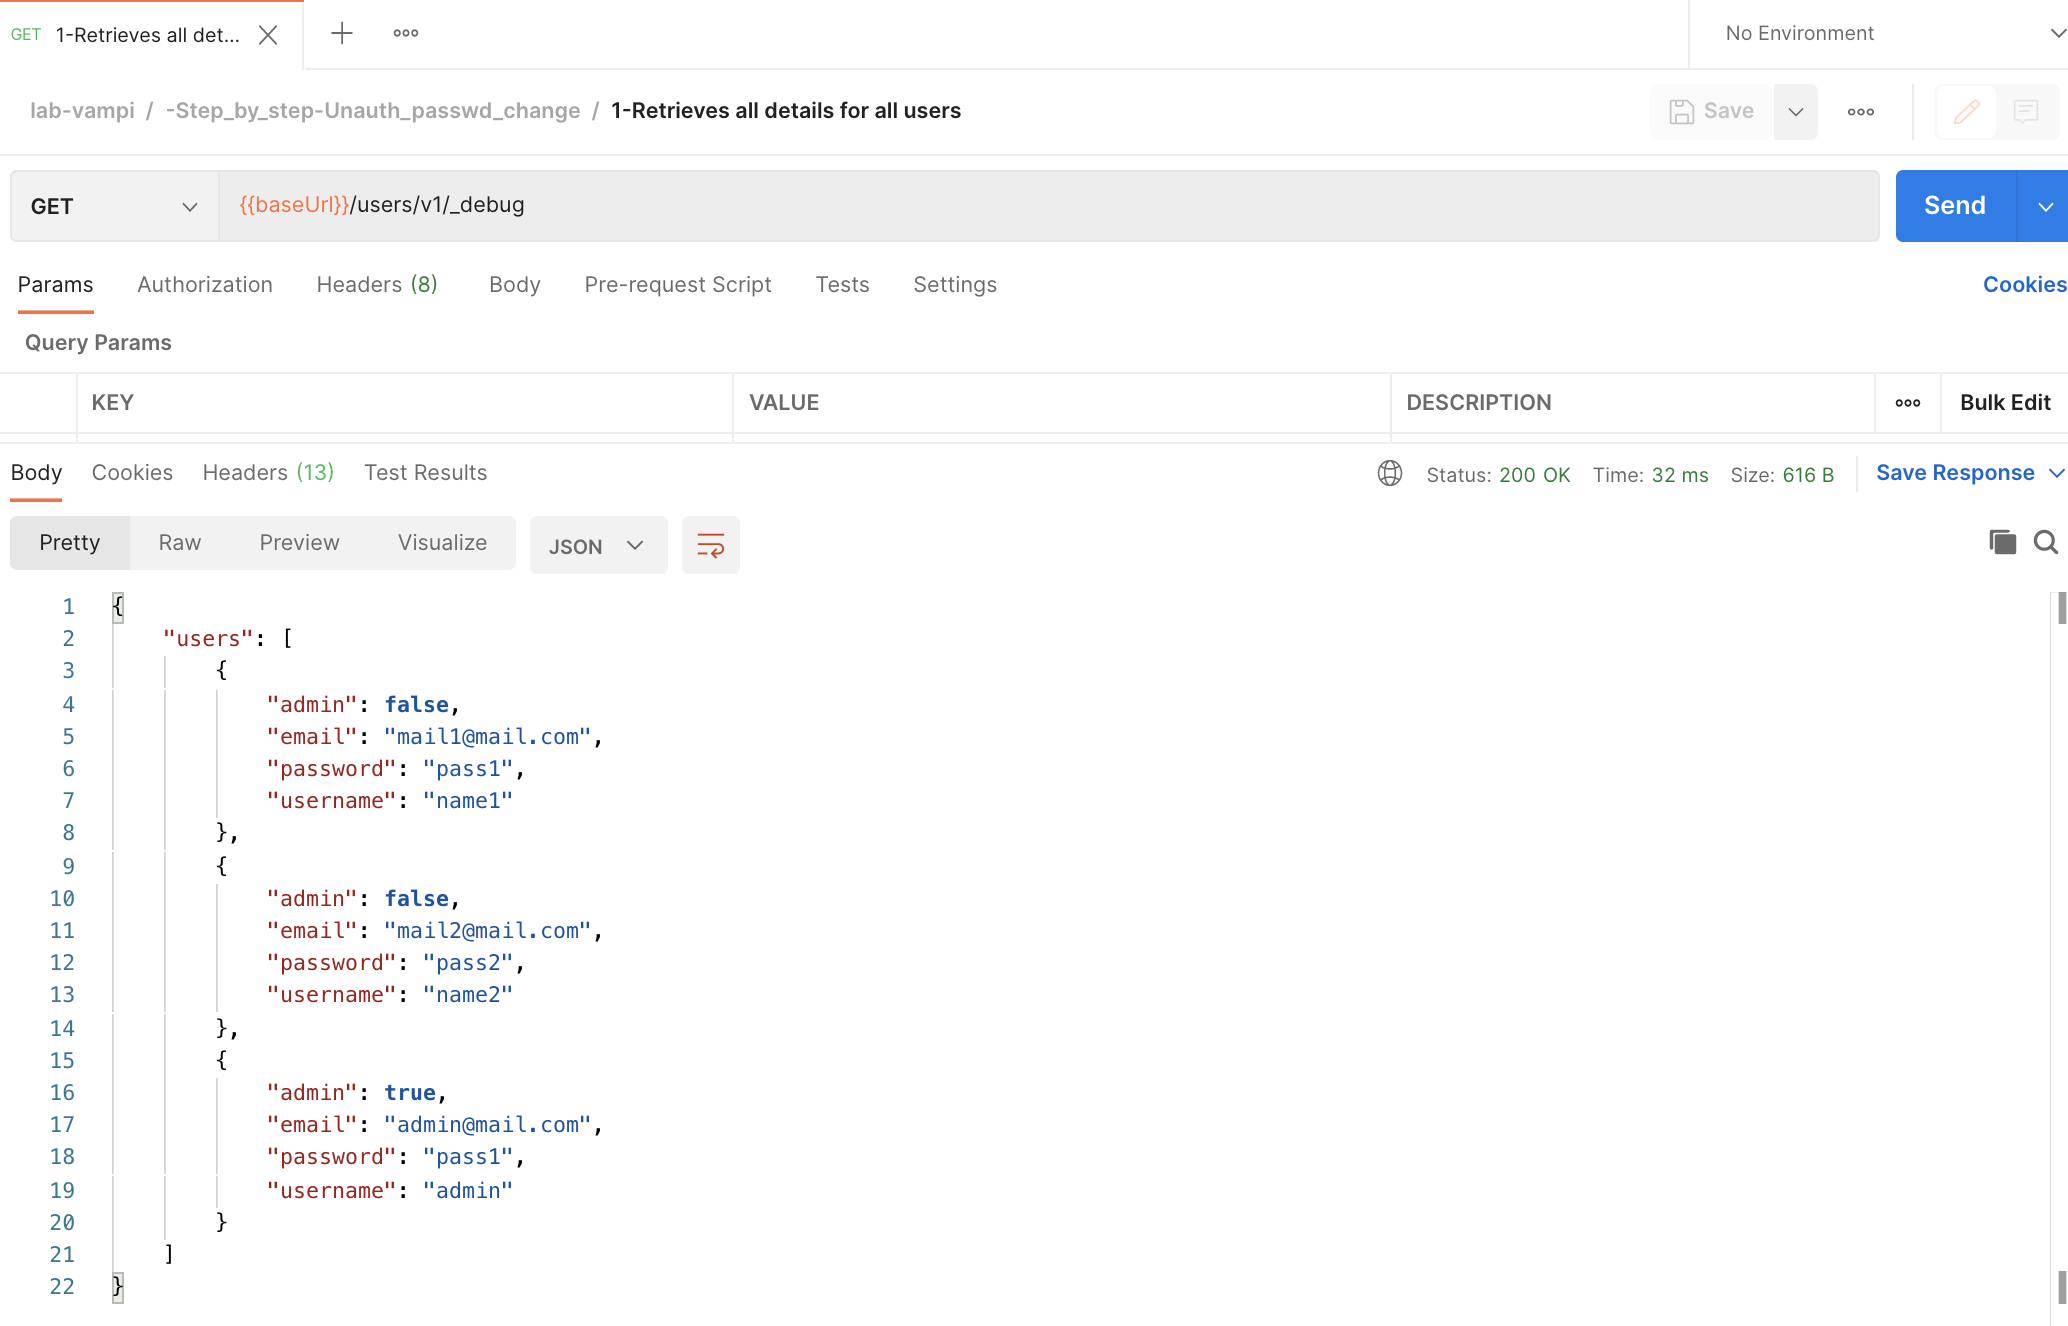
- Login to the service by hitting the POST
{{baseUrl}}/users/v1/loginendpoint which you can find in the request named2-Login to Vulnerable APIDo complete the body of the request with a username and password. Once you hit that, copy the bearer token of the user.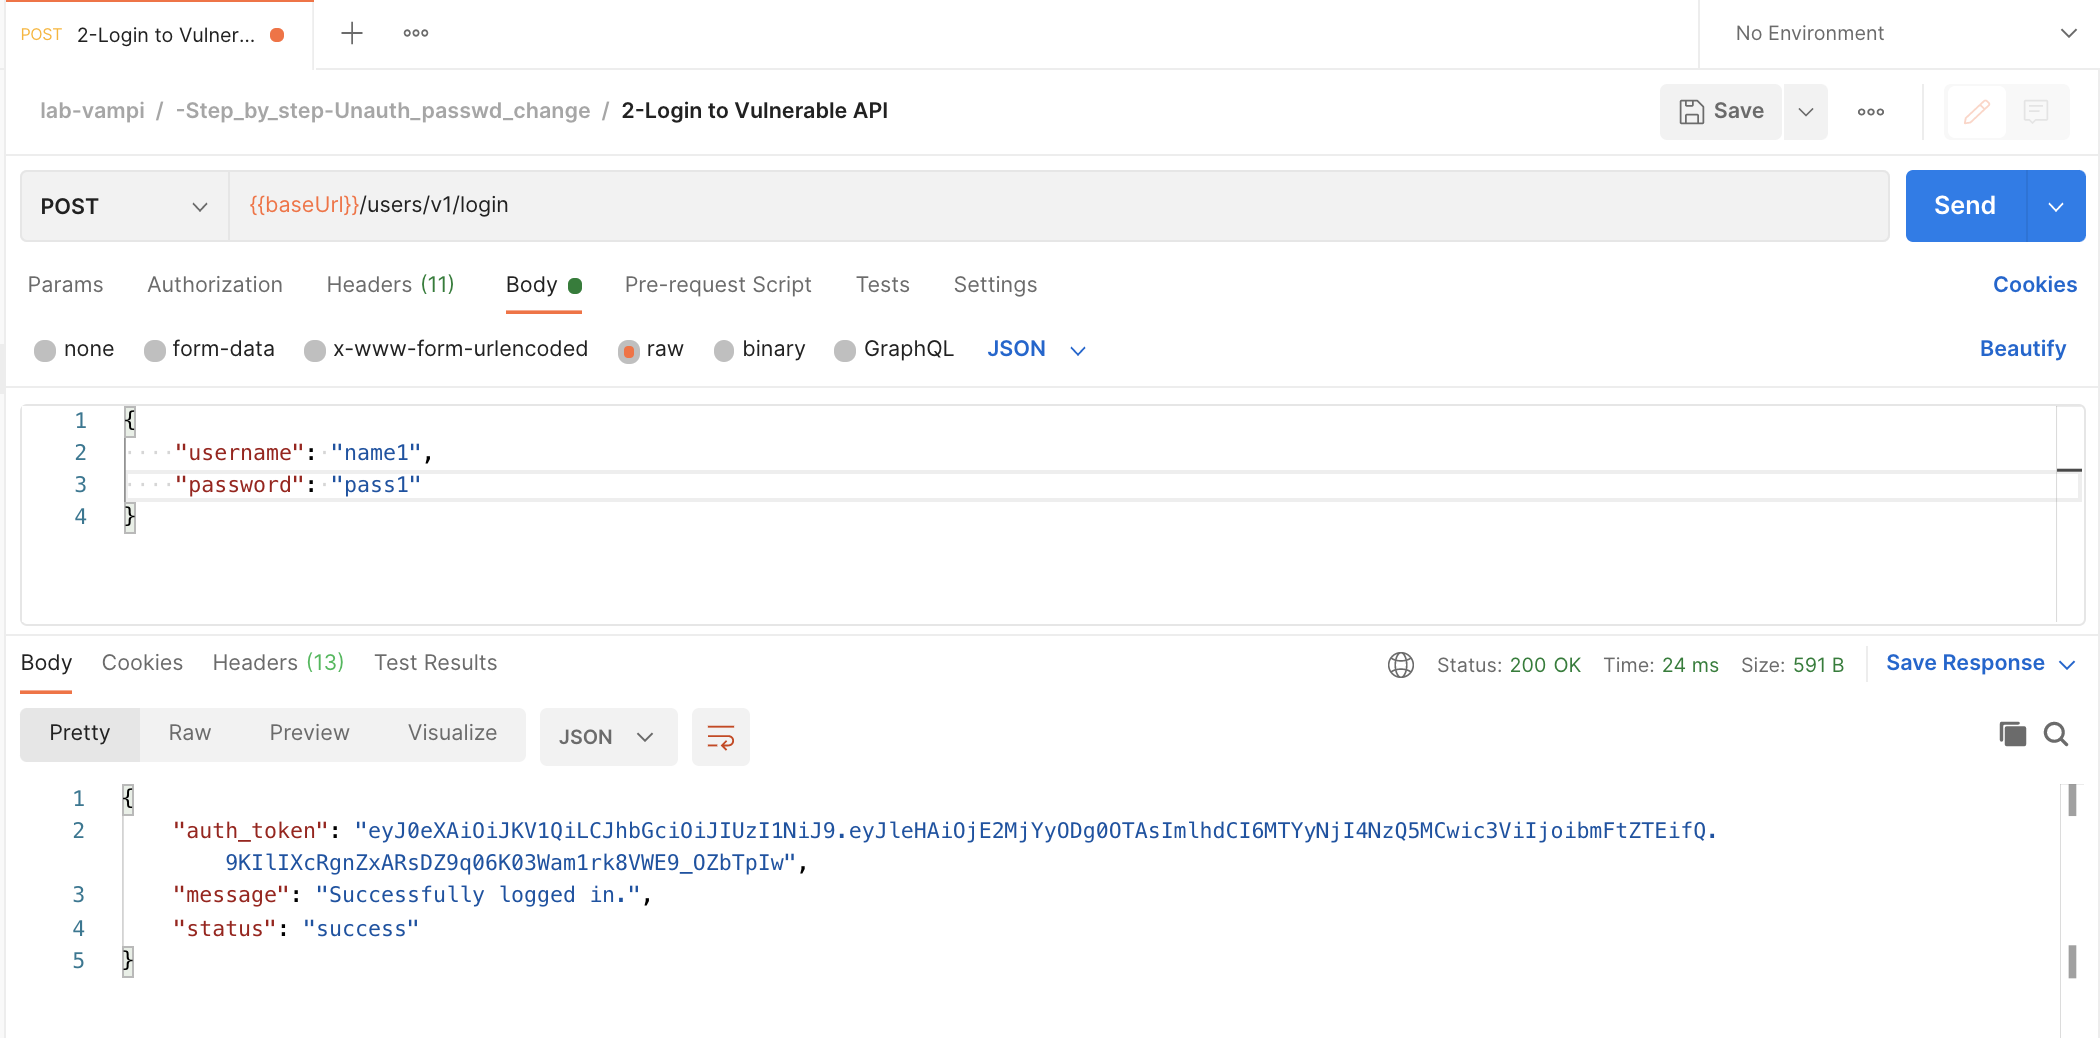
- 💣 And here come's the Unauthorized Password Change 💣
Using the collected Bearer Token we are gonna hit the PUT
{{baseUrl}}/users/v1/:username/passwordendpoint. Ensure that you have copied the bearer token in theAuth Typeand that you have anapikey:apikeyconfigured in the headers. You also need to complete the path variableusernamewith another username then the one you requested the token for. In thebodyyou can enter anew password


- You can verify that you were able to successfully change the password from another user by hitting the GET
{{baseUrl}}/users/v1/_debugendpoint again which you can find in the request named1-Retrieves all details for all usersand⚠️ note that you changed the password of another user 😱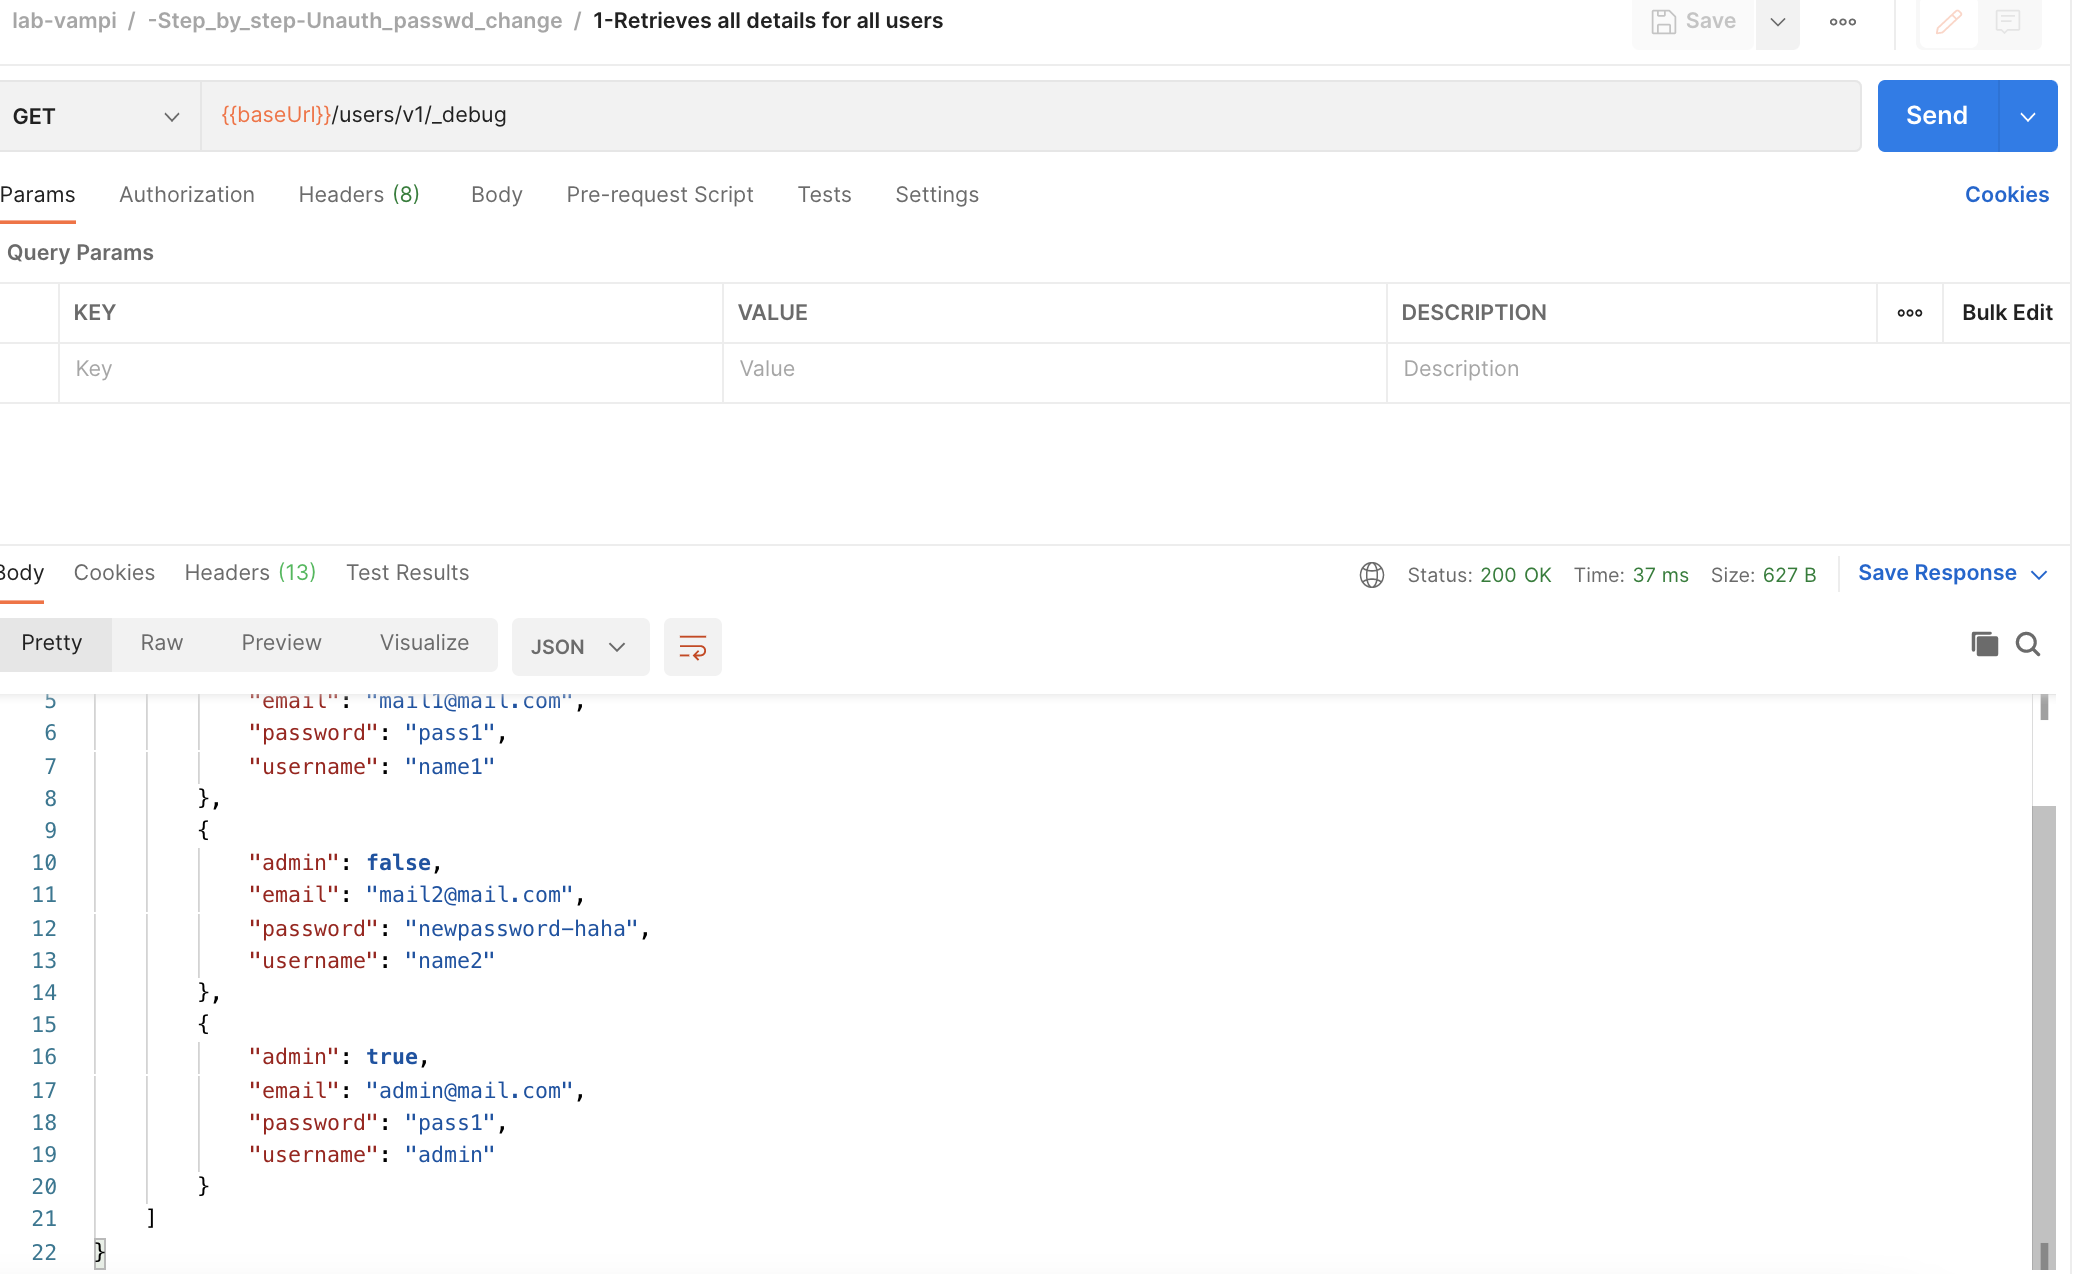


🎁 And here's a bonus 😉 - the above described step 3 is a text book example of an API Excessive Data Exposure security issue.
⭐ So with the above step-by-step instructions you were able to expose the top-3 risks described in the OWASP API Top-10 list ⭐
- API1:2019 Broken Object Level Authorization
- API2:2019 Broken User Authentication
- API3:2019 Excessive Data Exposure