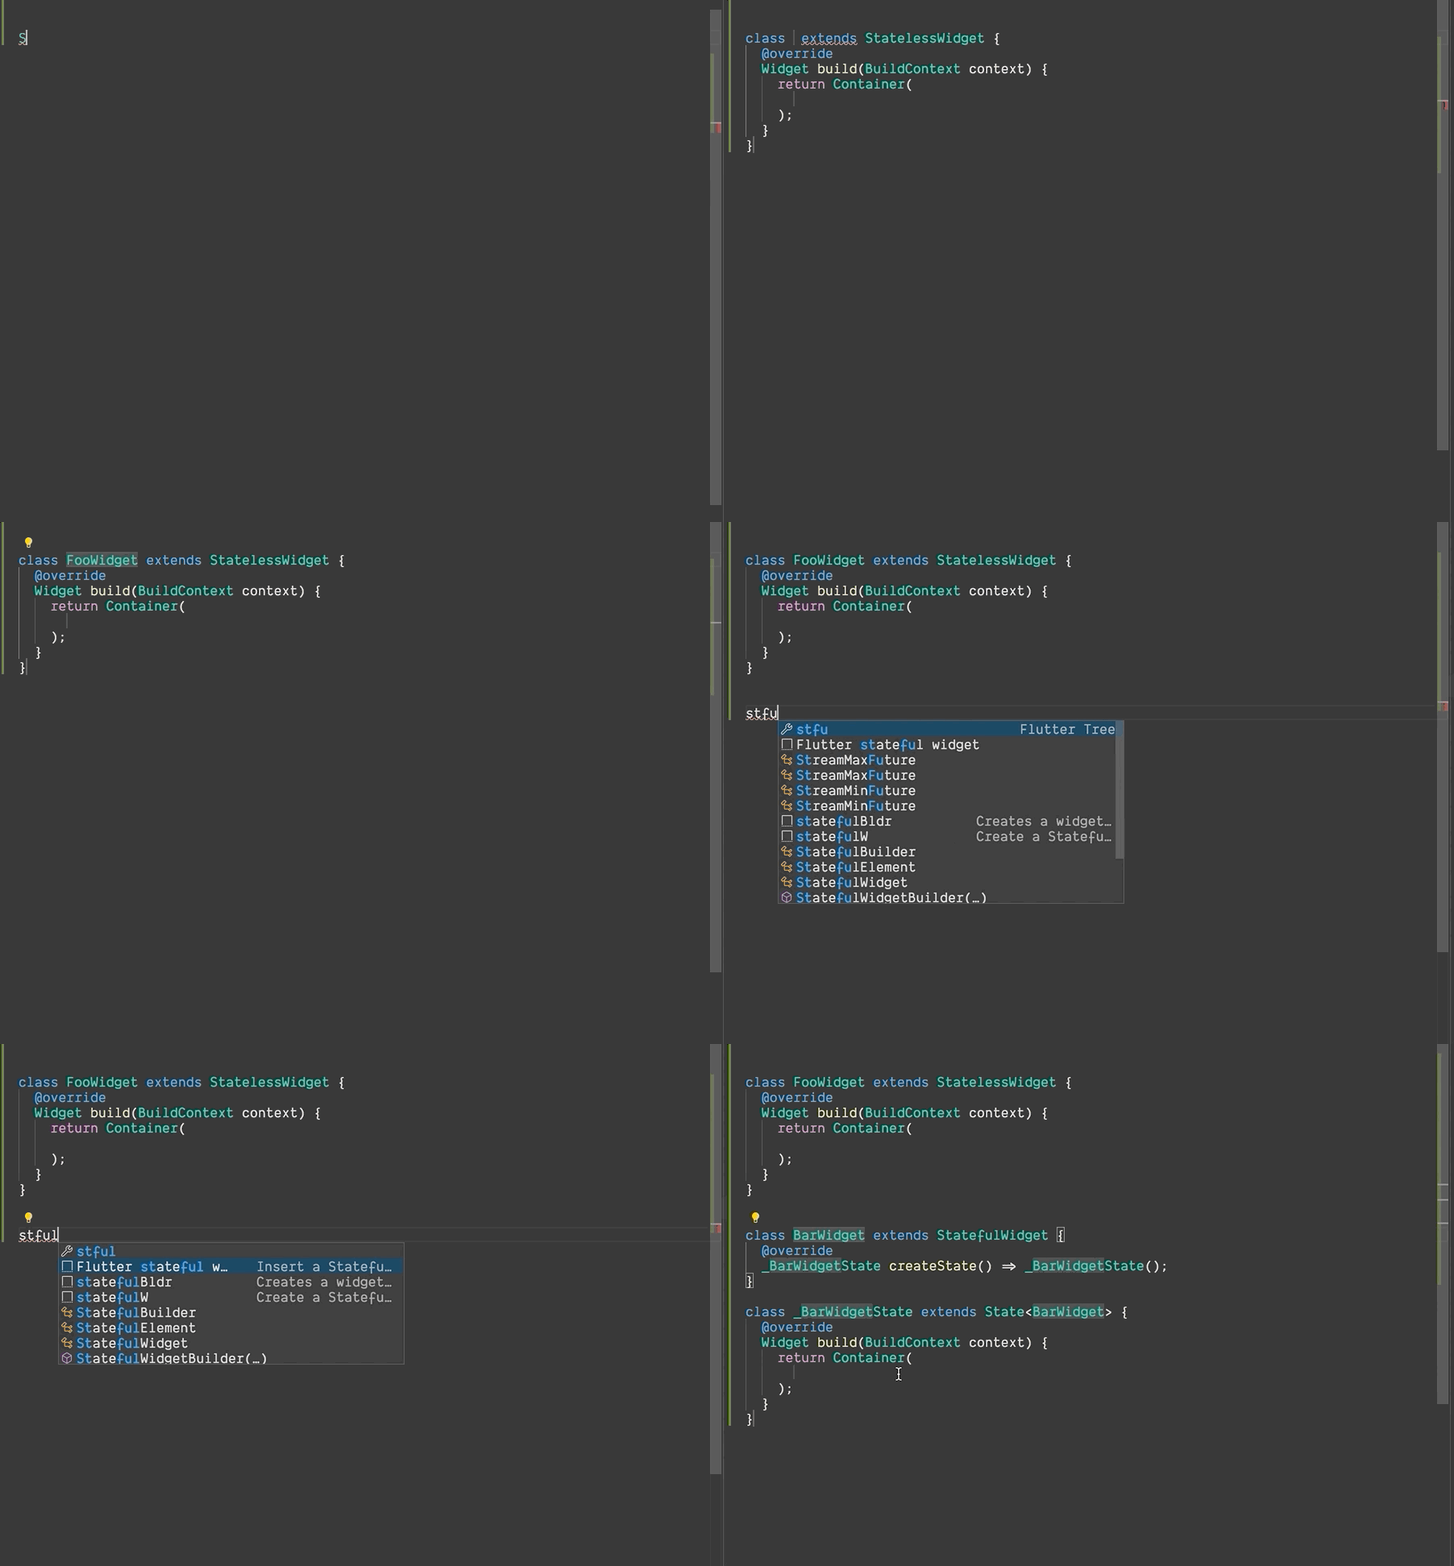
We can type stless and stful and we get Autocomplete Suggestion to generate Stateless Flutter Widget or Stateful Flutter Widget Respectively.
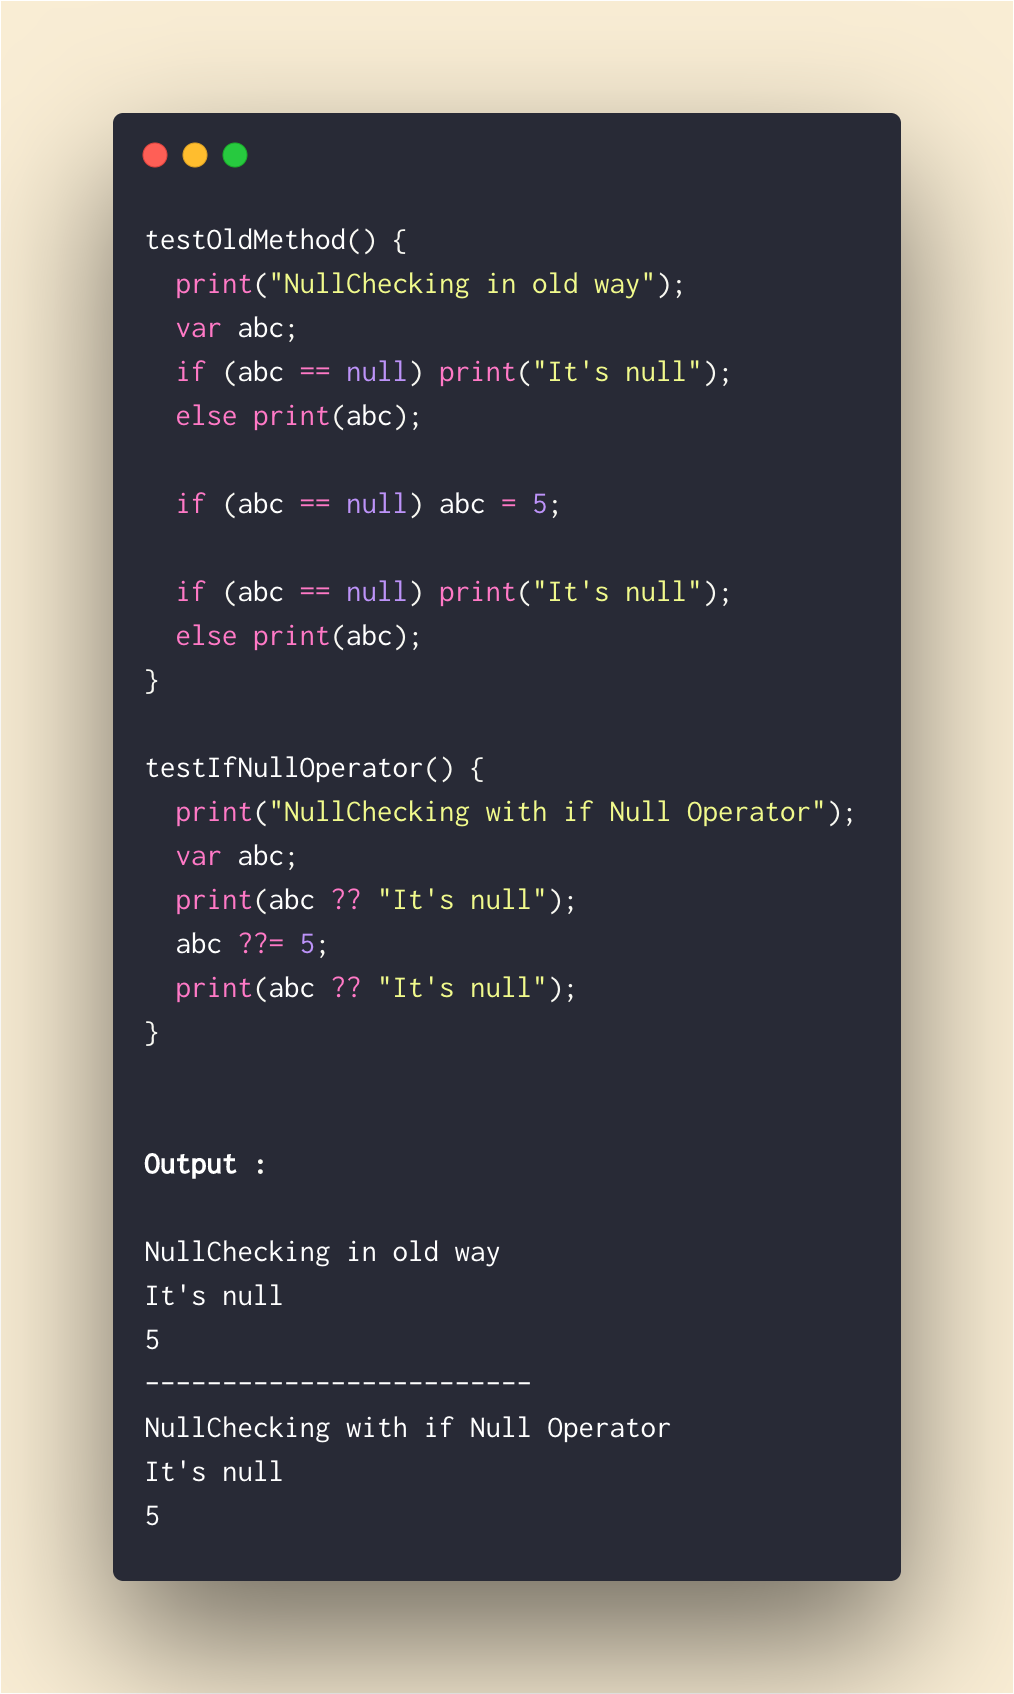
?? checks If something is null. If it's not null it returns its own value but if it's null it returns the value after ??
return abc??10; //returns 10 if abc is null else returns its own value,
It also has shorthand assignment when it's null.
abc??=5 //assigns 5 to abc if it's null
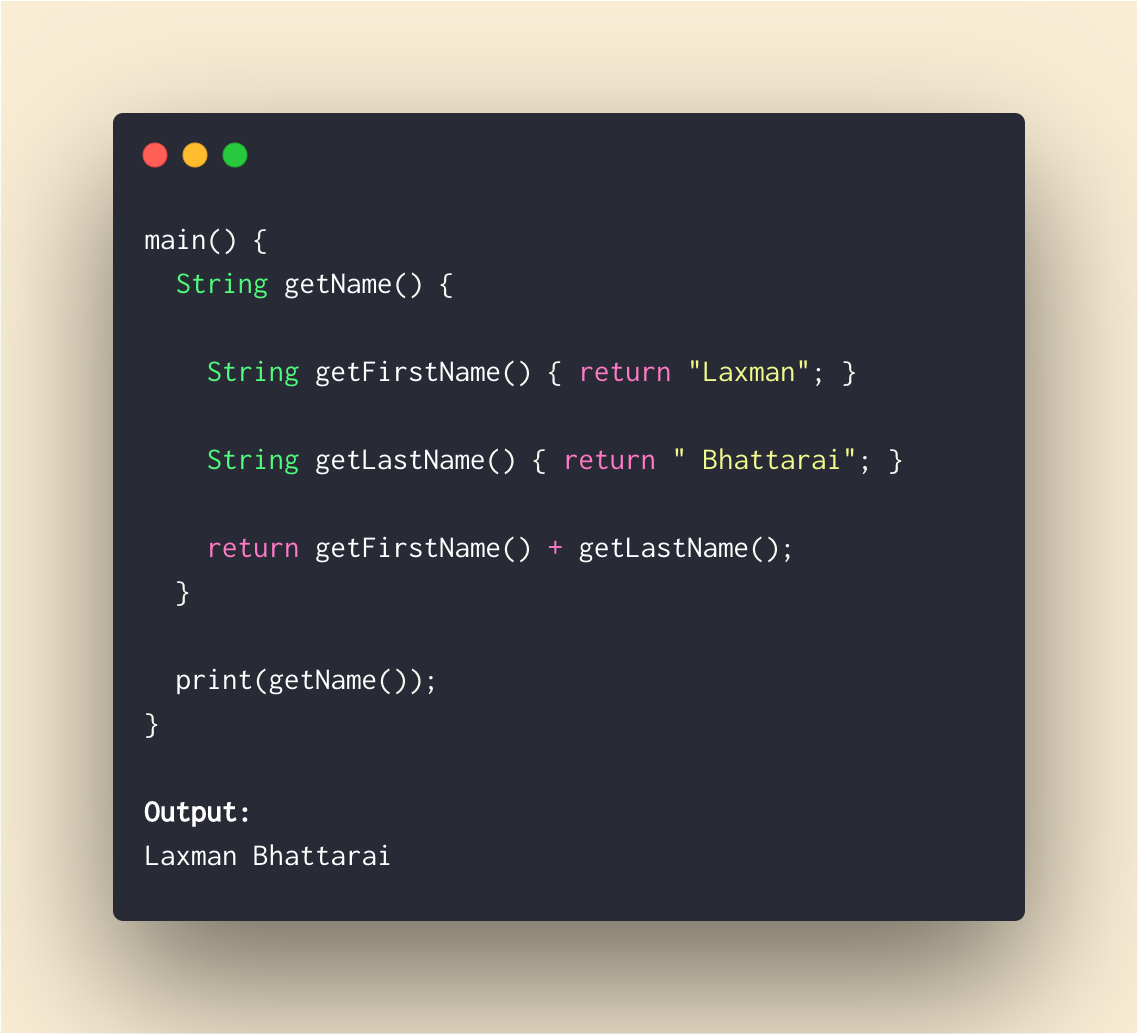
We can define a function inside another function.
This is to encapsulate the inner function from everything else outside the outer function.
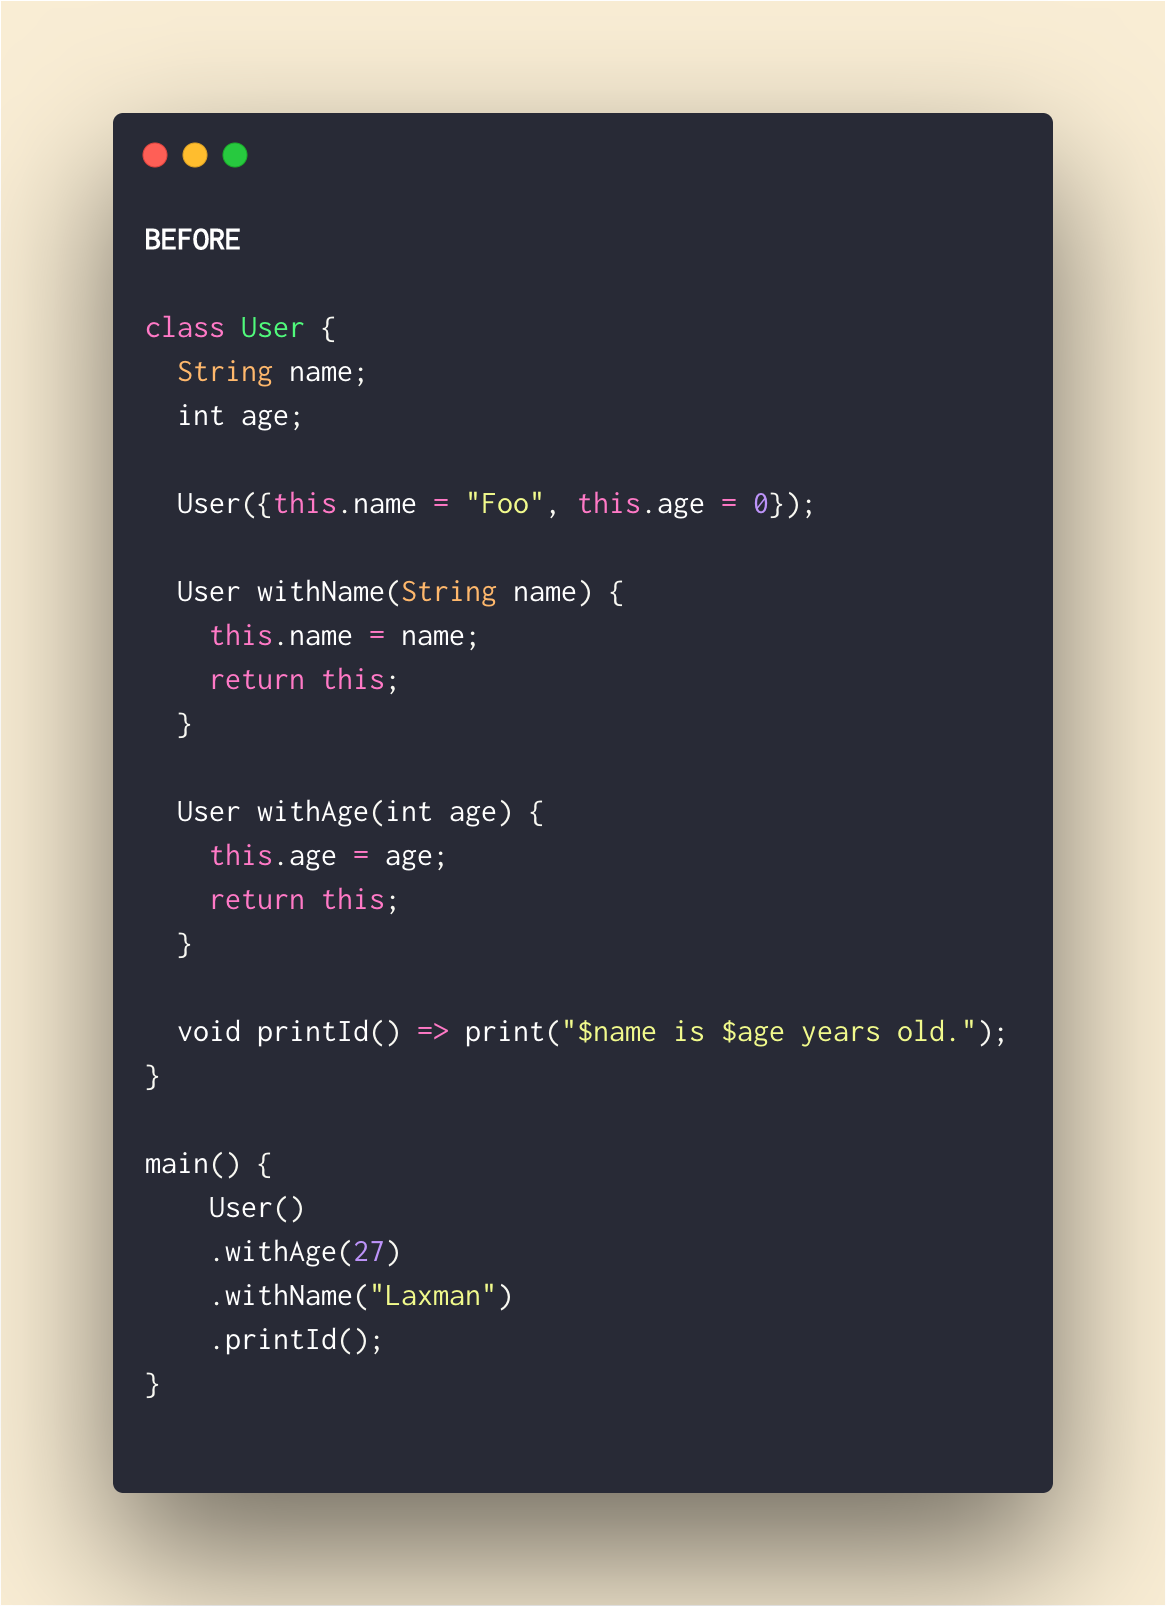
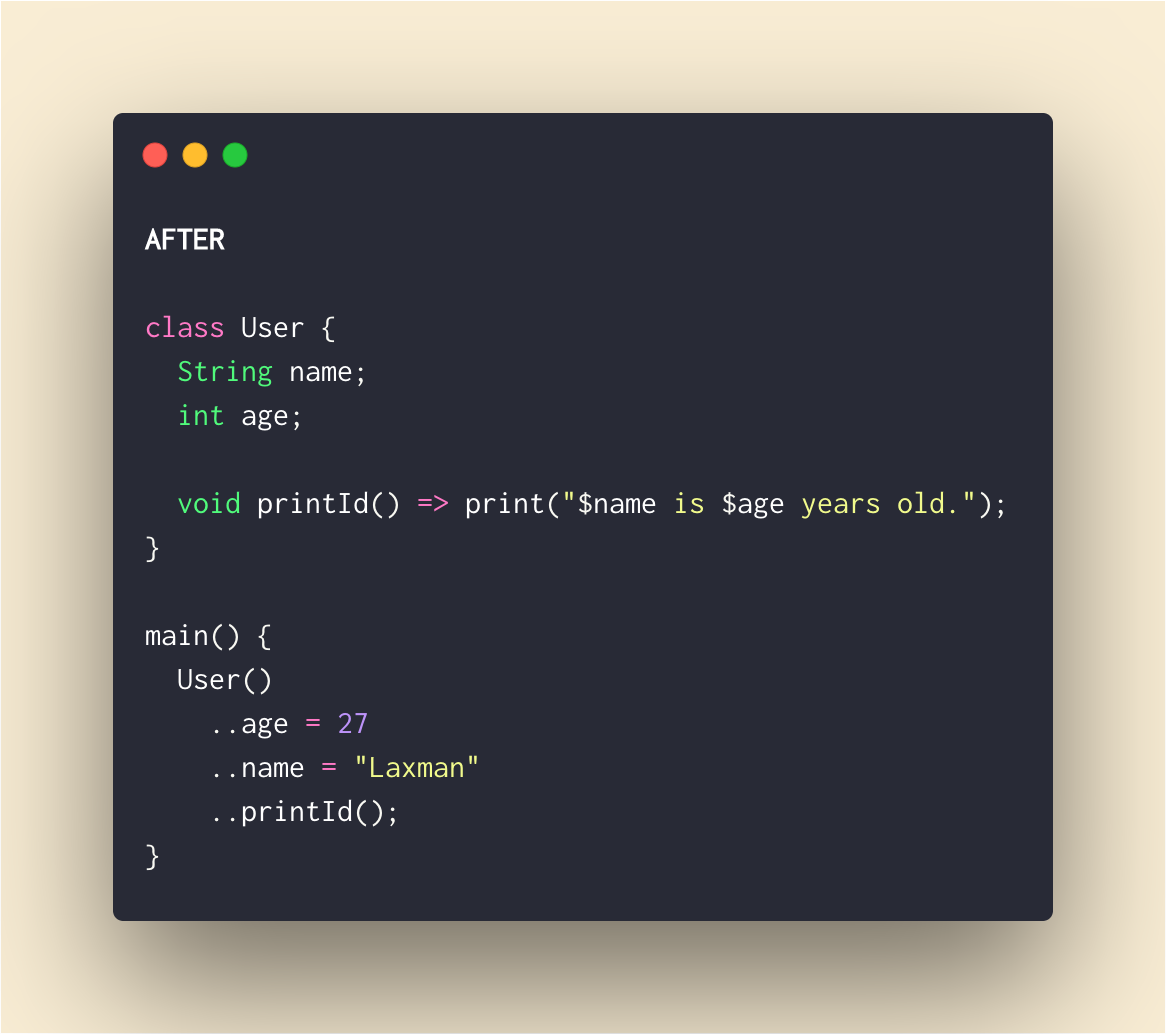
We can chain method/member calls without returning this from method(), getter() and setter() using cascade operator (..)
try in Dartpad
Can be replaced with
Dart does not support data class by default, but with plugins, we can simply generate data class (copyWith(),fromMap(), toMap(), Named Constructor, toString(),hashCode() & equals() methods implemented by the tool).
Download Plugins :
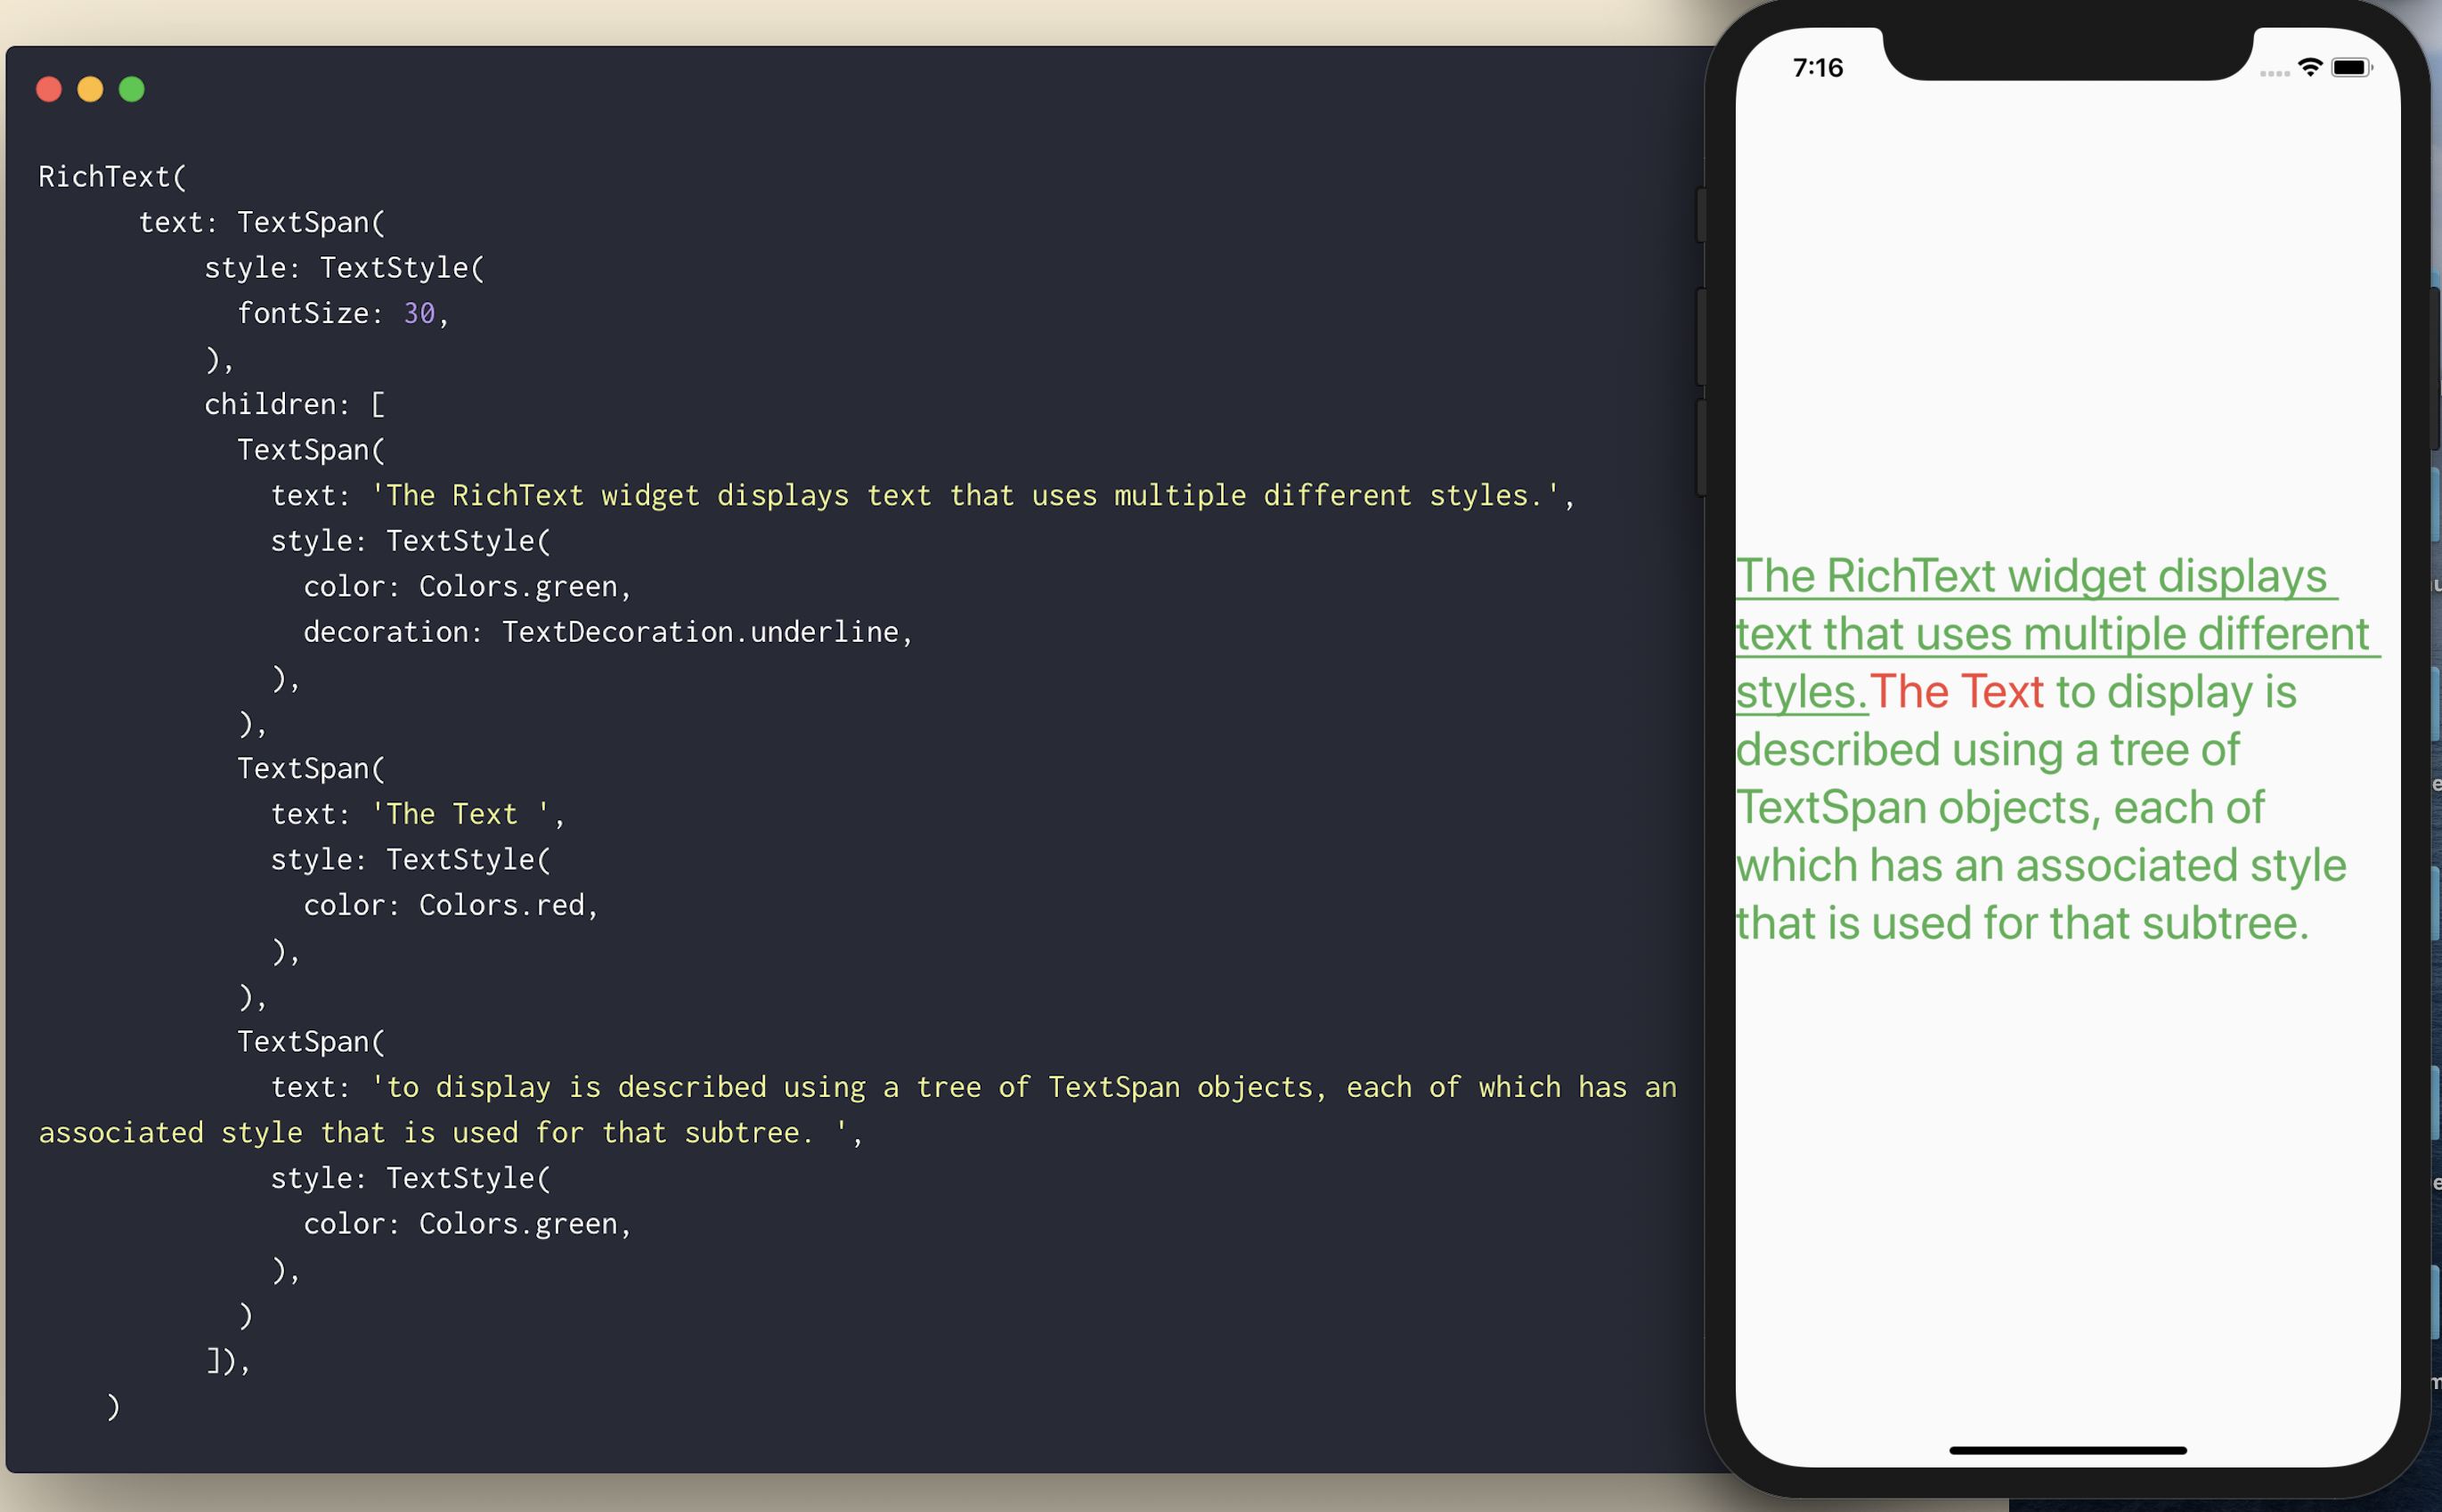
If you want to have a single text with different style within it? Do not bother or try to hack with with Text() and use RichText() with TextSpan()
Using Container with certain height/width to create responsive space between Widgets? That may look good on one screen but will not look the same in different screen size.
Spacer Widget comes for the rescue. Instead of Container(width: / height: ), use Spacer(flex: ).
How on this earth did I not know about this widget earlier? This is going to save many lives 😂
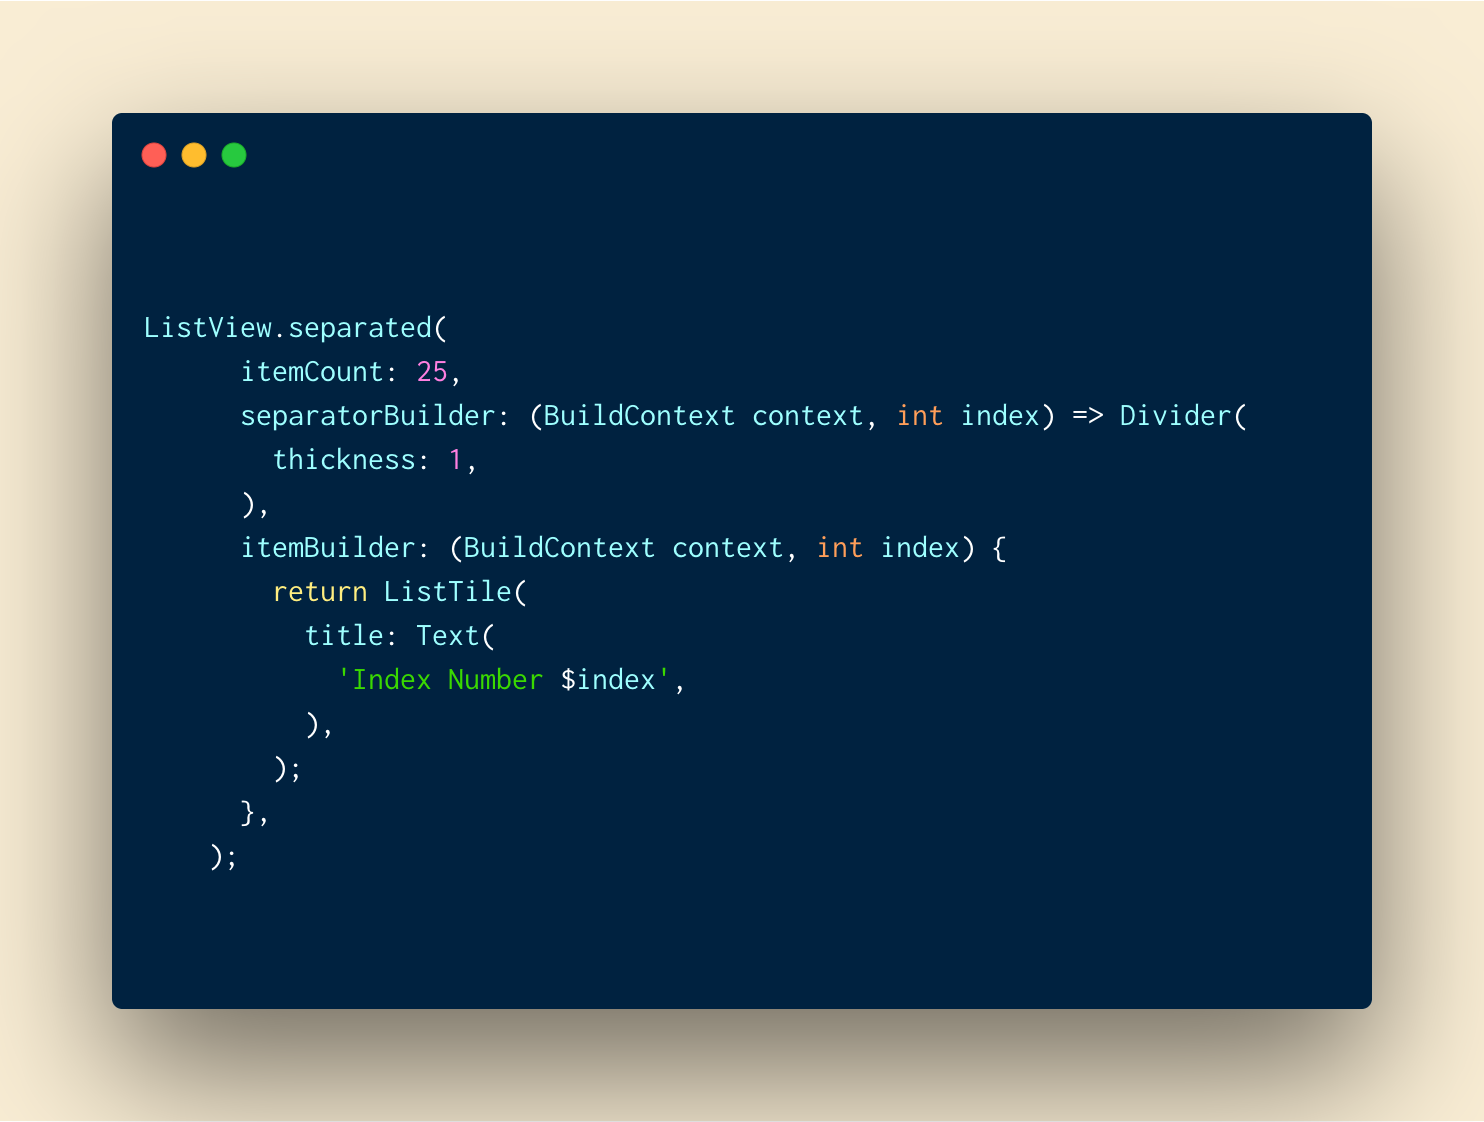
If you have you been adding Container() with maxwidth at the bottom of ListItem to put divider line like me, you have been doing it wrong all the time.
Flutter has ListView.separated just for that purpose. We have to also provide separatorBuilder in addition to what we already passed while using ListView.builder
Bonus 🍾🎁🎊🎉 : You do not have to check if the item is last in order not to draw divider after the last item.
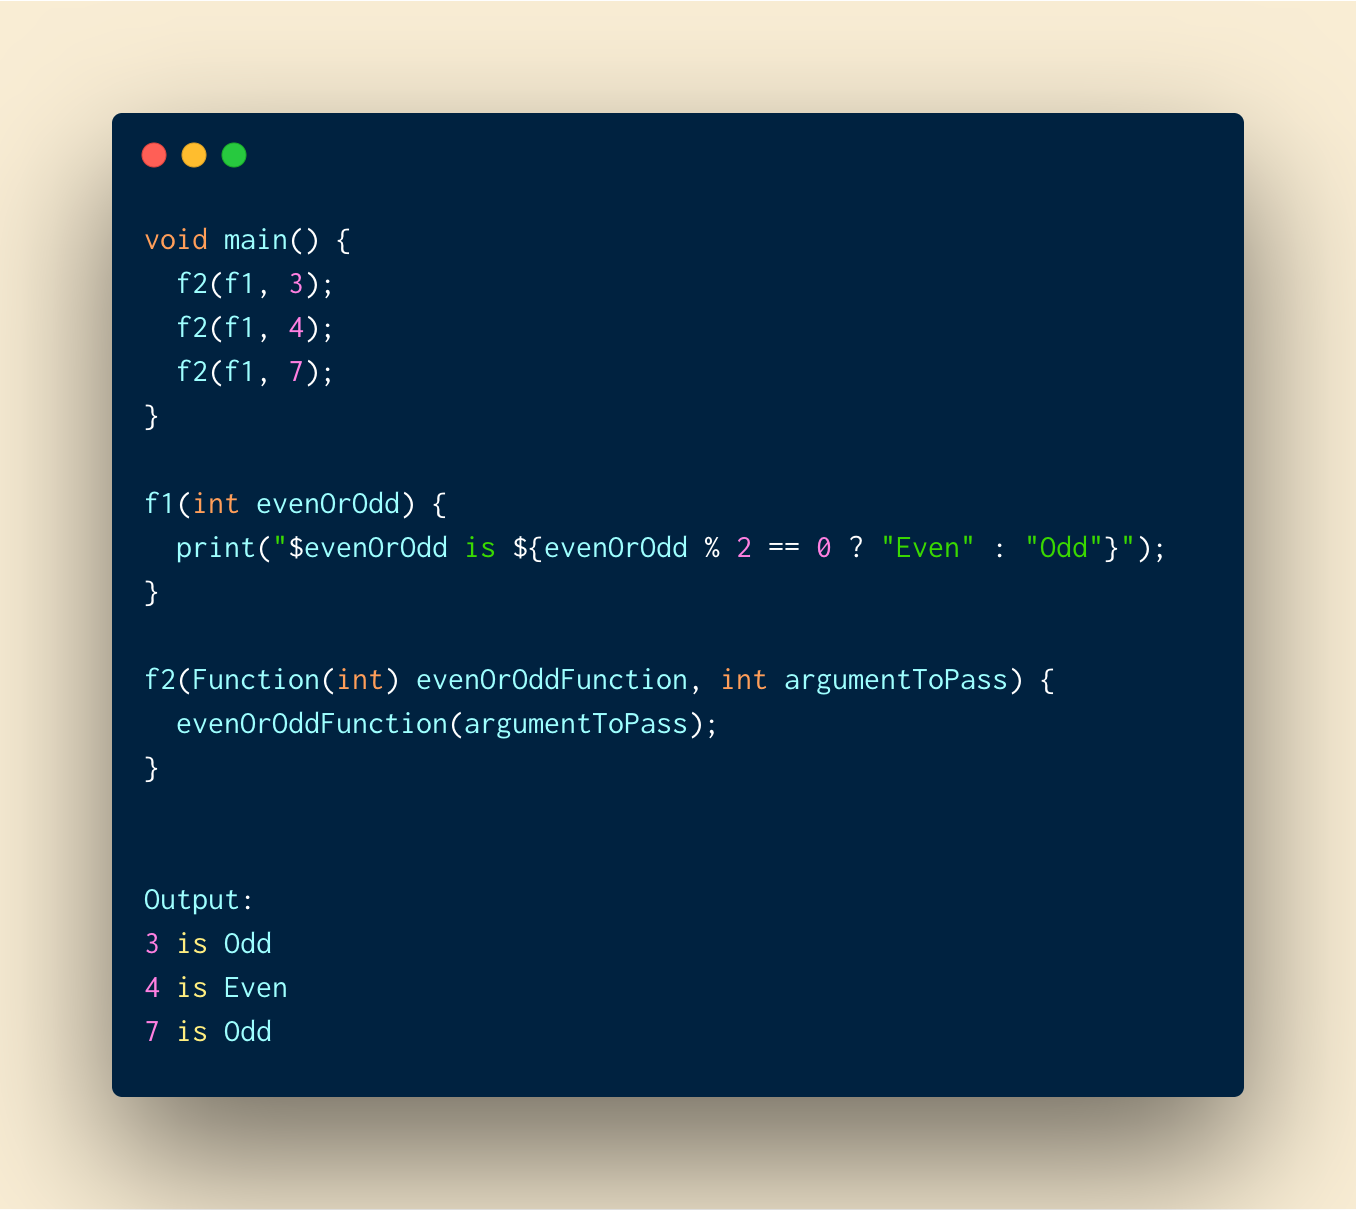
We can simply pass a function as parameter like we pass a variable. When we want to call the passed function from calling function, we just call it with () at the end along with parameters if it accepts any.
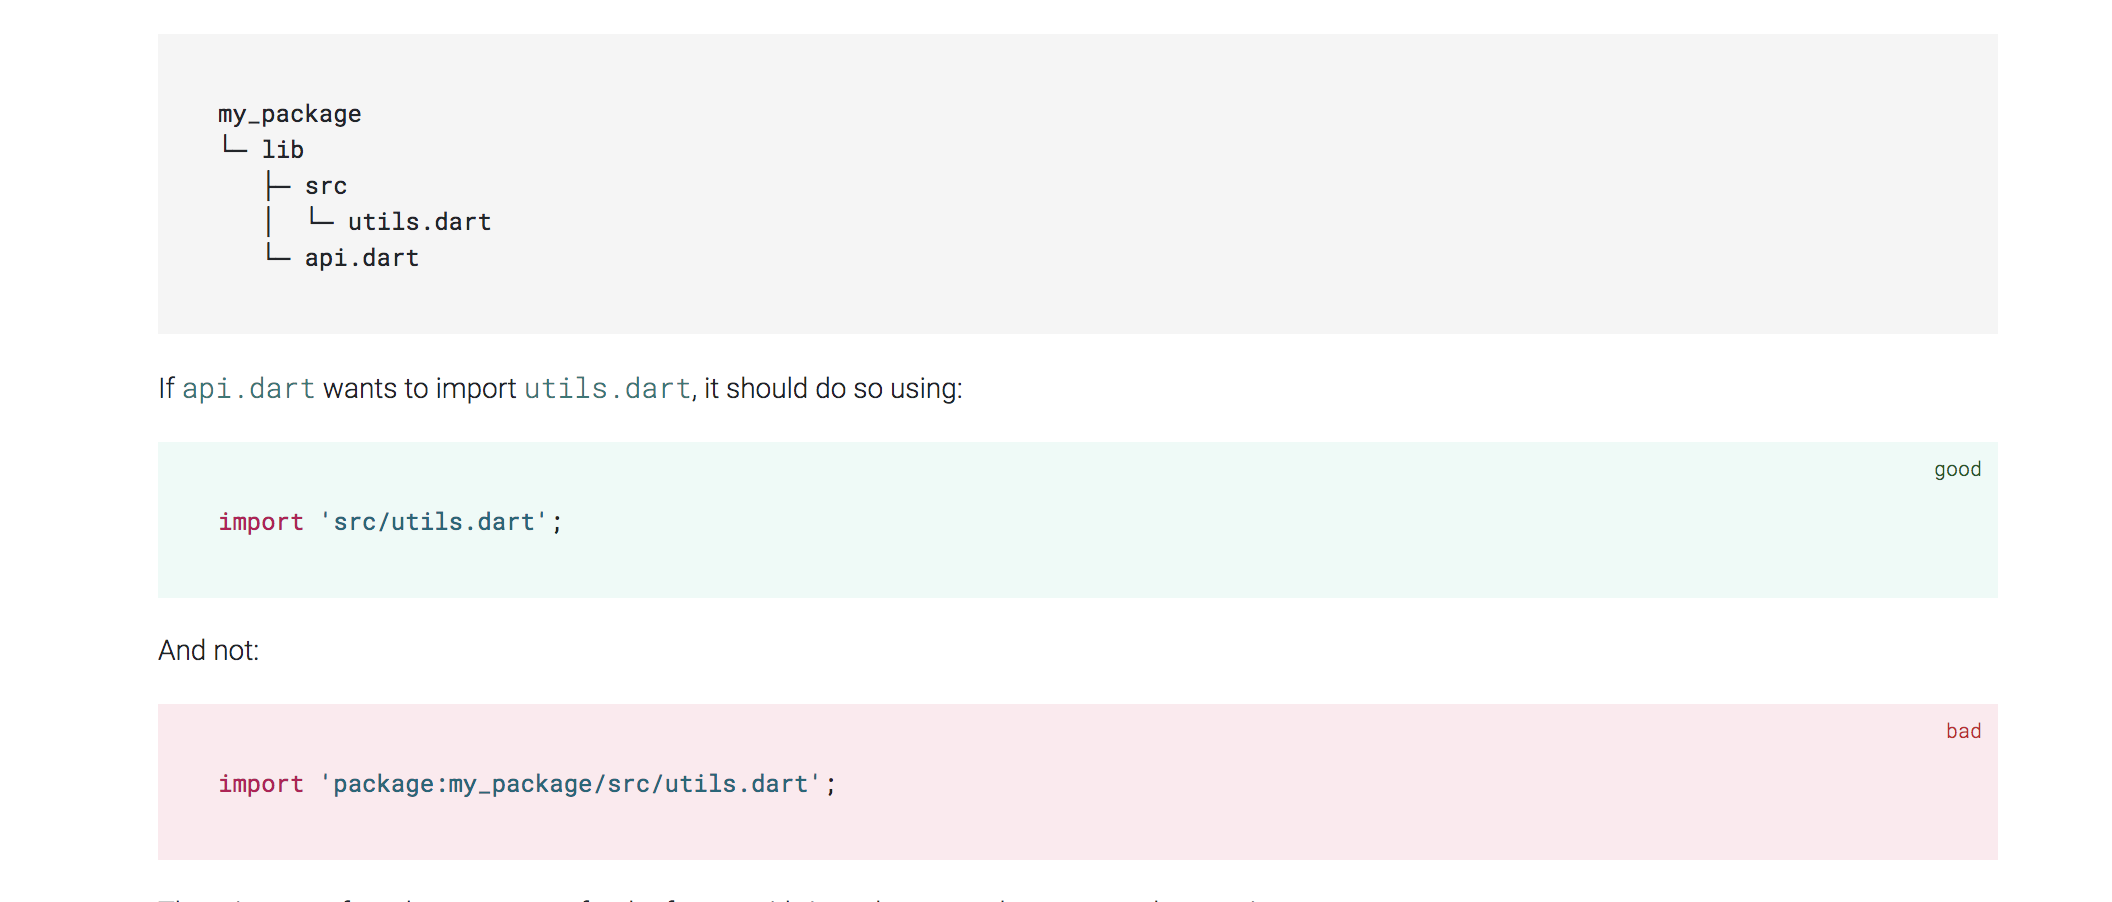
Ever wondered what is the right way to import a file in your own package?
Prefer relative imports to absolute imports.
Why?
- It's shorter and cleaner.
- We can easily differentiate our files and third-party ones.
- It makes sense, doesn't it?
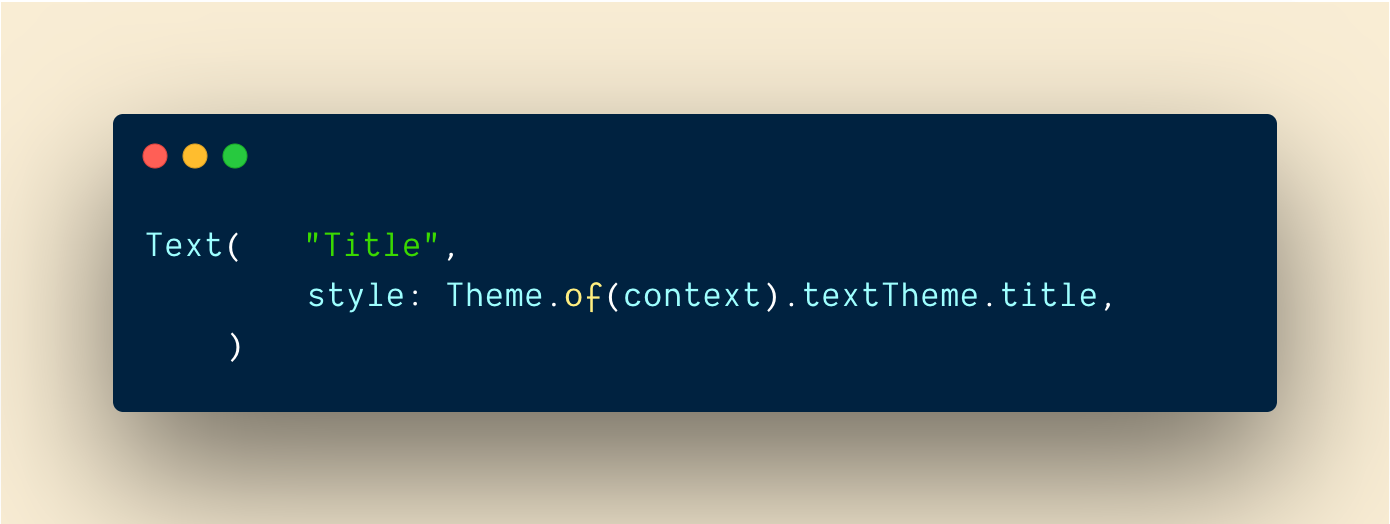
Tired of defining textStyle everytime you want to customize Text? Even worse if you have multiple theme (dark, light, full black theme etc).
just use
Theme.of(context).textTheme.title
where there are other styles like title inside textTheme.
try in dartpad with theme example
If we are to initialize growable collection, use literal initialization rather than with constructors.
// Good
var points = [];
var addresses = {};

// Bad
var points = List();
var addresses = Map();


// With type argument

// Good
var points = <Point>[];
var addresses = <String, Address>{};

// Bad
var points = List<Point>();
var addresses = Map<String, Address>();
We can use fat arrow => members (function, getter,setter) in dart.
I would not use => if the declaration is not ONE LINER. But few lines are OK.
void main() {
User()
    ..firstName = "Laxman"
    ..lastName = " Bhattarai"
    ..age = 18
    ..printUser();
}

class User {
String firstName;
String lastName;
DateTime birthday;

String get fullName => firstName + lastName;

set age(int age) =>  birthday = DateTime.now().subtract(Duration(days: age * 365));

int get age => DateTime.now().year - birthday.year;

bool get isAdult => age >= 18;

printUser() => print(fullName + " is a ${isAdult ? "Adult" : "Child"}");
}
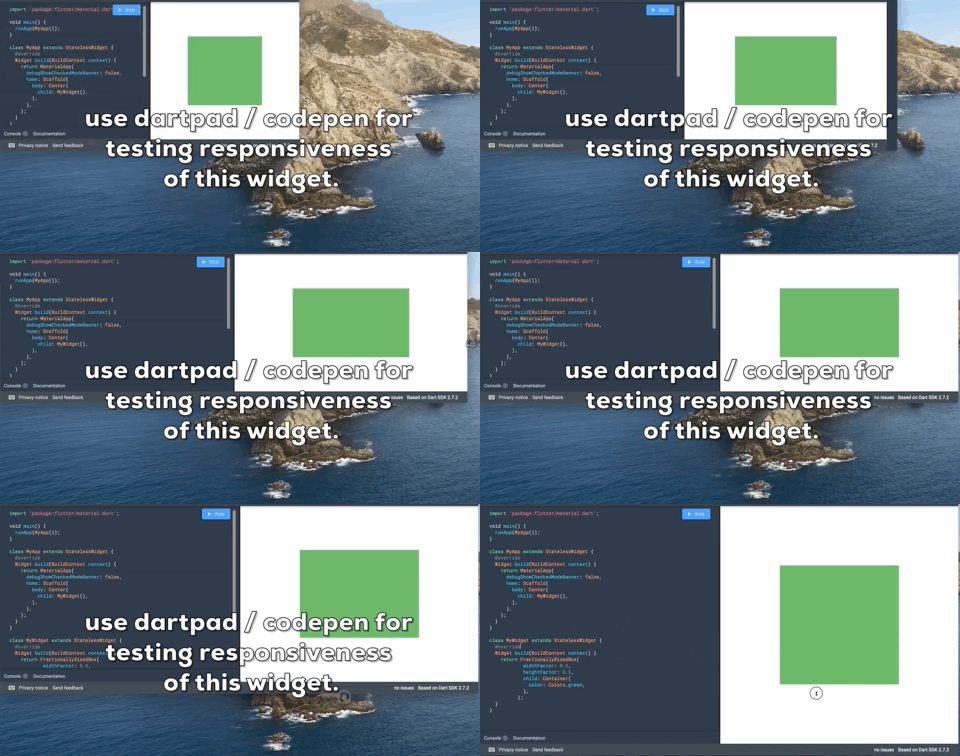
Ever wanted the widget to have height and width exactly in the same proportion to it's screen's height and width?
FractionallySizedBox is build exactly for that use case. Just give it the fraction you need for your height and width and it will handle everything else. The fraction value will range between 0.0 to 1.0
FractionallySizedBox(
            widthFactor: 0.5,
            heightFactor: 0.5,
            child: Container(color: Colors.green),
        )
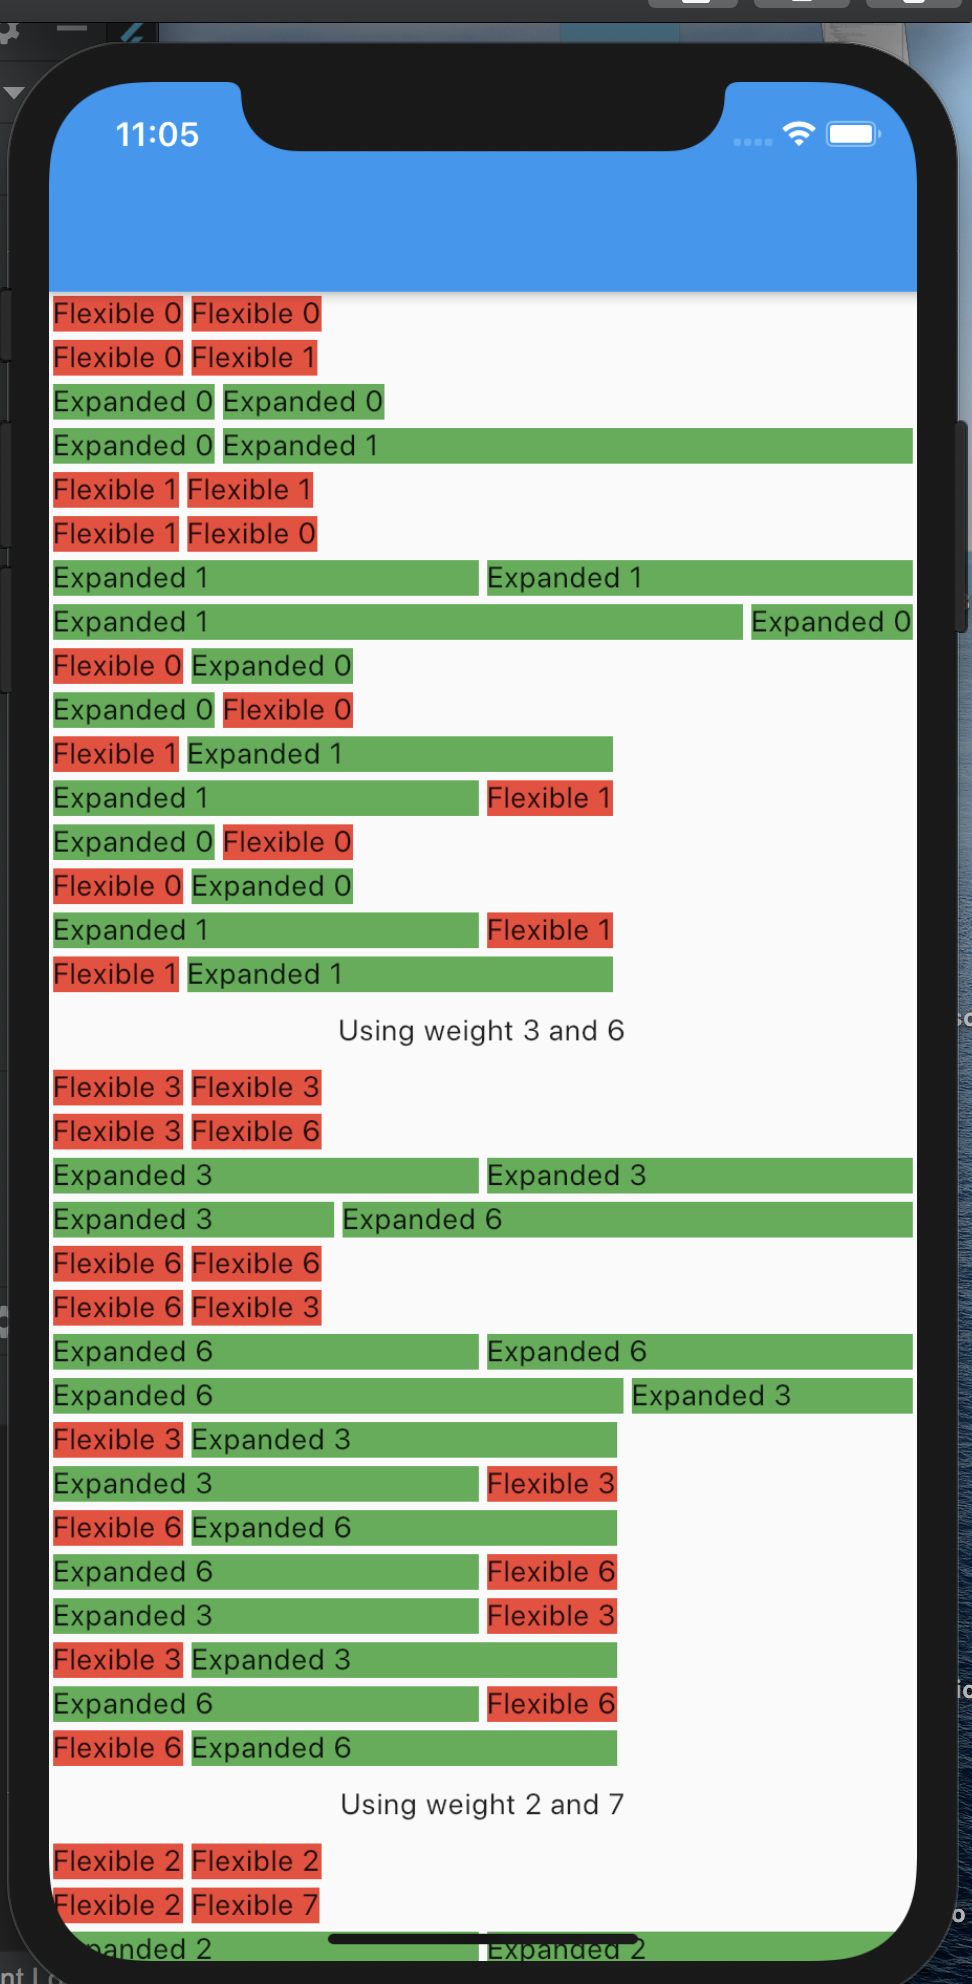
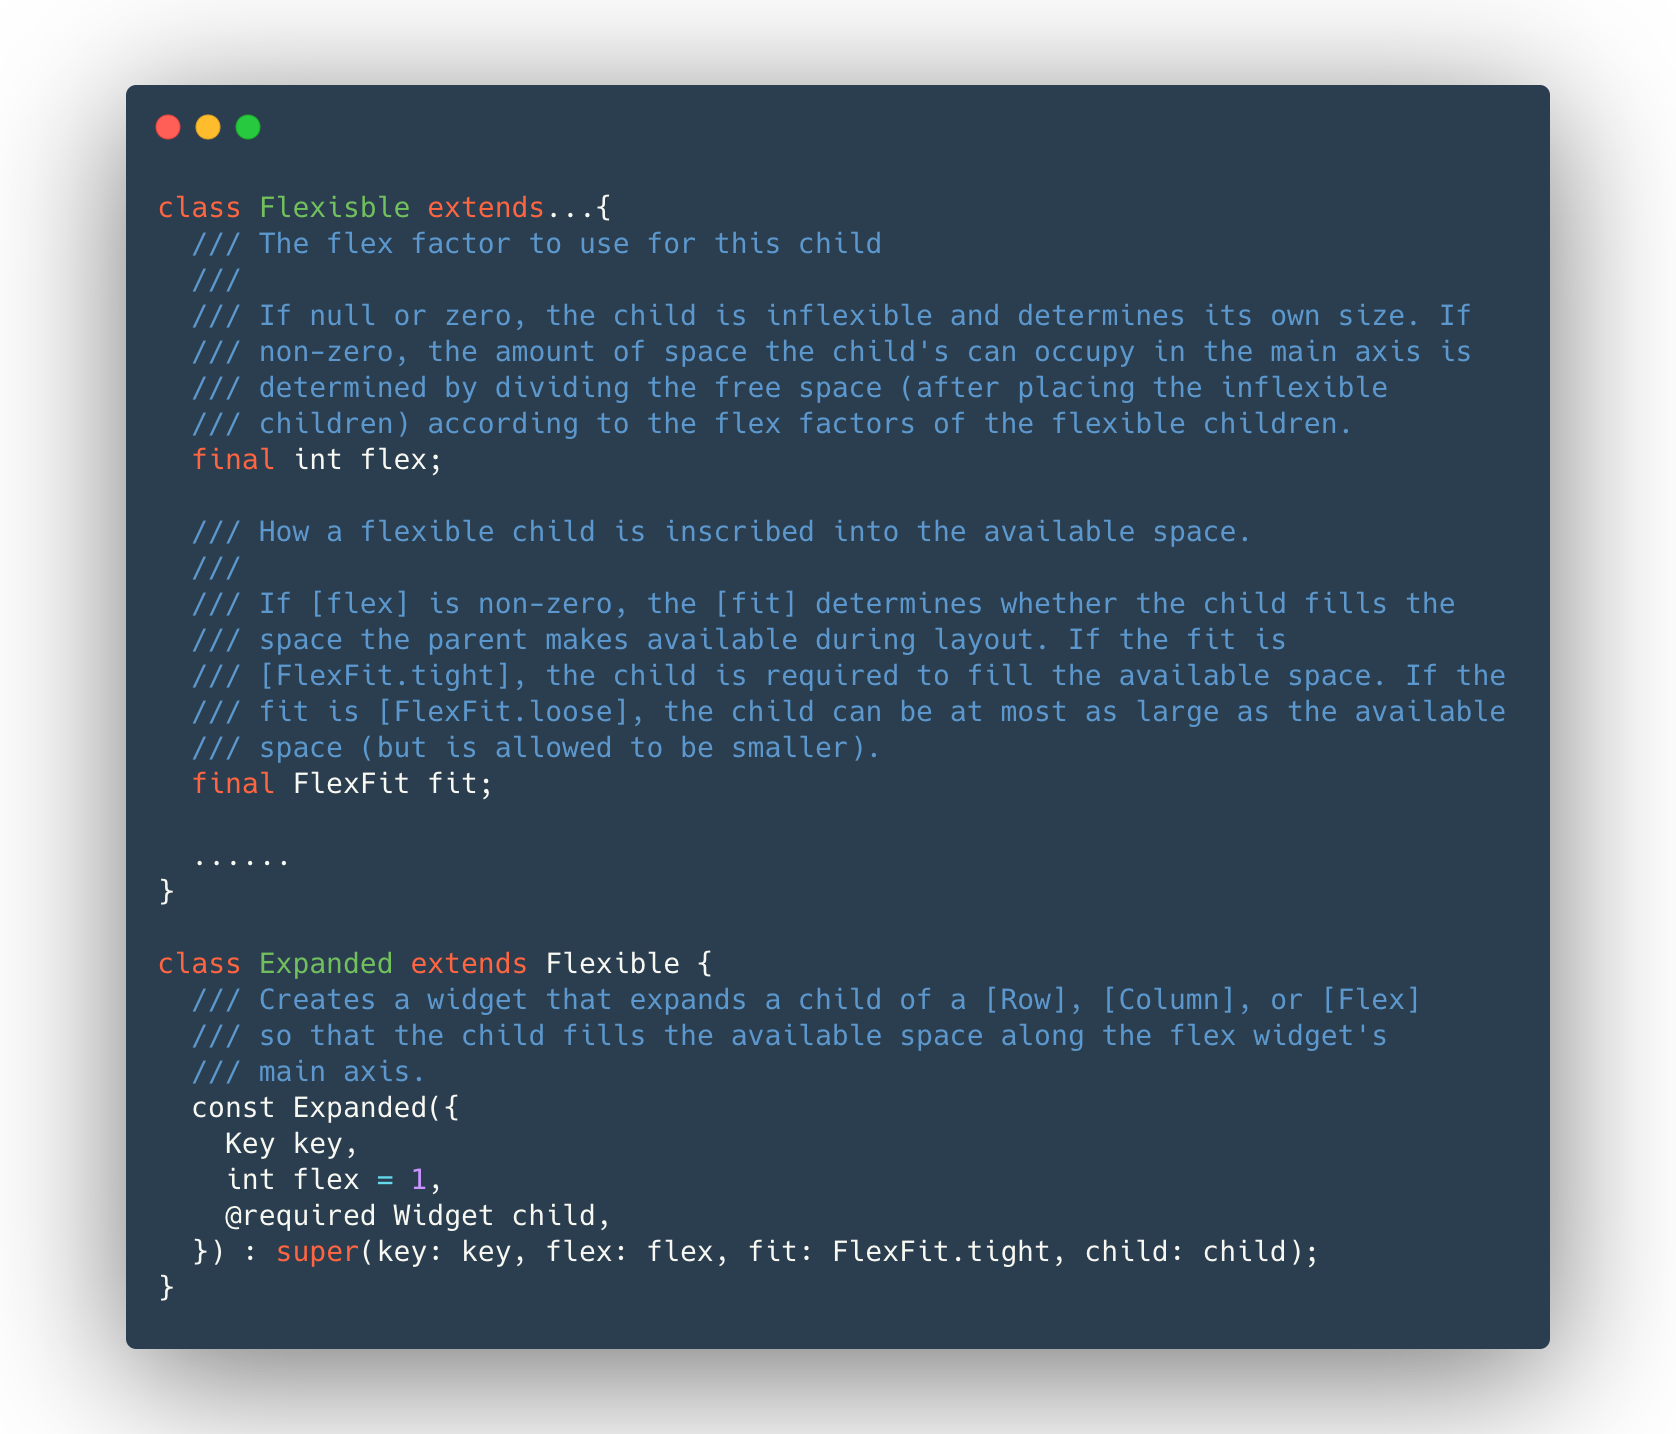
Expanded() is nothing more than Flexible() with
Flexible (fit: FlexFit.tight) = Expanded()
but, Flexible uses fit :FlexFit.loose by default.
FlexFit.tight = Wants to fit tight into parent taking as much space as possible.
FlexFit.loose = Wants to fit loose into parent taking as little space as possible for itself.
flex = The factor of space taken from parent. Mostly not fully used if flex: FlexFit.loose used i.e. Flexible.
If you fully read the following image, you will fully understand the difference between Flexible and Expanded
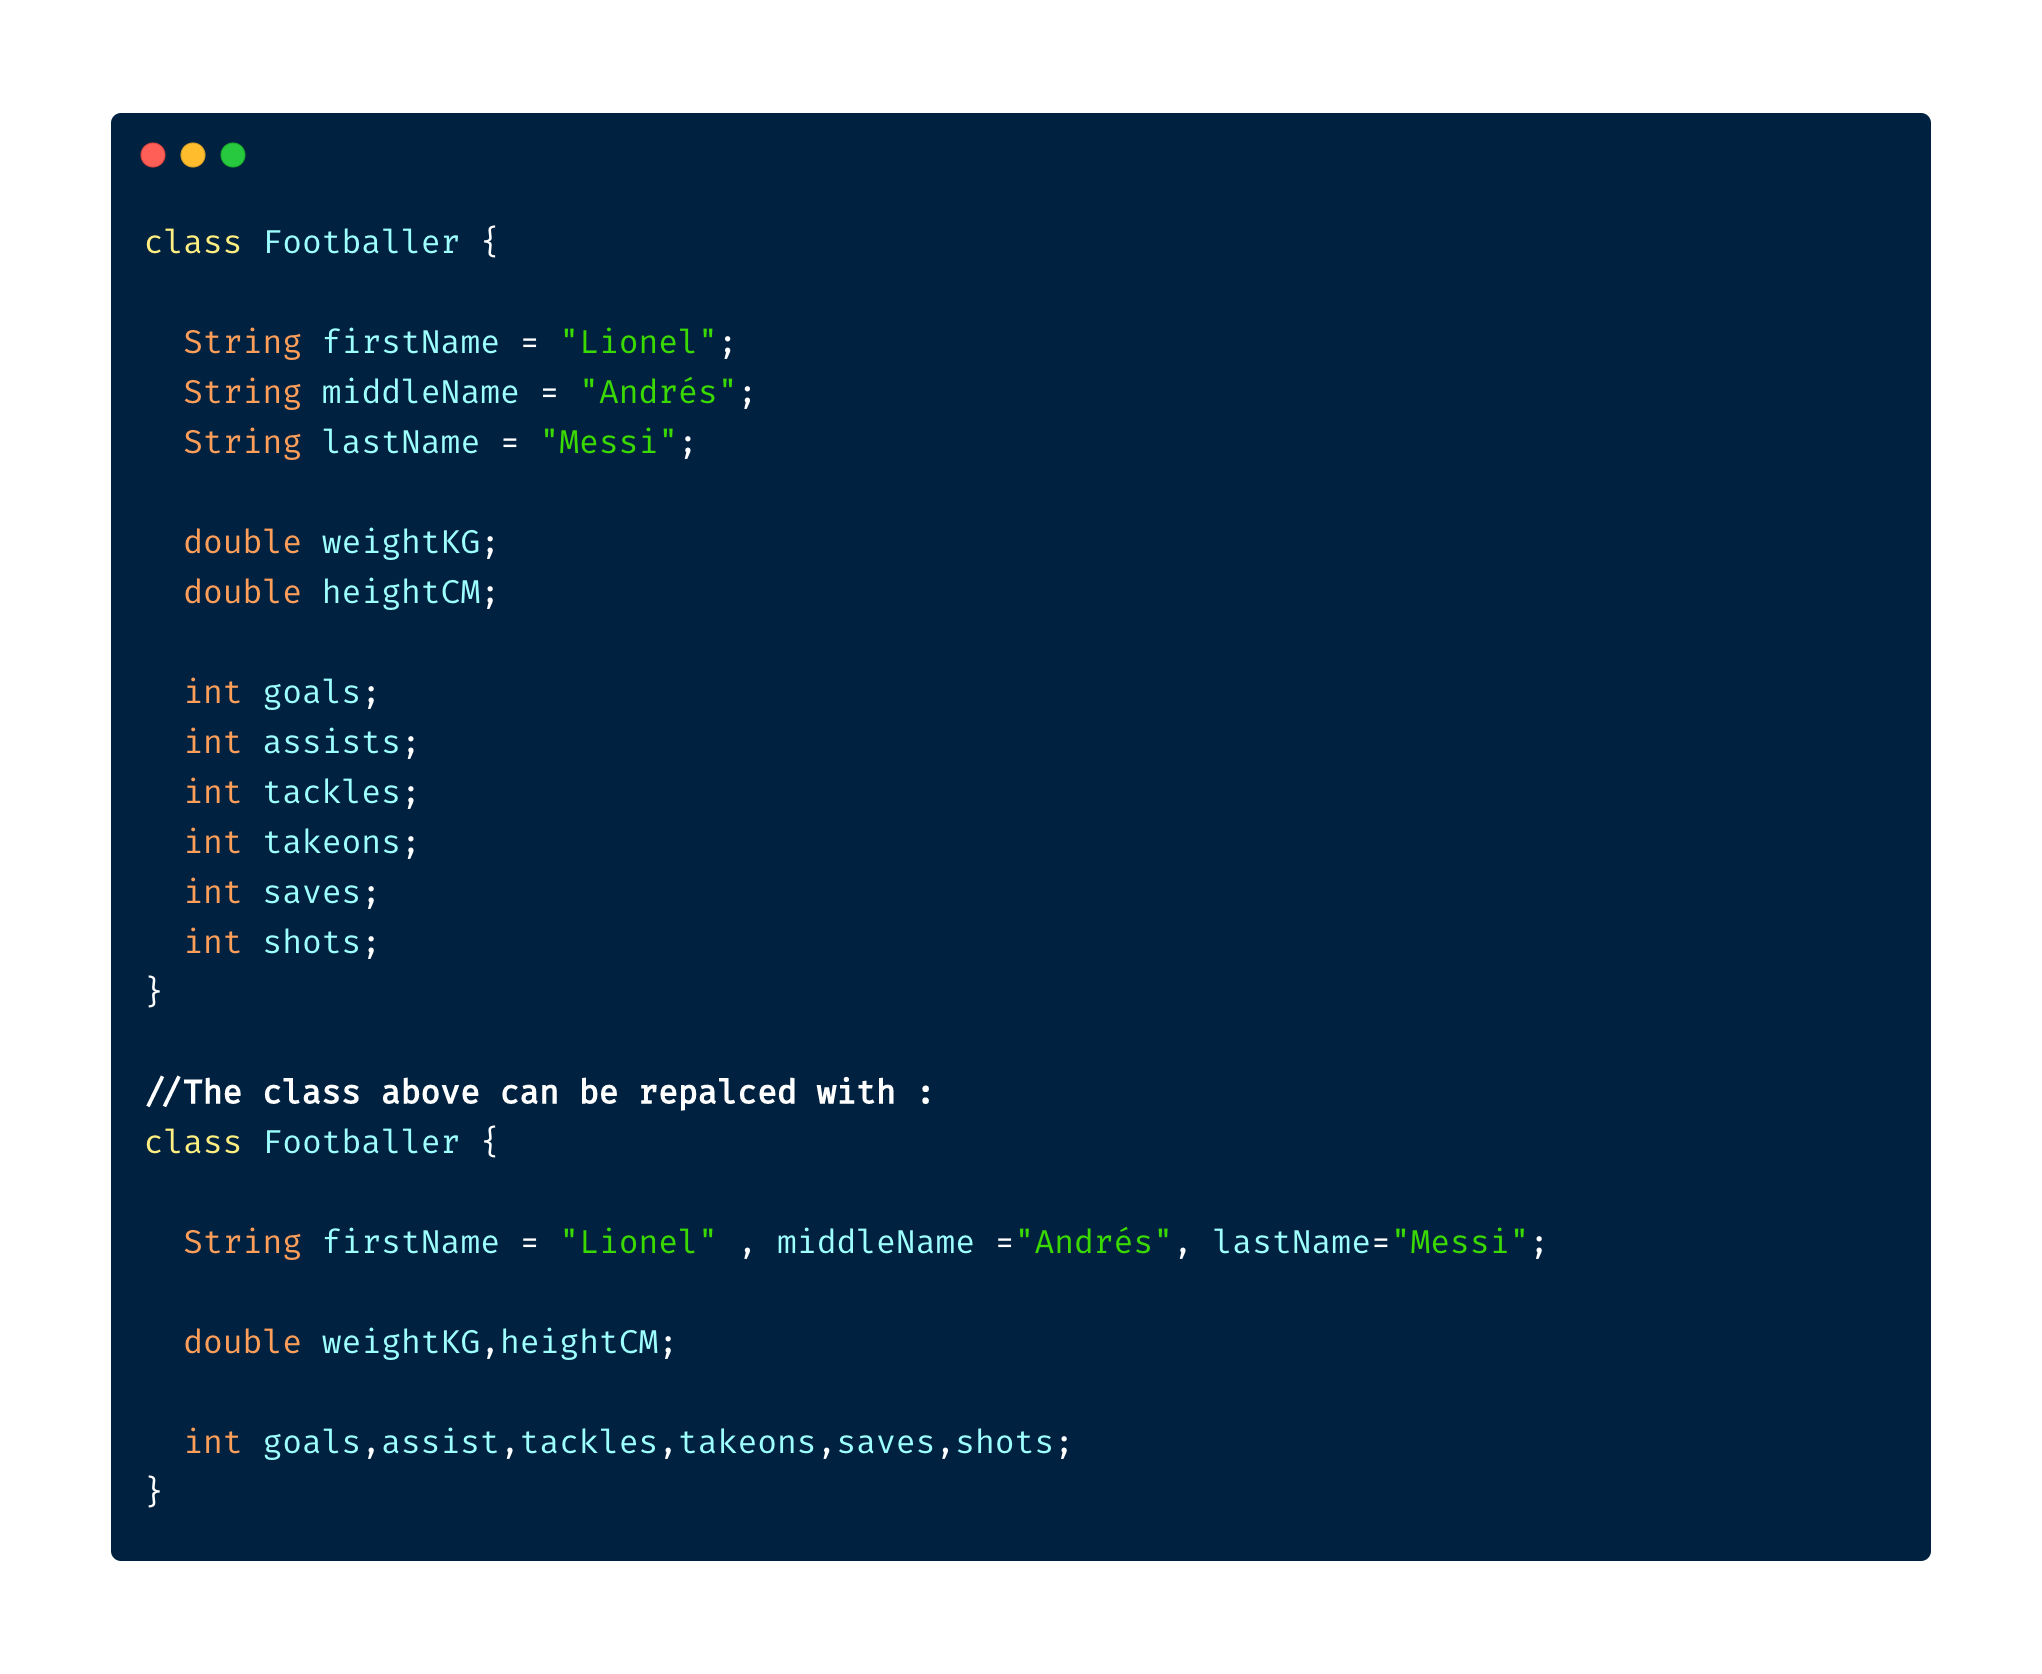
If you have been declaring each member separately all the time, you can declare members of same types at once.
I wouldn't declare age and shoeSize at once because they are not related.
With great power comes great responsibility, Use this wisely.
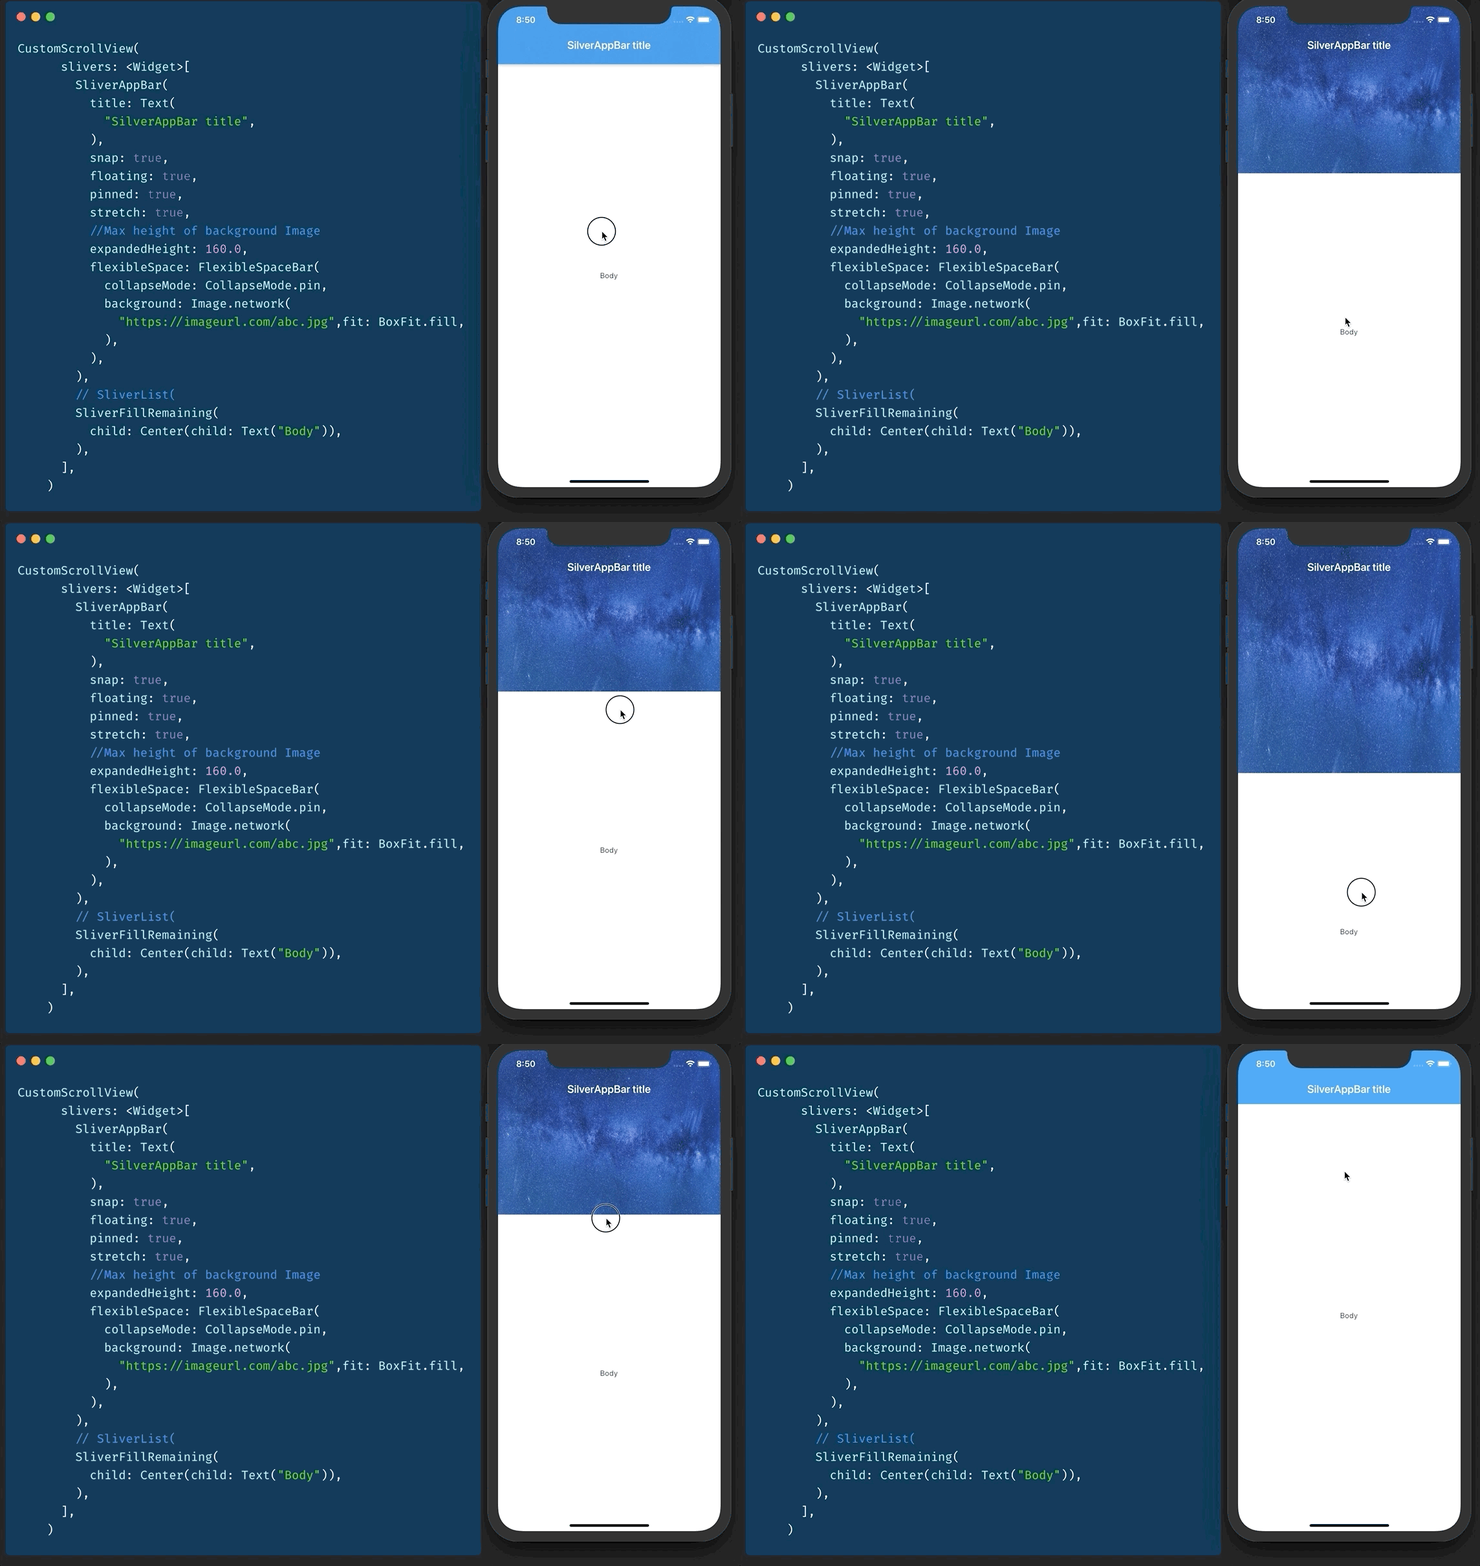
Remember CollapsableAppBar (android) / ParallaxHeader (ios)? We have SliverAppBar in Flutter to do exactly that.
To use it, you will have to have a CustomScrollView as parent.
then you add two slivers of it.
- SliverAppBar
- SliverFillRemaining
You can play with values of snap, floating, pinned etc to get desired effect
see various types of SliverAppBars here
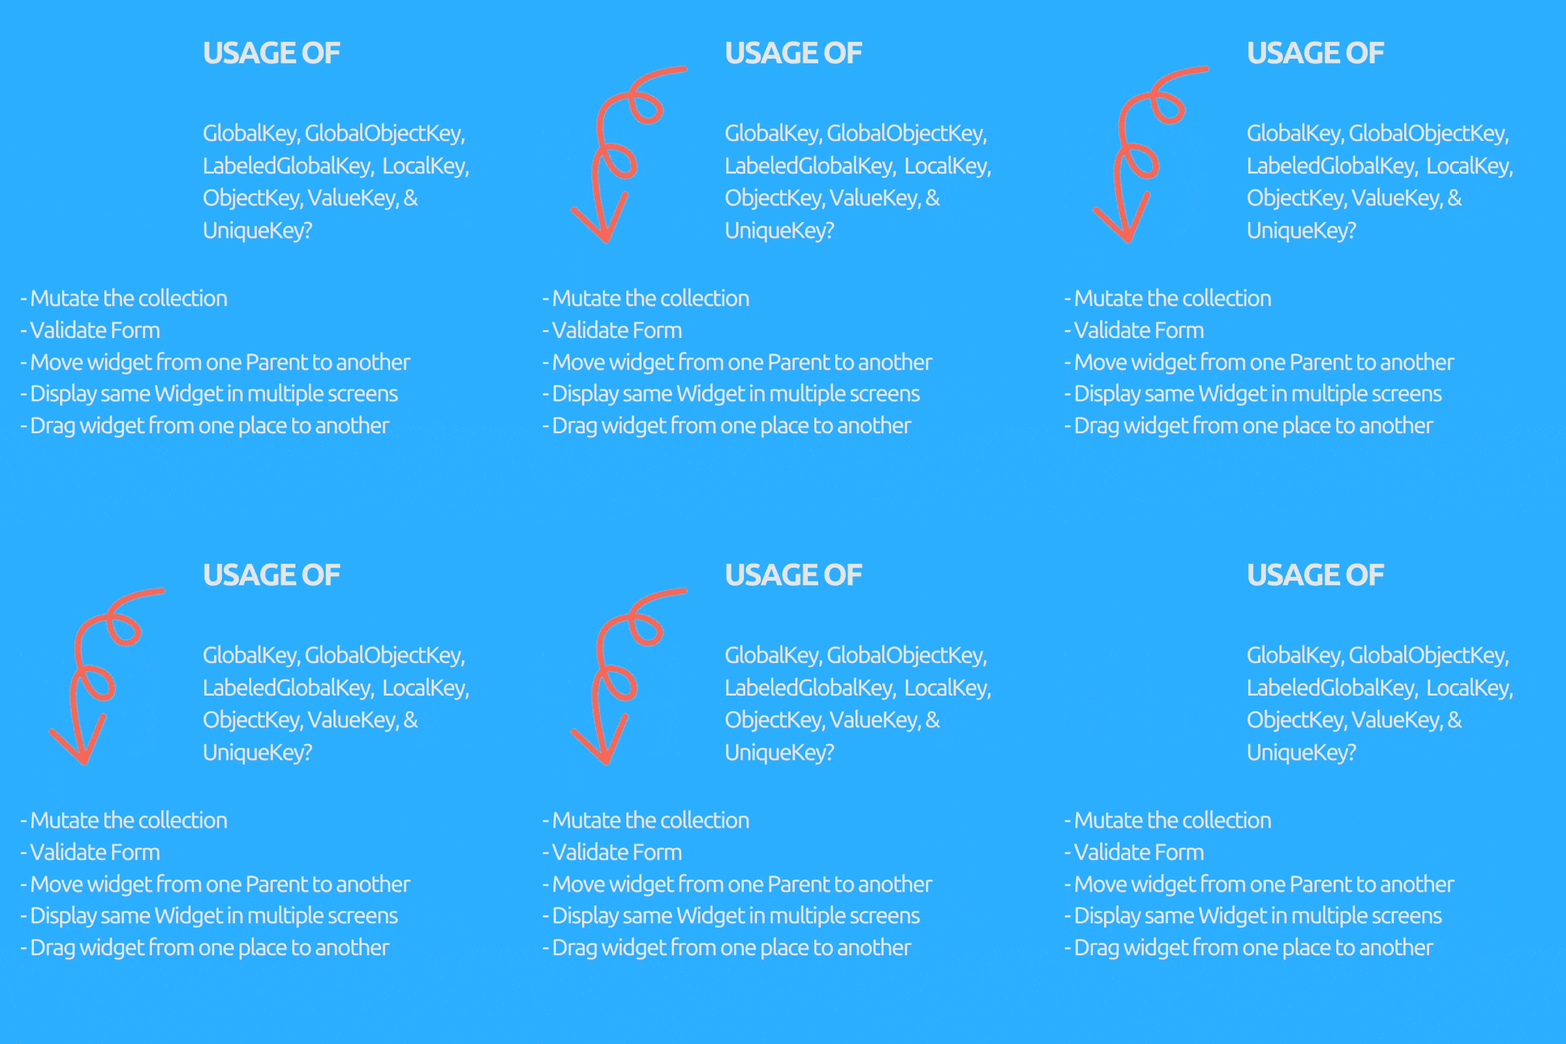
Ever wondered why we need GlobalKey(children : GlobalObjectKey, LabeledGlobalKey), LocalKey(children: ObjectKey, ValueKey & UniqueKey) right?
They are used to access or restore state In a statefulWidget (Mostly we don't need them at all if our widget tree is all Stateless Widgets).
- Mutate the collection i.e. remove / add / reorder item to list in stateful widget like draggable todo list where checked items get removed (ObjectKey, ValueKey & UniqueKey)
- Move widget from one Parent to another preserving it's state. (GlobalKey)
- Display same Widget in multiple screens and holding its state.(GlobalKey)
- Validate Form.(GlobalKey)
- You can to give a key without using any data. (UniqueKey)
- If you can use certain field of data like UUID of users as unique Key. (ValueKey)
- If you do not have any unique field to use as key but object itself is unique. (ObjectKey)
- If you have multiple Forms or Multiple Widgets of same type that need GlobalKey. (GlobalObjectKey, LabeledGlobalKey whichever is appropriate , similar logic to ValueKey and ObjectKey)
If you are tired to long and verbose DateTime and Duration calculation Time.dart comes to your rescue.
//Before
var 3dayLater = DateTime.now().add(Duration(days: 3)).day;

//After
var 3dayLater = 3.days.fromNow.day;


//Before
var duration = Duration(minutes: 10) +Duration(seconds: 15) -
    Duration(minutes: 3) +Duration(hours: 2);

//After
var duration = 10.minutes + 15.seconds - 3.minutes + 2.hours;

//Before
await  Future.delayed(Duration(seconds: 2))

//After
await 2.seconds.delay
give it a try https://github.com/jogboms/time.dart
You can simply test if two values are equal in dart with expect(actual, expected)
But if you want to test errors use the function closure that throws error as actual and check with throwsA<ErrorType> as expected.
  void main() {
    group("Exception/Error testing", () {
      test("test method that throws errors", () {
        expect(_testError(fails: false), false);
        expect(() => _testError(fails: true), throwsA(isA<FooError>()));
      });
    });
  }

  bool _testError({bool fails}) {
    if(fails)throw FooError();
    return fails;
  }

  class FooError extends Error {}
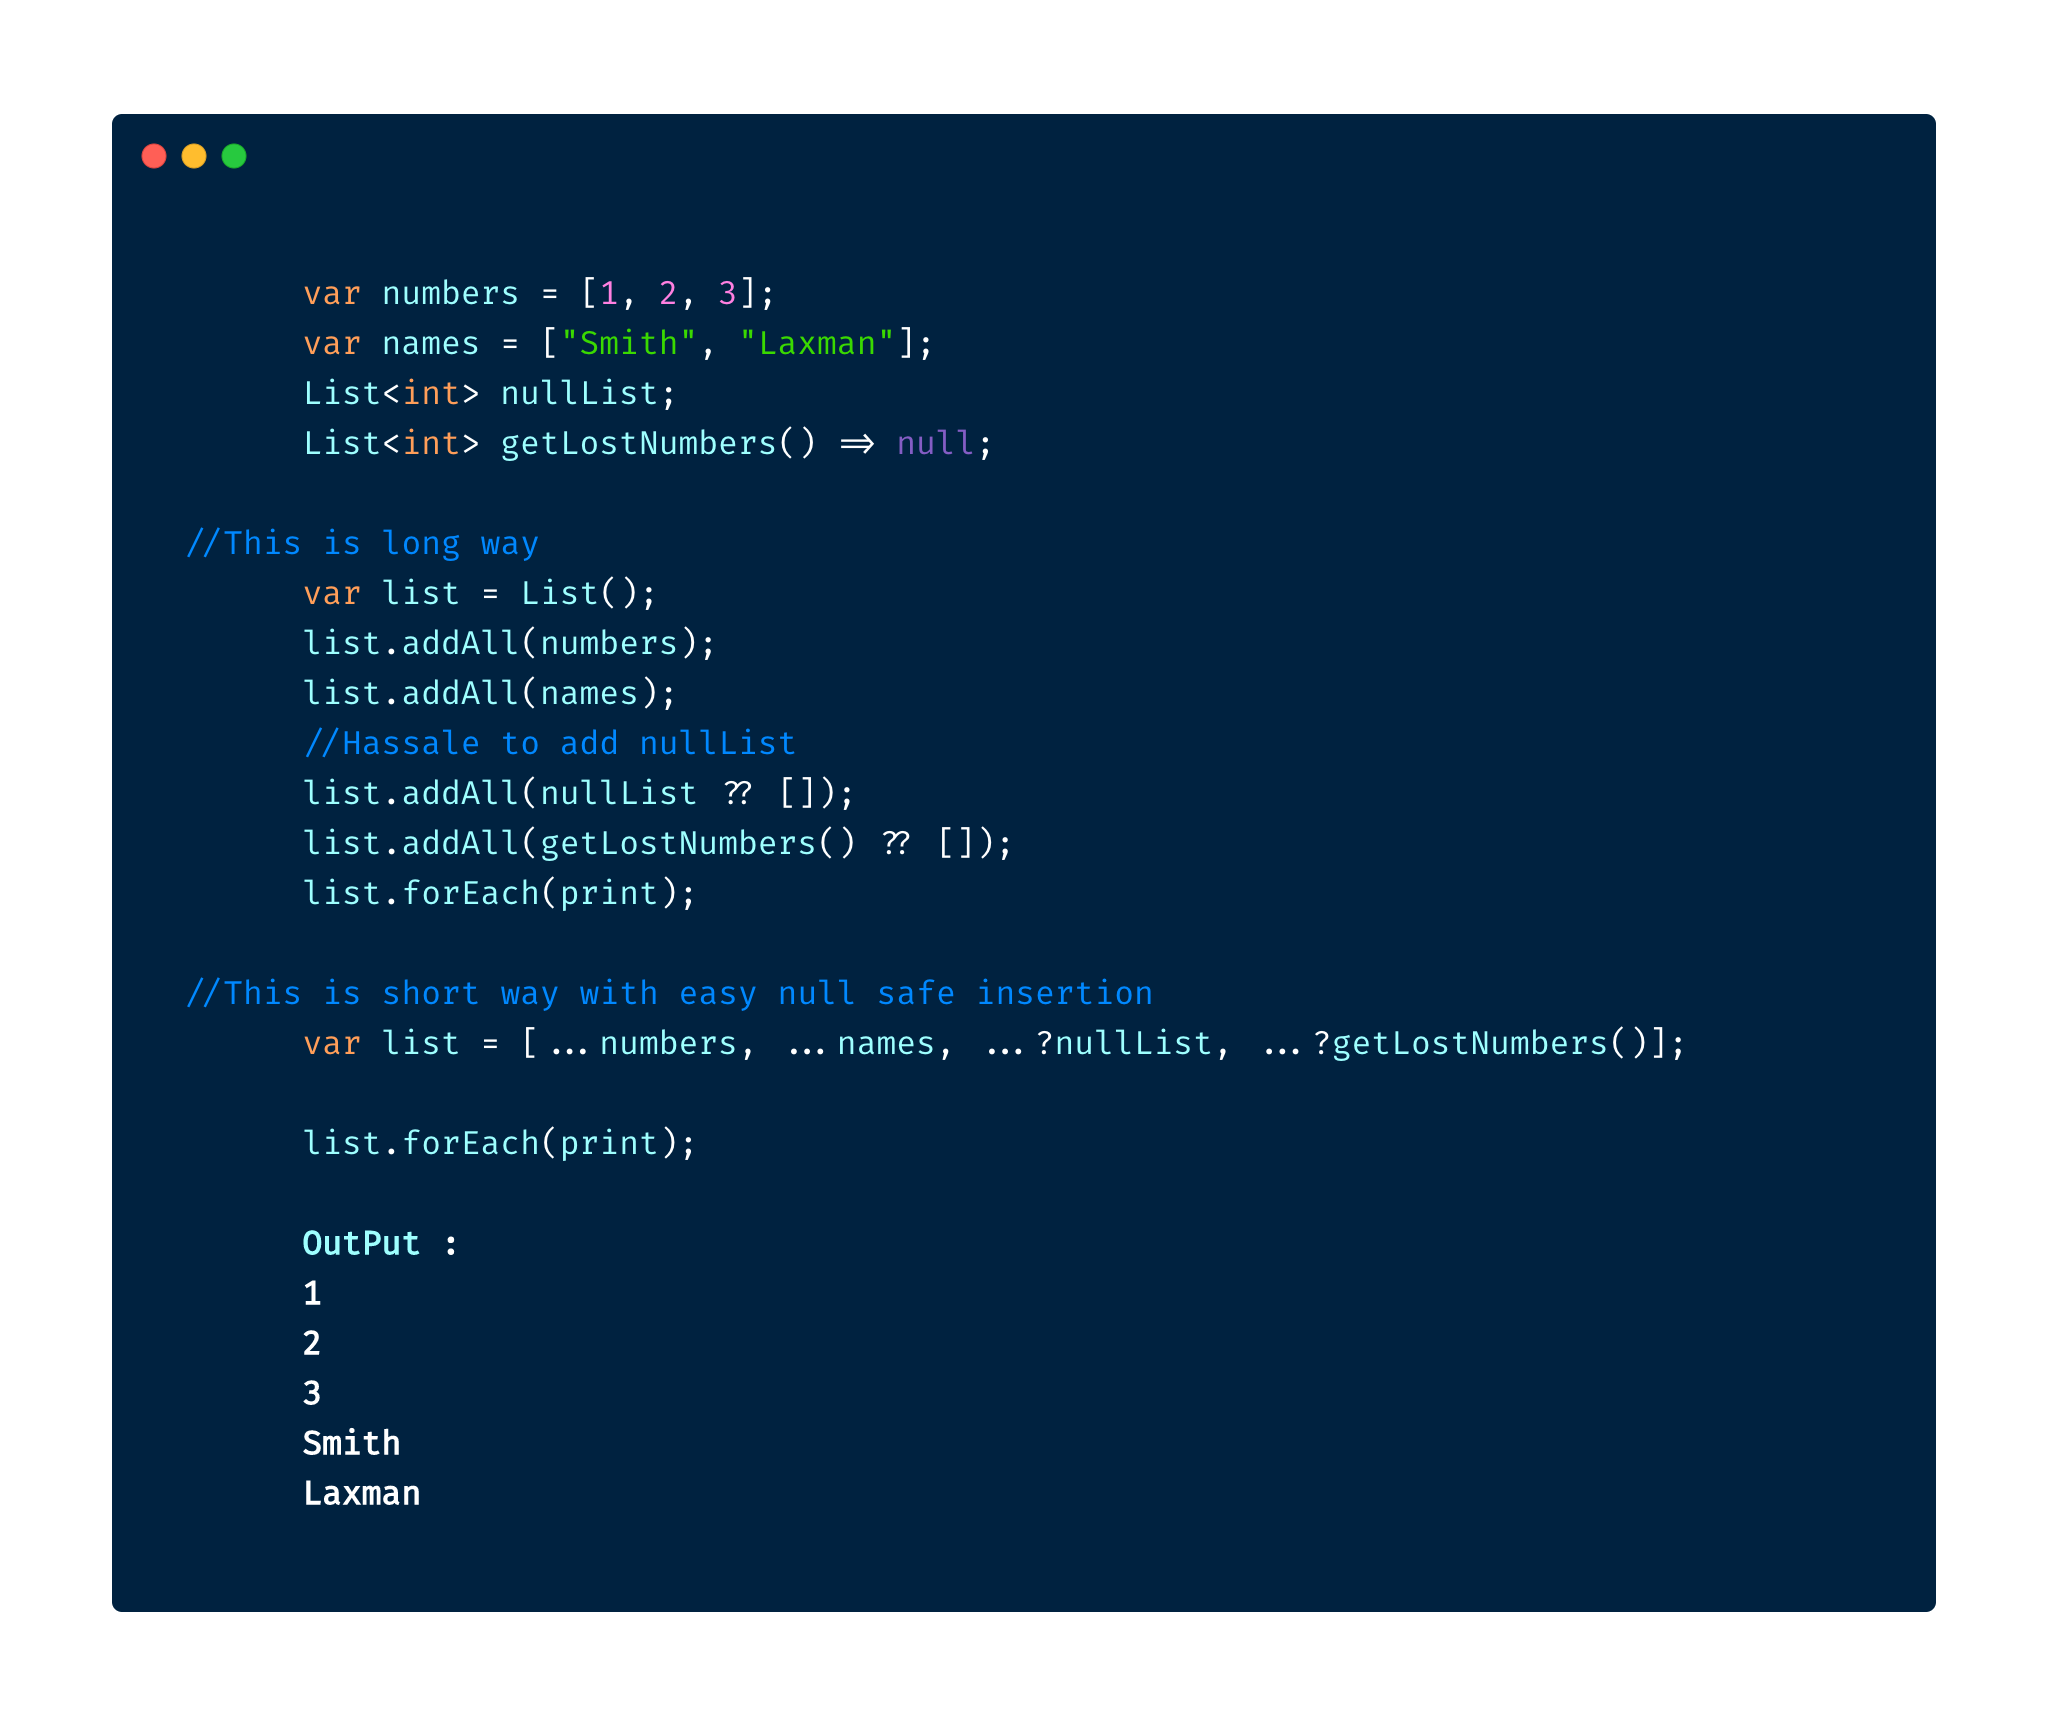
We normally use addAll() on collection to add one collection to another.
But From dart 2.3 and above, we can use Spread Operator (...) to add collection inside collection.
In flutter we can call instance of a class like we call method.
What you have to do is defile a call() method of any return type or arguments. that call() method will be called when you call the instance.
void main() {
    var member = CallableClass();
    member("Flutter");
}

class CallableClass{
    call(String name){
        print("Name is $name");
    }
}
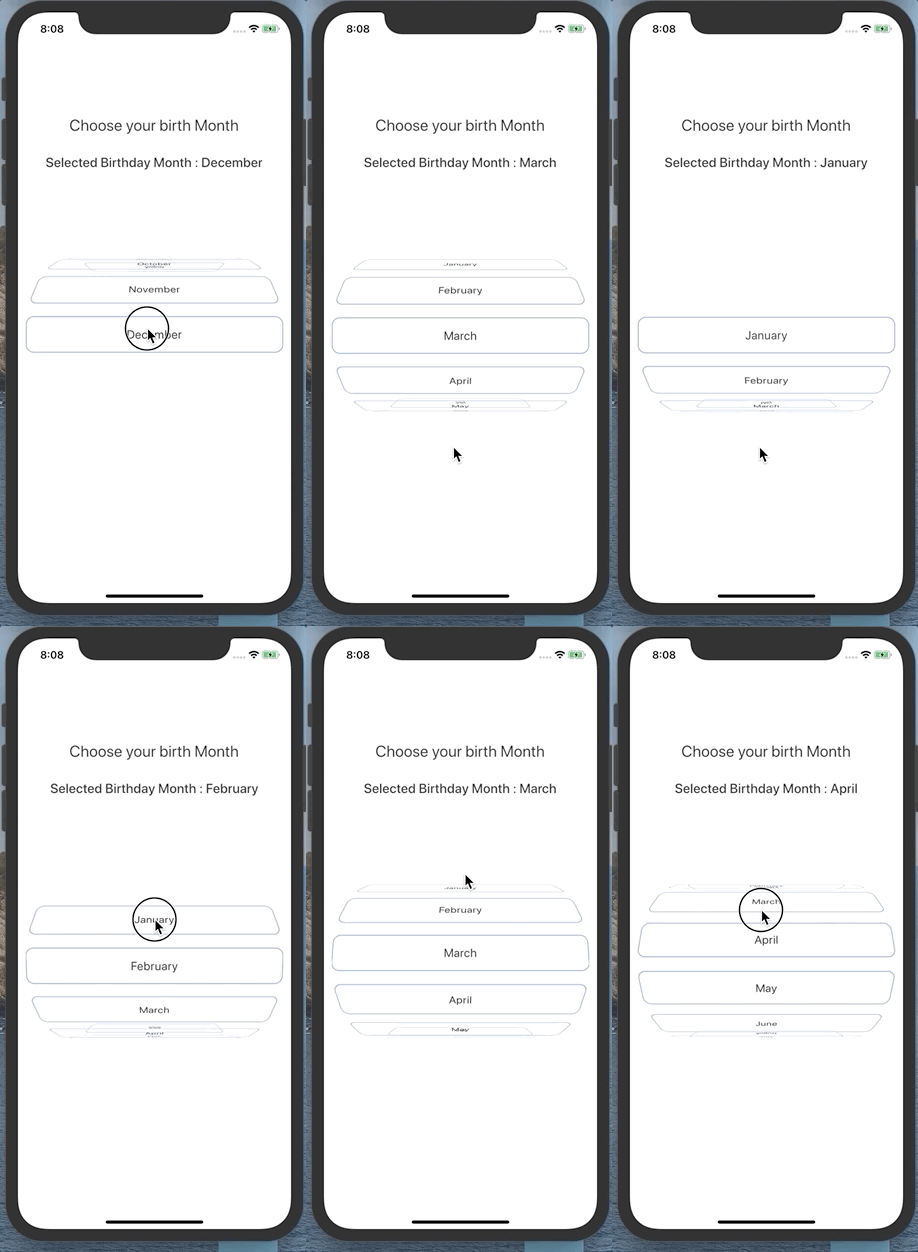
We can implement following Wheel List using ListWheelScrollView in flutter.
Just give it the children and it will start working for you.
You can customize the wheel with Constructor arguments of ListWheelScrollView play with them.
ListWheelScrollView(
    children: <Widget>[
        ..Children Widgets
    ],
)
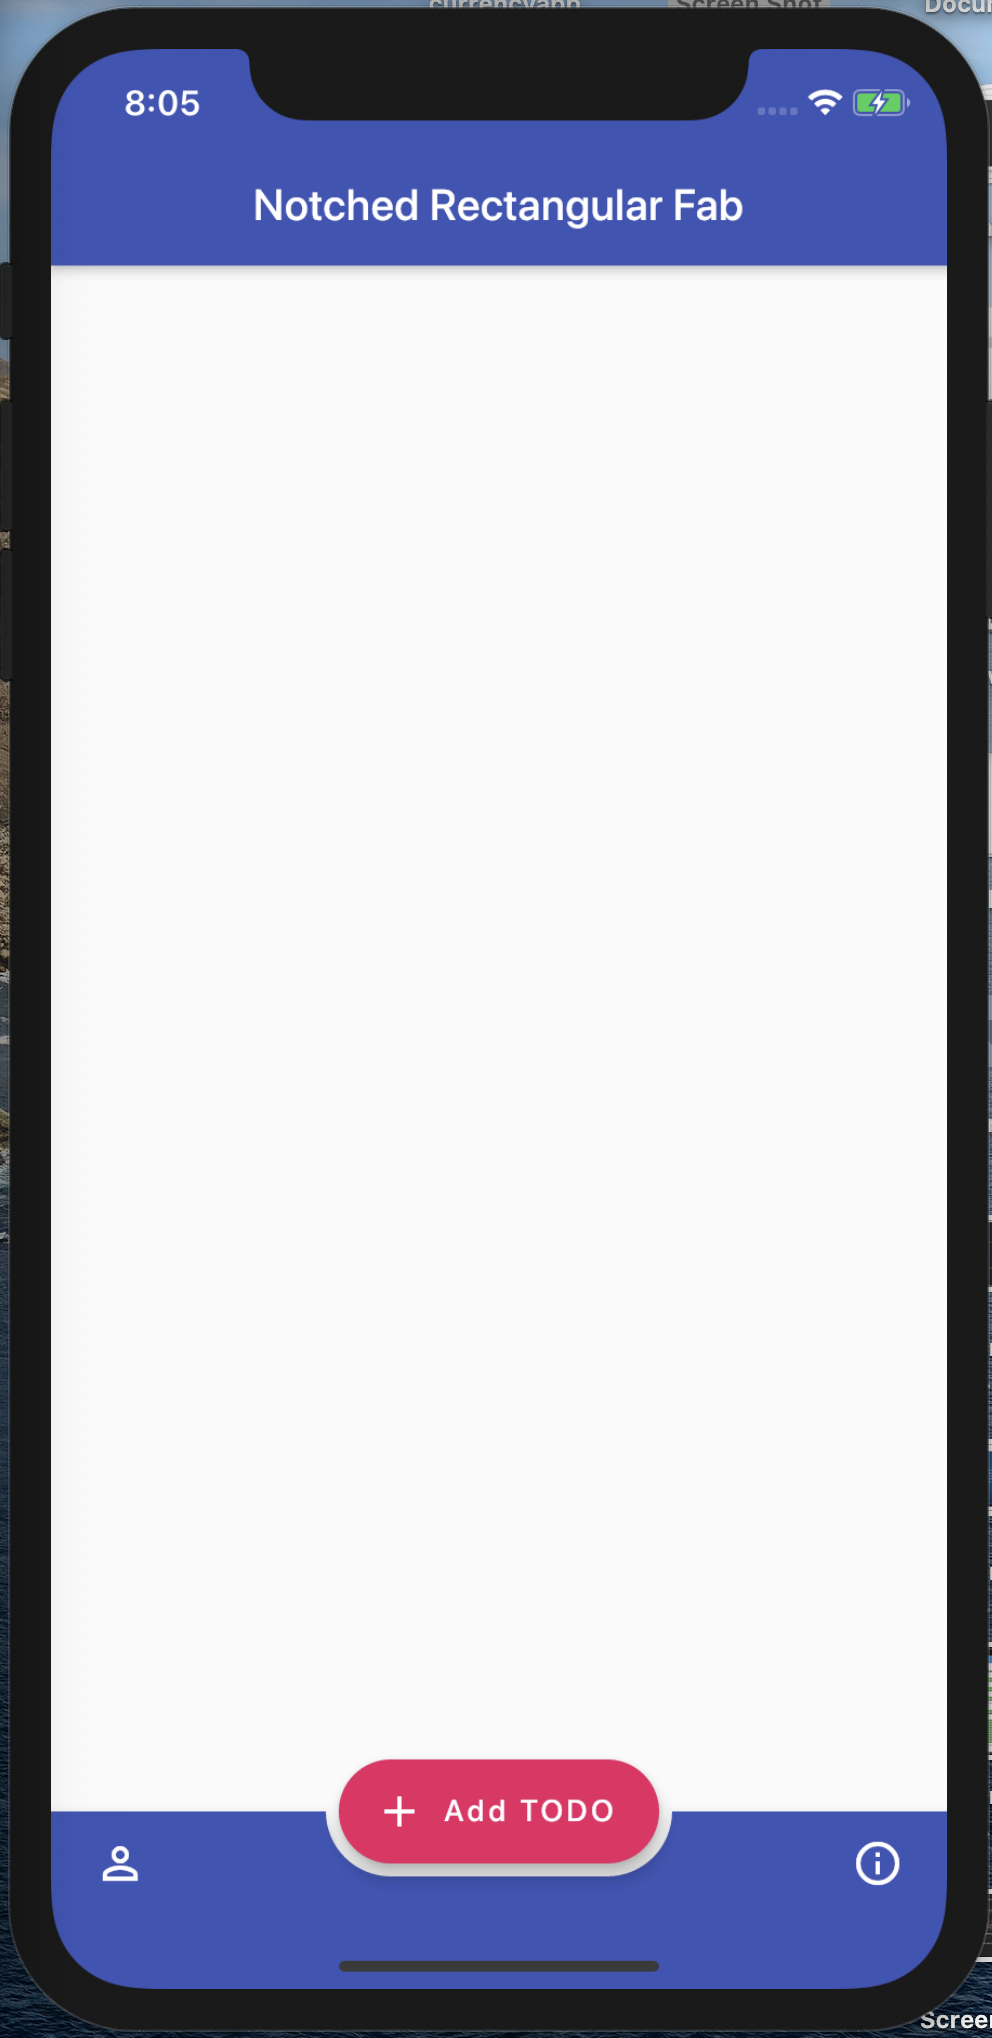
Circular notched Button Bar with Fab is cool
BUT
Ever wanted rectangular Fab with Notch?
FloatingActionButton.extended with BottomAppBar's shape as AutomaticNotchedShape like this:
shape: AutomaticNotchedShape(
        RoundedRectangleBorder(),
        StadiumBorder(
          side: BorderSide(),
        ),
      ),
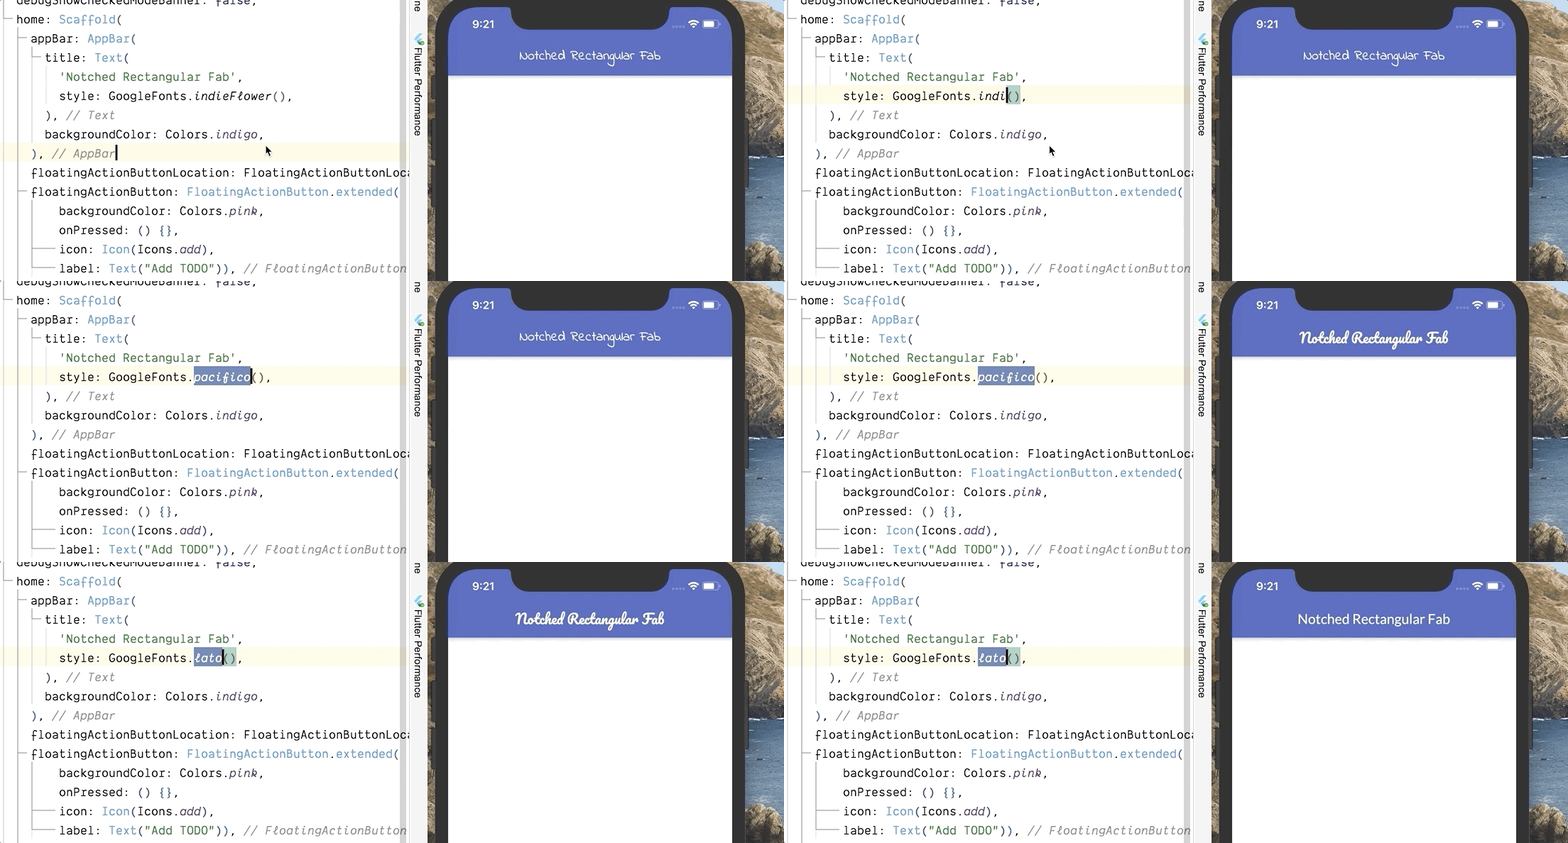
With the pub.dev package google_fonts you can use any google fonts without downloading them.
Just give the textStyle as any google fonts.
Want to set other textStyles properties? Just provide textStyle to the font (Which is a textStyle itself)
Text(
    'Notched Rectangular Fab',
    style: GoogleFonts.pacifico(
        textStyle: TextStyle(color: Colors.red),
    ),)
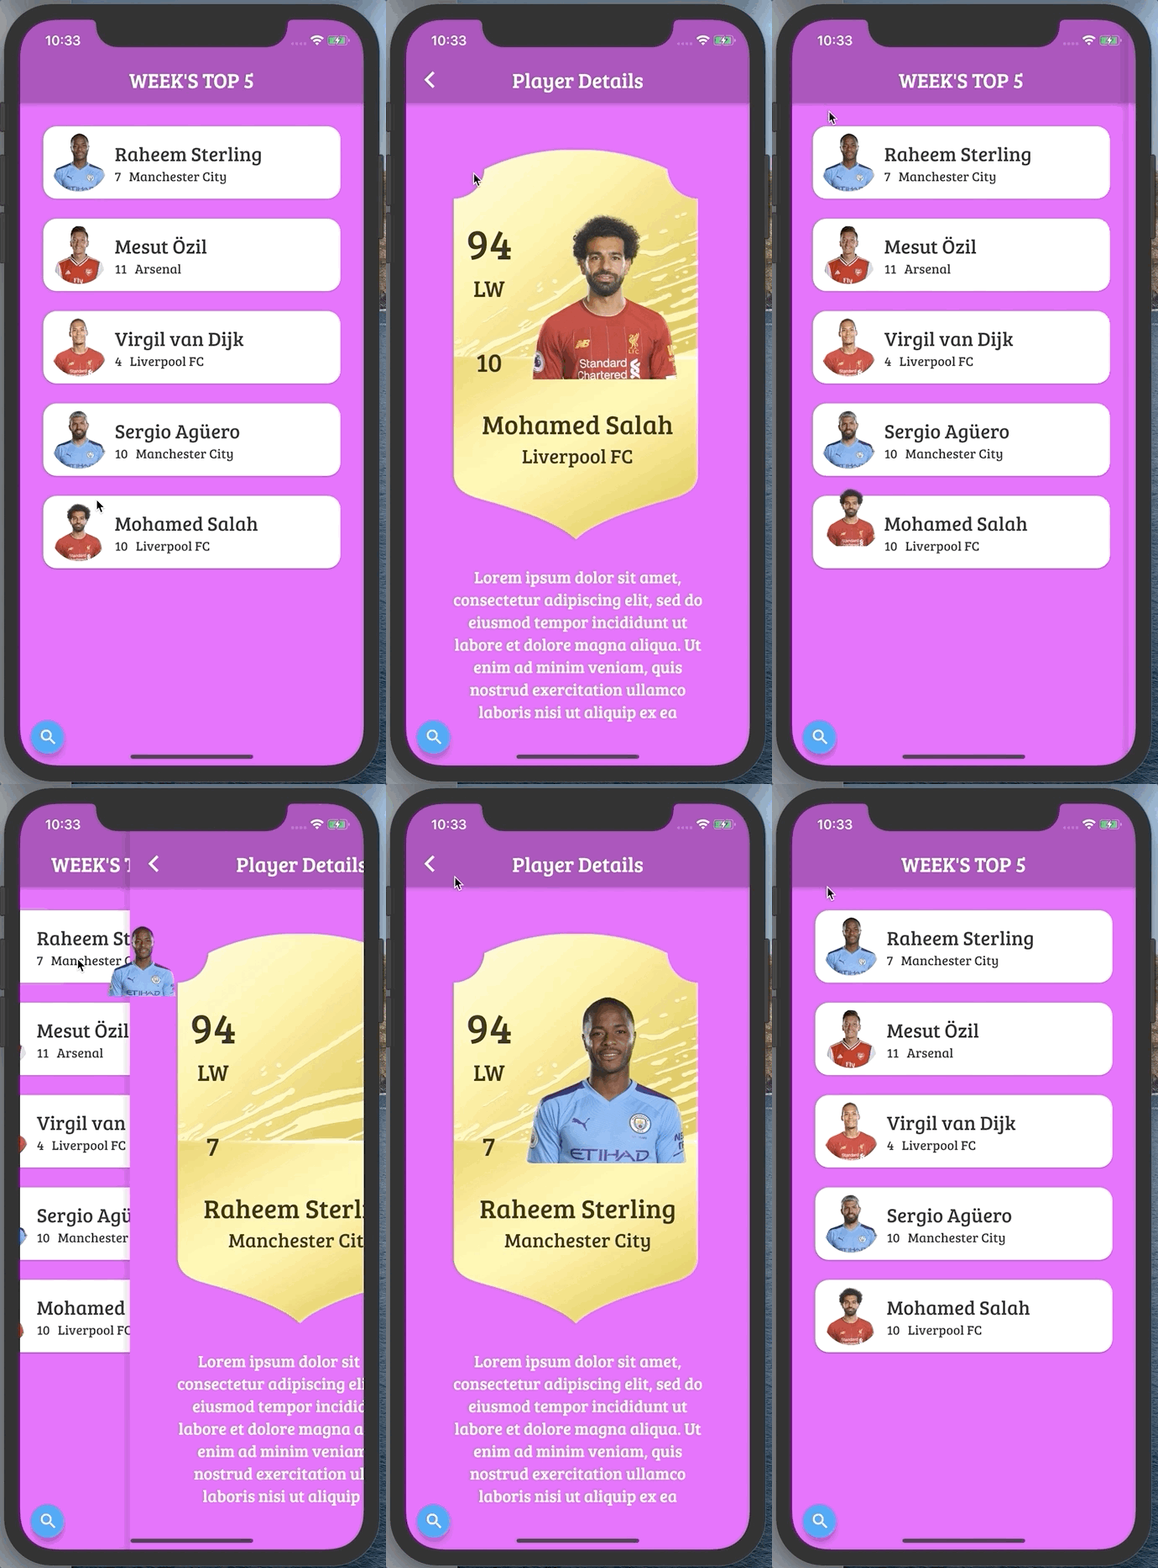
Flutter makes it super easy to do Shared Element / Hero animation with Widget called Hero.
Just give same tag for the Hero widget in both screen and your Widget will start flying from one screen to another.
Caution : Do not give a static string as tag if your UI has dynamic data like List, use a value of object like title,id etc as tag
//First Screen

FirstPageWidget extends StatelessWidget{
return Scaffold(
    ...
    Hero(
        tag: player.name
        child: Image.network(url)
    )
    //Other player List
    ...
    );
}

//Second Page

SecondPageWidget extends StatelessWidget{
return Scaffold(
    ...
    Hero(
        tag: player.name
        child: Image.network(url)
        )
    //Player details
    ...
    );
}
For better experience : Decrease the browser width
There are three types of arguments (Function arguments and constructor arguments work the same way).
-
Normal Parameters (✅✅Short & ❌Flexible) => required, requires all arguments to be called in order, most concise (doesn't need argument names),least flexible.
-
Named Parameters (✅Short & ✅✅Flexible) => Optional, can be called in any order BUT must provide the argument name.
-
Positional Parameters (✅✅Short & ✅Flexible) => optional but we cannot skip any argument on left to provide argument right to it. Does not require argument name.
 void main() {
     normalFunction("Laxman", "Bhattarai", 26, 65);

     optionalFunction("Laxman", "Bhattarai");
     optionalFunction("Laxman", "Bhattarai", age: 26);
     optionalFunction("Laxman", "Bhattarai", weight: 65);
     optionalFunction("Laxman", "Bhattarai", weight: 65, age: 26);

     positionalFunction("Laxman", "Bhattarai");
     positionalFunction("Laxman", "Bhattarai", 26);
     positionalFunction("Laxman", "Bhattarai", 26, 65);
 }


 //Requires all arguments passed in order, i.e. no meaning of default parameters
 normalFunction(String firstName, String lastName, int age, int weight) {
     print("$firstName $lastName age: $age weight: $weight");
 }


 //Optional, can be called in any order BUT must provide the argument name.
 optionalFunction(String firstName, String lastName,
     {int age = 18, int weight = 60}) {
     print("$firstName $lastName age: $age weight: $weight");
 }

 //Optional, doesn't need argument name  but cannot be skipped an argument on left to provide argument on right of it.
 positionalFunction(String first, String last,[int age = 18, int weight = 60]) {
     print("$first $last age: $age weight: $weight");
 }
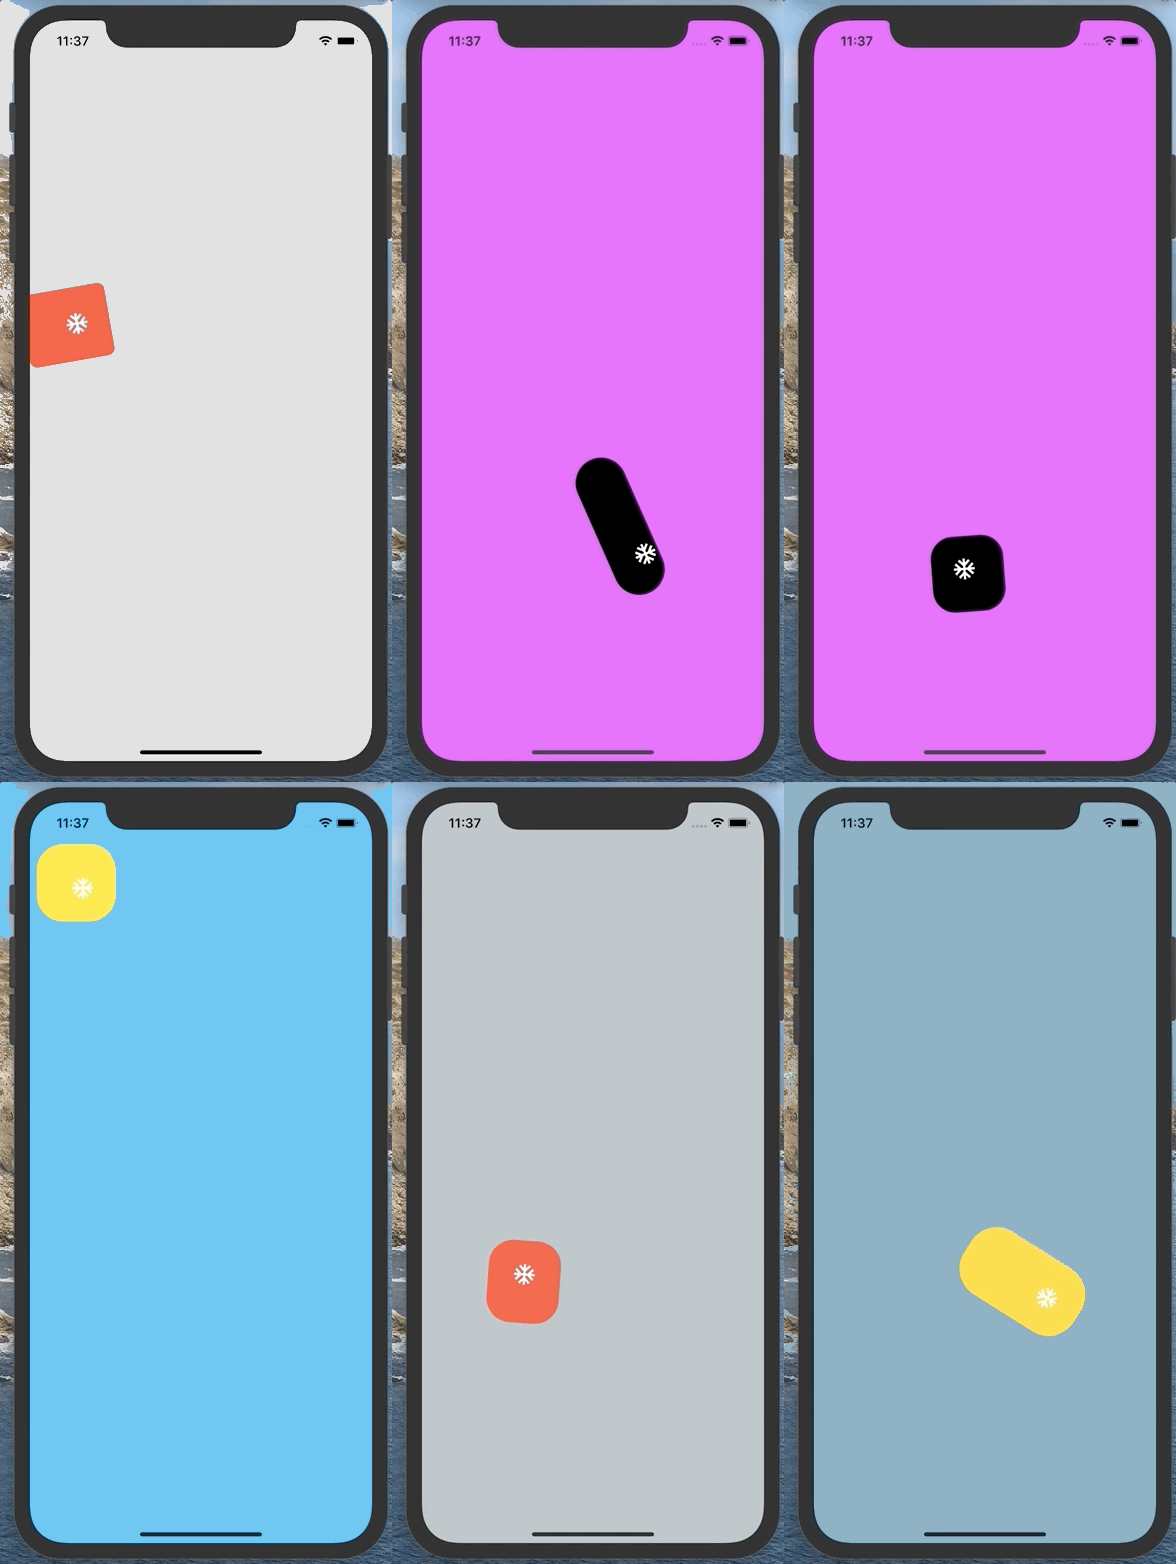
ImplicitlyAnimatedWidgets like AnimatedAlign,AnimatedContainer, AnimatedPadding, AnimatedTheme are easy way to do animation.
AnimatedContainer() is one of the most common.
You can animate any properties of container with AnimatedContainer. Mastery of this widget alone can get you far ahead in you animation game.
Just provide the changed value like
height, width,padding,transform,decoration(backgroundcolor, border radius & alignment etc.
along with curve then AnimatedContainer will automatically do the animation for you.
The following animation is done with just AnimatedContainer()
play with the animation in codepen
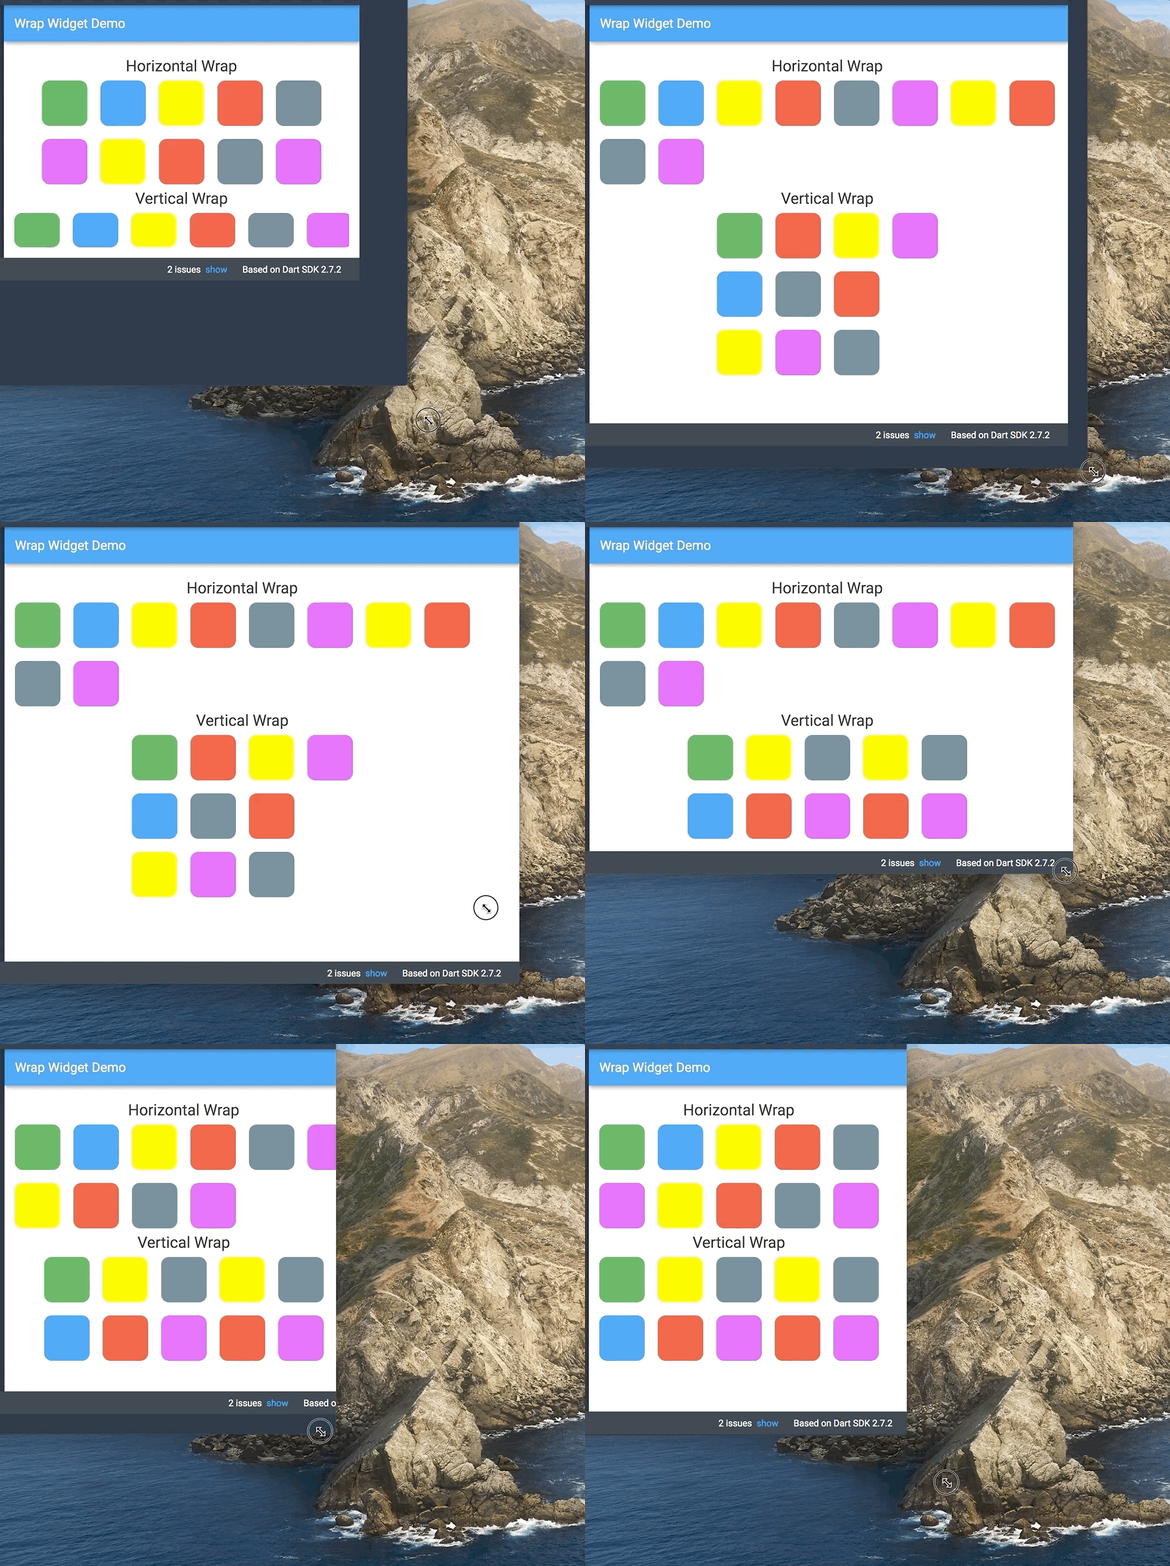
When you are making responsive UIs, you need to wrap contents dynamically.
Wrap comes to the rescue. Wrap is like Column/Row but wraps it's children to next row or column.
Use Wrap like you use Column or Row just give it's direction (either vertical or horizontal)
Wrap(
    direction: Axis.vertical/Axis.horizontal,
    children: [Widgets],
    runAlignment: WrapAlignment.start,
    spacing: 20, //space between previous and next item
    runSpacing: 20, //space between new row or column
    );
To blur a widget, put it below a BackdropFilter widget in stack.
-
Adjust Gussian blur level with sigmaX, and sigmaY.
-
Must provide child to Backdrop it needs a layer to act as blur.
 Stack(
     fit: StackFit.loose,
     children: <Widget>[
     FlutterLogo(size: 300),
     Positioned.fill(
         child: BackdropFilter(
         filter: ImageFilter.blur(sigmaX: 5, sigmaY: 5),
         child: Container(
             color: Colors.transparent,
         ),),
     ],
 )
You will a blur like this.
play in codepen

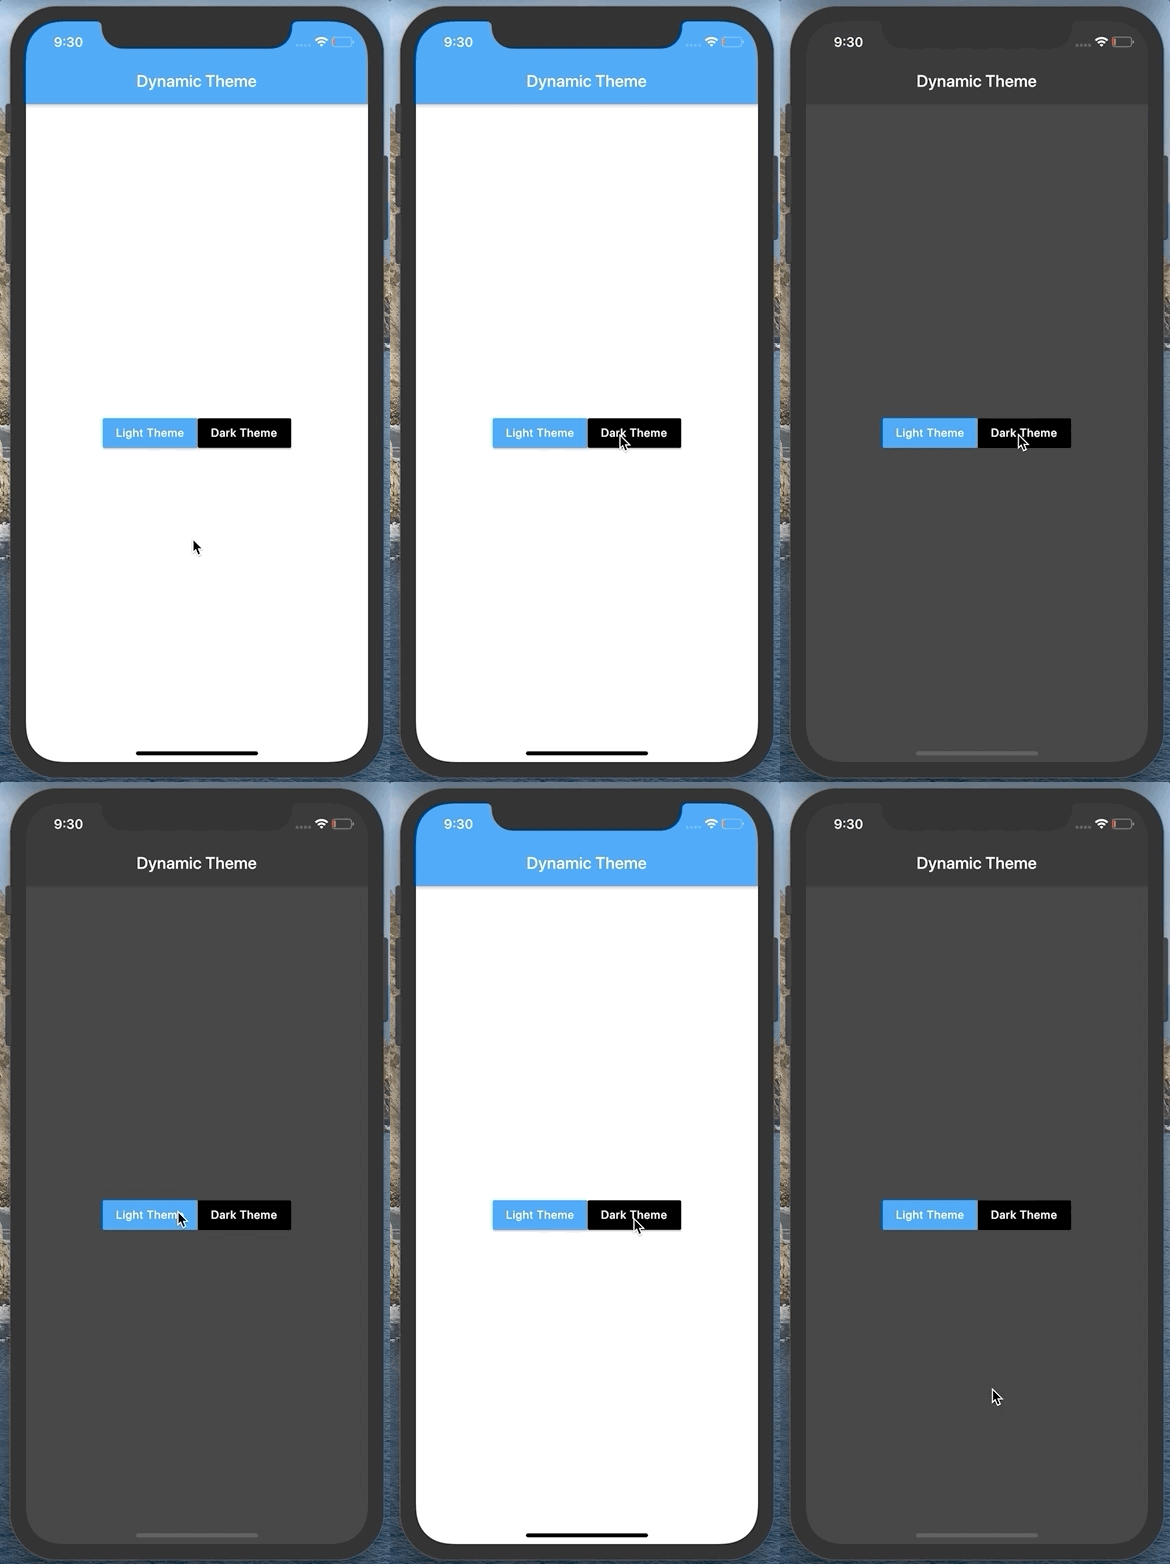
Theme of the application is nothing but argument in MaterialApp or CupertinoApp.
Just create a StreamController of bool to represent it's theme.
With the use of StreamBuilder, set the theme of inside Material/Cupertino App and boom 🚀 your app will be able to change it's theme dynamically.
//Define a Inherited Widget
class SettingsStore extends InheritedWidget {
    final ValueNotifier<ThemeData> theme = ValueNotifier(ThemeData.light());

    SettingsStore({@required Widget child}) : super(child: child);

    static SettingsStore of(BuildContext context) =>
    context.dependOnInheritedWidgetOfExactType<SettingsStore>();

    void updateTheme(ThemeData theme) => this.theme.value = theme;

    @override
    bool updateShouldNotify(SettingsStore oldWidget) => oldWidget.theme != this.theme;
}


//Listen to it
class App extends StatelessWidget {
    @override
    Widget build(BuildContext context) {
        return ValueListenableBuilder(
            valueListenable: SettingsStore.of(context).theme,
            builder: (context, theme, child) => MaterialApp(
            theme: theme,
            home: SettingsView(),),
        );
    }
}


//Change the theme from any build method.
SettingsStore.of(context).updateTheme(ThemeData.light())
Credit: u/Kounex's
We can extend functionality to existing class/API/Library without inheriting it to a child class.
Extensions can have method, getter and setter.
Here we add function to DateTime class without subclassing it.
Define extension like this :
extension DateExtensions on DateTime{

    printYYYYMMdd(String seperator) {
        var dateString = "${this.year}$seperator${getTwoDigit(this.month)}$seperator${getTwoDigit(this.day)}";
        print(dateString);
    }

    String getTwoDigit(int number){
        return (number < 10)? "0$number" :number.toString();
    }

    DateTime get  nextYear => this.add(Duration(days:365));

    DateTime previousYear() => this.subtract(Duration(days:365));
}
Then Just Call those extensions
void main() {
    var now = DateTime.now();
    var nextYear = now.nextYear;
    var lastYear = now.previousYear();

    now.printYYYYMMdd("-");
    nextYear.printYYYYMMdd("/");
    previousYear.printYYYYMMdd(".");
}
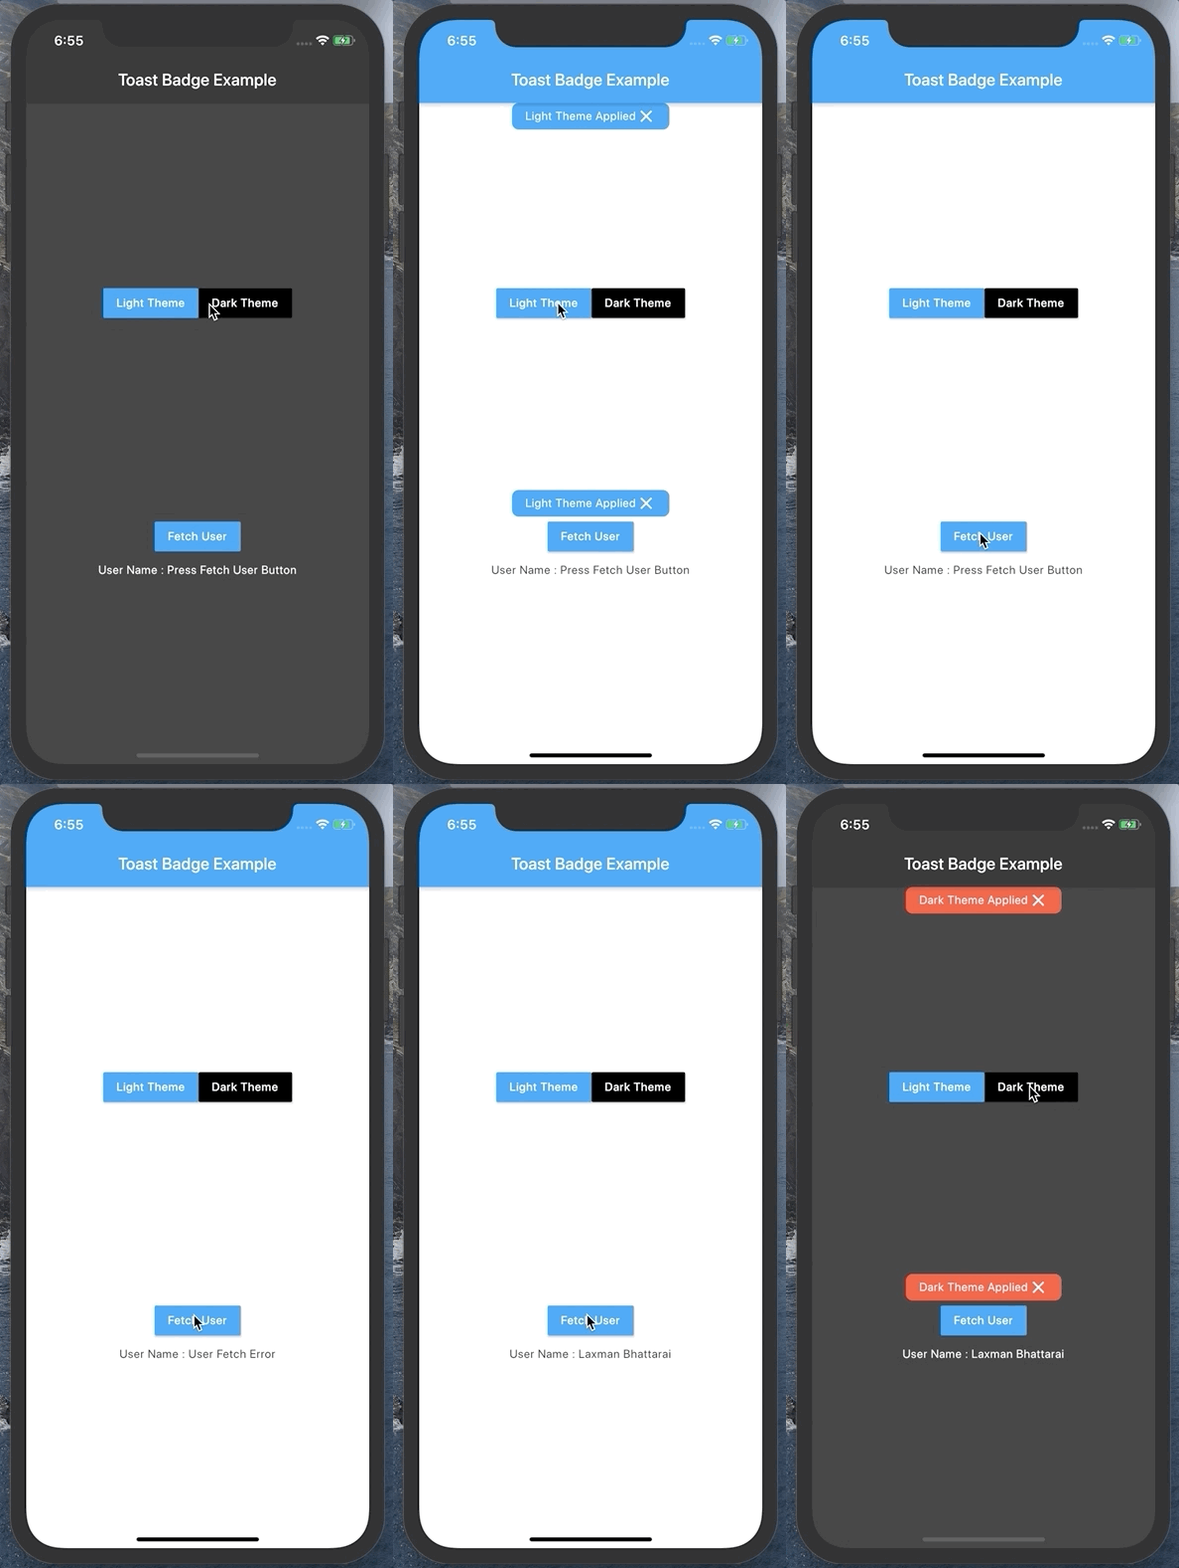
If you want to show notification that auto dismisses anywhere in the screen, use toast_badge.
Just wrap any widget with ToastBadget or call .enableBadge() on any widget, you will be able to show notification on that widget without the need of BuildContext object.
i.e. You use it like toast but in the place you desire.
-
Wrap
child: ToastBadge( child: SettingPage(),), //OR child: SettingPage().enableBadge(), -
Call
 ToastBadge.show("Hello Toast");


 //With more options

 ToastBadge.show("Hello Toast",
 mode: ToastMode.INFO,
 duration: Duration(milliseconds: 500));
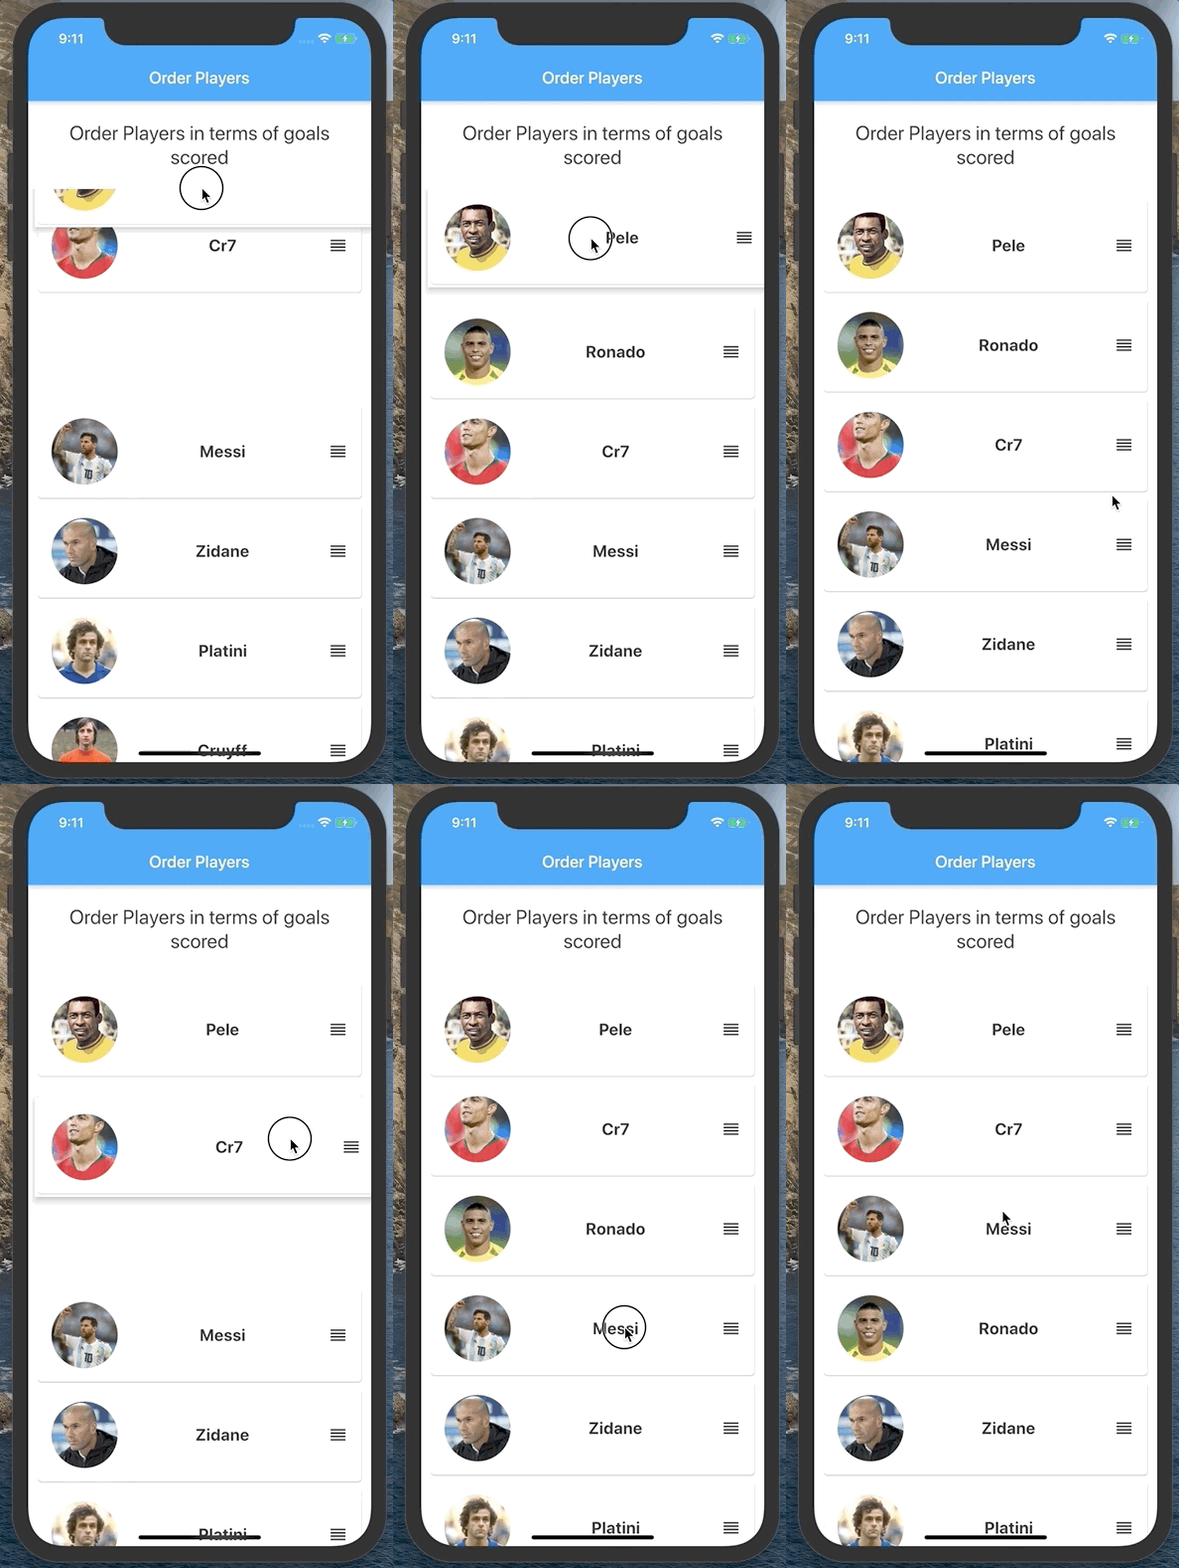
Create ReorderableListView just like normal ListView.
-
Give Key to each child
-
Handle onReorder: (oldIndex, newIndex)
 ReorderableListView(
       onReorder: (oldIndex, newIndex) {
         setState(() {
           if (oldIndex < newIndex) {
             newIndex -= 1;
           }
           var previous = names.removeAt(oldIndex);
           names.insert(newIndex, previous);
         });
       },
       children:[
         child(key:ObjectKey(item)),.....
       ]
 )
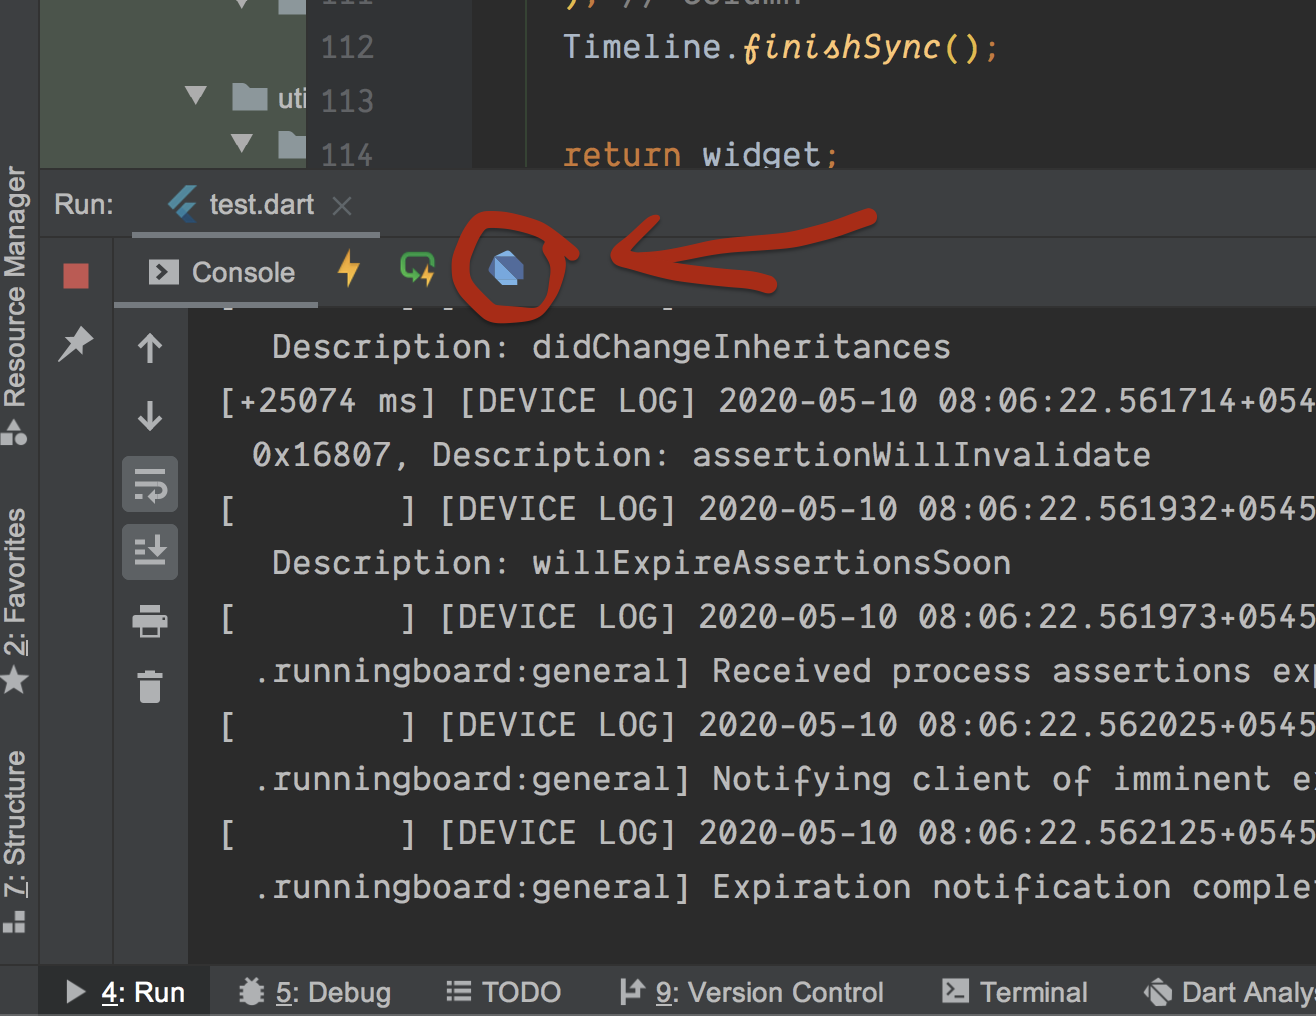
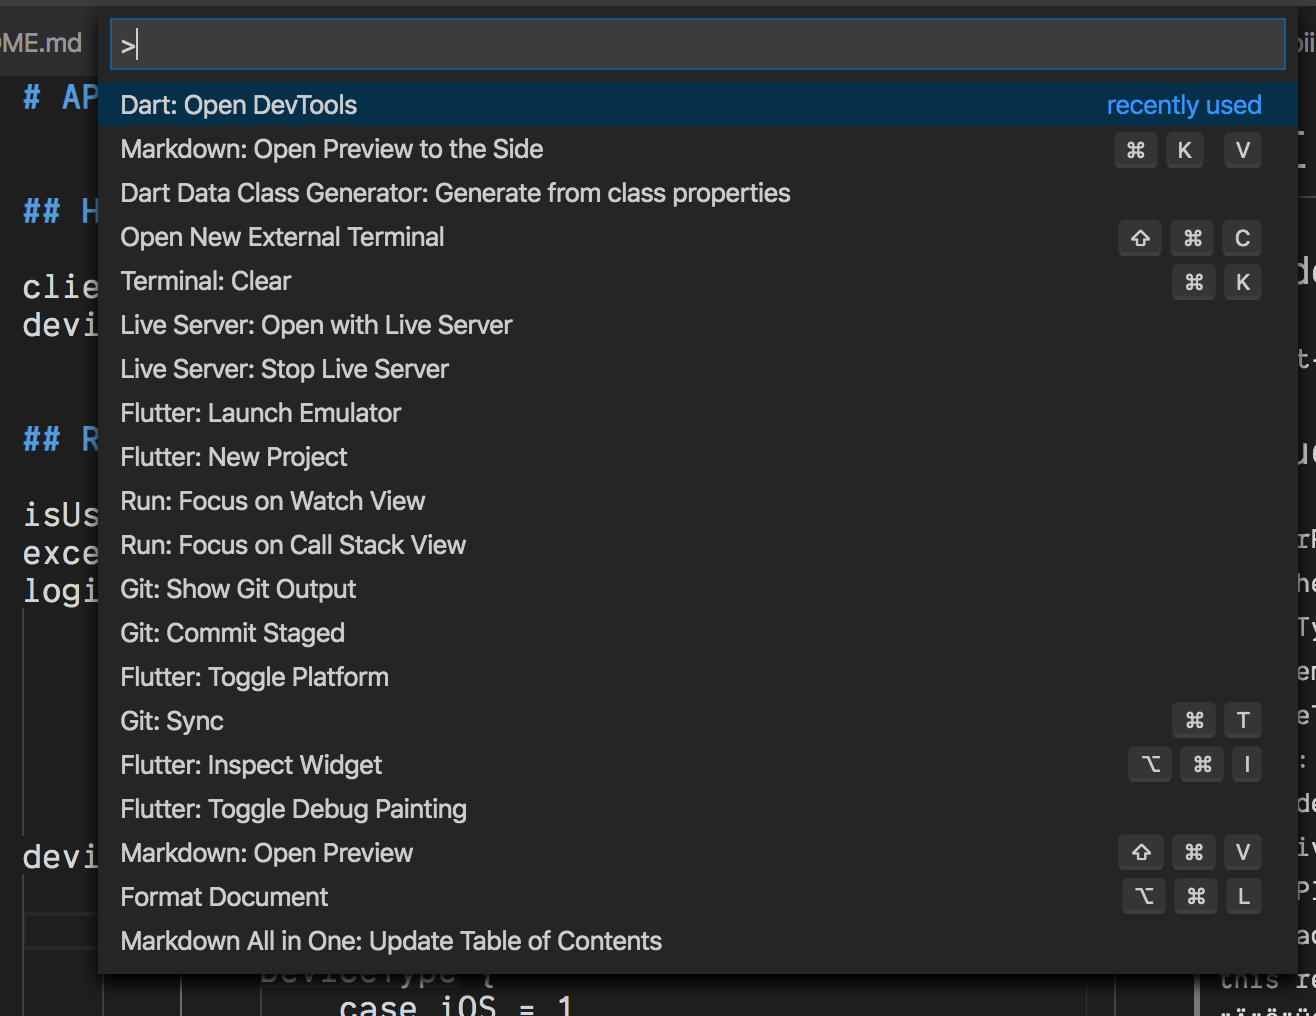
Dart dev tool is powerful set of debugging and performance tools like Layout Inspector,Timeline, Memory, App Performance,Debugger,Logging & Network monitor.
Android Stidio : You can open it by clicking dart icon on Run tab when app is runnin in Anadroid Studio
VSCode: typing Open Dev Tools in command Pallet.
Learining to use Dart Dev tool is very 🚨important skill🚨 to have as a Flutter/dart developer.
See amazing dart dev tool gifs
Did you know you can extend and implement a class in Dart?
- No need to create
IInterfaceto mock aclass. - No need to extract
IInterfaceas Contract / Protocal
Every class implicitly defines an interface containing all the instance variables, methods getter and setters.
-
extends -> must override abstract methods, other methods and variables override optional. i.e can inherit parent's behavior.
-
implements -> Every methdos and variables must be overriden. i.e. can't inherit parent behavior
         Dart has implicit Interface of every class

 class A {
     //Optional @override for 'extends' &&  must for 'implements'.
     var name;
     //Optional @override for 'extends' &&  must for 'implements'.
     void normalMethod() => print("B -> Normal Method");
 }

 abstract class B{
     //must @override in both 'extends' and 'implements'.
     void abstractMethod();
 }

 //Non abstract
 class C extends A {} // ✅
 class C implements A {} //❌ Must override name & normalMethod()
 class C extends B {} //❌ Needs to override `abstractMethod()`
 class C implements B {} //❌ Needs to override `abstractMethod()`

 //Abstract Child
 abstract class C extends A {}  // ✅
 abstract class C implements A {} // ✅
 abstract class C implements B {} // ✅
 abstract class C extends B {} // ✅
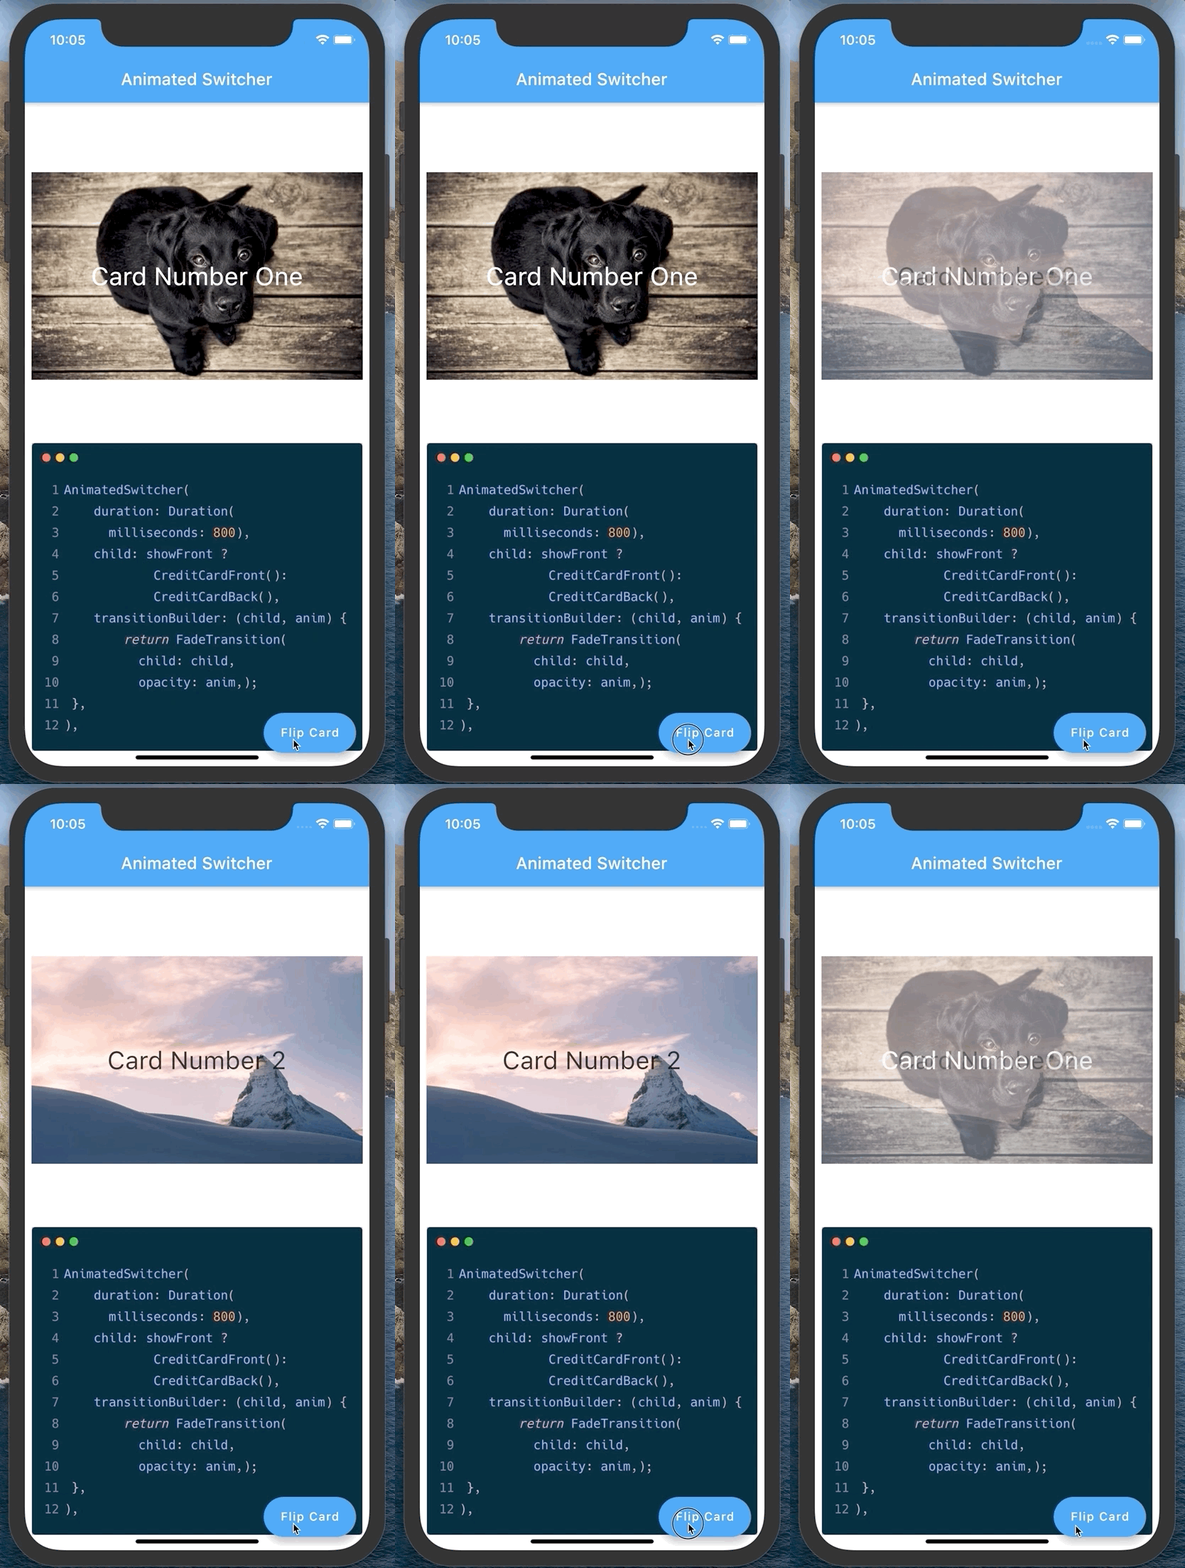
Use Animated Switcher for smooth transition when a widget is switched with another.
Provide:
-
durationof transition -
dynamic
child& -
TransitionBuilderlikeFade,Scale,Rotation
Then, Flutter will handle the rest.
    AnimatedSwitcher(

        duration: Duration(milliseconds: 800),

        child: shouldShowCard ? CreditCardFront() : CreditCardBack(),

        transitionBuilder: (child, animation) {
            print("Animation asked ${widget.runtimeType}");
            return FadeTransition(
                child: child,
                opacity: animation,
            );
        },
      )
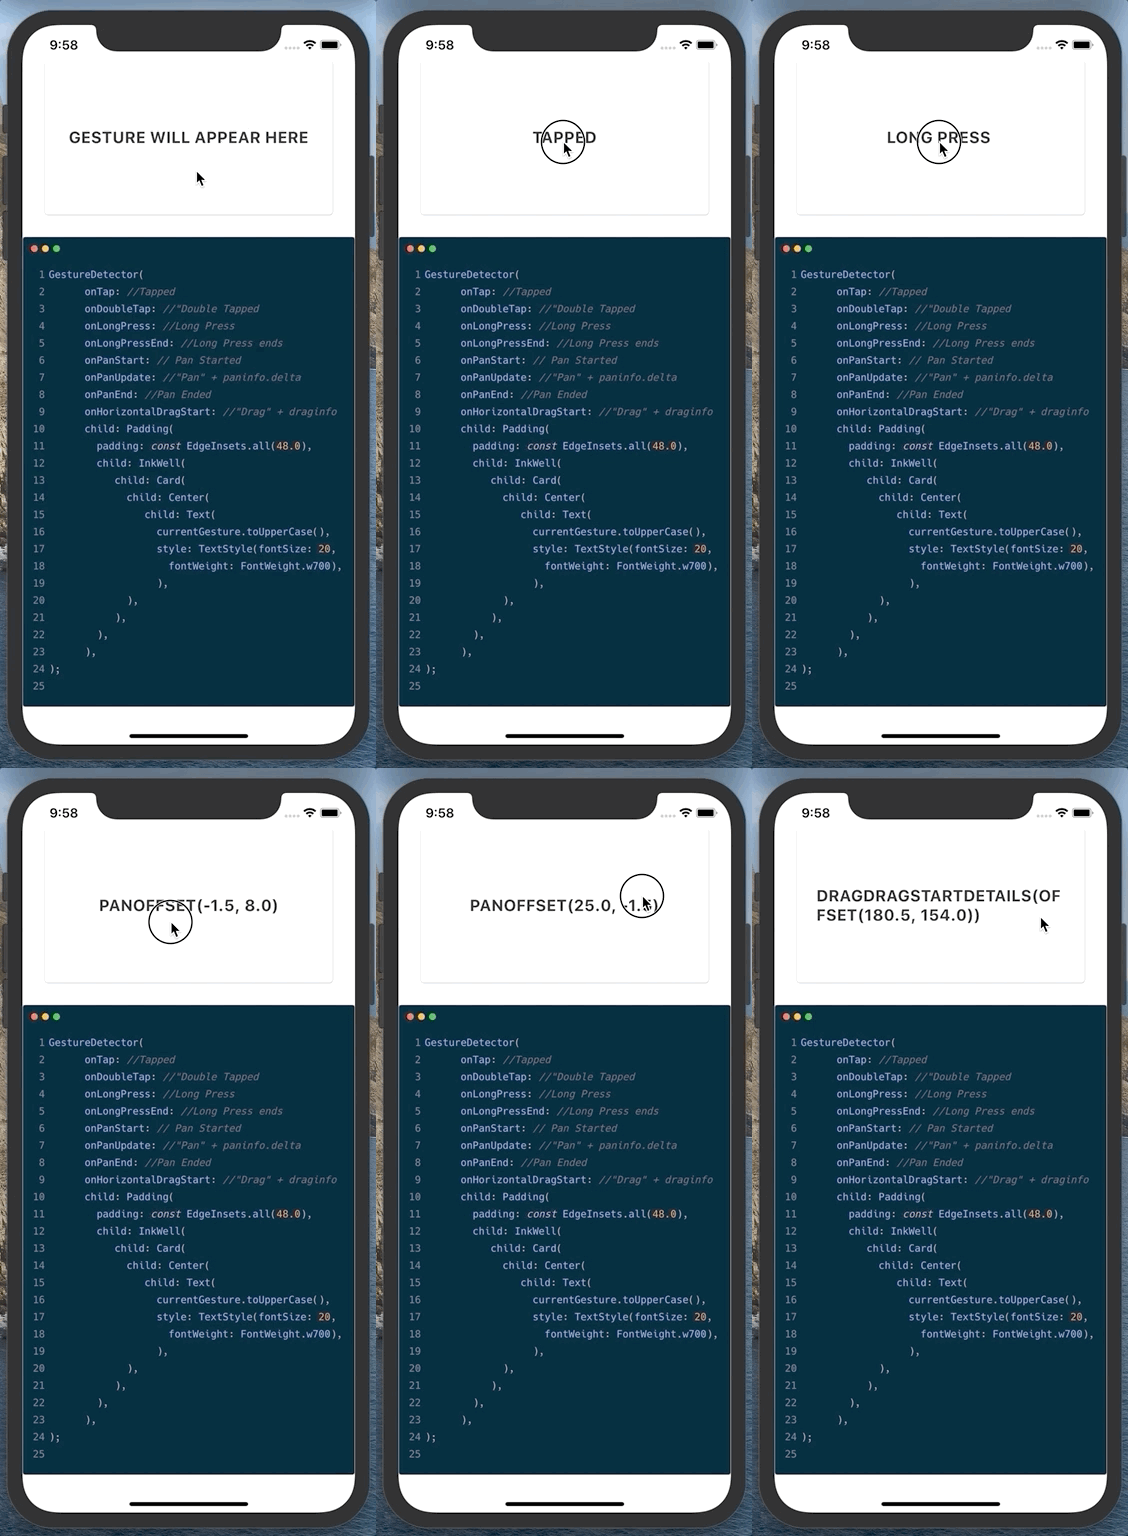
Use Gesture Detector to detect gestures like tap, double Tap, press, LongPress, pan, drag, zoom etc.
All those callbacks behave like onClick(){} on Button.
GestureDetector(
    onTap: //Tapped
    onDoubleTap: //"Double Tapped
    onLongPress: //Long Press
    onLongPressEnd: //Long Press ends
    onPanStart: // Pan Started
    onPanUpdate: //"Pan" + paninfo.delta
    onPanEnd: //Pan Ended
    onHorizontalDragStart: //"Drag" + draginfo
    child: Padding(
        padding: const EdgeInsets.all(48.0),
        child: InkWell(
        child: Card(
            child: Center(
                child: Text(
                currentGesture.toUpperCase(),
                style: TextStyle(fontSize: 20,
                    fontWeight: FontWeight.w700),
                ),
            ),
        ),
        ),
    ),
);
[try on codepen] (https://codepen.io/erluxman/pen/wvKxVrE)
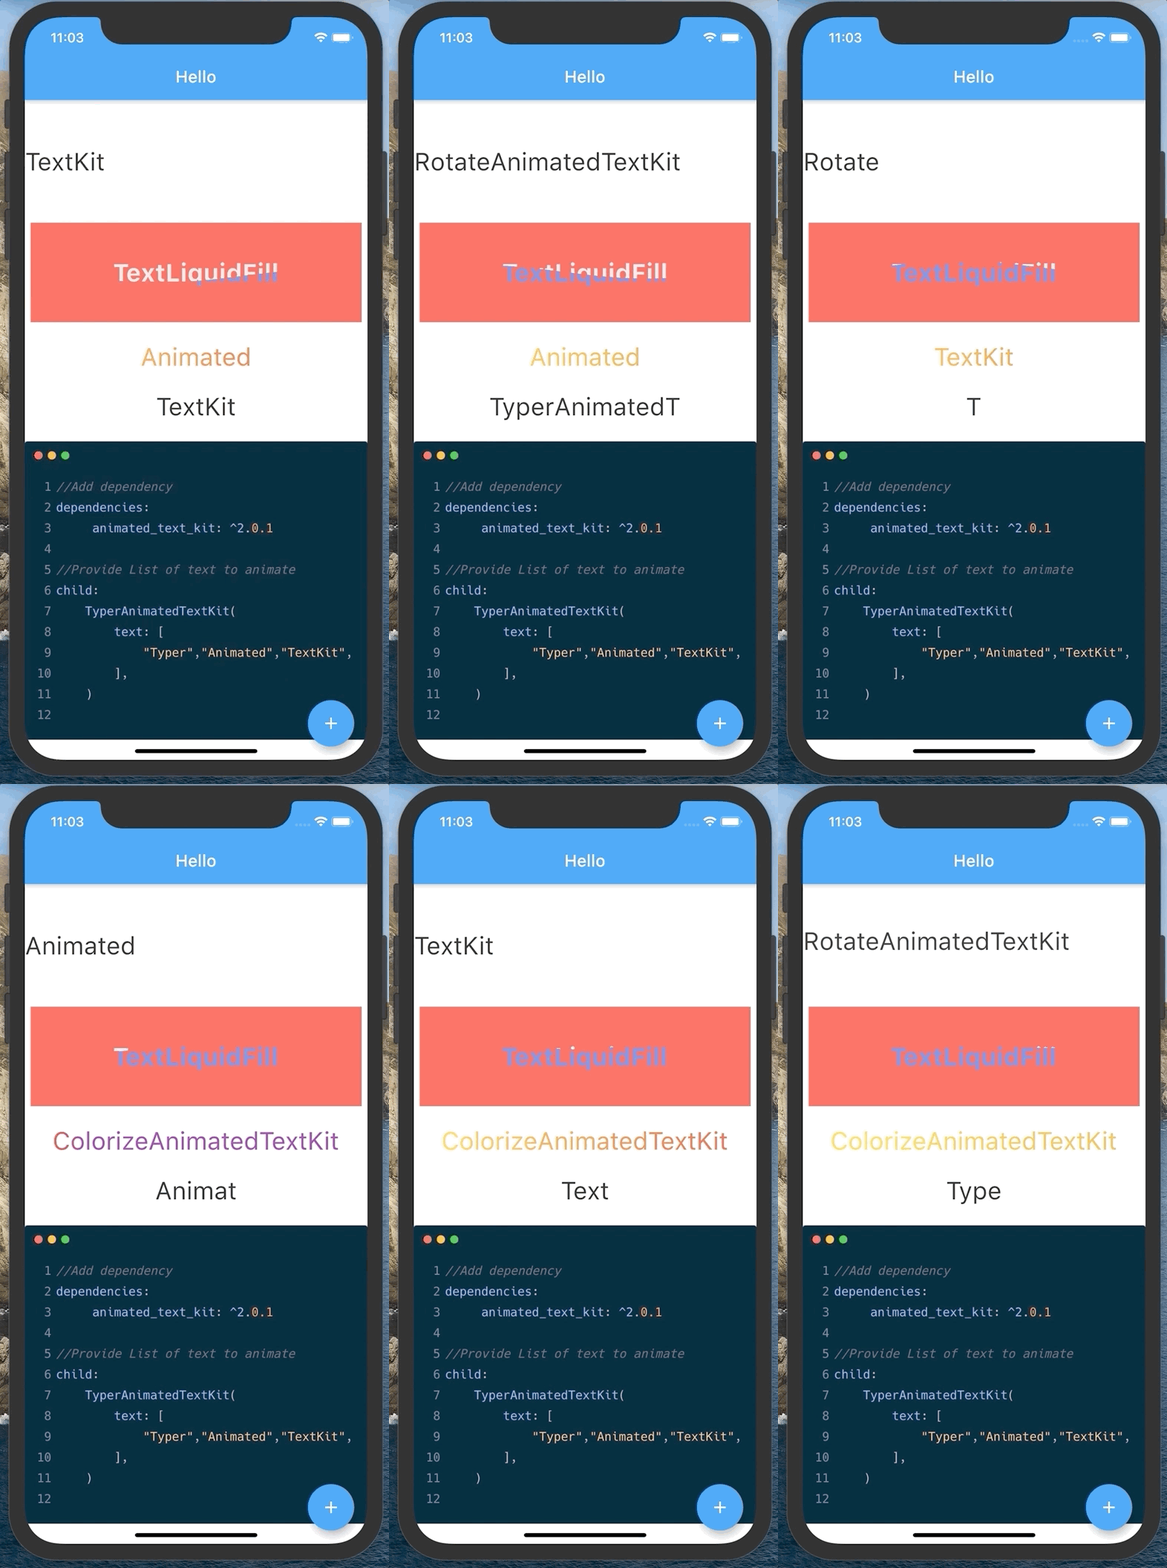
animated_text_kit provides some cool ways to animate text appearences.
-
Use built in Widget like
RotateAnimatedTextKit(), TextLiquidFill(), ColorizeAnimatedTextKit() etc. -
& Pass a list of text in constructor
TyperAnimatedTextKit( text: ["Colorize","Animated", "TextKit",]) -
Do additional customization if you want. To do that Look into constructor of each Widgets provided.
We can use AnimatedIcon in 5 simple steps.
- Define a Stateful Widget whose state mixins with SingleTickerProviderStateMixin.
- Define an AnimationController inside state with animation duration and pass this into vsync.
- Define a variable that stores wheather animation is at start or end.
- Provide the controller to AnimatedIcon.
- Animate icon by calling
.forward()or.reverse()on AnimationController based on the current state of icon.
Sometimes we want to get the location of Various common directories like:
The package path_provider is build for exact same reason so that we do not have to deal with Platform specific issues by our own.
-
Add path_provider to pubspect.
path_provider: ^verison -
Use it
 //Gives download directory
 Directory tempDir = await getTemporaryDirectory();

 //Gives documents directory
 Directory docDir = await getApplicationDocumentsDirectory();

 //Gives external Storages
 List<Directory> externalStorages = await getExternalStorageDirectories();

 //Gives download directory
 Directory downloadDir = await getDownloadsDirectory();
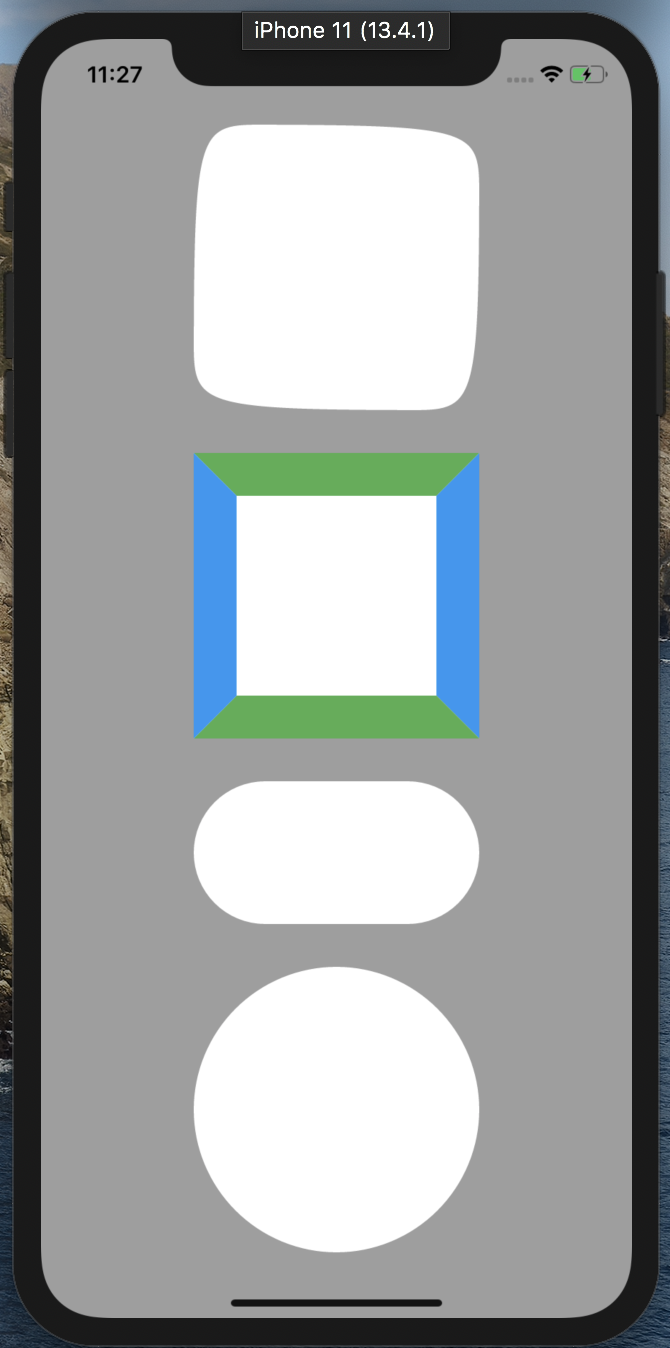
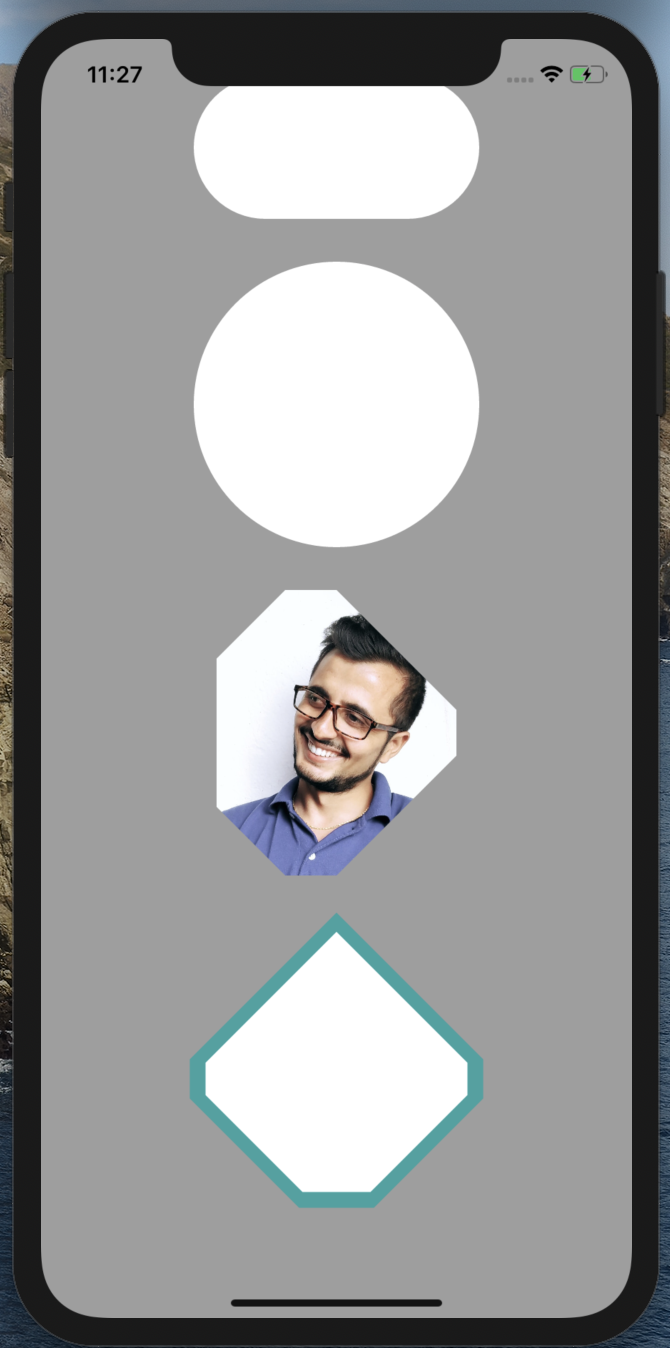
We can use ShapeBorder to give outline to widgets or Clip them on it's shape. There are my ShapeBorder like Border, ContinuousRectangleBorder, StadiumBorder, CircleBorder, BeveledRectangleBorder etc.
-
Use ShapeBorder to give a Widget outline.
Container( decoration: ShapeDecoration( color: Colors.white, shape: // Any shape border ), ) -
Use ShapeBorder to clip a Widget.
 ClipPath(
     clipper: ShapeBorderClipper(
         shape: // Any shape border
     ),
     child: // Any Child to be clipped
 )
