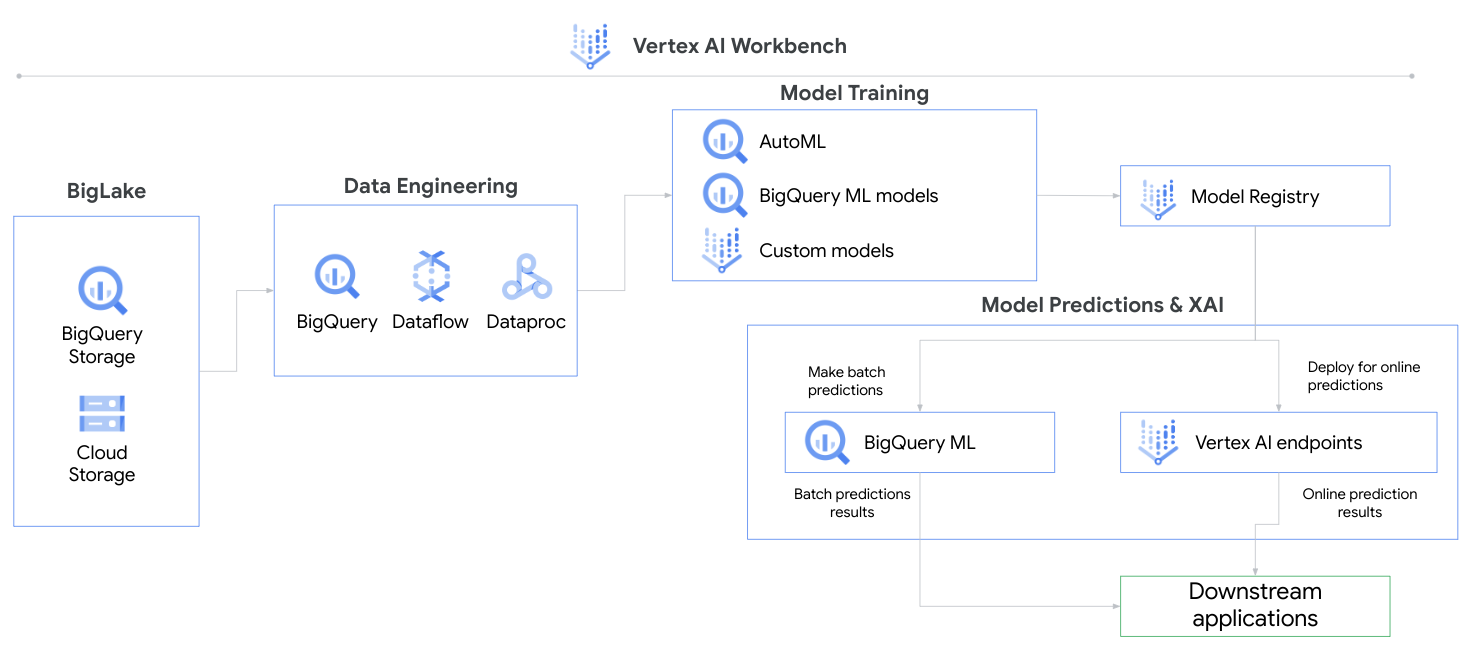
In this tutorial, you will go through various ways of importing, transforming, analyzing, and exporting data with Vertex AI. This tutorial will walk you through the Vertex AI Console.
This Compete collection includes the following:
- AutoML tutorial
- Custom model training and deployment tutorial
- GCP Account - Sign up for a free GCP account here
-
Create a new project (Manage Resources -> Create Project)
-
Enable the following API's Vertex API (APIs & Services -> +Enable APIs and Services -> Search)
-
Vertex AI API
-
Cloud Storage API
- Follow Step 5 - Step 7 -> https://cloud.google.com/vertex-ai/docs/tutorials/tabular-automl/setup
- Navigate to Vertex AI within the GoogleCloud platform. (Click on the Navigation Menu -> Artificial Intelligence -> Vertex AI)
- Go to Datasets -> Create -> Tabular -> Regression/Classification -> Upload CSV file from computer -> Select a Cloud Storage Path -> Create.
- View dataset and what values may be missing.
- Training -> Train new model -> AutoML -> Choose Target Col -> Select Compute and pricing -> Start Training
- Model Registry -> Model -> Version -> Deploy & Test -> Deploy to endpoint
- Test your model -> Enter values -> Predict
This tutorial borrows from Vertex AI: Custom training job and prediction using managed datasets with some changes made. It uses prebuilt scikit-learn containers to train and deploy a custom model based on Titanic survival data.
We recommend following the steps in that tutorial and referencing the notes listed here for the respective steps.
Following this tutorial will cost less than $5 to run, provided that you delete resources afterwards.
Step 1: Overview
- Ensure the following services are enabled, using the Console UI or gcloud shell:
- Vertex AI API
- Cloud Storage API
- Compute Engine API
- Artifact Registry API
Step 2: Setup your environment:
- The tutorial's written instructions can be skipped since we will be uploading data into Google Cloud Storage instead of BigQuery.
- Instead do the following:
- Download
titanic.csvin this repository and upload into a Google Cloud Storage Bucket. - Create a folder structure in your Bucket to hold your data and artifacts to look like the following:
- your-bucket/
- titanic/
- titanic.csv
- artifacts/
- model/
- titanic/
- your-bucket/
- Download
Step 3: Create a dataset
- Select datasource: Choose
Select CSV files from Cloud Storage.
Step 4: Custom training package using Notebooks
-
Create a user-managed notebook in Vertex AI Workbench. The region does not matter.
-
Create a new Python file in your new Notebook.
-
Copy the code provided in this repository (located under
custom-model/trainer/task.py) -
Paste code into your
task.pyfile in your Notebook environment. -
Test the program locally before building your package. Here is an example of user input. Replace the
model_dir,training_data_uri, andtest_data_uriarguments with your own paths.python -m trainer.task -v \ --model_param_kernel=linear \ --model_dir="gs://my-bucket/titanic/trial" \ --data_format=csv\ --training_data_uri="gs://my-bucket/titanic/titanic.csv" \ --test_data_uri="gs://my-bucket/titanic/titanic.csv"" \ --validation_data_uri="gs://my-bucket/titanic/titanic.csv""
Step 5: Model Training:
- Step 0: Training region does not matter.
- Step 3:
-
BigQuery project for exporting data can be the Cloud Storage Bucket hosting your training data
-
Model output directory: select the directory
artifactsif your folder structure is the same as defined in earlier steps.The training job will automatically look within that directory for a
modelfolder that stores yourmodel.pklandreport.txtfiles. -
Copy and paste these arguments into the UI, replacing the text with your respective paths. The training job will pass these to
task.pyas you tested locally in the previous step.Notice how the
--model_dirargument specifies that the outputs are saved inartifacts/modelfolder.--model_param_kernel=linear --model_dir="gs://my-bucket/titanic/artifacts/model" --data_format=csv --training_data_uri="gs://my-bucket/titanic/titanic.csv" --test_data_uri="gs://my-bucket/titanic/titanic.csv" --validation_data_uri="gs://my-bucket/titanic/titanic.csv"
-
- Training should take about 5-7 minutes.
Steps 6-9: Same as tutorial.
- Devanshi Thakar, Cloud Solution Architect
- Amanda Wong, Cloud Solution Architect