OHIF Viewer is a open source non-diagnostic DICOM viewer that uses DICOMweb API's to find and render DICOM images.
This project provides guidence on deployment of OHIF Viewer on Azure and configurations needed to work with Azure Health Data Services DICOM service .
- Create a Azure Health Data services workspace.
- Create a DICOM service. Go to the newly created resource.
- Make a note of the
Service URL(the URL to the newly created DICOM service), it will be used in a later step. - Assign roles to yourself or users accessing OHIF viewer to provide read write access using "DICOM Data Owner" Role.
- Set CORS on DICOM service created in the previous step to allow web URL's that can access the service.
- Register a new application. Choose Accounts in this organizational directory only for who can access and skip Redirect URI.
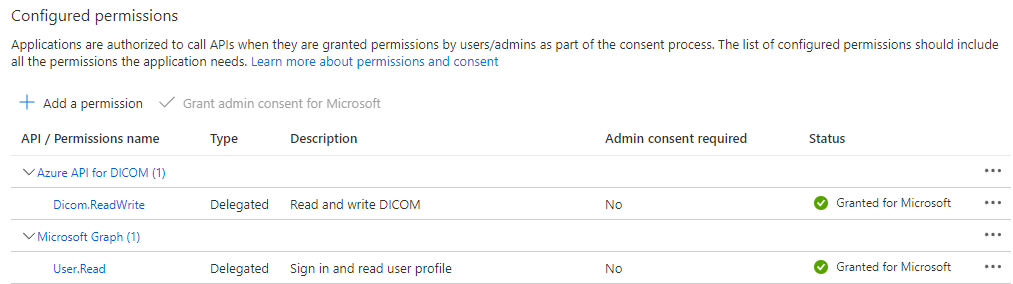
- Grant scoped permission to the DICOM service
- Skip Certificates and secrets, since we will use delegated/on-behalf of workflow
- Grant admin consent for your org to use the API. Verify the green check in the diagram is checked.
- Make a note of the
Application (client) ID, it will be used in a later step. - Make a note of the Azure Active Directory
Directory (tenant) ID, it will be used in a later step. (It can also be found on the root Overview page of your Azure Active Directory. There it is listed asTenant ID.) - Leave this browser tab open, as it will be used to add a redirect URI in a later step.

-
Click on the button to deploy a new Storage Account and configure it to host OHIF.
Provide the following inputs:
Parameter Value Description Subscription user provided Desired subsciption to host the OHIF viewer Resource Group user provided Desired Resource Group name. May be a new or existing. Region user provided Desired Azure Region to host the Resource Group and Storage account website. Storage Account Name user provided Desired name of storage account. This will appear in the OHIF URL. Dicom Service Url Service URLExisting DICOM service URL (noted above) Aad Teanant Id Directory (tenant) IDExisting Azure subscription AAD Tenant Id (noted above) Application Client ID Application (client) IDExisting Application Client ID (noted above) -
Make a note of the
storageAccountWebEndpointfrom the ARM deployment output variable. (You can find the output variables on the left-hand column, once the custom ARM template has successfully completed creating resources.)
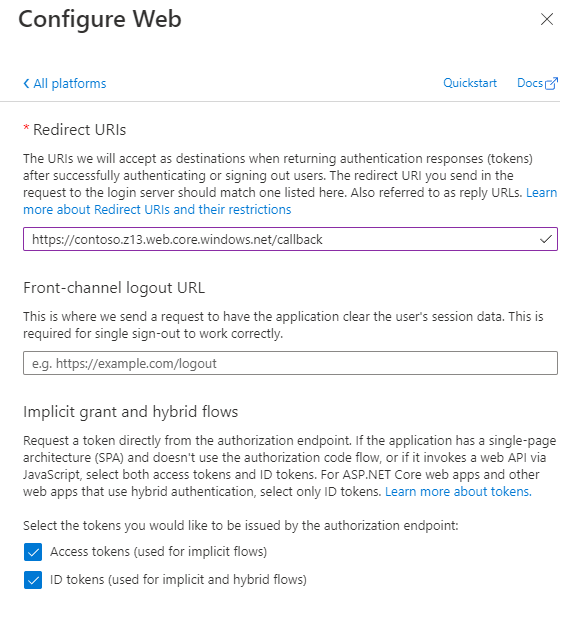
- Go back to browser tab with the AAD application created earlier (or reopen if necessary).
- Add a redirect URI to the OHIF viewer callback url to pass the token the web app.
- Under Configure platforms, select the Web tile.
- Specify the redirect URI to %storageAccountWebEndpoint%/callback.
- Select "Access tokens" and "ID tokens" flow.

Note: If you receive a
Need admin approval(as below), ensure you have green check in the Status column of of the Configured Permissions of your application. (SeeRegister an application with Microsoft Identity platformsection above.) In some organizations, this may require a separate, and potentially manual, process for approval.

- Browse to the
storageAccountWebEndpointto access OHIF viewer
You can do additional Domain and CDN configurations as need.
This project welcomes contributions and suggestions. Most contributions require you to agree to a Contributor License Agreement (CLA) declaring that you have the right to, and actually do, grant us the rights to use your contribution. For details, visit https://cla.opensource.microsoft.com.
When you submit a pull request, a CLA bot will automatically determine whether you need to provide a CLA and decorate the PR appropriately (e.g., status check, comment). Simply follow the instructions provided by the bot. You will only need to do this once across all repos using our CLA.
This project has adopted the Microsoft Open Source Code of Conduct. For more information see the Code of Conduct FAQ or contact opencode@microsoft.com with any additional questions or comments.
This project may contain trademarks or logos for projects, products, or services. Authorized use of Microsoft trademarks or logos is subject to and must follow Microsoft's Trademark & Brand Guidelines. Use of Microsoft trademarks or logos in modified versions of this project must not cause confusion or imply Microsoft sponsorship. Any use of third-party trademarks or logos are subject to those third-party's policies.