Pi_LibCamera_GUI
To work with RaspiOS based on BULLSEYE, using libcamera (NOT raspistill/raspivid).
At your own risk !!. Ensure you have any required software backed up.
Script to allow control of a Pi Camera. Will work with all models, v1, v2, v3 & HQ. Also Arducam 16MP and 64MP Autofocus. (Note for Arducam cameras you need to follow their installation instructions and install their version of libcamera)
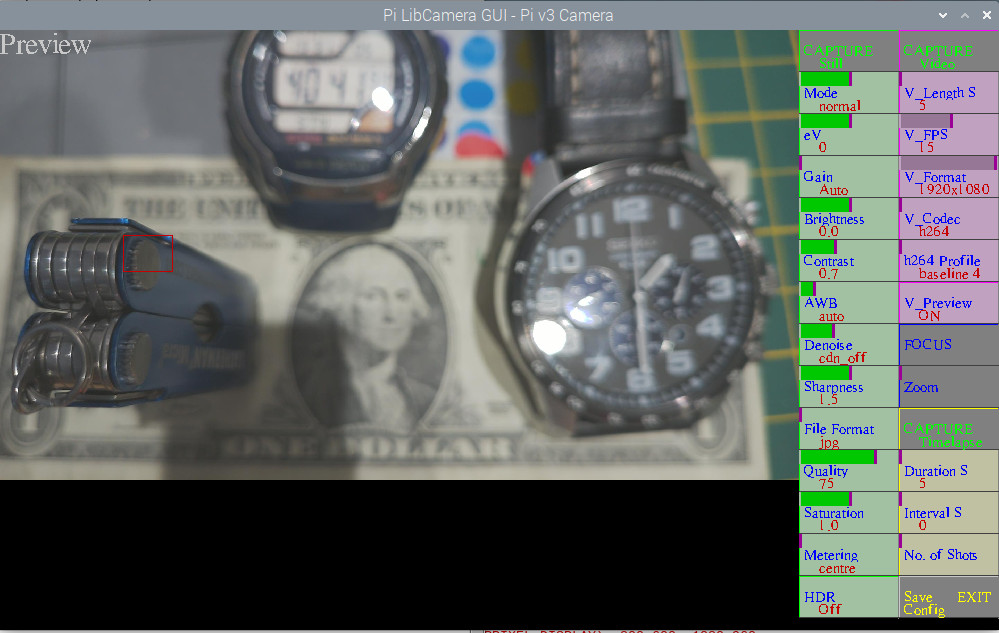
Screenshot
With Pi V3 or Arducam 16/64MP Click on FOCUS button to focus. This will show manual which gives Manual Focusing, then click on 'slider' or the middle of the button, left <<< or right >>> for fine adjustment, to adjust Manual Focus. Click on the image where you want to focus and it will show a value for focus in the top left corner, adjust for a maximum. Click on lower part of the button to go back to auto focus.
Spot focussing (focus point) in Auto Focus - ONLY with Pi v3 camera - with Zoom not in use and Focussing not in manual click on the point in the preview image you want the camera to focus on (see image below). A red box will appear to show where it's focussing. To return to normal either click below the preview image or switch to manual FOCUS and back to auto.
If not using a v3 camera in Manual or spot focus stills will use autofocus-at-capture
HDR option for Pi v3 camera
Gain shows analog and digital gain. Green shows analog gain, when increased beyond a level will show yellow when applying digital gain. eg 153 : 64/2.4 means gain set to 153, analog gain is 64, digital gain is 2.4 When a still is captured will show Analogue Gain, Digital Gain and Exposure time.
2x2 binning option for 64MP camera, Click on right hand side of the Capture Still or Capture Timelapse buttons.
For use with Hyperpixel square display set preview_width = 720, preview_height = 540, sq_dis = 1
Pi4B recommended.
Shows a reduced preview but saves stills at camera full resolution, and videos at user set resolution.
Can also save timelapses, set Interval to 0 for fast capture (uses libcamera-vid, or libcamera-raw if Vcodec set to raw). If you want to capture high resolution images as fast as possible using Timelapse set Interval to 0, set Duration to required seconds, set V_FPS to max, set V_Coder to mjpeg or raw , set V_Format to maximum value, click on CAPTURE Timelapse to start. The images will be in /home/.username./Pictures. If using Arducam 16MP or 64MP AF camera you will need more memory allocated to achieve full resolution if using Timelapse. In /boot/config.txt set dtoverlay=vc4-kms-v3d,cma-512 and then reboot. Note for fastest timelapse it uses libcamera-vid so not the highest quality images.
To convert RAWs to TIF from a Pi v1,v2,v3 or HQ camera try https://github.com/Gordon999/PiRAW2TIF
With a Pi HQ Camera will allow exposures upto 239 seconds. (Note Pi v1 limited to approx 1.1 seconds due to libcamera), Arducam 16 and 64mp cameras upto 200 and 435 seconds.
Click mouse on the left of a button to decrease, right to increase or use the appropriate slider
Always use the EXIT button to EXIT
( or you will need to reboot your pi)
To install(manual):
Install latest RaspiOS based on Bullseye (tested with FULL 32bit and 64bit versions)
sudo apt install python3 -y
python3 -m pip install -U pygame --user
sudo apt install libsdl-gfx1.2-5 libsdl-image1.2 libsdl-kitchensink1 libsdl-mixer1.2 libsdl-sound1.2 libsdl-ttf2.0-0 libsdl1.2debian libsdl2-2.0-0 libsdl2-gfx-1.0-0 libsdl2-image-2.0-0 libsdl2-mixer-2.0-0 libsdl2-ttf-2.0-0 -y
sudo apt install python3-opencv -y
Let's download PiLibCameraGUI.py to our home directory
curl -fsSL https://raw.githubusercontent.com/Gordon999/Pi_LIbCamera_GUI/main/PiLibCameraGUI.py -o ~/PiLibCameraGUI.pyUse the following commands to run it.
python3 ~/PiLibCameraGUI.pyAuto Installation (Beta):
sh -c "$(curl -fsSL https://raw.githubusercontent.com/Gordon999/Pi_LIbCamera_GUI/main/install.sh)"
