by: Alex - Super Make Something
date: August 13, 2022
license: Creative Commons - Attribution - Non-Commercial. More information available at: http://creativecommons.org/licenses/by-nc/3.0/
Arduino code and programming instructions for the Mini Video Player featured in Super Make Something Episode 24!
The project video can be found here: https://youtu.be/67RFm2RMjC4
We also built one LIVE on Youtube! Check out the replay of the livestream here: https://youtu.be/Ob_l5PkH2qA
If you like projects like these, consider subscribing to the Super Make Something YouTube page here for more cool builds! To support more projects you can buy me a coffee on KoFi.
This repository contains code and additional instructions to build your own Mini Video Player. Information found in this repository accompanies the "Open Source Mini Video Player" build video on the Super Make Something YouTube page, which can be found here: https://youtu.be/67RFm2RMjC4
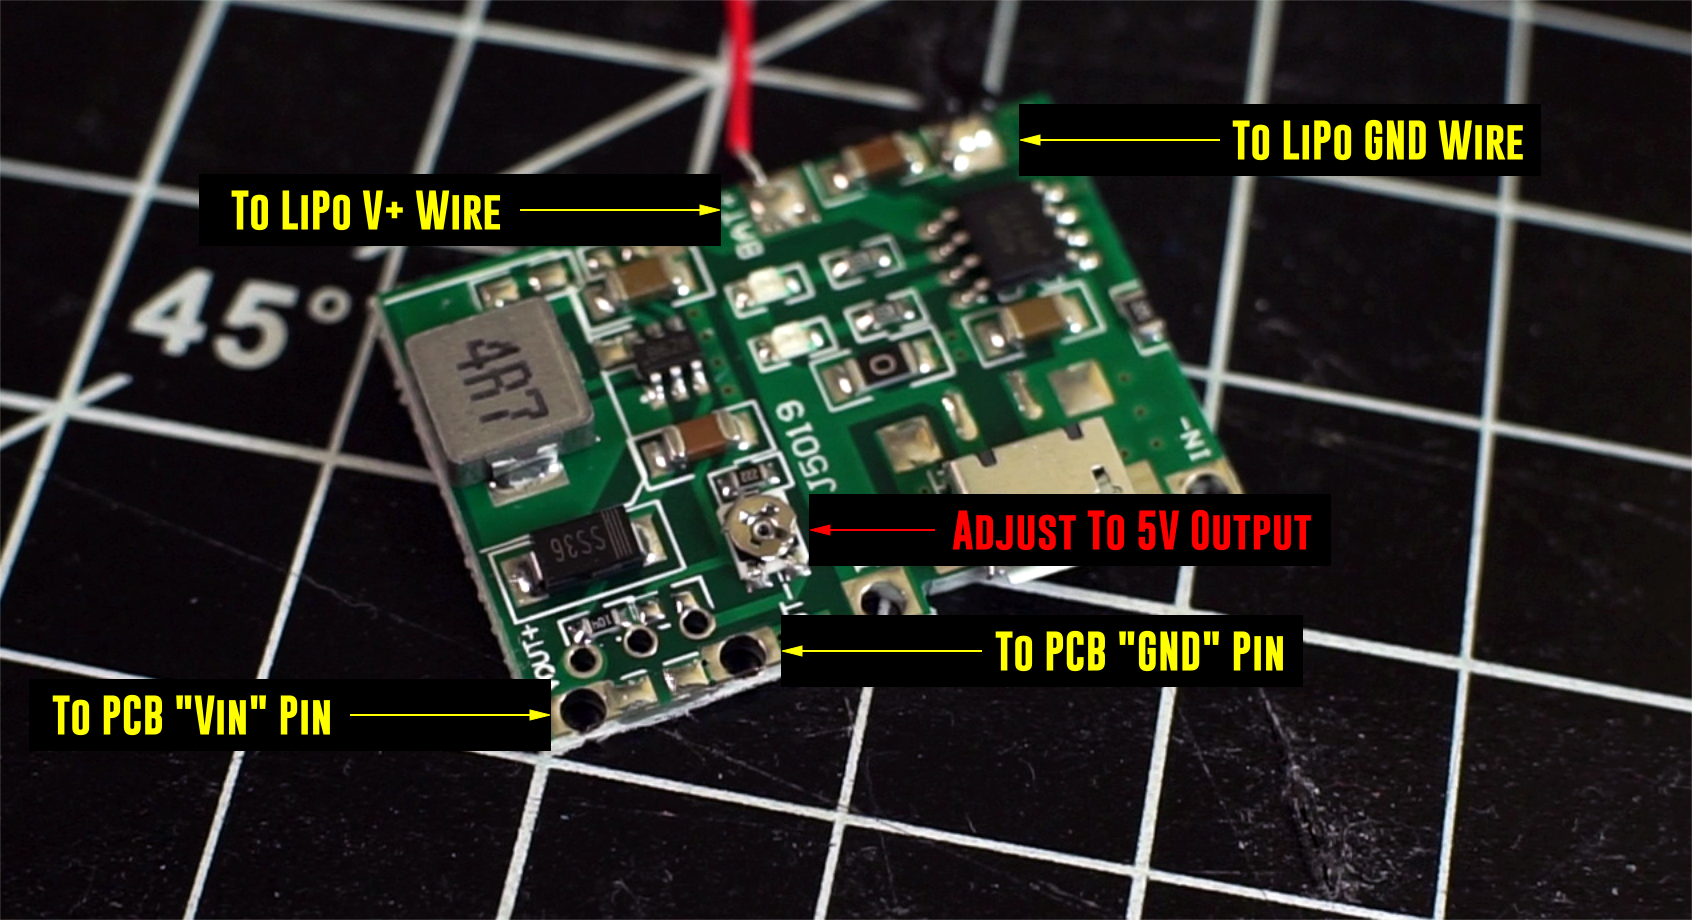
Please watch the accompanying project video and read through this README file in its entirety before beginning assembly of your PCB. For the 'Over 9000' configuration, the potentiometer of the battery charger and boost module must be adjusted so that it has a 5V output voltage in order to not damage the ESP32.
The Code folder contains all of the files needed to compile the project. The folder miniVideoVideoPlayer contains the miniVideoPlayer.ino file, which should be opened in the Arduino IDE.
To make the project as beginner friendly as possible, a set of support libraries is distributed with the base code that will allow you to compile and program the ESP32. Folders in the libraries directory should be copied to the location of where your other Arduino libraries are installed. For Windows users, this is typically under Documents\Arduino\libraries.
A better way to install these libraries is to use Library Manager that is built into the Arduino IDE. This manager can be accessed under Tools --> Library Manager, after which the appropriate libraries can be found by searching for them by name. Using these ensures that you are always using the most up-to-date code that may include improvements implemented by their respective developers.
Notes:
- Instructions on how to install the ESP32 library so that it can be programmed using the Arduino IDE can be found here.
At the time of this writing, the code for this project only works with theesp32library up to version 1.0.6. - A huge thank you to GitHub user bepaald for implementing various bug fixes, compatibility issues, and taking the time to clean up the code. Their edits have improved the code significantly since it was first released and make the project much more robust and easier to use.
The following quantities and components are needed to build this project. You can also buy a kit version that includes everything you need here: https://www.alien3d.us/product/diy-mini-video-player-kit-by-super-make-something/
- PCBs: https://bit.ly/3A1mmZc
- 1x ESP Wroom 32 Development Kit (30 pin version): https://amzn.to/3zT9VOL
- 1x PAM8403 Audio Amplifier: https://amzn.to/3AmsVa8
- 2x Thumbwheel Potentiometers: https://amzn.to/3dtOYCq
- 1x PCB Headphone Socket: https://amzn.to/3QgI2at
- 1x 2W 8 Ohm Speaker: https://amzn.to/3QlU2aT
- 1x ST7735 LCD with SD Card Slot: https://amzn.to/3bQvFmG
- 2x Momentary Push Buttons: https://amzn.to/3QKNdiz
- 1x 2.2k Resistor: https://amzn.to/3w2nN8x
- 1x SPDT 3 Terminal Slide Switch: https://amzn.to/3w6l1Pp
- 1x 10uF Capacitor: https://amzn.to/3PgUTYU
- 1x 16GB SD Card: https://amzn.to/3dqpxSo
- 1x Lipo Charger + Boost Module: https://amzn.to/3JSrEuo
- 1x 820mAh Lipo Battery: https://amzn.to/3SQjyqk
- 3x M3 Button Head Screws: https://amzn.to/3C4wIdm
I used the following tools during the build. If you need any of these, they can be found here:
- Hakko FX888D Digital Soldering Station: https://amzn.to/3JRXAim
- Digital Multimeter: https://amzn.to/3w6lWiP
- Desoldering Wick: https://amzn.to/3C0L1zy
- Desoldering Pump: https://amzn.to/3AkJWBt
- Tin Lead Rosin Core Solder: https://amzn.to/3SQJj9K
- Elegoo Neptune 3 3D Printer: https://amzn.to/3bWweeI
(All Amazon links are affiliate links.)
Note: PCBs ordered before 9/23/2022 have a silkscreen error that lists a 10K resistor instead of a 2.2K resistor in the volume control circuit. This is merely a cosmetic issue and does not affect functionality. When using a 1K thumbwheel potentiometer to control the volume, a 2.2K resistor should be used to approximate the desired pseudo-logarithmic curve for volume control.
The PCBs for this project were designed with Altium Designer. You can get a free trial of Altium Designer here and also get 25% off through this link if you decide to buy a license. I'm still working out how best to share the design files, but in the meantime feel free to grab the PCB Gerber files from PCBWay here: https://bit.ly/3A1mmZc
The wiring diagram for the battery charger and boost module can be found in the figure above. Please use a multimeter and adjust the potentiometer on this module to ensure sure that the output voltage that is connected to the ESP32 is 5V. Higher voltage may damage your ESP32 or other components.Hopefully you found this project useful! If you enjoyed this tutorial, consider subscribing to Super Make Something on YouTube here for more cool builds! If you really liked this tutorial and want to support future projects, you can buy me a coffee on KoFi.
If you have any questions or comments, I can most easily be reached on Twitter or Instagram. For items or issues specifically related to this project, please leaving your questions in the comments of the accompanying YouTube video so that they can be referenced by others during their own builds.

