For this, you need a 3D printer and ~100g of plastic (PLA).
Find all stl files in the folder "3D_print" and print them.
Instructions:
- Nozzle: 0.4 mm
- Filament: PLA
- Layer height: 0.2 mm
- Infill: 10%
- Support: Yes for
Holder(60°), No for Other parts - Wall thickness: 2.0 mm (5 wall lines count) for
Holder, By default for Other parts - Disable "Union overlapping Volumes"
For that, you can see my video on YouTube. (5:02)
- Download Raspbian OS
- Flash a SD card with the zip file by using balenaEtcher (for exemple)
- Plug the SD card into the Raspberry Pi and turn on the power.
- Follow the instructions on the screen to install the Raspbian OS.
git clone https://github.com/SylvJalb/Aquarium-Fish-Feeder.git
cd Aquarium-Fish-Feederpip3 install -r requirements.txtMake sure you have gunicorn installed. Do the command which gunicorn and make sure you have the good path in run.sh (last line).
Then define your environment variables in env.py (nano env.py):
timezone_name = "Europe/Paris" # Your timezone
pwm_gpio = 12 #Use pin 12 for PWM signal
frequence = 50

# Positions of the servo (in degrees)
posFeed = 160   #Position to drop the food
posReload = 30 #Position to reload the foodGo on your internet router panel and configure your DHCP to define static IP to your Raspberry Pi.
Open the port number in your router panel and configure it to your Raspberry Pi. (tcp protocol)
./run.shIf you want to automatically start the service at boot, create /etc/systemd/system/feeder.service file:
sudo nano /etc/systemd/system/feeder.servicePaste this content, then modify paths to your files:
[Unit]
Description=feeder service

[Service]
User=pi
WorkingDirectory=/home/pi/Aquarium-Fish-Feeder
ExecStart=/bin/bash /home/pi/Aquarium-Fish-Feeder/run.sh
Restart=always

[Install]
WantedBy=multi-user.target
Then, do sudo systemctl enable feeder.service to activate the auto-start of the service after each startup.
To start the service, do sudo systemctl start feeder.service
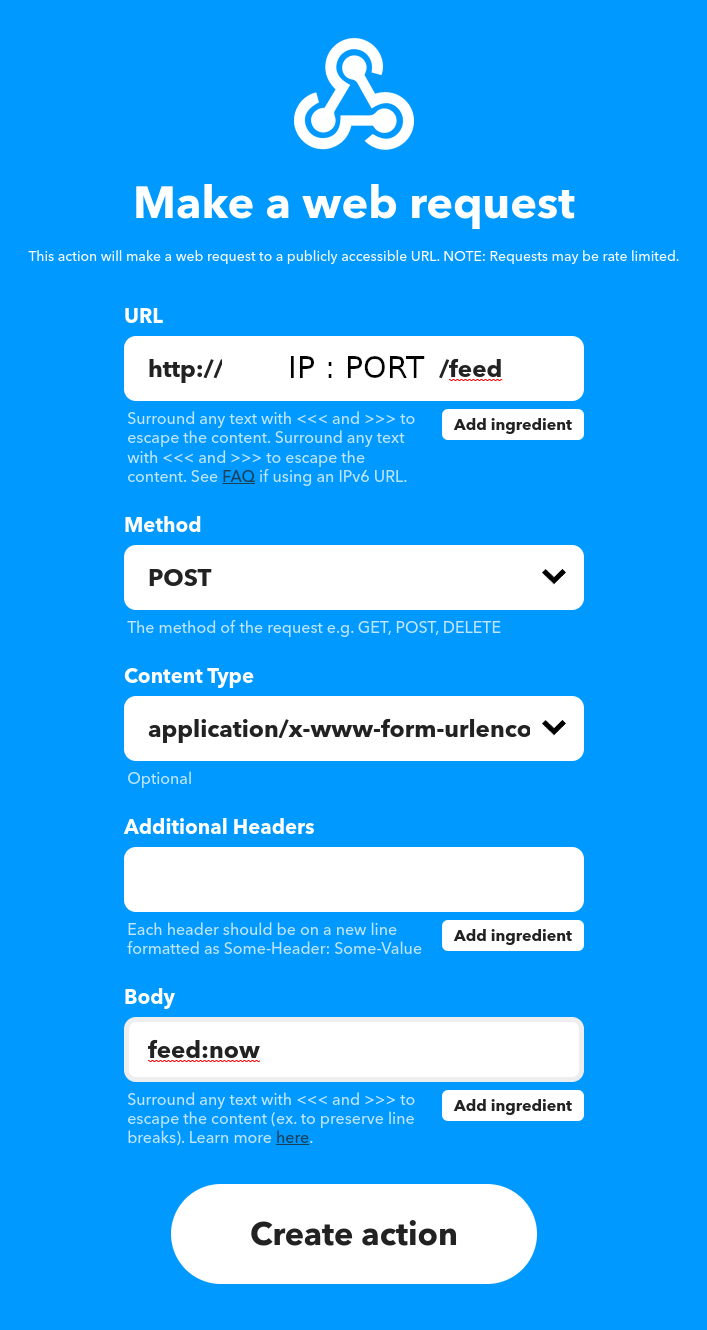
Go on your IFTTT account and create a new webhook. Add a Applet : IF you condition... THEN use webhook like this:
Now you can see the logs (dates when the feeder have been feeded) on this link:
http://YOUR_IP_ADDRESS:PORT/feed
https://raspberry-pi.fr/servomoteur-raspberry-pi/
https://pythonbasics.org/flask-http-methods/

