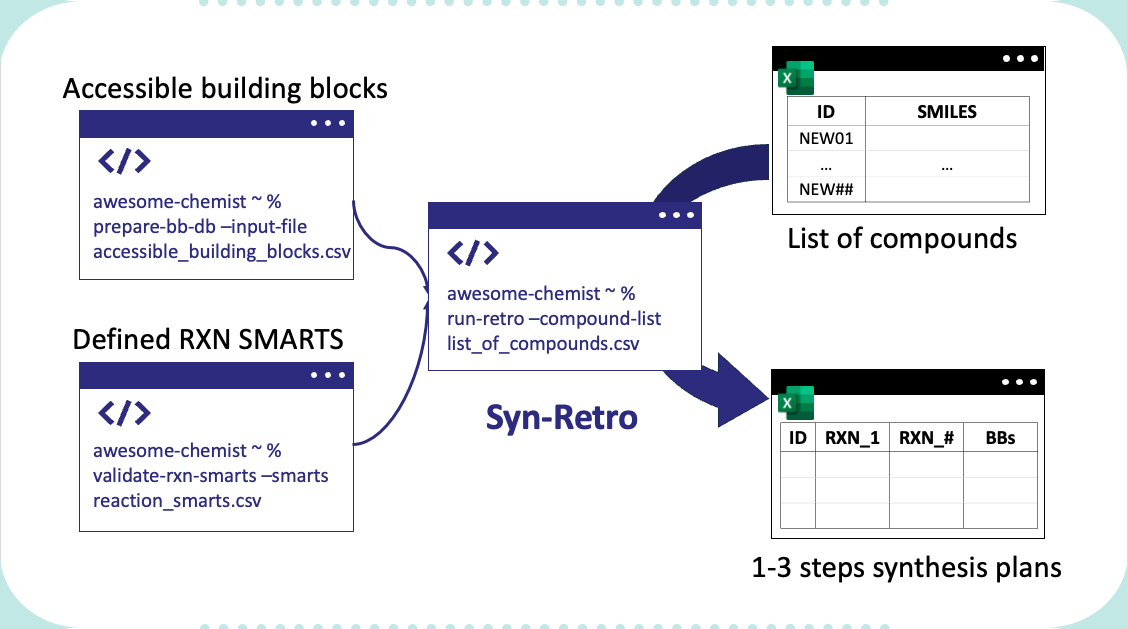
Syn-retro project decomposes compounds with the defined reaction SMARTS and given set of accessible building blocks. The package is developed in python and can be used as a python package or a command line tool.
The rule-based retrosynthesis is processed in following steps:
- Match all possible the templates with the target compound
- Fragment the compound with the matched templates
- Search the fragments in the database
- Repeat 1-3 until all fragments are found
Steps 1-2 are wrapped as fragement_compound function in syn_retro package. The function takes a compound and a retrosynthesis reaction smarts as inputs and returns a list of fragments. Then, search_fragment function processes step 3. The function has two modes, exact inchi key search mode and similarity search mode. By default, it uses exact inchi key search mode. The similarity search mode is used when the exact inchi key search mode fails to find the fragment.
These two functions are wrapped in return_1_step_retro_plan function in syn_retro package. The function takes a compound and a retrosynthesis reaction smarts as inputs and returns a list of fragments and the corresponding id from the database. The function repeats the process until all fragments are found. The users can specify the number of iterations. The default number of iterations is 3. In Synple Chem, we have demonstrated that three step reactions can cover more than 10^12 of chemical space.
(on-process) For the bulk retrosynthesis process, the users can use retrosynthesis_bulk function in syn_retro package. The function takes a list of compounds and a retrosynthesis reaction smarts as inputs and returns a list of fragments and the corresponding id from the database. The function repeats the process until all fragments are found. The users can specify the number of iterations. The default number of iterations is 3. This function uses multiprocessing to speed up the process.
To enable the retrosynthesis model, the users needs to provide the list of building blocks in .csv file with a colmn with building block id (named as id, integer) and building block smiles (named as smiles, and preferrably a parent mol, such as ChEMBL parent mol). With the following command, a temporal sqlite database will be generated with the provided building blocks.
By default, a table called building_blocks will be generated with the following columns: id, smiles, cano_smiles, inchi_key, parent_smiles, parent_inchi_key.
prepare_bb_db --input-file "PATH_TO_CSV_FILE" --db-path "PATH_TO_DB_FILE" --reactant-class-assets "assets/sub_smarts.yaml"
The users can also provide the substrate smarts in yaml file. The yaml file should be in the following format:
reactant_name_1: smarts_1
reactant_name_2: smarts_2
...
When substrate smarts are provided, then it makes tables for each substrates. In this case, for bb searching, the search space is restrict to the substrates, thus, a faster search.
Users should provide the reaction SMARTS and corresponding reactant names in yaml file. The yaml file should be in the following format, and in ./assets folder:
retro-rxn:
    rxn_1_nm: rxn_1_smarts
    rxn_2_nm: rxn_2_smarts
    ...

reactants:
    rxn_1_nm: reactant_1_nm_of_rxn_1, reactant_2_nm_of_rxn_1, ...
    rxn_2_nm: reactant_1_nm_of_rxn_2, reactant_2_nm_of_rxn_2, ...
Command line tool is enabled by installing the package. To use the package, the users need to prepare the building block database and reaction SMARTS assets. Then, the users can use the following command to run the retrosynthesis model:
- Prepare building block database
prepare_bb_db --input-file "PATH_TO_CSV_FILE" --db-path "PATH_TO_DB_FILE" --reactant-class-assets "assets/sub_smarts.yaml"
- (on-process) Prepare reaction SMARTS assets
- Instead, users can directly prepare the retro-reaction SMARTS assets in
./assetsfolder.
- Instead, users can directly prepare the retro-reaction SMARTS assets in
validate-rxn-smarts --smarts "PATH_TO_RXN_SMARTS_FILE"
- Run retrosynthesis model
run-retro --compound-list "PATH_TO_COMPOUND_LIST"
Setup python package:
make
If make doesn't work, manually set upt the environment:
conda env create -f ./environment.yaml -p ./env
./env/bin/python -m pip install -e .
Then, activate the environment:
conda activate ./env


