Note
Current Work In Progress:
- OLED display that will show current temp, humidity, and status of relays
- Installation video/walk-through
- Photo's/screenshots of the setup
Raspberry Pi based grow controller for your grow tent/room. Utilizing temperature & humidity sensor and relays to help automate grows and save you from having to buy another expensive device.
All the grow tent controllers I've come across require you to use their fans, lights, etc for everything to work out of the box OR purchase an additional adapter to convert their proprietary plugs to a standard outlet so you can use your own devices.
Using components I already had laying around I created a controller that is easily configurable to your needs. Even if you have to purchase all items to build you'll still be saving money.
Tip
You can also visit my forum post on this build for more in-depth documentation (such as images/screenshots), discussion, grow updates, and general inquiries at Urban Hydro Gardening - DIY Raspberry Pi Grow Tent/Room Controller
This space can also be used to post your builds and/or issues you may be running into
- Lights (Based on time schedule in the 12 hour clock format)
- Exhuast Fan (Based on Sensor readings)
- Humidity (Based on Sensor readings)
- Temperature (Based on Sensor readings)
- Water Pump (Based on a set interval schedule)
- Raspberry Pi (I'm using a Raspberry Pi Zero W)
- AM2303/DHT22 Temperature/Humidity Sensor
- 10k Ohm Resistor (unless your AM2302/DHT22 has one built in. Mine has it built in so research the wiring diagram if you need to wire that resistor in)
- 5v relay bank (I'm using a bank of 8 but the program only uses 6 as of right now)
- Jumper wires
- 14/2 romex/housing wire
- (3) 15amp outlets
- Wires to connect the sensor to the Pi (I'm using come Cat5e cable I had laying around)
- Some sort of box to house the Pi, relay(s), and outlets
Simply input the time you want the lights to turn on and off at.
# Define lights on and off times (in 12-hour format with AM/PM)
lights_on_time = datetime.datetime.strptime('6:00 AM', '%I:%M %p').time()  # Change to your desired on time
lights_off_time = datetime.datetime.strptime('10:00 PM', '%I:%M %p').time()  # Change to your desired off time
You can set the desired temperature and humidity thresholds which will trigger the relays based off the sensor readings.
# Define temperature and humidity thresholds
Temperature_Threshold_Fan = 75  # Will turn on Fan if temperature in Fahrenheit (F) is above this value.
Temperature_Threshold_Heat = 63  # Will turn on Heat if temperature in Fahrenheit (F) is below this value.
Humidity_Threshold_Fan = 85  # Will turn on Fan once humidity is above this percentage (%) to try and move lower humidity air in. Disable this if humidity outside the tent/room is higher.
Humidity_Threshold_Humidifier = 70  # Will turn on Humidifier once humidity is below this percentage (%).
Humidity_Threshold_Dehumidifier = 80  # Will turn on Dehumidifier once humidity is above this percentage (%).
Here you can set how often you want the pump to run and for how long.
# Define pump runtime and interval (in seconds)
pump_runtime = 90  # Change to your desired pump runtime in seconds
pump_interval = 600  # Change to your desired pump interval in seconds
If you're not using a particular appliance/relay you can simply change the value from "True" to "False". If set to False, the program will ignore that logic as well as print "Disabled" on the device status output to remind/tell you that the device is disabled.
# Define appliance control flags (True: Enabled, False: Disabled)
lights_enabled = True  # Change to True or False
fan_enabled = True  # Change to True or False
humidifier_enabled = True  # Change to True or False
heater_enabled = True  # Change to True or False
dehumidifier_enabled = True  # Change to True or False
pump_enabled = True  # Change to True or False
Notice there is no variable for an air conditioner. For me I do not need this option since my tent is in my basement which is always far cooler and don't feel its necessary to incorporate an air conditioning unit here. These relays can only handle so much power as well and don't want to push their limits. If you need an air conditioning unit then you can always get one that has it's own thermostat and set it according to your needs.
The GPIO pins used and their corresponding variables are listed below for relay use. We will be using GPIO pins 14, 15, 18, 23, 24, and 25 that need to be connected to the 5v relay's using your jumper wires. You'll then connect GPIO 17 to your DHT22 sensor DATA terminal. Once that is complete you need to connect your DHT22 to an open 5v power pin as well as Ground pin. In my case, I chose GPIO-2 for the 5v power and GPIO-6 for Ground.
# Define pin numbers
LIGHTS_PIN = 14
FAN_PIN = 15
HUMIDIFIER_PIN = 18
HEATER_PIN = 23
DEHUMIDIFIER_PIN = 24
PUMP_PIN = 25
SENSOR_PIN = 17 # DHT22 sensorImportant
There are 2 options here, read both and make a decision on which one to do BEFORE blindly running commands
Option 1: Create an environment for the DHT22 sensor to work.
python3 -m venv myenvsource myenv/bin/activatepip install Adafruit_DHT
If you chose this route, you will need to run the source myenv/bin/activate everytime you reboot your pi in the directory which you created it.
--OR--
Option 2: You can also use the pip function "--break-system-packages" to install it without needing to setup the environment.
pip install Adafruit_DHT --break-system-packages
This is the easier route, but could potentially cause system issues? I think? Idk, this is the way I did it and it's working just fine.
Now let's pull down code from GitHub to our Pi's by running the following:
- Run the command
cdto make sure you're not in any odd directories before pulling down the code. git clone https://github.com/TFro3/Raspberry-Pi-Grow-Tent-Controller.git- Then cd into the directory by using
cd Raspberry-Pi-Grow-Tent-Controller - Run the following command
chmod +x StartGrowController.shto make the shell script executable - You can now run
./StartGrowController.shORpython3 GrowController.pyto start the controller! - Optional: run the command
sudo nano /etc/rc.localand insert the following line between the 'fi' and 'exit 0' as shown below. This will run the GrowController.py at boot so if you reboot or close power it will run automatically once the Pi is running:
fi

cd /home/pi/Raspberry-Pi-Grow-Tent-Controller
./StartGrowController.sh &

exit 0
- Once in the 'Raspberry-Pi-Grow-Tent-Controller' directory you'll the the GrowController.py file.
- Open the file by running
nano GrowController.py - Edit the temperature and humidity parameters along with the light schedule times and save when complete. (shown above in the examples)
# ------------ You CAN edit values starting here ------------ #

# Define lights on and off times (in 12-hour format with AM/PM)
lights_on_time = datetime.datetime.strptime('6:00 AM', '%I:%M %p').time()  # Change to your desired on time
lights_off_time = datetime.datetime.strptime('10:00 PM', '%I:%M %p').time()  # Change to your desired off time

# Define pump runtime and interval (in seconds)
pump_runtime = 90  # Change to your desired pump runtime in seconds
pump_interval = 600  # Change to your desired pump interval in seconds

# Define temperature and humidity thresholds
Temperature_Threshold_Fan = 75  # Will turn on Fan if temperature in Fahrenheit (F) is above this value.
Temperature_Threshold_Heat = 63  # Will turn on Heat if temperature in Fahrenheit (F) is below this value.
Humidity_Threshold_Fan = 85  # Will turn on Fan once humidity is above this percentage (%) to try and move lower humidity air in. Disable this if humidity outside the tent/room is higher.
Humidity_Threshold_Humidifier = 70  # Will turn on Humidifier once humidity is below this percentage (%).
Humidity_Threshold_Dehumidifier = 80  # Will turn on Dehumidifier once humidity is above this percentage (%).

# Define appliance control flags (True: Enabled, False: Disabled)
lights_enabled = True  # Change to True or False
fan_enabled = True  # Change to True or False
humidifier_enabled = True  # Change to True or False
heater_enabled = True  # Change to True or False
dehumidifier_enabled = True  # Change to True or False
pump_enabled = True  # Change to True or False

# ------------ Do NOT edit values past here ------------ #- The run
python GrowController.pyOR./StartGrowController.shORpython3 GrowController.pyif you have both Python2 and Python3 installed on your Pi.
The save the file and you're all set!
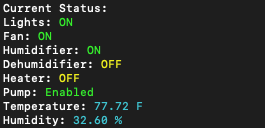
Once the program is running you'll get print out statuses that look like the following:
Caution
Disclaimer:
- This project involves working with electrical circuits and high voltage components. Incorrect wiring or handling of high voltage lines can pose serious risks of electric shock or fire hazards. It's crucial to follow proper safety precautions and guidelines when working with high voltage.
Safety Recommendations
-
Qualified Personnel: It's strongly advised to involve or consult with qualified personnel or electricians when dealing with high voltage lines.
-
Disconnect Power: Always disconnect power sources before working on electrical circuits.
-
Insulation: Ensure proper insulation of wires and components to prevent accidental contact with live circuits.
-
Proper Wiring: Follow manufacturer instructions and local electrical codes when wiring high voltage lines.
-
Use Enclosures: Enclose circuits in suitable cases to prevent accidental contact.
-
Safety Gear: Wear appropriate safety gear, such as gloves and goggles, when handling electrical components.
Liability Statement
- The creators or contributors of this project do not accept any liability or responsibility for any damages, accidents, injuries, or losses resulting from the use, misuse, or inability to use the information or instructions provided in this project. Users assume all risks associated with handling high voltage circuits and should exercise caution and expertise when working on such systems.
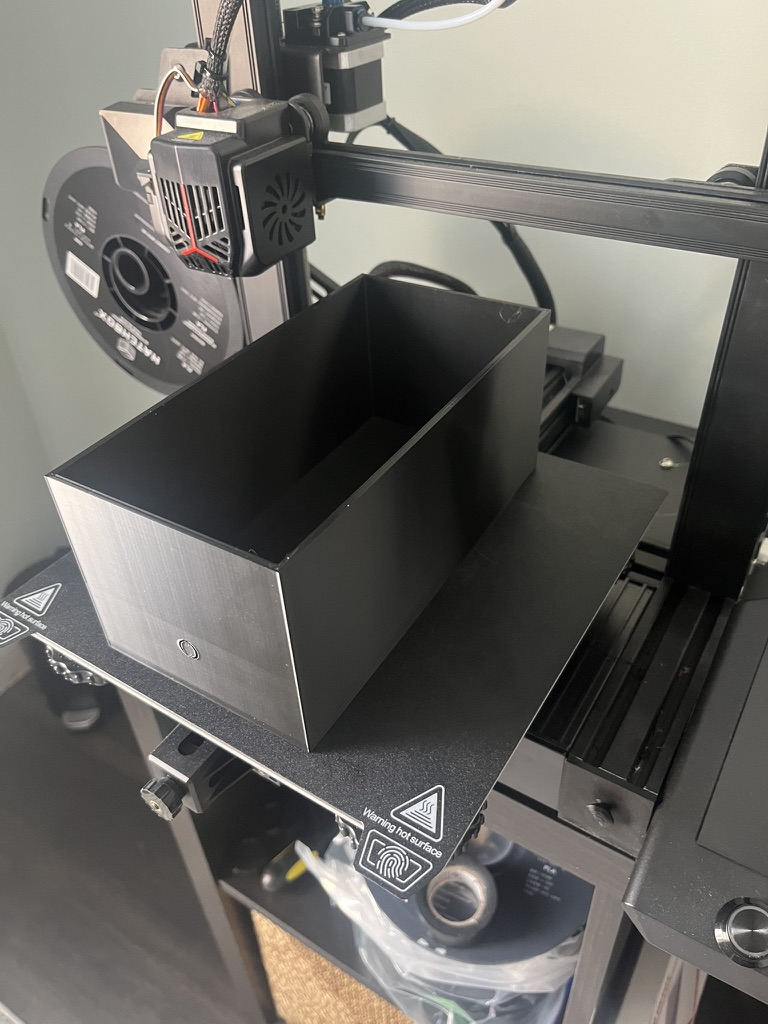
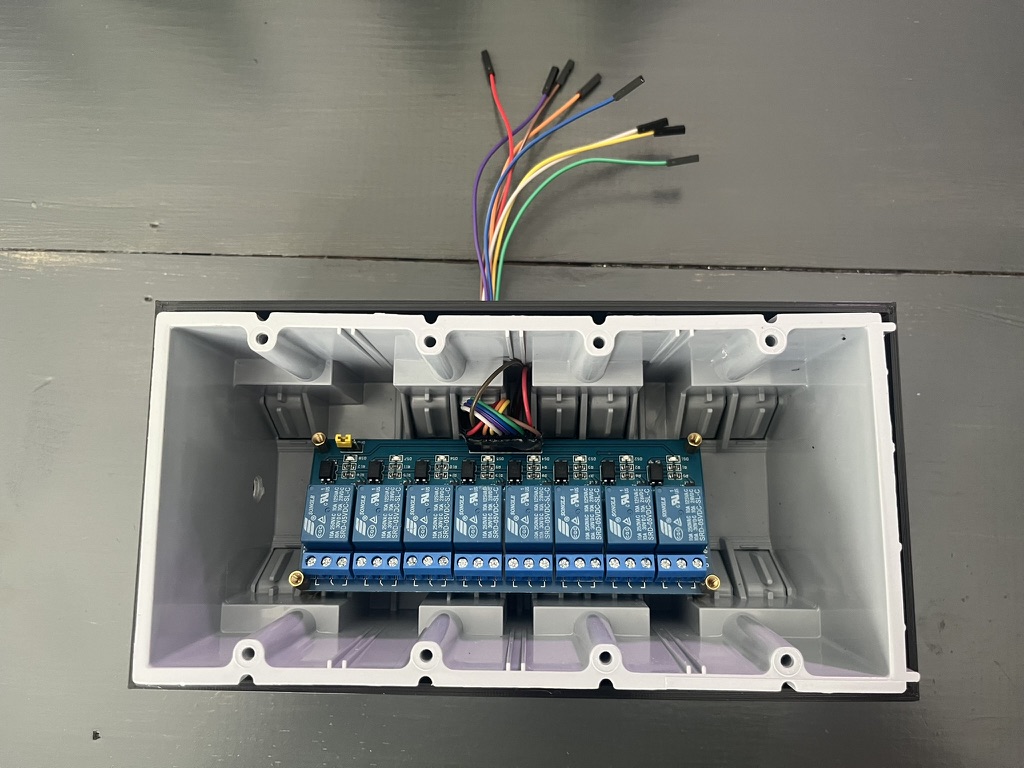
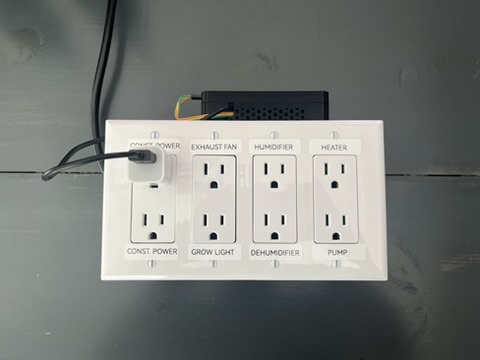
I did a quick design and 3D printed an enclosure for a 4 gang electrical box
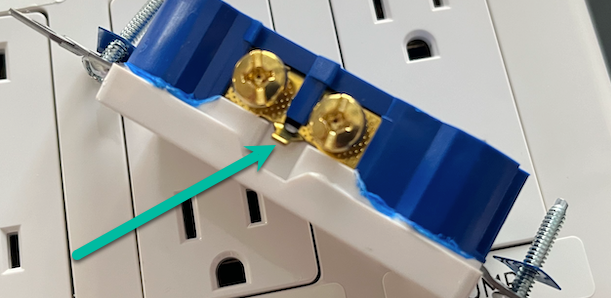
Break off the tab to make each plug independent from each other on each outlet. Depending on your wiring config this could be the 'hot' or 'common' side.
I secured the electrical box inside the 3d printed enclosure with a general adhesive, then test fit the bank of 8 relays
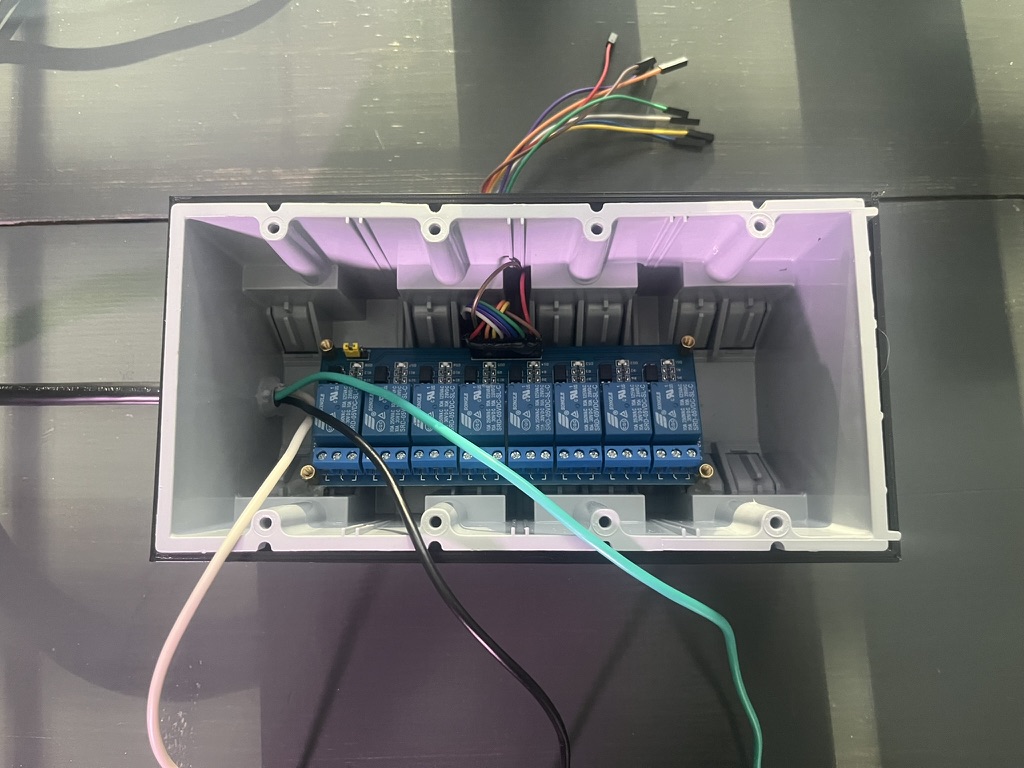
Routed in the cord that will be powering everything
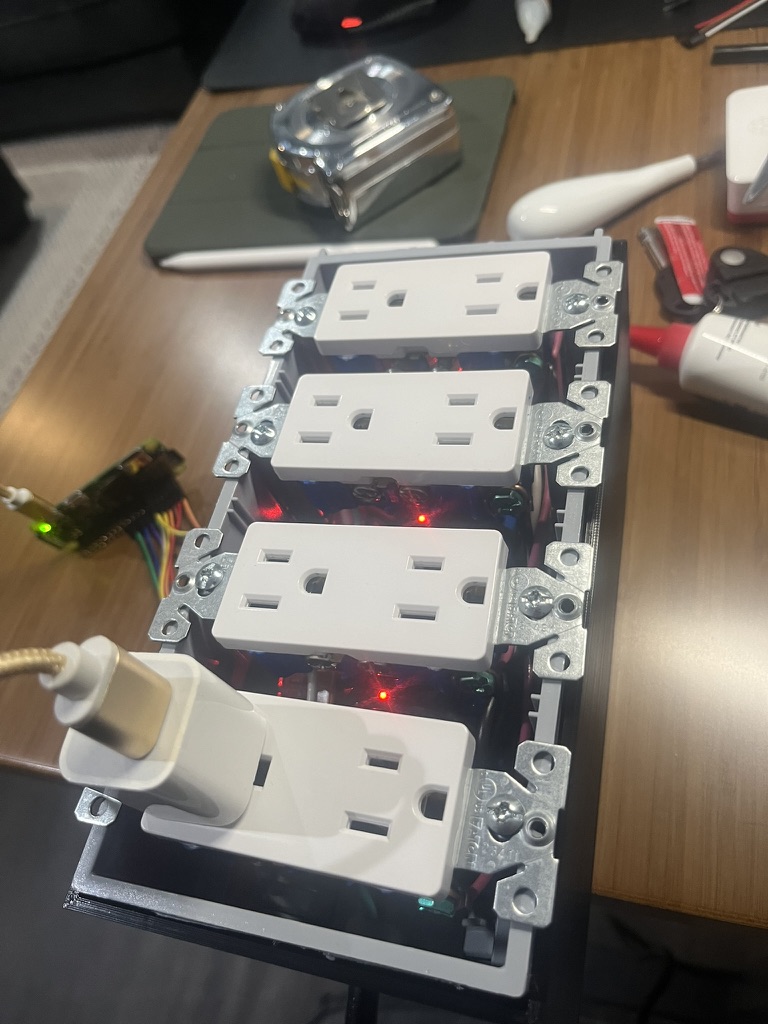
Wired in and installed all the outlets.
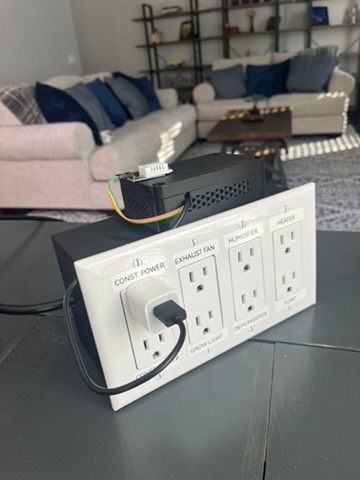
I put an extra outlet in the box that will provide constant power. This will be used for powering the Pi and the circulating fans inside the tent
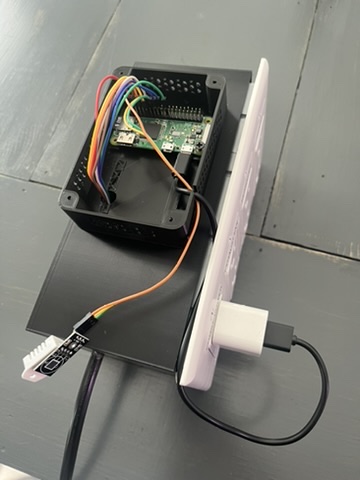
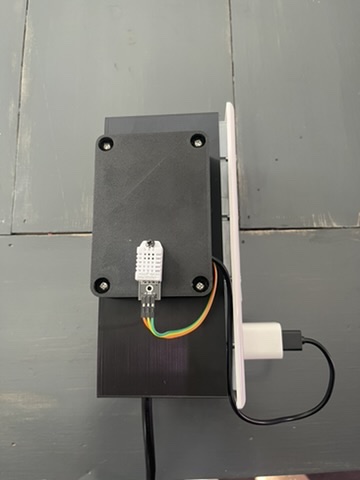
Mounted the Pi enclosure on the side of the electrical enclosure.
For now the sensor is mounted on the Pi enclosure. Later on I will use some Cat5e cable to add more length and add it to the center of the tent hanging from the top.
Now it's all wrapped up and ready for the first grow!
Caution
When picking out appliances/lights make sure you're keeping in mind the constraints of these relays and wiring. In my build the cord going to the box is only 16 gauge wiring which can handle 13 amps of power since the wire is less than 50'. This isn't an issue because the relays can only handle 10 amps. In my basement this will also be plugged into a GFCI outlet since this is dealing with water. I highly suggest you also plug into some sort of GFCI protected outlet. This circuit I'm using also has other items on it and is only a 15 amp circuit so if I came anywhere close the the 10 amps allotted I'd trip the breaker.
When picking out the appliances make sure you're under calculated wattage for your setup.
To do this it's simply Amperage X Volts = Wattage
So in this case my max amperage is 10 and its running on a 110v circuit so 10x110= 1,100 watts.
I won't be needing a dehumidifier so I will be disabling that in the controller.
If you're planning on running every single available device in your setup you very well need 2 plugs going to your relay(s) and split the power going to the outlets with 2 completely separate circuits in your home. With my pumps, lights, fans, humidifier, and small desk heater I'm totaling just under 800 watts which is probably the max I'd want to be at since there are motors involved in the appliances. Motors need a little more amperage when starting then consume their regular amperage after the initial startup.
Have fun and enjoy!
