A project backed by LeXtudio Inc.
-
Launch PowerShell 7 console as administrator, and run
install.ps1to install context menu items to Windows Explorer.Quickest way to run the latest script from GitHub at an elevated PowerShell 7 console is
Set-ExecutionPolicy Bypass -Scope Process -Force; [System.Net.ServicePointManager]::SecurityProtocol = [System.Net.ServicePointManager]::SecurityProtocol -bor 3072; iex ((New-Object System.Net.WebClient).DownloadString('https://raw.githubusercontent.com/TGSAN/windowsterminal-shell/master/install.ps1'))
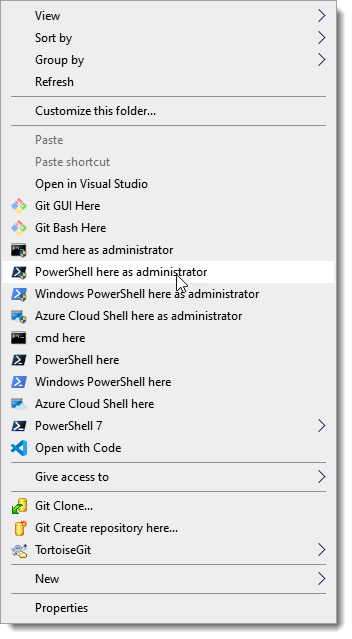
Now the menu items are added to Windows Explorer context menu.
Figure 1: Default layout
The menu items are organized in the
defaultlayout. Other layouts such asminiandflatgive different look and feel. To apply an alternative layout (likemini), simply runinstall.ps1 mini.
Figure 2: Flat layout
Figure 3: Mini layout
- Run
uninstall.ps1to uninstall context menu items from Windows Explorer.
To uninstall an alternative layout (like
mini), rununinstall.ps1 mini.
The current release only supports Windows 10 machines (Windows Terminal restriction) and Windows Terminal installed via the store or .appx file.
If Windows Terminal is installed via Scoop, scripts from another repo might help.
The install script must be run as administrator.
That's because it pulls out data from Windows Terminal's installation folder, which is locked down by Windows 10.
install.ps1 and uninstall.ps1 only manipulate current user's Windows Explorer settings for the context menu items, and do not write to Windows Terminal settings.
So different users on the same machine must install the context menu items separately, but possibly with different layouts.
Downloading Windows Terminal icon from GitHub (in install.ps1) requires internet connection, but in general is just an optional step that won't be executed in most cases.
To learn more about other cool products from LeXtudio Inc. , please visit our homepage.


