-
Uses OpenGL for rendering, offloads rendering to the GPU for lower system load and buttery smooth scrolling. Uses threaded rendering to minimize input latency.
-
Supports all modern terminal features: graphics (images), unicode, true-color, OpenType ligatures, mouse protocol, focus tracking, bracketed paste and so on.
-
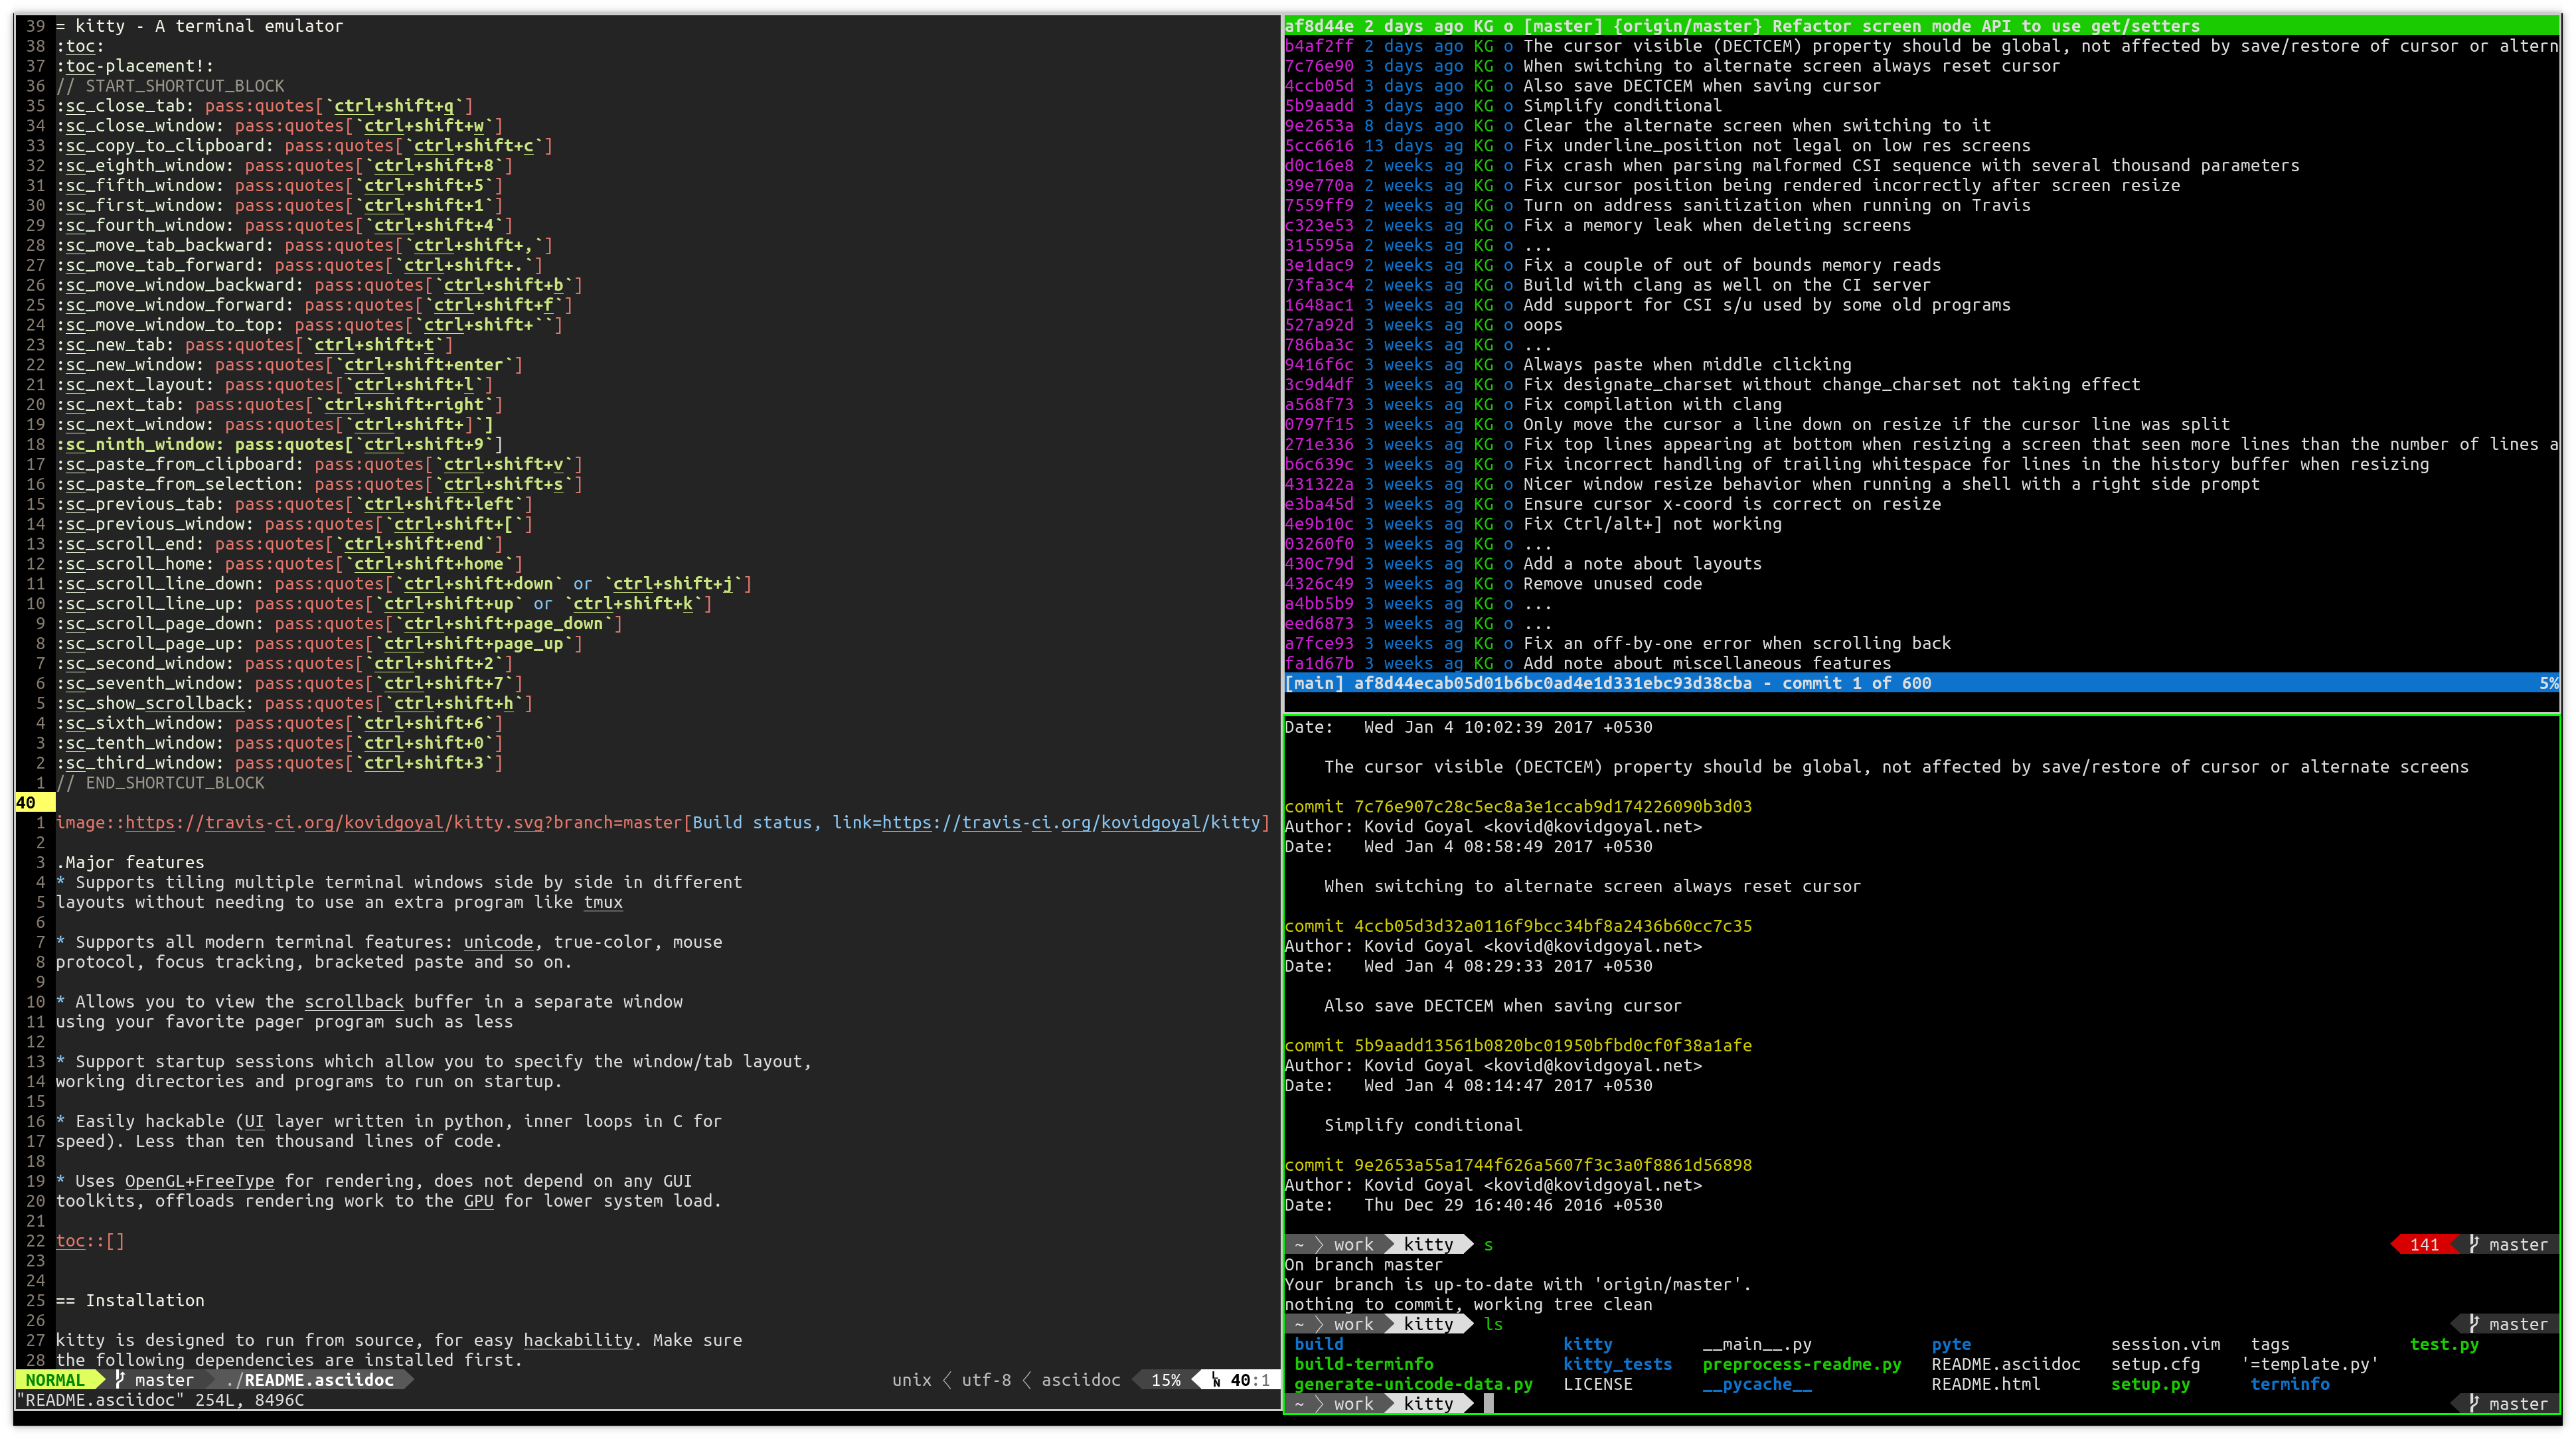
Supports tiling multiple terminal windows side by side in different layouts without needing to use an extra program like tmux
-
Can be controlled from scripts or the shell prompt, even over SSH.
-
Has a framework for kittens, small terminal programs that can be used to extend kitty’s functionality. For example, they are used for Unicode input and Hints.
-
Supports startup sessions which allow you to specify the window/tab layout, working directories and programs to run on startup.
-
Cross-platform support: kitty currently works on Linux and macOS, but because it uses only OpenGL for rendering, it should be trivial to port to other platforms.
-
Allows you to open the scrollback buffer in a separate window using arbitrary programs of your choice. This is useful for browsing the history comfortably in a pager or editor.
- Major Features
- Installation
- Design philosophy
- Tabs and Windows
- Controlling kitty from scripts
- The scrollback buffer
- Unicode input
- Hints
- Miscellaneous features
- Layouts
- Configuration
- Startup Sessions
- Protocol Extensions
- Font control
- Performance
- Note for Linux/macOS packagers
- Frequently Asked Questions
- Some special symbols are rendered small/truncated in kitty?
- How do I build kitty.app on macOS?
- Using a color theme with a background color does not work well in vim?
- I get errors about the terminal being unknown or opening the terminal failing when SSHing into a different computer?
- How do I change the colors in a running kitty instance?
- How do I specify command line options for kitty on macOS?
- Resources on terminal behavior
kitty is designed to run from source, for easy hackability. Make sure the following dependencies are installed first.
-
python >= 3.5
-
harfbuzz >= 1.5.0
-
zlib
-
libpng
-
freetype (not needed on macOS)
-
fontconfig (not needed on macOS)
-
ImageMagick (optional, needed to use the
kitty icattool to display images in the terminal) -
gcc or clang (required only for building)
-
pkg-config (required only for building)
-
For building on Linux in addition to the above dependencies you might also need to install the
-devpackages forxcursor,xrandr,xinerama,libgl1-mesaandxkbcommon-x11, if they are not already installed by your distro.
git clone https://github.com/kovidgoyal/kitty && cd kitty
Now build the C parts of kitty with the following command:
make
You can run kitty, as:
python3 .
-
Arch Linux: AUR git package https://aur.archlinux.org/packages/kitty-git/
-
Arch Linux: AUR stable package https://aur.archlinux.org/packages/kitty/
-
NixOS / nixpkgs: https://github.com/NixOS/nixpkgs/blob/master/pkgs/applications/misc/kitty/default.nix
-
Gentoo: https://packages.gentoo.org/packages/x11-terms/kitty
-
openSUSE: https://build.opensuse.org/package/show/X11:terminals/kitty
kitty is available as a macOS dmg file for easy installation from the
releases page. You can also run kitty directly from
source using the above install from source instructions, after installing its
dependencies using brew or a similar package manager.
kitty is designed for power keyboard users. To that end all its controls work with the keyboard (although it fully supports mouse interactions as well). Its configuration is a simple, human editable, single file for easy reproducibility (I like to store config files in source control).
The code in kitty is designed to be simple, modular and hackable. It is written in a mix of C (for performance sensitive parts) and Python (for easy hackability of the UI). It does not depend on any large and complex UI toolkit, using only OpenGL for rendering everything.
Finally, kitty is designed from the ground up to support all modern terminal features, such as unicode, true color, bold/italic fonts, text formatting, etc. It even extends existing text formatting escape codes, to add support for features not available elsewhere, such as colored and styled (curly) underlines. One of the design goals of kitty is to be easily extensible so that new features can be added in the future with relatively less effort.
kitty is capable of running multiple programs organized into tabs and windows. The top level of organization is the Tab. Each tab consists of one or more windows. The windows can be arranged in multiple different layouts, like windows are organized in a tiling window manager. The keyboard controls (which are all customizable) for tabs and windows are:
| Action | Shortcut |
|---|---|
Scroll line up |
|
Scroll line down |
|
Scroll page up |
|
Scroll page down |
|
Scroll to top |
|
Scroll to bottom |
|
| Action | Shortcut |
|---|---|
New tab |
|
Close tab |
|
Next tab |
|
Previous tab |
|
Next layout |
|
Move tab forward |
|
Move tab backward |
|
Set tab title |
|
| Action | Shortcut |
|---|---|
New window |
|
New OS window |
|
Close window |
|
Next window |
|
Previous window |
|
Move window forward |
|
Move window backward |
|
Move window to top |
|
Focus specific window (windows are counted clockwise from the top left corner) |
|
| Action | Shortcut |
|---|---|
Increase font size |
|
Decrease font size |
|
Restore font size |
|
Toggle fullscreen |
|
Input unicode character |
|
Click URL using the keyboard |
{sc_run_simple_kitten_text_url_hints} |
Pass current selection to program |
|
Edit kitty config file |
|
Open a kitty shell |
{sc_kitty_shell} |
You can control kitty from the command line/scripts by sending it messages.
You can tell kitty to open/close/rename tabs and windows. You can even send
arbitrary input/text to any specified window. Messages can be sent using kitty
@. Note that you must set allow_remote_control yes in your
kitty.conf to use this feature. It even works over SSH
connections. This feature is best illustrated with a
tutorial.
kitty supports scrolling back to view history, just like most terminals. You
can use either the keyboard shortcuts or the mouse
scroll wheel to do so. However, kitty has an extra, neat feature. Sometimes
you need to explore the scrollback buffer in more detail, maybe search for some
text or refer to it side-by-side while typing in a follow-up command. kitty
allows you to do this by pressing the ctrl+shift+h key-combination,
which will open the scrollback buffer in your favorite pager program (which is
less by default). Colors and text formatting are preserved. You can explore
the scrollback pager comfortably within the pager.
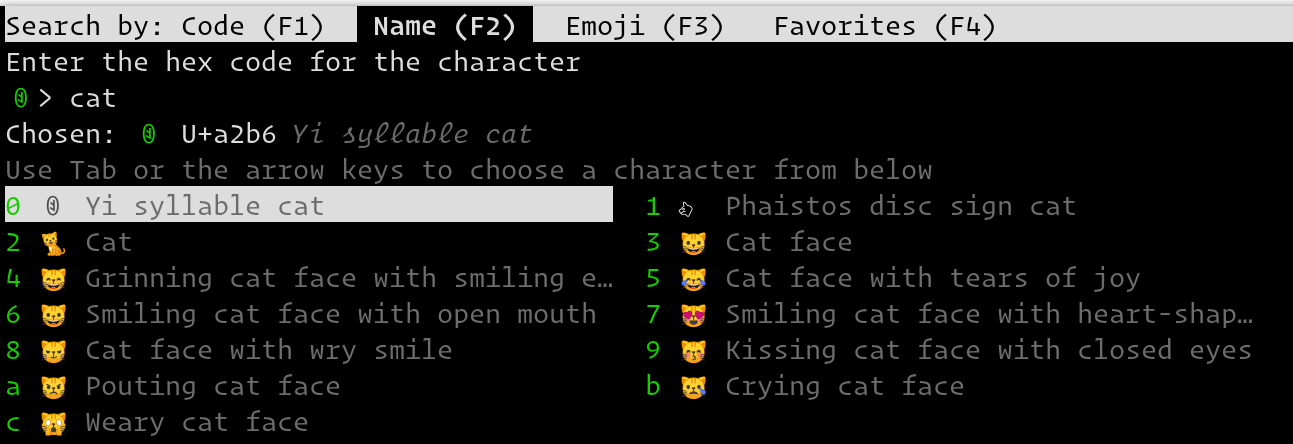
You can input unicode characters by name, hex code, recently used and even an editable favorites list.
Press ctrl+shift+u to start the unicode input widget, shown below.
In Code mode, you enter a unicode character by typing in the hex code for the character and pressing enter, for example, type in 2716 and press enter to get ✖. You can also choose a character from the list of recently used characters by typing a leading period and then the two character index and pressing Enter.
In Name mode you instead type words from the character name and use the arrow keys/tab to select the character from the displayed matches. You can also type a leading period and the index for the match if you dont like to use arrow keys.
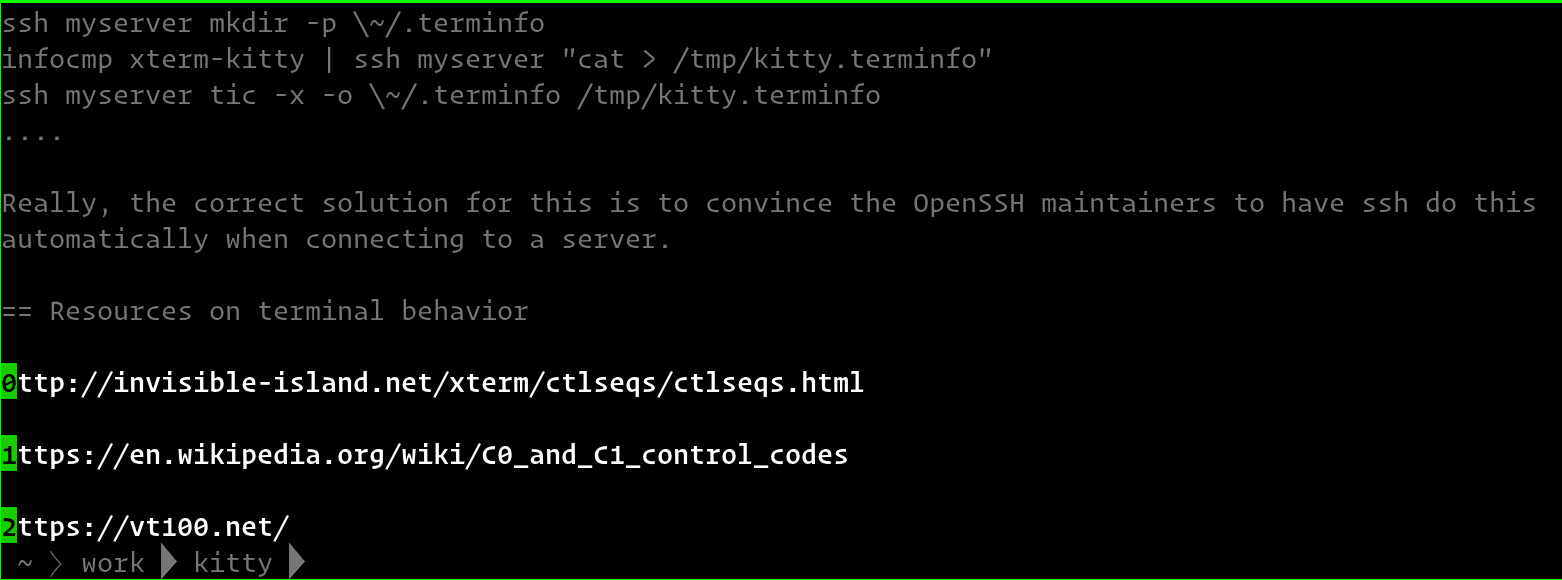
kitty has a hints mode to select and act on arbitrary text snippets currently
visible on the screen. For example, you can press ctrl+shift+e
to choose any URL visible on the screen and then open it using your system
browser.
Similarly, you can press {sc_run_kitten_text_hintstype_path_program_} to select anything that looks like a path or filename and then insert it into the terminal, very useful for picking files from the output of a git or ls command and adding them to the command line for the next command.
The hints kitten is very powerful to see more detailed help on its various
options and modes of operation, use: kitty +kitten hints --help.
-
You can also hold down
ctrl+shiftand click on a URL to open it in a browser. -
You can double click to select a word and triple click to select a line.
-
You can right click to extend a previous selection
Currently, there are five layouts available,
-
Stack — Only a single maximized window is shown at a time
-
Tall — One window is shown full height on the left, the rest of the windows are shown one below the other on the right
-
Grid — All windows are shown in a grid
-
Horizontal — All windows are shown side-by-side
-
Vertical — All windows are shown one below the other
You can switch between layouts using the ctrl+shift+l key combination. You can
also create shortcuts to select particular layouts, and choose which layouts
you want to enable/disable, see kitty.conf for examples.
Writing a new layout only requires about fifty lines of code, so if there is some layout you want, take a look at layout.py and submit a pull request!
kitty is highly customizable, everything from keyboard shortcuts, to painting frames-per-second. See the heavily commented default config file for an overview of all customization possibilities.
By default kitty looks for a config file in the OS config directories (usually
~/.config/kitty/kitty.conf and additionally
~/Library/Preferences/kitty/kitty.conf on macOS) but you can pass a specific
path via the --config option or use the KITTY_CONFIG_DIRECTORY environment
variable. See the help for the --config option in kitty --help for full
details. You can also dump the current configuration using the --debug-config
option.
You can control the tabs, window layout, working directory, startup
programs, etc. by creating a "session" file and using the --session
command line flag. For example:
# Set the window layout for the current tab
layout tall
# Set the working directory for windows in the current tab
cd ~
# Create a window and run the specified command in it
launch zsh
launch vim
# Set the title for the next window
title Chat with x
launch irssi --profile x

# Create a new tab (the part after new_tab is the optional tab name which will
# be displayed in the tab bar, if omitted, the title of the active window will
# be used instead)
new_tab my tab
cd ~/somewhere
# Set the layouts allowed in this tab
enabled_layouts tall, stack
# Set the current layout
layout stack
launch zsh
# Make the current window the active (focused) window
focus
launch emacs
kitty has a few extensions to the xterm protocol, to enable advanced features, see Protocol Extensions.
kitty has extremely flexible and powerful font selection features. You can specify individual families for the regular, bold, italic and bold+italic fonts. You can even specify specific font families for specific ranges of unicode characters. This allows precise control over text rendering. It can come in handy for applications like powerline, without the need to use patched fonts. See the various font related configuration directives in the config file.
The main goals for kitty performance are user perceived latency while typing and "smoothness" while scrolling as well as CPU usage. kitty tries hard to find an optimum balance for these. To that end it keeps a cache of each rendered glyph in video RAM so that font rendering is not a bottleneck. Interaction with child programs takes place in a separate thread from rendering, to improve smoothness.
There are two parameters you can tune to adjust the performance. repaint_delay
and input_delay. These control the artificial delays introduced into the
render loop to reduce CPU usage. See the config file for details.
See also the sync_to_monitor option to further decrease latency at the cost
of some tearing while scrolling.
You can generate detailed per-function performance data using
gperftools. Build kitty with
make profile which will create an executable called kitty-profile. Run
that and perform the task you want to analyse, for example, scrolling a large
file with less. After you quit, function call statistics will be printed to
stdout and you can use tools like kcachegrind for more detailed analysis.
Here are some CPU usage numbers for the task of scrolling a file continuously in less.
The CPU usage is for the terminal process and X together and is measured using htop.
The measurements are taken at the same font and window size for all terminals on a
Intel® Core™ i7-4820K CPU @ 3.70GHz CPU with a
Advanced Micro Devices, Inc. [AMD/ATI] Cape Verde XT [Radeon HD 7770/8760 / R7 250X] GPU.
| Terminal | CPU usage (X + terminal) |
|---|---|
kitty |
6 - 8% |
xterm |
5 - 7% (but scrolling was extremely janky) |
termite |
10 - 13% |
urxvt |
12 - 14% |
gnome-terminal |
15 - 17% |
konsole |
29 - 31% |
As you can see, kitty uses much less CPU than all terminals, except xterm, but its scrolling "smoothness" is much better than that of xterm (at least to my, admittedly biased, eyes).
While kitty does use python, it is not a traditional python package, so please do not install it in site-packages. Instead run,
python3 setup.py linux-packageThis will install kitty into the directory linux-package. You can run kitty
with linux-package/bin/kitty. All the files needed to run kitty will be in
linux-package/lib/kitty. The terminfo file will be installed into
linux-package/share/terminfo. Simply copy these files into /usr to install
kitty. In other words, linux-package is the staging area into which kitty is
installed. You can choose a different staging area, by passing the --prefix
argument to setup.py.
You should probably split kitty into two packages, kitty-terminfo that
installs the terminfo file and kitty that installs the main program.
This allows users to install the terminfo file on servers into which they ssh,
without needing to install all of kitty.
You also need tic to compile the terminfo files, it is usually found in the development package of ncurses
This applies to creating packages for kitty for macOS package managers such as brew or MacPorts as well.
The number of cells a unicode character takes up are controlled by the unicode standard. All characters are rendered in a single cell unless the unicode standard says they should be rendered in two cells. When a symbol does not fit, it will either be rescaled to be smaller or truncated (depending on how much extra space it needs). This is often different from other terminals which just let the character overflow into neighboring cells, which is fine if the neighboring cell is empty, but looks terrible if it is not.
Some programs, like powerline, vim with fancy gutter symbols/status-bar, etc. misuse unicode characters from the private use area to represent symbols. Often these symbols are square and should be rendered in two cells. However, since private use area symbols all have their width set to one in the unicode standard, kitty renders them either smaller or truncated. The exception is if these characters are followed by a space or empty cell in which case kitty makes use of the extra cell to render them in two cells.
Install imagemagick, optipng and librsvg using brew or similar (needed for the logo generation step).
And run:
make appThis kitty.app unlike the released one does not include its own copy of
python and the other dependencies. So if you ever un-install/upgrade those dependencies
you might have to rebuild the app.
Note that the released kitty.dmg includes all dependencies, unlike the
kitty.app built above and is built automatically by using the kitty branch of
build-calibre however, that
is designed to run on Linux and is not for the faint of heart.
First make sure you have not changed the TERM environment variable, it should
be xterm-kitty. vim uses background color erase even if the terminfo file
does not contain the bce capability. This is a bug in vim. You can work around
it by adding the following to your vimrc:
let &t_ut=''
See here for why kitty does not support background color erase.
I get errors about the terminal being unknown or opening the terminal failing when SSHing into a different computer?
This happens because the kitty terminfo files are not available on the server. Either install kitty on the server, or simply copy over the terminfo files, using:
infocmp xterm-kitty | ssh myserver tic -x -o \~/.terminfo /dev/stdin
Really, the correct solution for this is to convince the OpenSSH maintainers to have ssh do this automatically when connecting to a server, so that all terminals work transparently.
You can either use the
OSC
terminal escape codes to set colors or you can enable remote control
for kitty and use kitty @ set-colors --help.
Apple does not want you to use command line options with GUI applications. To
workaround that limitation, kitty will read command line options from the file
<kitty config dir>/macos-launch-services-cmdline when it is launched
from the GUI, i.e. by clicking the kitty application icon or using open -a kitty.
Note that this file is only read when running via the GUI.
You can, of course, also run kitty from a terminal with command line options, using:
/Applications/kitty.app/Contents/MacOS/kitty.
And within kitty itself, you can always run kitty using just kitty as it
cleverly adds itself to the PATH.


