The template used to bootstrap plugins for CodedRed Plugin Jams.
Report Bug
·
Request Feature
Table of Contents
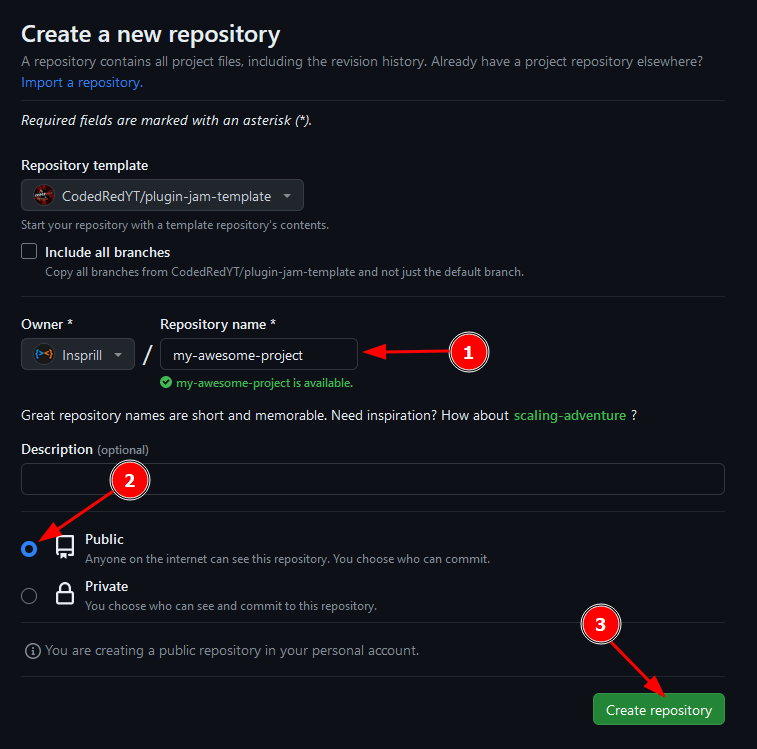
To get started creating a plugin using this template, you'll first want to create a new repository using this template.

You'll then want to give the new repository a name.
The name should be all lowercase, with words separated by dashes.
Make sure you also select "Public" to ensure that your plugin is visible to everyone, including the judges.
The description is optional, but you can add one if you'd like.

Now that you have the repository created, you'll want to clone it to your computer.
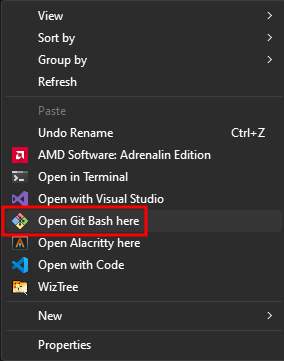
Make sure you have Git installed, then go to the folder where you want to clone the repository to.
Right click in some empty space and select "Open Git Bash here".

Once Git Bash is open, run the following command to clone the repository.
git clone https://github.com/<your username>/<your repository name>For example, if your username is Insprill and your repository name is my-awesome-project, you would run the following command.
git clone https://github.com/Insprill/my-awesome-projectNote: You cannot paste with Ctrl + V in Git Bash.
Instead, you'll need to right-click and select "Paste", or use Shift + Insert.
Now that you have the repository cloned, there's a few more thing you'll need to change before getting started. First, you'll want to open the project in your IDE of choice.
Then you'll want to open the settings.gradle.kts file and update the name of the project.
Make sure to use the same name as your repository, and keep the double quotes around it.
Next, you'll want to open the build.gradle.kts file and change the group to me.yourusername.
For example, if your username is Insprill, you would change it to me.insprill.
To go along with this you'll want to navigate to the src/main/java/me folder and rename the name folder to the same name
you used for the group in the build.gradle.kts file.
Then you'll want to rename the projectname folder inside the folder you just renamed to the name of your project using only lowercase letter.
When finished, assuming your name is Insprill and your repository name is my-awesome-project,
the path to your plugin's main class should be src/main/java/me/insprill/myawesomeproject/Main.java.
Lastly, you'll want to open the main class and change the package name to match the new package name you just created.
Now you're ready to start coding!
Testing your plugin with the template is made extremely easy.
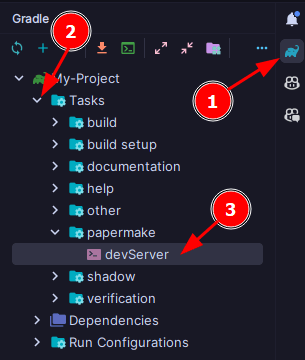
To automatically build your plugin, create, and start a server all you need to do is run the devServer Gradle task.
In IntelliJ IDEA, you can do this by opening the Gradle tab on the right side of the window, and navigating to Tasks > papermake > devServer.

Once the server is running, you can connect to it using the IP localhost and the port 25565.
When you make changes to your plugin, you can simply run the build Gradle task to automatically build your plugin and live reload it on the server.
Once you're ready to submit your plugin, you'll need to push your changes back to GitHub.
If you're using IntelliJ IDEA, you can do this by opening the Commit tab on the left side of the window, selecting the files you want to commit, entering a commit message, and clicking "Commit and Push".
This can also be done using Git Bash. First you'll need to open it inside your project directory as before, then run the following commands.
git add .
git commit -m "Commit message"
git push
If everything was successful, you should see your changes on GitHub, and your plugin is ready to be submitted!
This template is distributed under the GNU Lesser General Public License v3.0.
See LICENSE for more information.