Control your 4WD robotic/rover and pan-tilt camera module through the internet by simply downloading this repository onto your Raspberry Pi and follow the instruction down below.
The Internet Controlled Rover project uses Node.js and Socket.io to send commands and data between client and server in the same local network. The client uses HTML5 with embeded Javascript and Canvas. OpenCV saves images from the Pi Camera then Socket.io serves them on an HTML canvas to simulate a live stream. The framerate and resolution of the stream can be change but it will affect the latency, depending on the network.
This project is my own implementation from a rejected idea for our Second Year Computer Engineering Project. It has allowed me to learn so much more along the way. I will continue to update and refine it as time go on.
Please click the image below to see the rover in action

*The following are the list of components used by this specific project. Equivalent components may or may not work.
- Raspberry Pi 3
- Arduino Leonardo (Arduino Uno is preffered)
- SainSmart 4WD Drive Aluminum Mobile Robot Platform (https://www.amazon.ca/SainSmart-Aluminum-Platform-MEGA2560-Duemilanove/dp/B008Q47VKE)
- Pi Camera
- 2x2A DC Motor Shield for Arduino (https://www.dfrobot.com/product-69.html)
- Triple-axis Accelerometer+Magnetometer (Compass) Board - LSM303 (https://www.adafruit.com/product/1120)
- 2xDS3218 Digital Servo
- USB battery bank
- 6xAA rechargable batteries and battery holder
*Specific hardware assembly depends on the components you have sourced. In order for the project to work, wire the components to the according pins on the Arduino code.
[To be Updated]
Before you install Node.js, go to https://nodejs.org/en/download/ to find the latest version, we are currently using v6.11.1 In terminal, input the followings:
wget https://nodejs.org/dist/v6.11.1/node-v6.11.1-linux-armv7l.tar.xz
tar -xvf node-v6.11.1-linux-armv7l.tar.xz
cd node-v6.11.1-linux-armv7l
sudo cp -R * /usr/local
cd
git clone https://github.com/ThankyTo/Internet-Controlled-Rover.git
cd Internet-Controlled-Rover
npm install express
npm install socket.io
npm install serialport
Follow the instructions from http://docs.opencv.org/master/d7/d9f/tutorial_linux_install.html to install OpenCV onto your Raspberry Pi
Follow the instructions from https://www.raspberrypi.org/learning/getting-started-with-picamera/ to enable and test your Pi Camera
cd Internet-Controlled-Rover
python PiCamera.py
node server.js
From a different computer or mobile devices on the same local network, go to http://[RaspberryPi's IP Address]:8000 If you don't know your Raspbery Pi's IP address, on the Pi's terminal, input:
ifconfig
and look for 'inet addr' under 'wlan0'
The image below is the interface seen on the client's webpage:
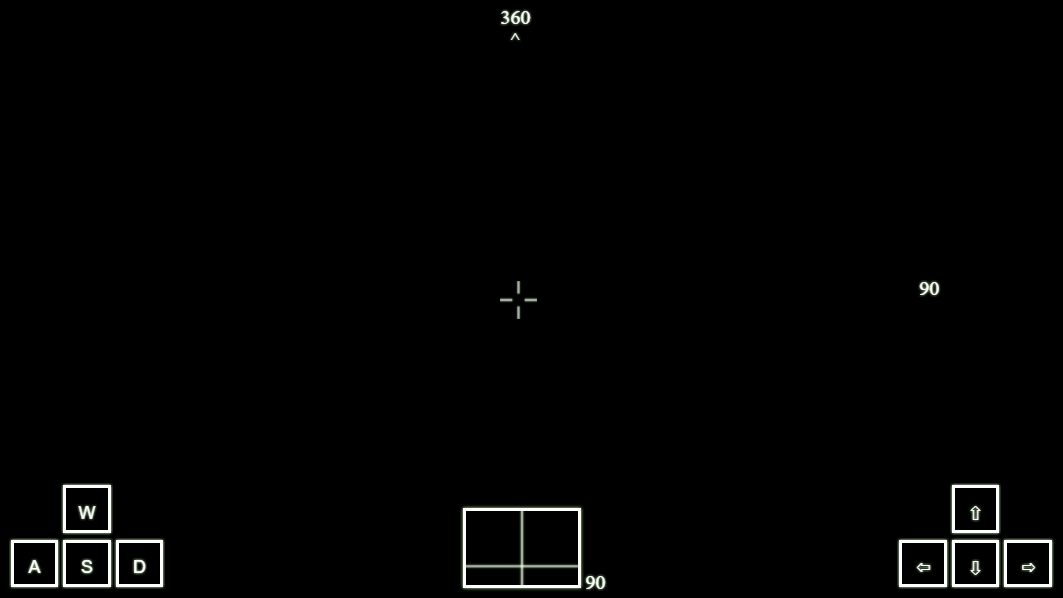
- Use WASD keys to control the direction of the rover chassis itself and arrow keys to control the pan-tilt head.
- The number on top indicates the current compass heading.
- The number on the right indicates the current tilt angle.
- The number at the bottom indicates the current pan angle.
- The small rectangle at the bottom visually indicates the current position on the pan-tilt head in relative to the chassis.
- W3Schools HTML, Javascript and Canva tutorials
- Easy Node.JS + WebSockets LED Controller for Raspberry Pi
- Accessing the Raspberry Pi Camera with OpenCV and Python
- socket io, node js, Simple example to send image/files from server to client
- Adafruit's Triple Axis Accelerometer and Magnetometer (Compass) breakout board
- OpenCV Tutorials